
Jeli Incidents
Jeli Part of PagerDuty
View Jeli Incidents
In the Jeli web, select Incidents in the left menu:
- Filter and sort through recent and active incidents.
- Keep track of progress across multiple incidents at once.
- View response details and updates outside of Slack.
Note: Private incidents are not displayed on the Jeli Incident view.
Historical Incidents
Incidents created prior to June 1, 2023 will not appear in the Incidents view in the Jeli web app. Incidents created prior to June 1, 2023 will still appear in the
/jeli activeview in Slack.
Filter, Sort, and Track Multiple Jeli Incidents at Once
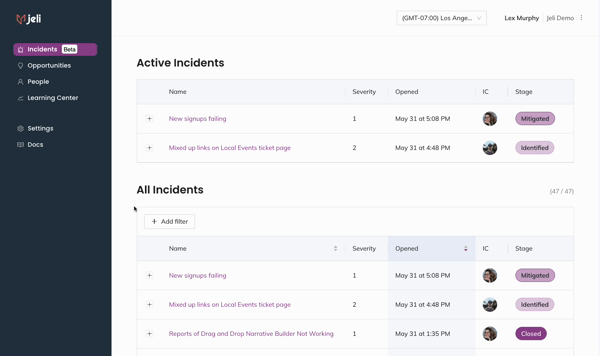
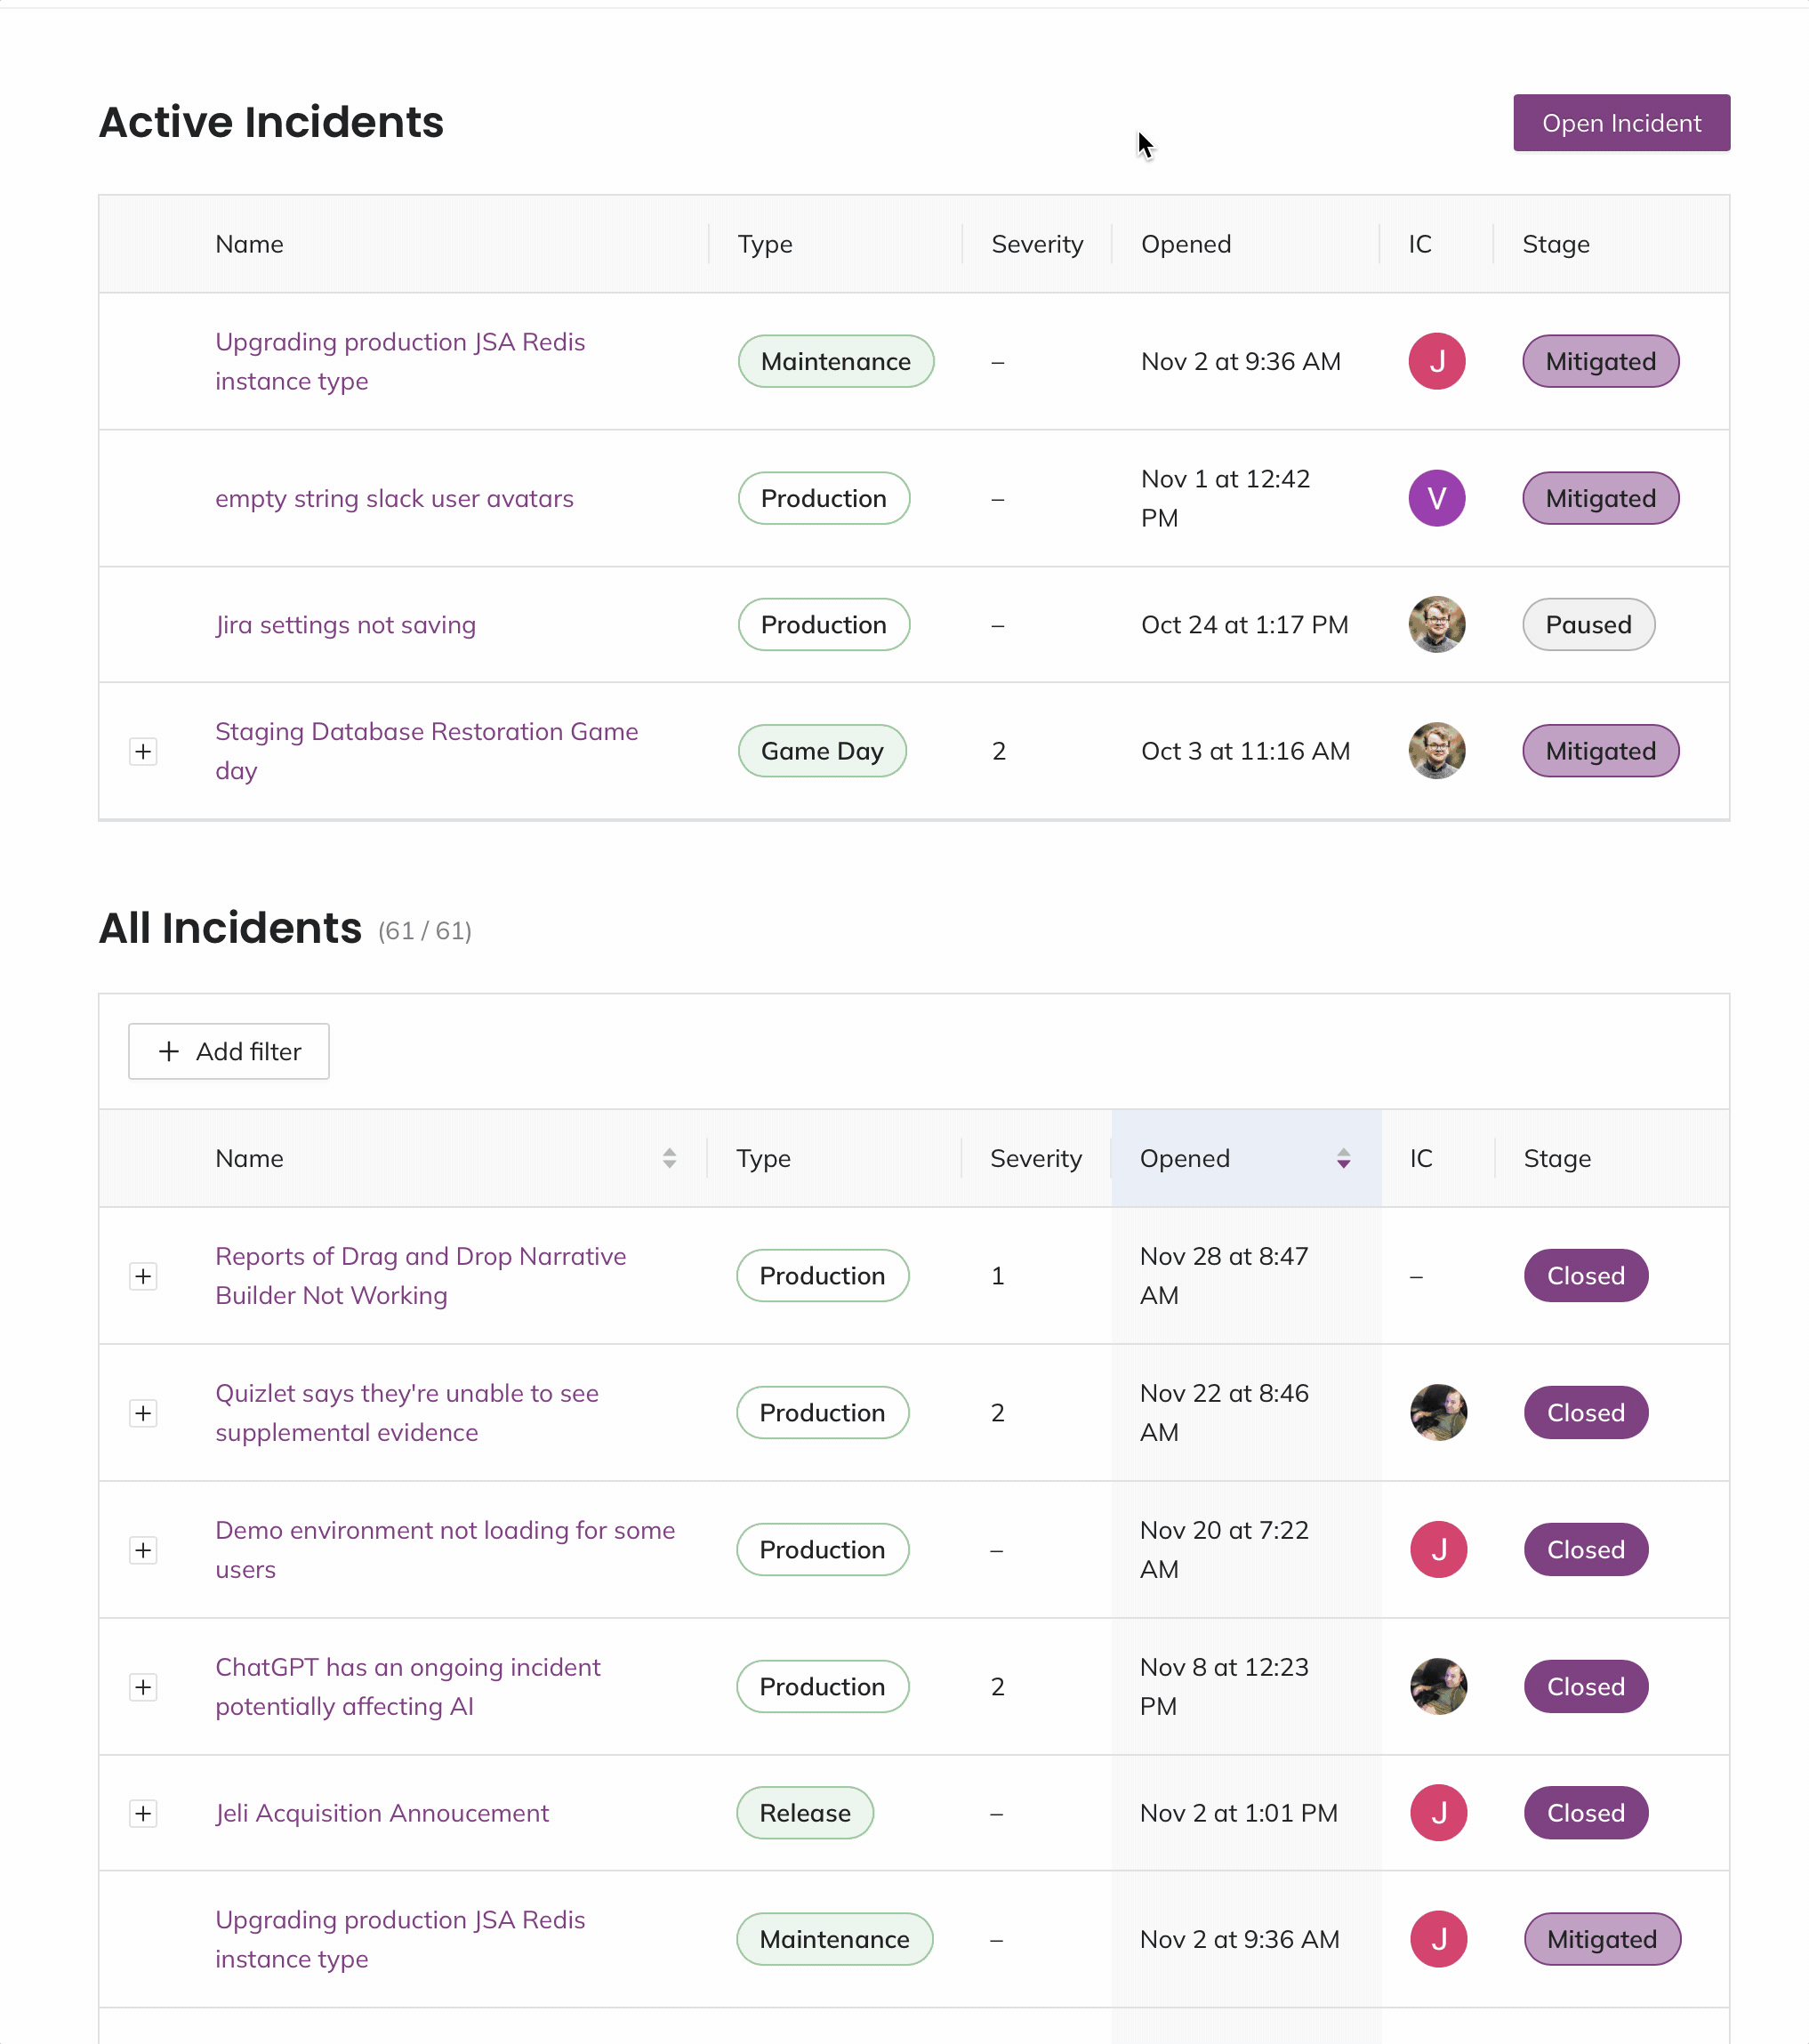
From the Incident tab in the Jeli web app, active incidents (i.e., any incident not in the closed stage) will be displayed at the top of the page to easily see their stage, severity, how long they’ve been active, and who is coordinating response. Similar to /jeli active in Slack, this view provides you with a dashboard to track the progress of multiple incidents at once, as well as indicate to unsure responders whether an incident has already been created for an issue they’re seeing.
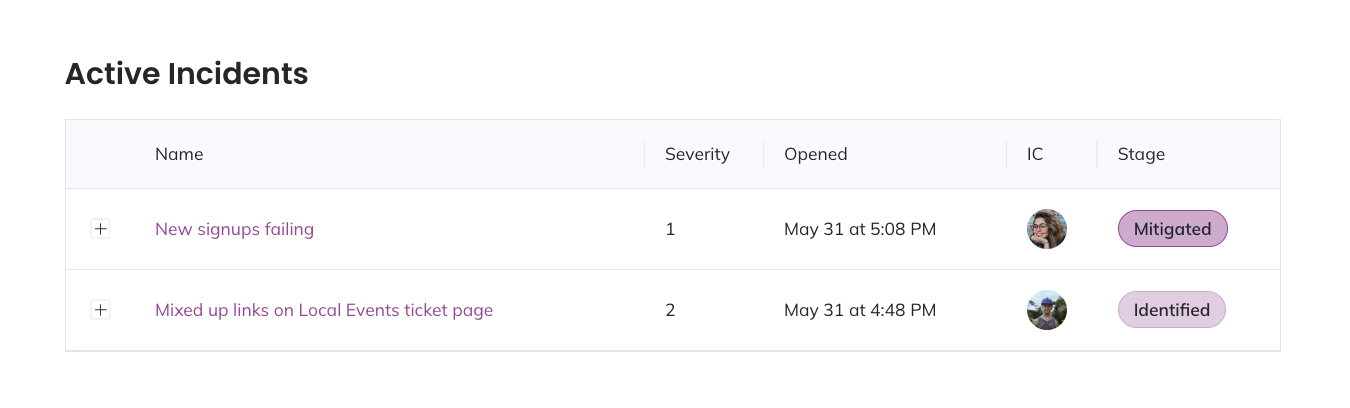
Active Jeli incidents
Below the active incidents you can view the response details from all of your incidents. You can filter by words found in the incident title and/or summary, and by stage. You can also sort incidents by incident name and open date.
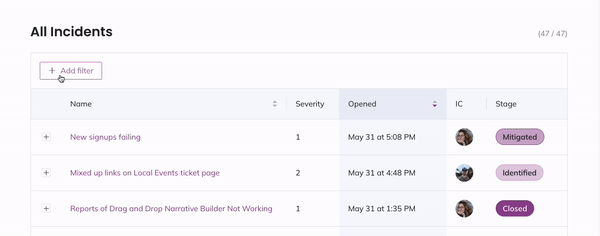
Filter Jeli incidents
View Jeli Incident Response Details Outside of Slack
Every incident has an audience, which is why broadcast channels are flexibly configurable throughout response, but we also know not every part of your organization lives in Slack.
The Incident view keeps folks up to date on how response efforts are progressing by providing all the details typically sent to the broadcast channel, on a webpage. This provides a handy URL you can send to stakeholders as an internal status page, and the link to the incident view is also available in the broadcast channel message. The information on this page will update automatically as soon as details are added or changes are made with the Jeli Slackbot.
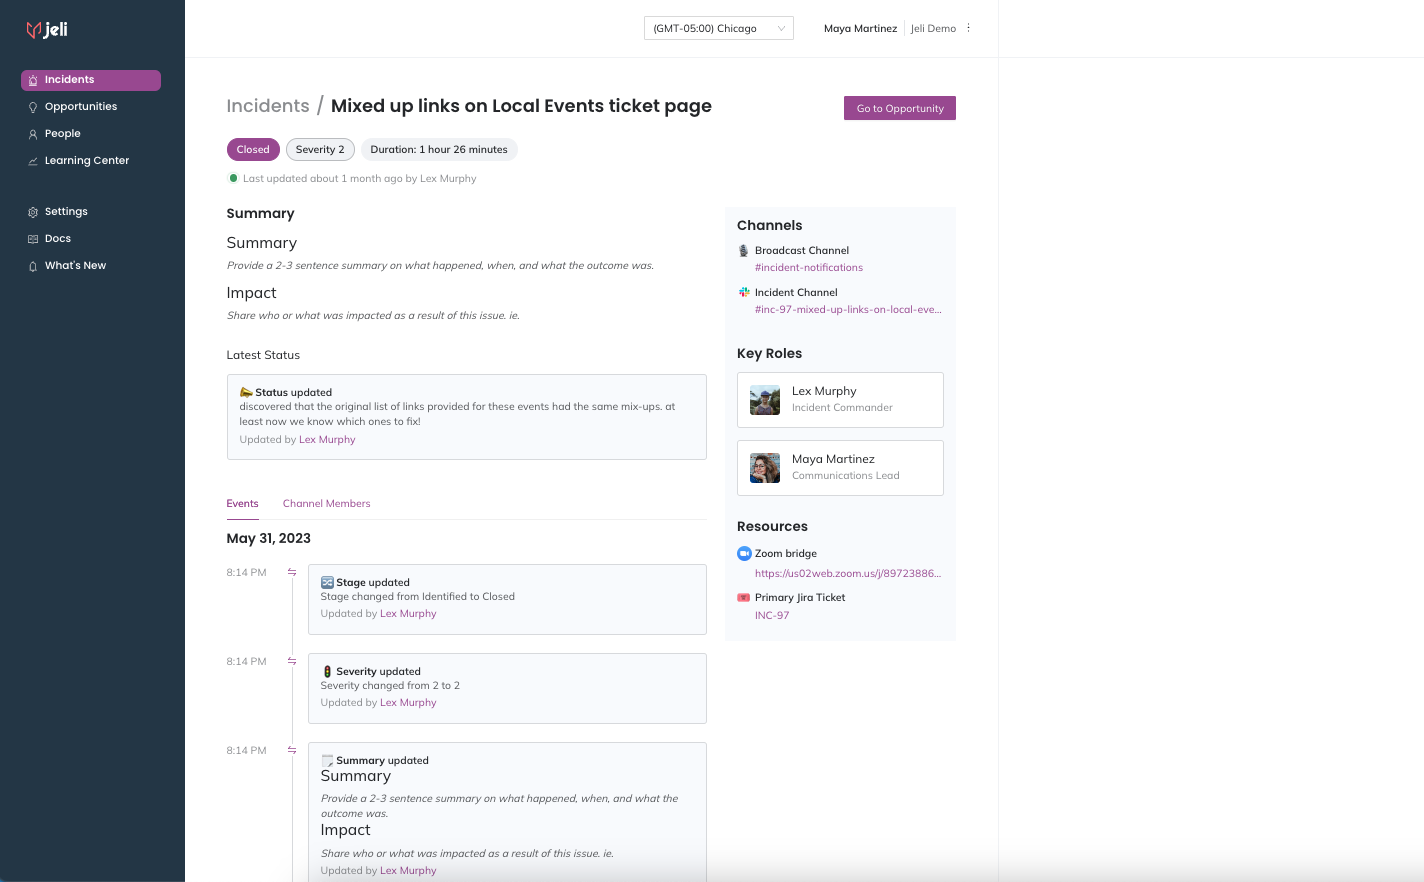
Incident view in the Jeli web app
Access the Incident View
The incident view is internal-only. Please log in to your Jeli account to access this page.
Jeli Incident Details
At the top of the Incident view you will find the incident details:
- Incident Name
- Current Stage
- Current Severity
- Incident Duration (time elapsed since the incident was opened)
- Summary
- The most recent Status Update
Channels, Key Roles and Resources
On the right is a block containing important links and who is currently assigned to each key role. This provides easy access to the Slack channels involved in response, including the dedicated incident Slack channel, and currently selected broadcast channels. Also on display are the Zoom or Google Meet conference bridges, the primary Jira ticket created for response, and any relevant links attached to the incident via /jeli link in Slack.
Events and Channel Members
Below the incident details are two tabs, Events and Channel Members. The Events tab contains all the updates being made to the incident as they happen, as well as who made the updates.
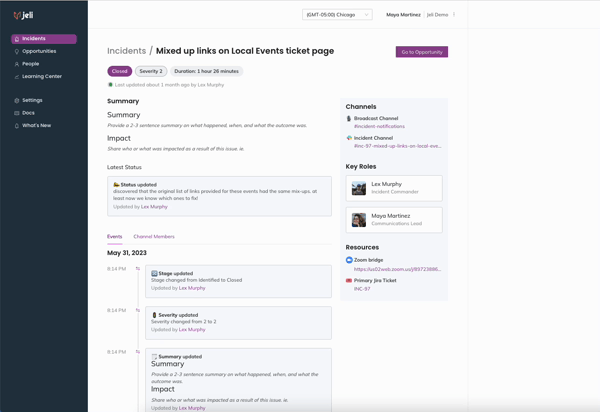
This includes the following events:
- Status Updates
- Stage Changes
- Severity Updates
- Assigning (and reassigning) Key Roles
- Updates to the Summary
- Added Links
The updates are in reverse chronological order, so the most recent updates will be at the top, with progressively older updates below.
The Channel Members tab displays responders who have joined the dedicated incident Slack channel and adds their profile data to display their Name, Organization Role, and Group. It also includes a link to their People page in Jeli, which provides rich historical data about their time spent in other incidents, and can provide insights into their areas of expertise or potential risk for burnout.
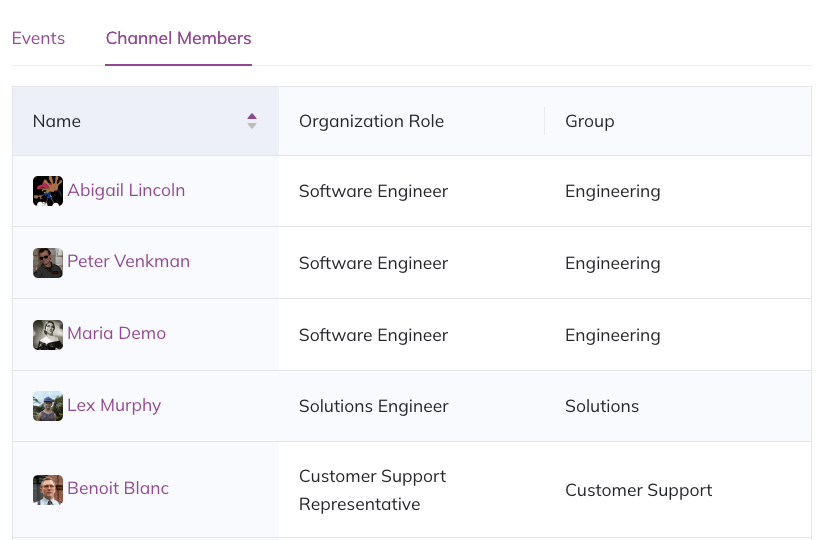
Channel members
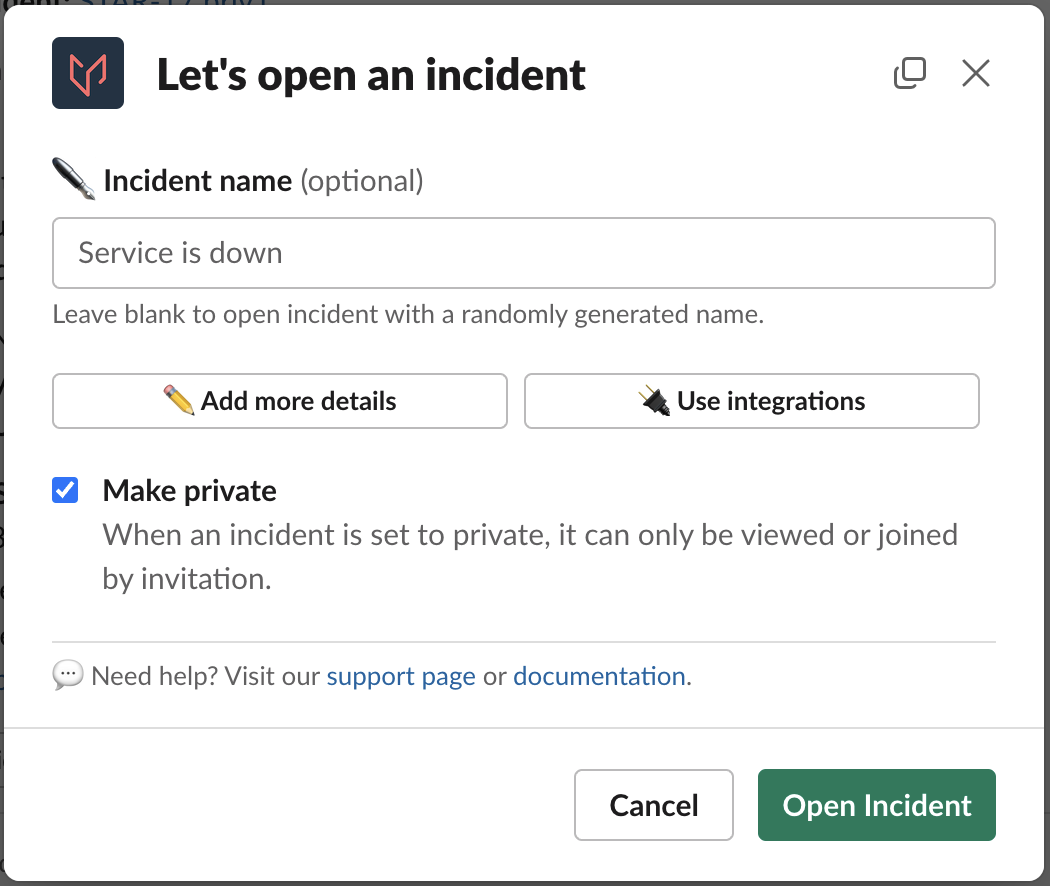
Open a New Jeli Incident in Slack: /jeli open
/jeli openIn a Slack channel with the Jeli Slackbot configured, enter /jeli open to open a new incident. Enter the following information:
- Incident name
- Select incident type from the dropdown — read Incident Types for more information.
- Add more details
- Use integrations
Note: No field is required, if you do not add a name we will generate one for you from a randomized list of adjectives and nouns.
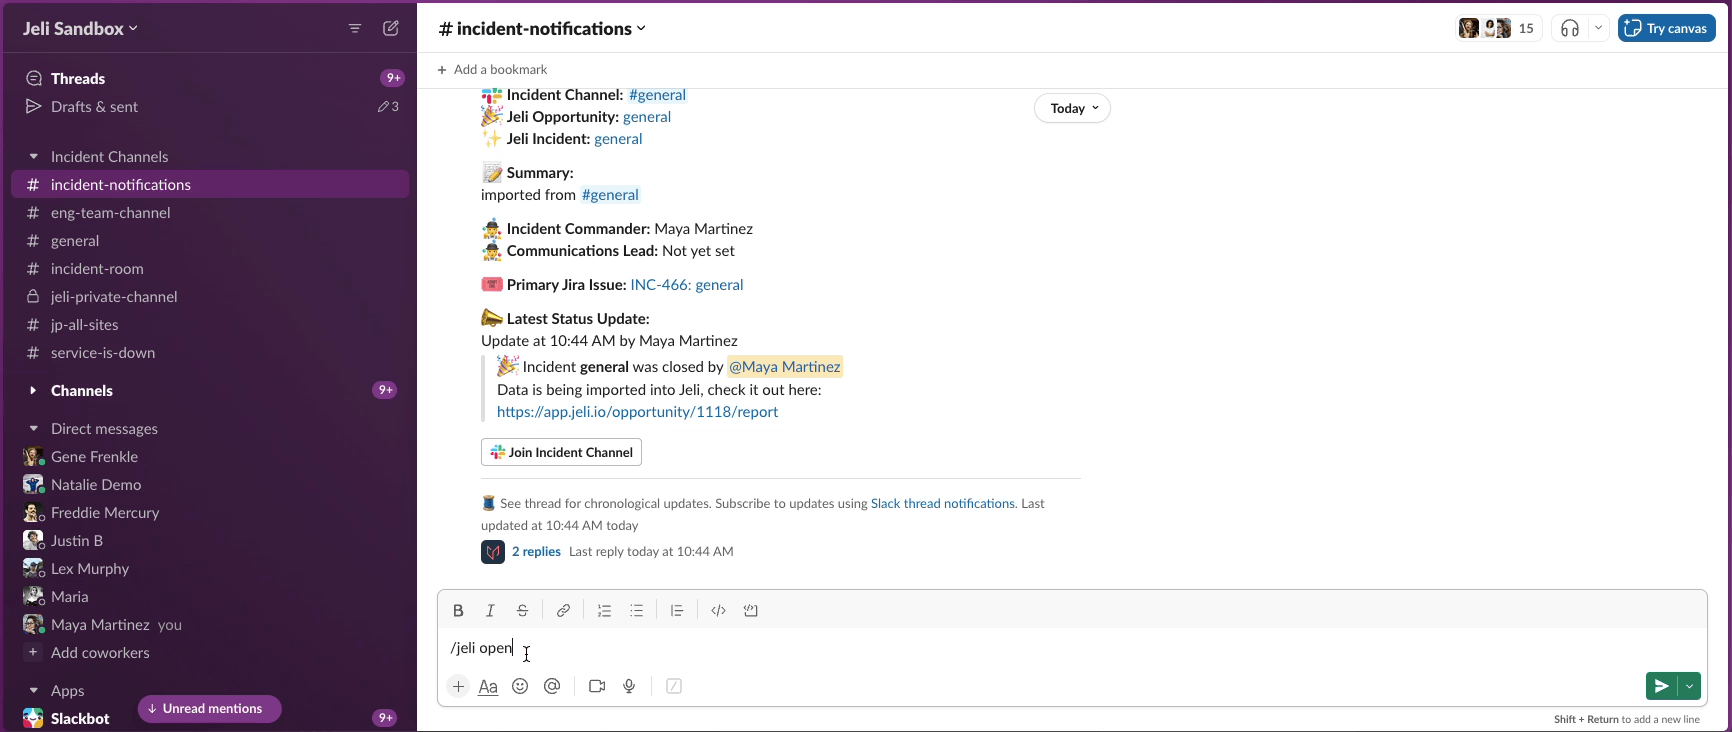
We’ll send you an ephemeral message confirming the incident has been created with a link to the generated Slack channel. We’ll also notify your selected broadcast channels that an incident has been created.
Aliases: /jeli incident, /jeli open-incident, /jeli start, /jeli start-incident
Add More Details
Every field in this section is optional, just add what you know now such as the:
- Summary
- Severity
- Add or remove relevant Broadcast Channels
- Assign yourself to a role within response
All of the fields in this section are optional, and you can edit them later using the appropriate Jeli Slackbot Command.
Use Integrations
Your Incident Settings will determine the default selections on this page, and you can change them on a per-incident basis here, including:
- Automatically initiate a Zoom
- Automatically initiate a Google Meet
- Create a Primary Jira ticket when the Jeli incident opens
- More information about creating Jira tickets from Jeli here
- Note: Using the Primary Jira ticket integration does change the naming scheme of the incident channels.
Jeli Incident Channel Naming
- When a Jeli incident is created, the generated Slack channel name will follow this format:
#jeli-[incident number]-[incident name], e.g.,#jeli-29-docs-pages-are-down. - If you select the option to automatically create a primary Jira ticket, it will add the Jira ticket number as a prefix on the channel name instead of the
#jeliprefix:#[jira ticket project and ticket id]-[incident name], e.g.,#inc-133-payroll-is-down. - If you do not add a name, Jeli will generate one for you from a randomized list of adjectives and nouns, and the channel name will get the
#jeliprefix, or the Jira ticket prefix based on your configurations, e.g.,#eng-34-full-lemon. - To distinguish demo incidents from actual events, the naming differs:
#jeli-demo-[incident name]-[YYYY-MM-DD], e.g.,#jeli-demo-just-testing-2023-06-20. - If Jeli is currently undergoing an incident of our own impacting incident creation, we have fallbacks in place which will change the name format to:
#jeli-[incident name]-[YYYY-MM-DD], e.g.,#jeli-emails-are-delayed-2023-06-21.
Open a Jeli Incident Using an Existing Slack Channel
Using an existing channel to open and run an incident, makes it easy to run an incident no matter where you are in Slack. Check the box Use current channel for Incident to begin using the Jeli Slackbot in the current channel.
Open a Jeli incident in the current Slack channel
Make a Jeli Incident Private
When opening an incident, you have the option to make the incident private. Jeli will create the incident in a private channel. Private incidents will not post updates to broadcast channels, and will not be displayed on the Jeli Incident View.
Open a private Jeli incident
When closing an incident, only the users who were members of the private channel will have access to the Opportunity.
If you would like additional people to have access to your a private opportunity, you may configure access in the Jeli web app.
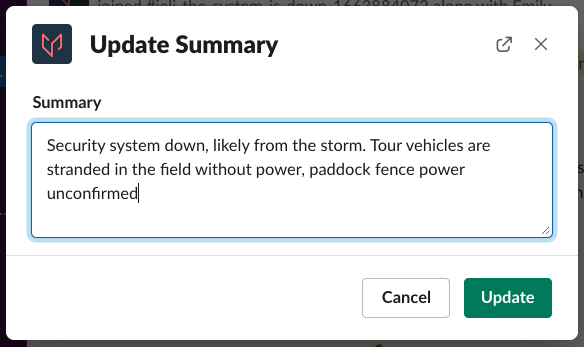
Add a Summary to a Jeli Incident: /jeli summary
/jeli summaryEnter /jeli summary to type what you know about the issue so far and update it when anything significant changes.
Enter a summary for a Jeli incident
The summary is the main description of the incident. Responders will see this information in the incident overview to get up to speed in the incident channel. The summary is also included in the incident notifications sent to the broadcast channels, where those not involved in active response can stay up to date on the status of response.
To quickly update the status without opening a dialog box use /jeli summary [type out summary before hitting enter].
Aliases: /jeli update-summary
Add a Severity Level to a Jeli Incident: /jeli sev
/jeli sevEnter /jeli sev, select from the severity options of 0, 1, and 2, provide some in the moment context behind your decision, and customize the broadcast based on the severity. Severity is not required and can be disabled by request.
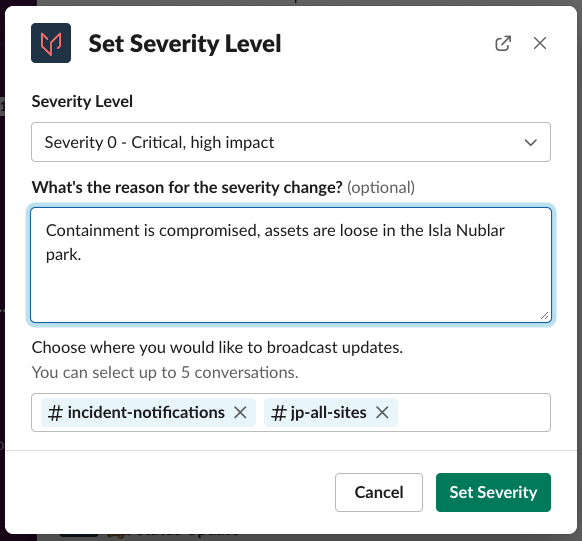
To quickly set the severity without opening a dialog box use /jeli severity [severity level number].
Aliases: /jeli severity, /jeli set-severity
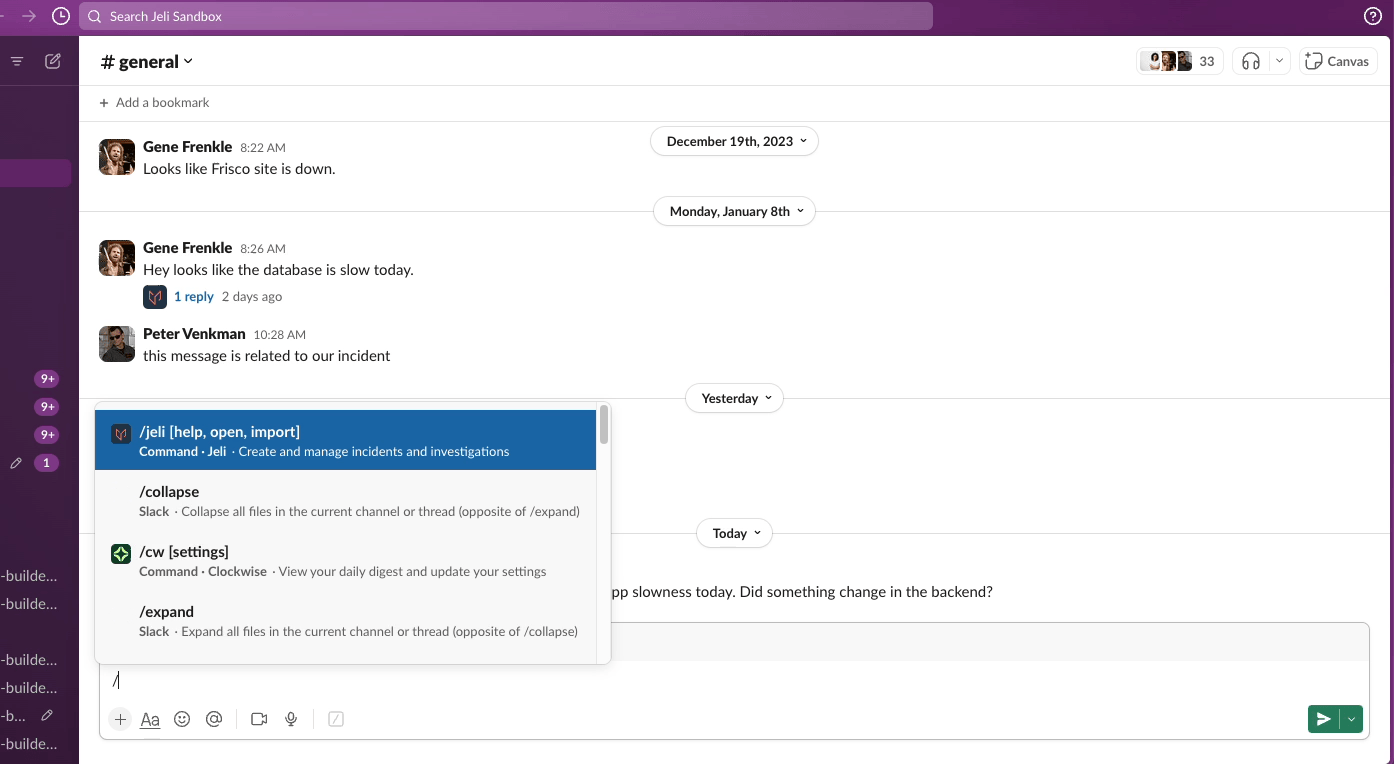
Become Familiar with the Jeli Slackbot
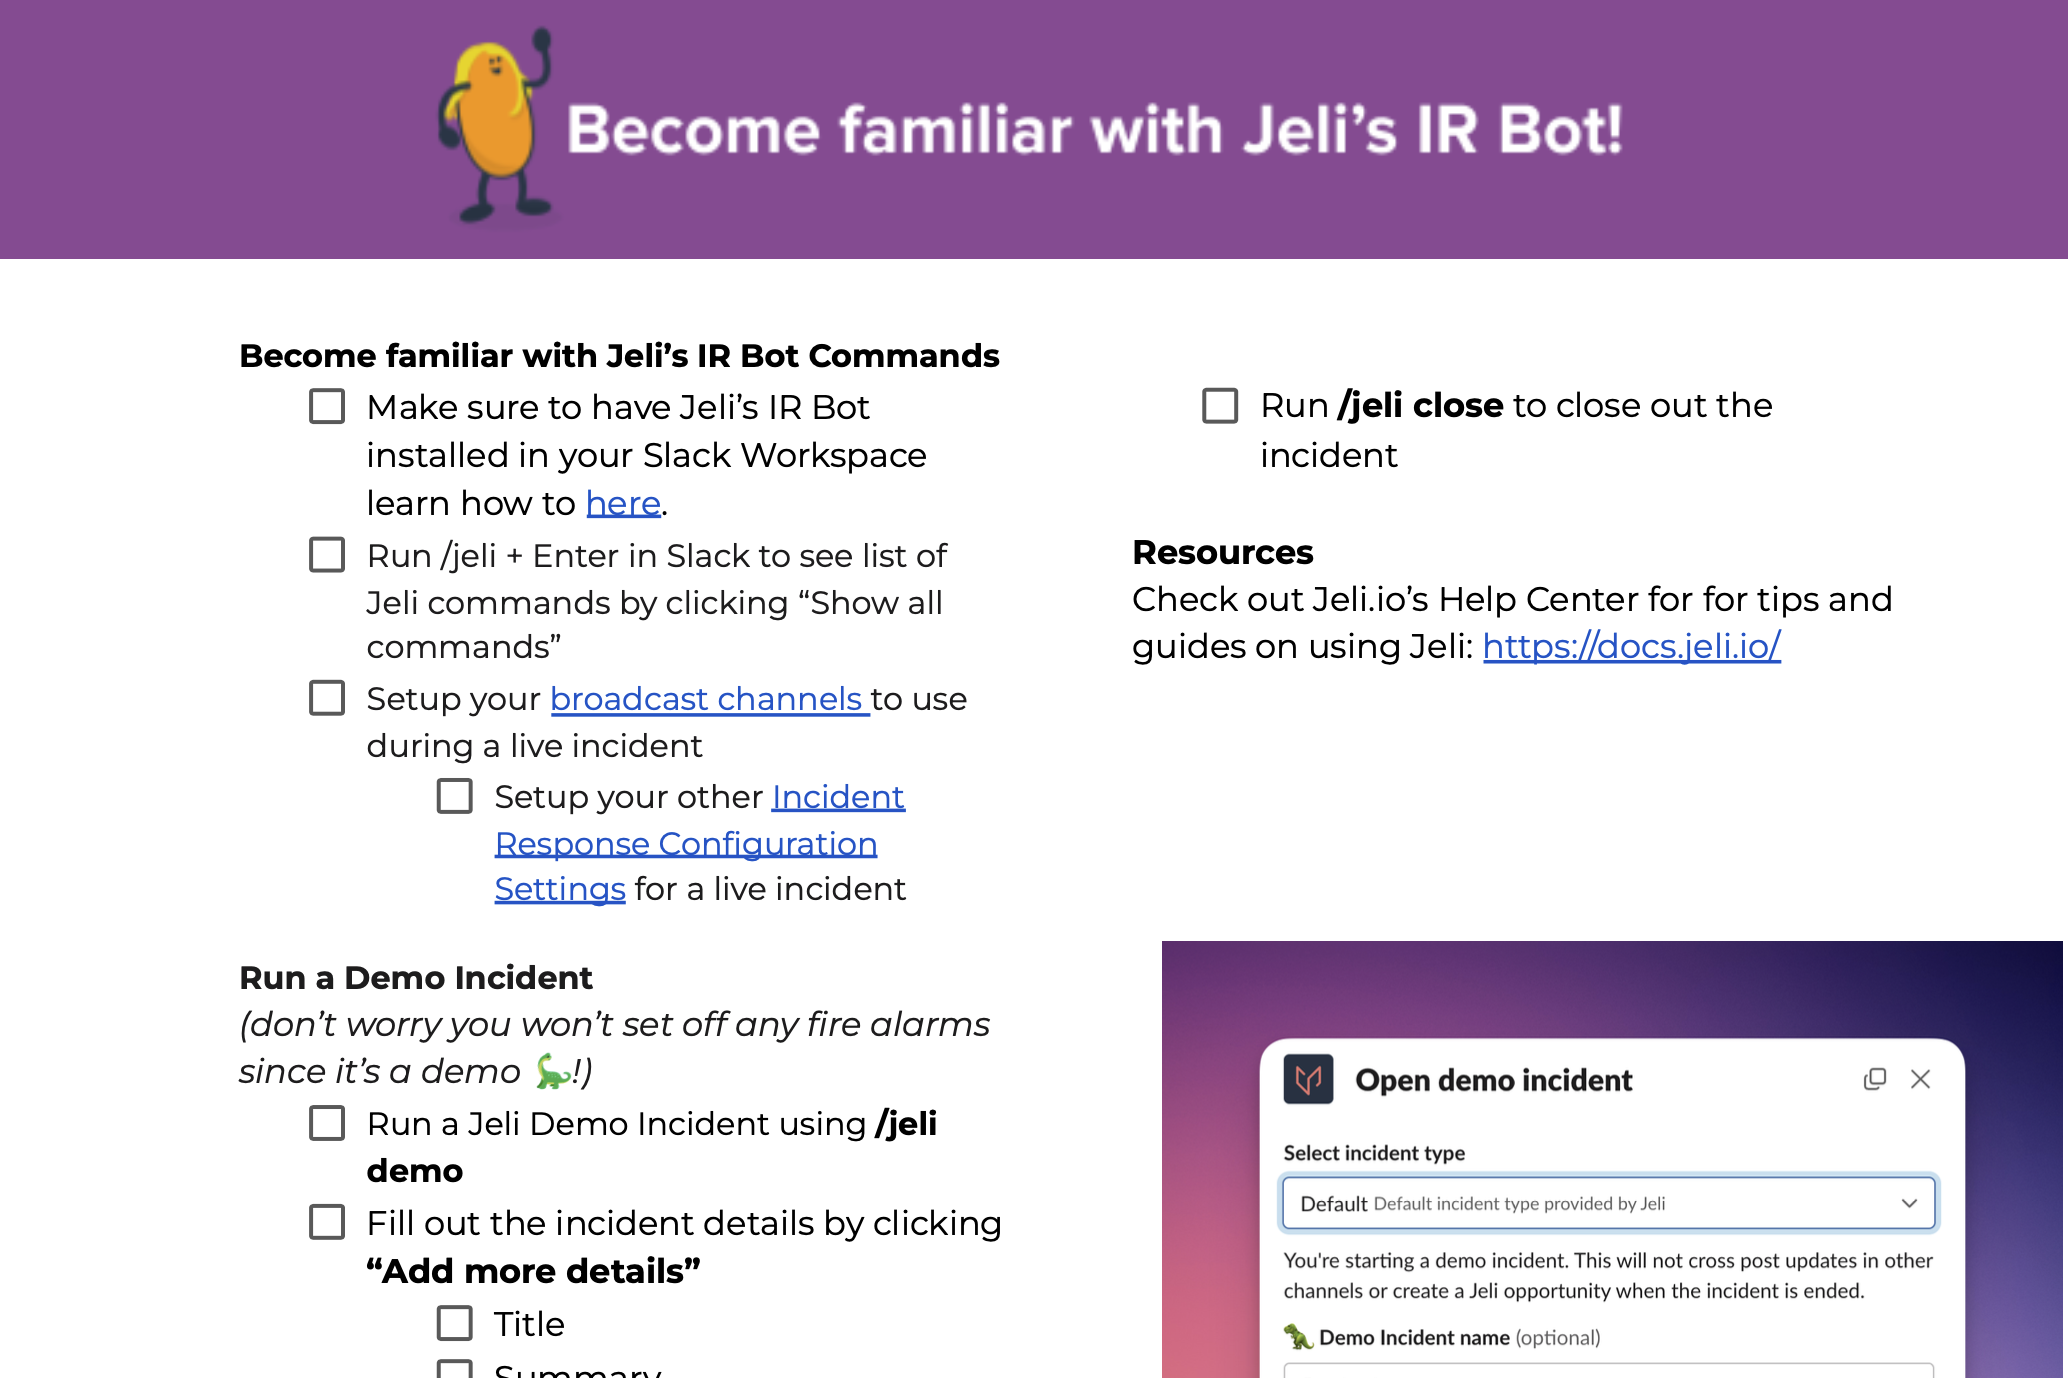
Prerequisite
If you have not installed the Jeli Slackbot yet, please add it to your Slack Workspace using our Slack Integration | Jeli guide.
Checklist
We've created an easy to follow checklist so you can test out the Jeli Slackbot by running a demo incident using /jeli demo. The demo will run you through the Jeli Slackbot's most-used commands. Download the checklist.
Jeli Slackbot checklist
Video Demo
You can also check out this video to see our 3 Key Features of Jeli's IR Bot in action:
Open a Jeli Incident in the Web App
Incidents can happen at any time, and responders may not always be in Slack. You can start an incident from the Jeli web app:
- Navigate to the Incident tab in the Jeli web app.
- Click Open Incident.
- Populate the necessary fields.
- Click Start.
Once you start an incident from the web app, Jeli will create an associated Slack channel, conference bridges, broadcast messages, etc., just as if you had started the incident in Slack.
Open an incident in the Jeli web app
Best Practice
This seamless integration within the Jeli environment ensures that everyone, regardless of their preferred communication platform, can swiftly and effectively respond to incidents. Opening an incident in the Jeli web app is particularly useful for:
- Teams and individuals who are not regular Slack users.
- If you become aware of an incident while working in another system, there's no longer a need to switch to Slack to initiate the response process.
For instance, many customer support teams juggle multiple tools and platforms. With the ability to start incidents directly in Jeli, these teams can now streamline their workflow, reducing the need to navigate between different applications. This means faster response times to incidents and more focused customer support operations.
Jeli Incident Types
Incident types can be used to categorize your incidents. You might create types like Staging or Production to indicate the incident location, Customer Facing or Internal Only to indicate impact. Or maybe API Team or Security to help provide team specific automation and filtering. Incident Types can be selected when opening a new Jeli Incident, and used in workflows as conditions that trigger an automated action to be performed.
Incident Types can be found under Settings, in the Incident Response section. Select the Types tab to add, edit, and archive incident types.
When a new Incident Type is added it will show up in Jeli when opening an incident from Slack, as well as in Jeli Workflows for you to use as a condition when creating a new automation.
Updated about 20 hours ago