
ServiceNow Provisioning
Provision ServiceNow objects to PagerDuty
How ServiceNow Objects are Provisioned into PagerDuty
Required User Permissions
The ServiceNow
x_pd_integration.adminrole is required to provision services and users to PagerDuty.
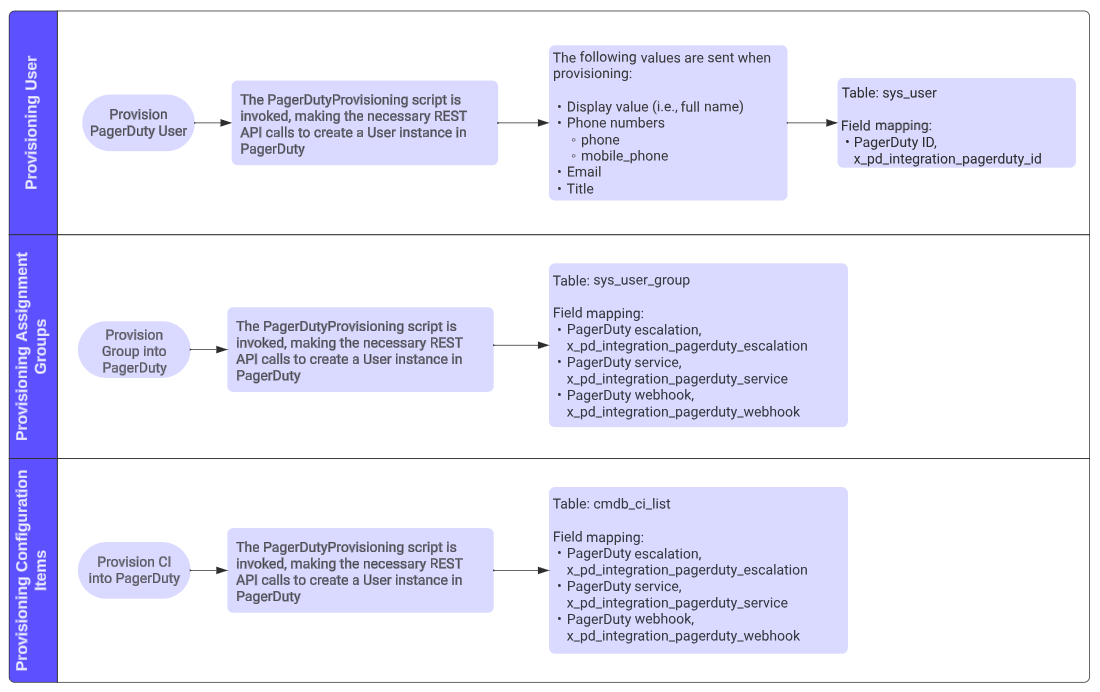
For any ServiceNow User, Assignment Group, or Configuration Item (CI) to be recognized by the integration, it must be provisioned.
Objects can be provisioned by navigating to the Related Links section in the User, Assignment Group, or Configuration Item form and clicking Provision PagerDuty User, Provision Group into PagerDuty or Provision CI into PagerDuty. This process will make the necessary REST API calls in the PagerDutyProvisioning script.
How ServiceNow Objects Map to PagerDuty Objects
The option Choose ServiceNow to PagerDuty mapping on the PagerDuty Settings page allows the following two options for the correspondence between systems:
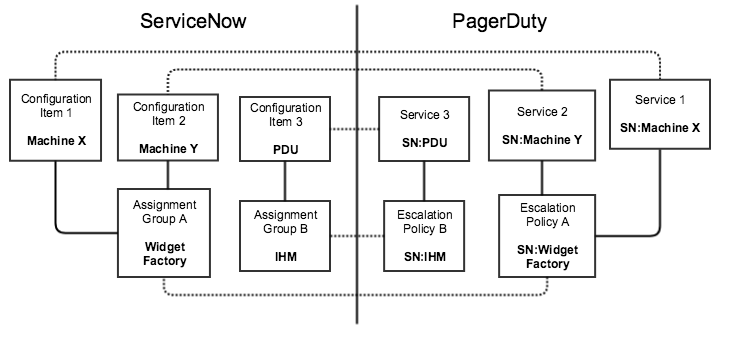
- ServiceNow Configuration Items and Assignment Groups map to PagerDuty (Recommended):
- Configuration Items map to PagerDuty Services
- Assignment Groups map to PagerDuty Escalation Policies
- ServiceNow Assignment Groups map to PagerDuty:
- Assignment Groups will map to both a PagerDuty Service and PagerDuty Escalation Policy
The following diagram represents the mapping between objects in both systems when Configuration Items and Assignment Groups map to PagerDuty:
Provision Users to PagerDuty
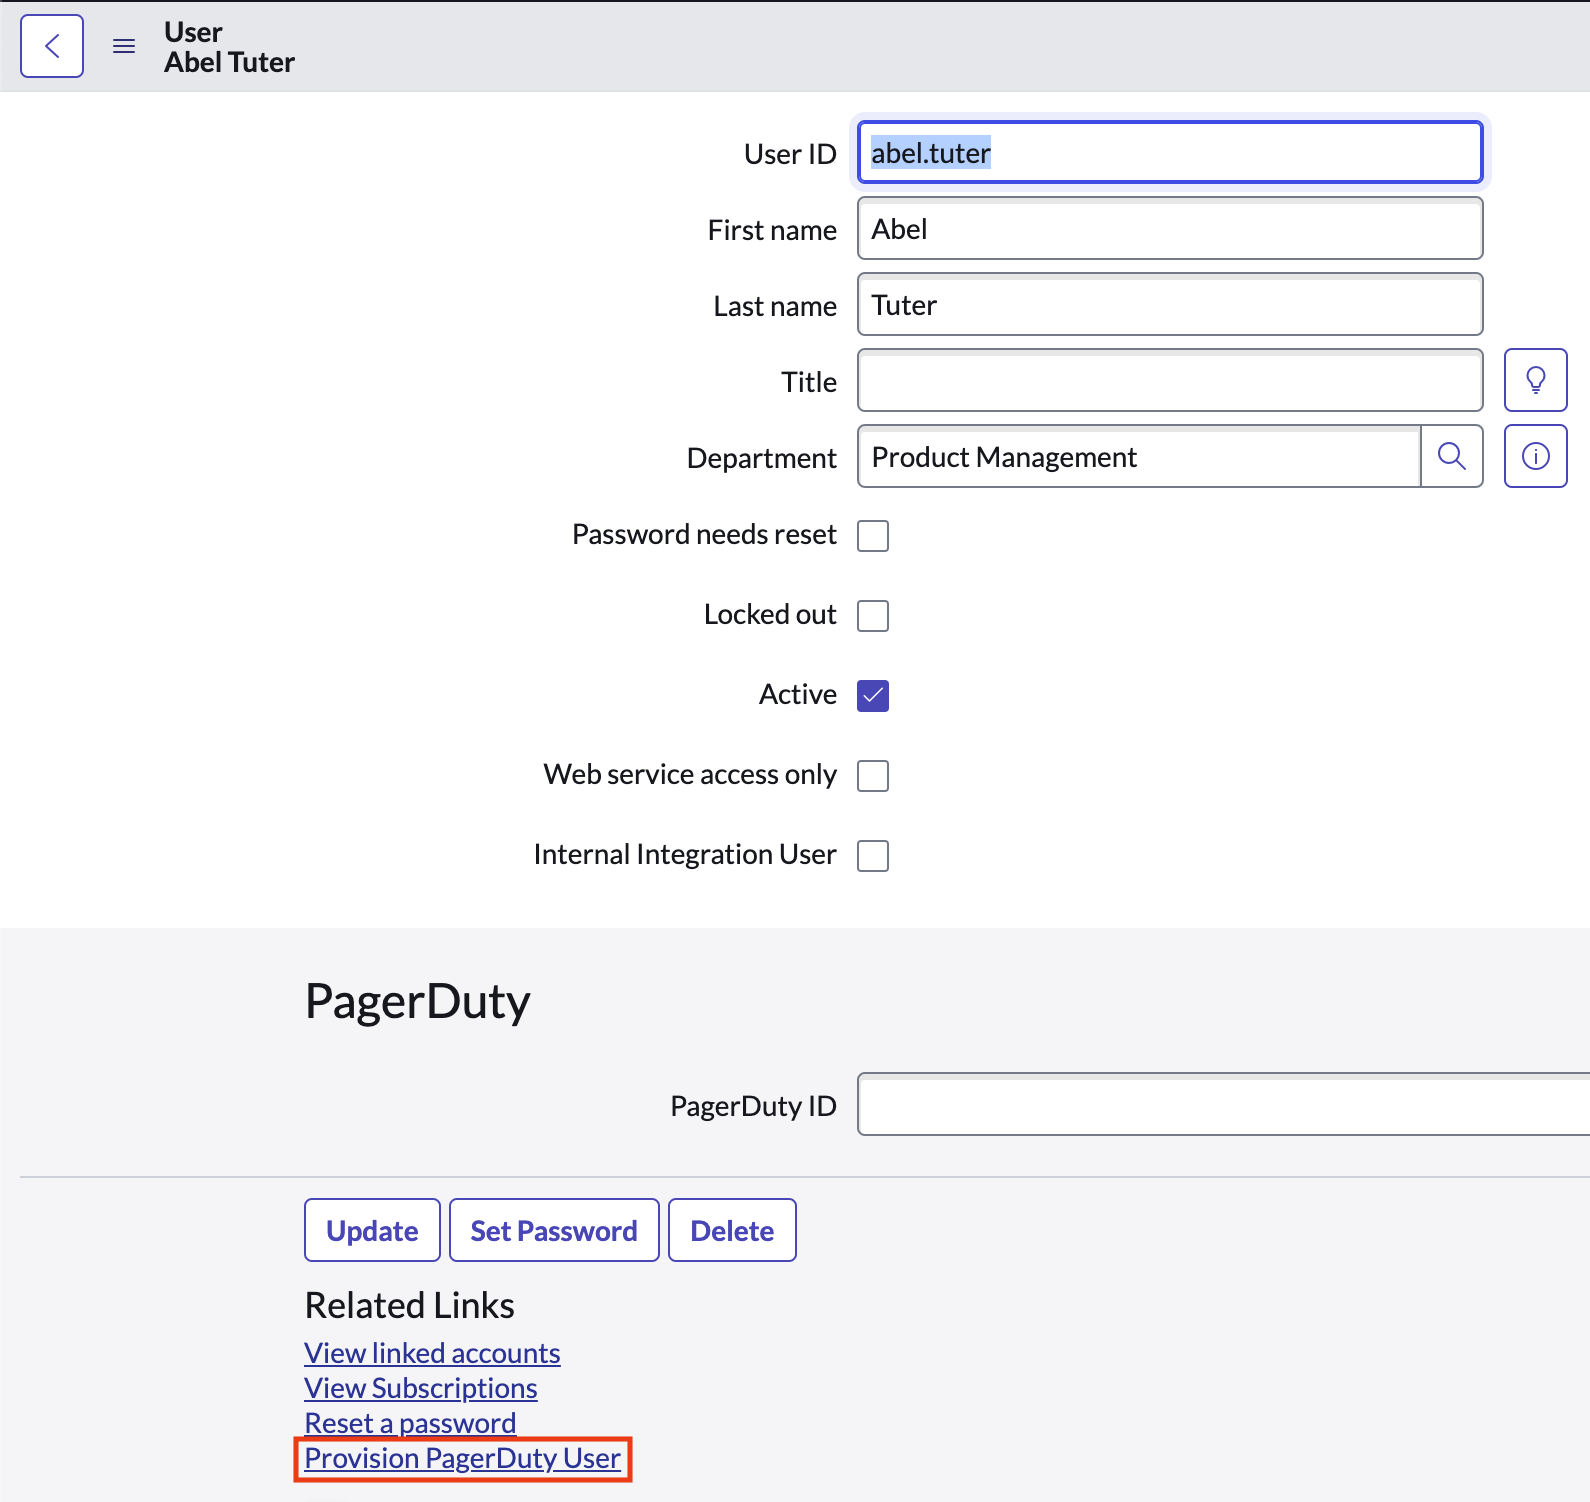
- In your ServiceNow Users list, select a user who has not already been provisioned to PagerDuty.
- Click Provision PagerDuty User to add them to your PagerDuty account.
- You will then see a message that the user is being provisioned.
- Upon completion, the PagerDuty ID field is automatically populated. The user also shows up in PagerDuty, with the same name and email address.
- If the user has their Business phone or Mobile phone fields populated in ServiceNow, these settings will also be automatically provisioned as Contact Methods and Notification Rules in PagerDuty.
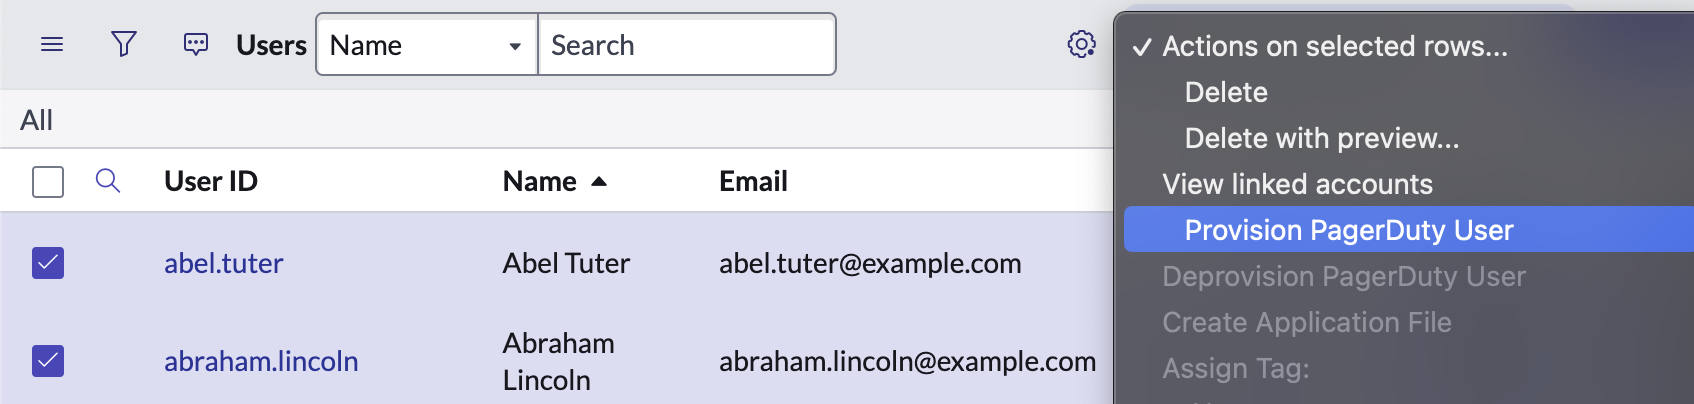
- You can also provision multiple users at once by selecting the checkboxes to the left of their names, clicking Actions on selected rows and selecting Provision PagerDuty User from the dropdown.
Examples
Expand
Provisioning a single user
Provisioning multiple users
Provision Assignment Groups and Configuration Items
New Assignment Groups and Configuration Items provisioned to PagerDuty will be connected via v3 webhooks. We strongly recommend that you migrate webhooks to v3 immediately after upgrading to ServiceNow v8, to prevent the application from having a mix of v2 and v3 webhooks.
Prerequisite: Set Default Incident Sync Option
Before provisioning Assignment Groups or Configuration Items to PagerDuty, you can set the default incident sync option in PagerDuty Settings. Assignment Groups and Configuration Items that do not have an individual sync option configured will default to the sync option set on the PagerDuty Settings page.
- Navigate to PagerDuty Settings and scroll to the Webhooks Configuration section.
- You may select the incident sync option from the Sync option dropdown:
- Auto: When a PagerDuty incident triggers, it automatically creates a ServiceNow Incident. The same logic applies in the ServiceNow Incident to PagerDuty incident direction.
- Manual: When a PagerDuty incident triggers, it will not automatically create a ServiceNow Incident. Instead, you will need to select More Sync with ServiceNow on the PagerDuty incident’s details page. The same logic applies in the ServiceNow Incident to PagerDuty incident direction.
Provision Individual Configuration Items to PagerDuty
-
In ServiceNow, click into the Configuration Item that should be provisioned to PagerDuty.
-
Select the Webhook Configuration tab.
-
Select the preferred Sync Option and Task Type.
- If you do select a Sync Option for the CI: Incidents will sync according to your selection.
- If you do not select a Sync Option for the CI: Incidents will sync according to the default sync behavior configured on the PagerDuty Settings page.
-
Click Provision CI into PagerDuty.
Provision Bulk Configuration Items to PagerDuty
- In the Configuration Items table, select the checkboxes to the left of the Configuration Items that should be provisioned to PagerDuty.
- Click the Actions on selected rows dropdown menu on the right and select Provision CI Into PagerDuty.
- The Configuration Items will inherit the default sync behavior configured on the PagerDuty Settings page. However, you can change the sync option. For more information please see our Edit Webhooks Configuration section.
Provision Individual Assignment Groups to PagerDuty
- In ServiceNow, click into the Assignment Group that should be provisioned to PagerDuty.
- Click Provision Group into PagerDuty.
- In the PagerDuty Webhook tab, configure the preferred Sync Option and Task Type. Note: You may need to refresh the page to see these options.
- If you do select a Sync Option for the Assignment Group: Incidents will sync according to your selection.
- If you do not select a Sync Option for the Assignment Group: Incidents will sync according to the default sync behavior configured on the PagerDuty Settings page.
Provision Bulk Assignment Groups to PagerDuty
- In ServiceNow, select the checkboxes to the left of the Assignment Groups that should be provisioned to PagerDuty.
- Click the Actions on selected rows dropdown menu on the right and select Provision Groups Into PagerDuty.
- The Assignment Groups will inherit the default sync behavior configured on the PagerDuty Settings page. However, you can change the sync option. For more information please see our Edit Webhooks Configuration section.
Edit Webhooks Configuration
- Navigate to PagerDuty Webhooks.
- Select the checkboxes to the left of the records that should be modified.
- Click the menu next to the column that you would like to modify and select Update Selected.
- Select your preferred Sync option and Task type and then click Update.
Provision Configuration Items to PagerDuty with Services Provisioning
The Services Provisioning feature allows you to provision Configuration Items as business and technical services in PagerDuty, along with their dependencies. You can quickly generate a new PagerDuty service and webhook connection for Configuration Items. Any Configuration Item that extends the base cmdb_ci table can be mapped to PagerDuty.
This feature is located in ServiceNow under PagerDuty Services Provisioning.
Tips
Before provisioning Configuration Items as services in PagerDuty, we recommend the following:
- Read our Full Service Ownership Guide for best practices in planning your PagerDuty technical and business service relationships.
- Given the dependency relationships between business and technical services, review how you would like to map Configuration Item relationships, noting the higher-level CMDB classes and lower-level CMDB classes.
- Set the corresponding Assignment Group for each of the Configuration Items you will be provisioning. This simplifies the provisioning process; when you provision a single Configuration Item, it will verify that the Assignment Group exists in PagerDuty (as an escalation policy). If not, it will also provision the corresponding Assignment Group as a PagerDuty escalation policy.
Step 1: Choose Provisioning Method
Under Provision using CMDB relationship table, you have two options for defining CI dependencies prior to provisioning:
- Yes (Default): Provision CIs and dependencies based on the CMDB relationships table (Option 1).
- No (Custom Relationships): Provision CIs and dependencies based on custom relationships (Option 2).
Best Practices
If you have a well-established CMDB, we recommend that you provision using the CMDB relationship table.
Provision Using CMDB Relationship Table (Option 1)
When provisioning based on the CMDB relationship table, you have two further options:
Provision CIs Based on Selected CI Classes
Use Service Classification Where Applicable
If you have defined the type of service classification on the CI class service items and would like to use that value to classify the service as a business or technical service, select the Use service classification where applicable checkbox.
Tips
- If you select the checkbox, and you have defined the service classification values, we will honor the value. Only the CIs with business and technical service classification type will be provisioned, but the application service type will be ignored.
- If the value is left empty, we will provision it based on the classification in the slush buckets below, else if the service class is selected under both service types then the CI will be provisioned as both a business and technical service.
- CIs that are both business and technical services will have an additional relationship provisioned in PagerDuty with the business service having a dependency on the technical service of the same CI.
CIs Without Defined Service Classification
If you have not defined the type of service classification on the CI class service items, or for other CI classes that you would like to provision into PagerDuty, select the CI classes which belong to business service type under the Business Services class slush bucket and select the CI classes which belong to Technical Services type under the technical service class slush bucket.
Example
Expand

Select CI classes
Behaviors:
- Select the CI classes under Business Services for CIs that you’d like to provision as a business service.
- Select the CI classes under Technical Services for CIs that you’d like be provision as a technical service.
- Select the CI classes which could be both business and technical service under both the slush buckets.
- Avoid the CI classes which you do not want to provision into PagerDuty on both of the slush buckets.
- The CIs and dependencies will be considered based on the CI classes selected under both the slush buckets.
- All other CIs which do not match the classification will be ignored.
Choose Table with CIs
Once the CI classes are classified, under Choose Table with CIs or a single CI to be provisioned along with dependencies, select the CI table from where the CIs should be fetched. The dependencies will be identified for the items in the table based on the classes and they will be defined in the Services Provisioning Table.
Example : Selecting cmdb_ci_service will provision the CIs from the service table along with its dependencies, which may or may not be restricted to the table.
Select a Filtered List of CIs (Optional)
If you would like to only select a filtered list of CIs from the selected table, then select the option Open selected table to set and save filter to save and select the filter in the next field. Note: The filter option will appear only after you set the table value. Also, you will need to manually select the saved filter name to apply the filter for your provisioning.
Select Column for Service Name
Next, select the column which will define the service name in PagerDuty. The Name value is set by default, though you may change it to another value if required.
Provision a Single Cl With Dependencies
You can provision a single CI along with its dependencies based on the configuration within the same user interface. Select the Provisioning single CI along with its dependencies checkbox, and then select the CI that you would like to provision with its dependencies, matching the CI classification set above.
Users can do bulk and single CI provisioning at the same time through the same configuration.
Save the different combinations of configurations if you would like to set different types of relationships, allowing you to set all the services and dependencies before provisioning.
Provision Using Custom Relationships (Option 2)
Read Carefully
Please read this user guide carefully before provisioning in bulk, as bulk deprovisioning is not supported.
The custom relationships provisioning configuration allows users to define the relationships between CIs without taking into consideration the relationship that exists within ServiceNow CMDB.
| Field | Expected Value |
|---|---|
| Provision using CMDB relationship table | No (Custom Relationships) |
| Select CI Table containing services | Select the table which contains the configuration items you would like to provision. Example: Service(cmdb_ci_service) If you would like to provision the items from this table. |
| Select Filter | Open the selected table and save a filter, or save a filter on the table view before selecting this value. The filter selected will be applied to fetch a filtered list of items from the table selected in the previous field. |
| Select the type of service to be provisioned | Business Service or Technical Service. This selected value will apply to all the items on the selected table. |
| Select column for service name | This value will be used for the name to set on the service on PagerDuty. Default value : Name |
| Select the relationship between services to be provisioned | - Consumes: First being parent and second being child CI. OR - Consumed by: First being child and second being parent CI. The first selected table and the second selected table items will have the above relationship between the services. |
Once you’ve set the values, click Save Configuration.
The custom relationship is set between each item on both the tables, or if only one table is selected in both the values, then relationships are set between each item and the other items within the same table.
Example
Expand
A table is selected and filtered to provision the following list of configuration items:
If table cmdb_ci_A contains:
- CI 1
- CI 2
- CI 3
If table cmdb_ci_B contains:
- CI 4
- CI 5
- CI 6
Then the following relationships will be defined on the view services table:
Parent CI 1:
- Child CIs:
- CI 4
- CI 5
- CI 6
Parent CI 2:
- Child CIs:
- CI 4
- CI 5
- CI 6
Parent CI 3:
- Child CIs:
- CI 4
- CI 5
- CI 6
Please review this information and delete the relationships and services which do not meet the requirements, to ensure only the expected services and relationships are provisioned in PagerDuty. In other words, the custom relationship merely creates all possible relationships between the selected list of items, and you will need to remove any which are not required.
Step 2: View Services
Once saved, the configuration will populate the potential services and dependencies in the Services Provisioning table (PagerDuty Services Provisioning Table), along with the service type.
Review the table information before provisioning the services.
The Validation warnings column will load any missing information on the services, which allows users to fix these errors before provisioning. Once the errors are fixed, click Revalidate services.
Change the service type if there are any service types not as expected on the view services table, also remove any services and dependencies which you do not want to provision into PagerDuty.
Step 3: Provision Services
Once you have reviewed the list of services, click Provision Services. If there are any errors while provisioning, they will be captured in the Provisioning errors column. Fix the errors and retry provisioning.
Note: If there are older services, which were not provisioned due to errors or any other reason, delete these services/relationships from the View Services table before provisioning new services again.
Updated about 20 hours ago