
Incident Workflows
Create packaged incident response actions
Use Incident Workflows to build an automated response for every incident. For example, you can configure one workflow that automatically triggers for all P1 and P2 incidents, and a separate workflow that orchestrates a security incident response. Through highly-configurable Triggers and Actions, you can apply 'if-this-then-that' logic to orchestrate the right response for your teams, processes, and business. Streamline your incident management processes even more by taking advantage of Workflow Integrations.
Availability
Incident Workflows are included with the following pricing plans: Business, Digital Operations (legacy) and Enterprise for Incident Management. Please contact our Sales team to upgrade to a plan with Incident Workflows.
Upgrade to Incident Workflows
- Because Incident Workflows are a more robust and powerful version of Response Plays, we will be working to upgrade accounts from Response Plays to Incident Workflows, ultimately culminating in a Response Plays end-of-life in June 2024.
- Please read Upgrade Response Plays to Incident Workflows for details and frequently asked questions about the upgrade process.

Incident Workflow Components
Incident Workflows are comprised of three main components: triggers, actions, and Workflow Integrations. By customizing the right set of triggers and actions, you can adjust workflows for your particular use case.
Triggers
Triggers determine when Incident Workflows should be run, and you can add multiple triggers to each workflow to customize your preferred response. For example, you can use triggers to create a workflow that only runs for high-priority incidents. There are three types of triggers: Conditional, Manual and API.
Conditional Triggers
Conditional triggers can start Incident Workflows whenever an incident is created, or only when specific conditions are met.
- If you select When an incident is created, you are not required to add a condition. If you do add a condition, though, the condition will be evaluated when the incident is created.
- If you select When conditions are met, the condition is evaluated any time there is a change to the incident. This means that workflow could potentially run multiples times. For example, if the condition is
priority matches P-1and a user toggles the priority back and forth betweenP-1andP-2, the workflow will trigger each time the incident's priority changes toP-1.
When a conditional trigger is used, it will perform actions automatically. Some actions, such as adding responders, require a user association for the request. When this occurs, you will see the incident's assignee (or first assignee if there are multiple users assigned) logged as the user performing the action in the incident timeline.
The following conditional trigger fields are available to all users with Incident Workflows:
- Priority
- Status
- Urgency
In addition to the fields above, users with the Enterprise plan for Incident Management have access to the fields listed below. Please contact our Sales Team if you'd like to upgrade to an account with these fields:
- Custom Fields
- Created At
- Incident Key
- Incident Number
- Resolved At
- Service ID
- Title
- Updated At
Manual Triggers
Manual triggers let responders start the Incident Workflow directly from an incident. When a manual trigger is added, Incident Workflows can be triggered from the PagerDuty web app, mobile app, Slack, or Microsoft Teams.
API Triggers
You can trigger workflows using the Incident Workflows REST API endpoint. One of the following user roles is required to trigger workflows via the API:
- Manager base role
- Admin
- Account Owner
Integration Triggers
You can trigger Incident Workflows directly from our Slack, Microsoft Teams, ServiceNow, Zendesk, Salesforce and Jira Server integrations.
Applying Triggers to Services
The last step of creating a trigger is applying it to the right services. There are two ways to apply a trigger to services:
- Apply a trigger to all services on the account.
- Apply a trigger to specific services.
Once a trigger has been applied to a service and the Workflow has been published, it can then be used for incidents on those services.
Actions
Every Incident Workflow is made up of a set of actions that define what the workflow will do. You can review a list of supported actions below.
Workflow Integrations
Workflow Integrations facilitate the connection between Incident Workflows and external tools such as AWS, Azure Functions, Datadog, and Web API, enabling seamless authentication and data exchange. Please read Workflow Integrations to learn more about how to streamline your incident management processes.
Create an Incident Workflow
Required User Permissions
Account Owners and Global Admins can create and edit all Incident Workflows. Other users can edit workflows and triggers for services where they have Manager access.
Maximum Workflow Amount
Each account can create a maximum of 2,000 Incident Workflows.
Create an Incident Workflow from a Template
Incident Workflow templates provide a helpful starting point so you don’t have to create a Workflow from scratch. With templates, you can see best practices and review common examples of Incident Workflow use cases.
- In the web app's top navigation bar, go to Automation Incident Workflows.
- Select the template you would like to use:
- Major Incident
- Collaboration
- Update Stakeholders
You will be directed to a preview of the template.

Incident Workflow templates
- Click Use Template to create a workflow based on the template you selected.
- In the builder view, you can optionally select the Settings tab to modify the workflow Name, Description, and Who can edit this Workflow?. Click Save.
- With the Builder tab selected, triggers and actions that require updates are marked Needs attention.

- Click a trigger or action to review its configuration:
- For any triggers or actions you wish to remove from the workflow, click Remove.
- Click to add additional triggers or actions to the workflow.
- To left of a trigger or action, click and drag to reorder items as needed.
- When you are satisfied with the workflow's configuration, click Publish in the upper right and then Publish again in the confirmation modal.
Create an Incident Workflow from Scratch
- Select Automation Incident Workflows from the top navigation bar.
- Click Create Workflow.
- Enter a workflow Name and Description. Under Who can edit this Workflow? select one of the following:
- All admins
- Team managers on a specific team: Select the preferred Team from the dropdown.
- Click Create.
Add Triggers
- Click Add Trigger and select from the following:
Conditional Trigger: Starts an Incident Workflow when an incident in an associated service is created or updated
a. In the section When should this Workflow start? , select When an incident is created or When conditions are met (default) from the dropdown. This selection determines if a Workflow should start on incident creation, or only when the conditions are met.
b. Select the icon to use the Visual Condition Editor, or the icon to use the PagerDuty Condition Language (PCL) editor.
c. Configure the field, operator, and value to define the condition that must be met in order for the trigger to run. The list of available operators will dynamically update depending on the field's data type. Optional: Click And to add an AND condition. To add an OR condition, click New Condition. Then repeat this step.
d. In the This trigger applies to dropdown, select whether you would like your condition(s) to apply to All services or Specific services. If you select Specific services, then select your preferred service(s).
e. Click Save.
Manual Trigger: Starts an Incident Workflow when manually updated
a. In the Who can run this workflow? dropdown, select whether you would like to grant permissions to All incident responders or Incident responders on a specific team. If you selected Incident responders on a specific team, then select your preferred Team.
b. In the This trigger applies to dropdown, select whether you would like your condition(s) to apply to All services or Specific services. If you select Specific services, then select your preferred service(s).
c. Click Save.
Add Actions
- Click Add Action and select an action. Please reference the full list of Incident Workflows actions below. Note: Actions will trigger in the sequential order that they are added to the Workflow.
- Repeat steps 4-5 until all of the appropriate triggers and actions have been added to the Incident Workflow.
- Click Publish in the upper right-hand corner of the page, and then click Publish again in the modal to confirm that the Incident Workflow should be published.
Incident Workflow Drafts
Until an Incident Workflow is published, it exists as a draft. Draft Incident Workflows will not run, even when they have fully configured triggers. If you leave the workflow builder before an Incident Workflow has been published, it will remain in a draft state.
When you edit a published Workflow it creates a draft version, where changes can be safely made without affecting the published version. You can only have one draft at a time. When you publish a draft, it will replace the previous live version.
Edit an Incident Workflow
Required User Permissions
Account Owners and Global Admins can edit all Incident Workflows. Other users can edit workflows and triggers for services where they have Manager access.
- To edit an Incident Workflow as a draft, navigate to Automation Incident Workflows.
- Click to the right of the Incident Workflow you would like to edit and select Open in Builder.
- If the Incident Workflow being edited has already been published, your edits will be applied to a draft Incident Workflow. This allows you to make changes to published Incident Workflows without impacting the Workflow currently being used. When you’re ready to apply those changes, you can re-publish the Workflow to make those changes live.
- Make your edits to Triggers, Actions and/or Settings and then click Save.
Edit Workflow Permissions
Workflow permissions are set per-Workflow, and you can grant users access by their role or Team. A Team must be given explicit permission to view or edit a Workflow, and only one Team can have access at a time.
Users with edit access will also be able to run the Workflow via API. Because of how permissions are handled, when using the Team managers on a specific team setting, users on that Team with an Observer or Responder role can also run the Workflow via API, though they cannot edit it. Additionally, when an incident triggers a Workflow, any user added to that incident as a responder can also run the Workflow via API.
Required User Permissions
Account Owners and Global Admins can edit Workflow permissions for all users. Other users can edit Workflow permissions for services where they have Manager access.
-
Navigate to Automation Workflows.
-
Select to the right of the Workflow you wish to edit and then select Open in Builder.
-
Select the Settings tab. Under Who can edit this Workflow?, select one of the following options:
- All admins
- Team managers on a specific team: Under the Select team dropdown, select your preferred Team.
- Click Save.
Edit Manual Workflow Permissions
To run a Workflow manually, the Workflow must have a manual trigger, from which you can configure permissions. Manual Workflow permissions are set per-trigger.
Required User Permissions
Account Owners and Global Admins can edit manual Workflow permissions for all users. Other users can edit manual Workflow permissions for services where they have Manager access.
-
Navigate to Automation Incident Workflows.
-
Select to the right of the Workflow you wish to edit and then select Open in Builder.
-
Select the Manual Trigger. Under Who can run this workflow?, select from one of the following:
- All incident responders
- Incident responders on a specific team: Under the Select team dropdown, select your preferred Team.
- Click Save.
Field References
You can use field references to dynamically insert incident data into your Incident Workflow actions. During configuration, you may add data such as incident.id, incident.status, incident.priority, etc., to an action's input parameters, resulting in the workflow pulling the corresponding incident’s data each time it runs. This feature allows you to customize and standardize the information, settings, and flow of every response. You can browse all available field references by typing {{ in the input field or by clicking the icon on the right side of the input field.
Insert field reference icon
Examples
- Add Users as Responders: When you select this action, you have the option to include a message to responders. You may want to include standard incident data in the Message field, such as
{{incident.service.name}}and{{incident.priority}}, so that responders see the service name and priority in the responder request. - Send Status Update: When you select this action, you may want to include
{{incident.title}}and{{incident.priority}}in the Message field so that stakeholders see the incident’s title and priority in their status updates. - Create a Slack Channel for an Incident: When you select this action, you have the option to set a Slack channel name. You may want to include the
{{incident.id}}in the Desired Channel Name field to get a unique channel name every time.
Supported Fields
Incident Workflows support referencing fields in most action configuration fields. Field references use the syntax {{example}}, which are called “double curly braces,” or sometimes "double handlebars".
| Field name | {{field-name}} |
|---|---|
| incident.custom_fields.CUSTOM_FIELD_NAME (will vary based on the Custom Field's name) | {{incident.custom_fields.CUSTOM_FIELD_NAME}} |
| incident.id | {{incident.id}} |
| incident.url | {{incident.url}} |
| incident.title | {{incident.title}} |
| incident.status | {{incident.status}} |
| incident.service.id | {{incident.service.id}} |
| incident.service.name | {{incident.service.name}} |
| incident.urgency | {{incident.urgency}} |
| incident.priority | {{incident.priority}} |
| incident.created_at | {{incident.created_at}} |
| incident.updated_at | {{incident.updated_at}} |
| incident.resolved_at | {{incident.resolved_at}} |
| incident.incident_key | {{incident.incident_key}} |
| incident.incident_number | {{incident.incident_number}} |
| incident.conference_bridge.conference_url | {{incident.conference_bridge.conference_url}} |
| incident.conference_bridge.conference_number | {{incident.conference_bridge.conference_number}} |
| current_date | {{current_date}} |
| time_zone | {{time_zone}} |
| workflow.id | {{workflow.id}} |
| workflow.name | {{workflow.name}} |
Action-Specific Field References
Most actions produce outputs, which you can use as field references in later steps of the workflow. While configuring an Incident Workflows action, you can find them under the Steps tab, if compatible. Select your desired action and output. It will be formatted as {{steps['ACTION_NAME'].fields['FIELD_NAME']}}.
For example, you may wish to Create Slack Channel for an Incident at the beginning of a workflow, and then reference its Channel Link in a Send Status Update action later in the workflow.
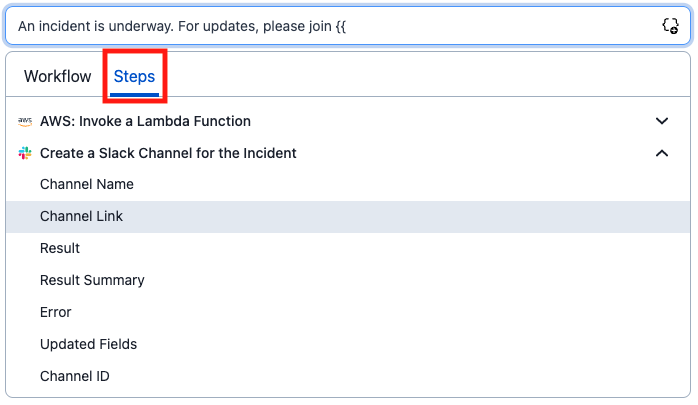
Action-specific field reference for Slack channel link
Please see the full List of Incident Workflow Actions below to review each action's available outputs.
Reference Action Names
Create Slack Channel for an Incident is the default name for this action, and you can reference it in later steps by entering
{{steps['Create a Slack Channel for an Incident'].fields['Channel Link']}}.If needed, you can rename an action by clicking Rename to the right of an action's title. If you rename an action, please also update the string name in the
stepsobject. For example, if you rename the action to Auto-generate Slack Channel, you can reference its channel link with the following snippet:{{steps['Auto-generate Slack Channel'].fields['Channel Link']}}.
Run a Workflow
There are two ways to run Workflows:
Manually Run an Incident Workflow
Required User Permissions
A PD Automation Actions user license is required to manually trigger Incident Workflows that include PagerDuty Automation Actions. Any responder can start all other workflows from an incident.
Manually Run a Workflow via Web or Mobile App
- In the web or mobile app, click the incident's Title to view its details page, and then click Run a Workflow in the actions menu.
- In the mobile app you may also tap More and select Run a Workflow.
- Select your desired Workflow.
- Click Run Workflow.
To configure a manual trigger, follow the instructions in Create an Incident Workflow and select Manual Trigger when you Add Triggers to the Workflow.
Manually Run a Workflow via Slack
Please see our Slack User Guide for instructions.
Manually Run a Workflow via Microsoft Teams
Please see our Microsoft Teams Integration Guide for instructions.
Run an Incident Workflow when a Condition is Met
Incident Workflows with conditional triggers will run automatically when their preconfigured conditions are met. To run a Workflow automatically, the Workflow must have a conditional trigger.
To configure a conditional trigger, follow the instructions in Create an Incident Workflow and select Conditional Trigger when you Add Triggers to the Workflow.
View Incident Workflow Audit Trail Reporting
Please read our Audit Trail Reporting article for more information.
List of Incident Workflow Actions
Enterprise plan for Incident Management
Actions marked [EIM] are available on our Enterprise plan for Incident Management. Please contact our Sales Team to upgrade to an account with these actions.
AWS
AWS: Invoke a Lambda Function [EIM]
Description: Invoke an AWS Lambda function with a custom payload
Instructions:
a. Enter the following:
- Integration: Select a Workflow Integration or click New AWS Connection to establish a new one.
- Function name: Enter the name of the Lambda function to invoke.
- Payload: Specify the payload in JSON to send to the Lambda function. Ex:
{“key”: ”value”, ...} - Invocation type: Select an invocation type, Event, RequestResponse or DryRun. If left blank, defaults to RequestResponse (synchronous).
- Region: The region in which the function is defined. If left blank, uses the default region configured for the integration.
b. Click Save.
Outputs
| Name | Description |
|---|---|
| Response Status Code | The status code of the response. |
| Successful Status Code Response | Boolean value that signifies if the call made within the action was successful or not (e.g., 2XX). |
| Response Time Milliseconds | The time in milliseconds taken for the request to be sent and the response to be received. |
| Result | Value that shows if the action was successful or not. Either "Success" or "Failed." |
| Result Summary | Brief description of what the action did or if it failed. |
| Error | Brief description that is populated if the action failed. |
| Response Body | The body attached to the response. |
| JSON Response Body | The response body parsed into a JSON object, if a JSON response body is returned. |
Azure
Azure: Invoke an Azure Function [EIM]
Description: Invoke an Azure function with a custom payload.
Instructions:
a. Enter the following:
- Integration: Select a Workflow Integration or click New Azure Functions Connection to establish a new one.
- Payload: Specify the payload in JSON to send to the Azure function. Ex:
{“key”: ”value”, ...}
b. Click Save.
Outputs
| Name | Description |
|---|---|
| Response Status Code | The status code of the response. 204 is the expected value for successful invocations for Functions 2.x and higher. |
| Successful Status Code Response | Boolean value that signifies if the call made within the action was successful or not (e.g., 2XX). |
| Response Time Milliseconds | The time in milliseconds taken for the request to be sent and the response to be received. |
| Result | Value that shows if the action was successful or not. Either "Success" or "Failed." |
| Result Summary | Brief description of what the action did or if it failed. |
| Error | Brief description that is populated if the action failed. |
| Response Body | The body attached to the response. |
| JSON Response Body | The response body parsed into a JSON object, if a JSON response body is returned. |
Datadog
Datadog: Create a Graph Snapshot
Description: Generate a snapshot graph from a metric query.
Instructions:
a. Enter the following:
- Integration: Select a Workflow Integration or click New Datadog Connection to establish a new one.
- Metric Query: Enter the metric query or JSON graph definition. You can paste here from the "Copy query to clipboard" option on your Datadog graph.
- Start Time: Select a value from the dropdown. This represent's the graph's start time.
- End Time: Select a value from the dropdown. This represent's the graph's end time.
- Graph Height in Pixels: The height of the graph in pixels. Must be between
100and10,000. - Graph Width in Pixels: The width of the graph in pixels. Must be between
100and10,000.
b. Click Save.
Outputs
| Name | Description |
|---|---|
| Graph Snapshot URL | The URL of the graph snapshot. |
| Result | Value that shows if the action was successful or not. Either "Success" or "Failed." |
| Result Summary | Brief description of what the action did or if it failed. |
| Error | Brief description that is populated if the action failed. |
Datadog: Get a Monitor's Details
Description: Get the overall status of a monitor, e.g. "Alert", "Ignored", "No Data", "OK", "Skipped", "Unknown" or "Warn."
Instructions:
a. Enter the following:
- Integration: Select a Workflow Integration or click New Datadog Connection to establish a new one.
- Monitor ID: Enter the ID of the monitor. This will be the number at the end of the monitor URL, e.g.,
https://app.datadoghq.com/monitors/<Monitor ID>. This input also accepts Field References.
b. Click Save.
Outputs
| Name | Description |
|---|---|
| Monitor Details | The details of the monitor. |
| Monitor Name | The name of the monitor. |
| Monitor State | The overall state of the monitor. Can be "Alert", "Ignored", "No Data", "OK", "Skipped", "Unknown" or "Warn." |
| Monitor Query | The query used to define the monitor. Can be used to fetch a graph snapshot of the monitor state. |
| Result | Value that shows if the action was successful or not. Either "Success" or "Failed." |
| Result Summary | Brief description of what the action did or if it failed. |
| Error | Brief description that is populated if the action failed. |
Datadog: Get the Alerting Monitor
Description: Get the ID of the Datadog monitor that triggered the incident. This can be used to get a graph snapshot, or the current monitor status.
Instructions:
a. Select the action.
b. Click Save.
c. Reference the Monitor ID output field reference in a subsequent action such as Datadog: Get a Monitor’s Details or Datadog: Create a Graph Snapshot.
Outputs
| Name | Description |
|---|---|
| Monitor ID | The ID of the Datadog monitor that triggered the incident. |
| Result | Value that shows if the action was successful or not. Either "Success" or "Failed". |
| Result Summary | Brief description of what the action did or if it failed. |
| Error | Brief description that is populated if the action fails. |
Google Meet
Google Meet: Create a Meeting
Description: Create a new meeting that anyone in your Google Workspace can join.
Instructions:
a. Click Add Action and perform the following:
- Meeting title: Enter a Meeting title. You may optionally add field references to the meeting title by clicking {+}, or entering
{{, and selecting your preferred field. If you do not enter a meeting title, it will default toincident_{{incident.incident_number}}.- Note: Meeting titles must be 60 characters or less, and can only contain lowercase letters, numbers, hyphens and underscores. When the Incident Workflow runs, PagerDuty will reformat any uppercase letters to lowercase, and replace invalid characters with a hyphen. PagerDuty will truncate meeting titles that are longer than 60 characters.
b. Click Save.
Outputs
| Name | Description |
|---|---|
| Meeting URL | The URL for the meeting. |
| Result | Value that shows if the action was successful or not. Either "Success" or "Failed." |
| Result Summary | Brief description of what the action did or if it failed. |
| Error | Brief description that is populated if the action failed. |
PagerDuty Incident Management
Add Conference Bridge
Description: Add a phone number and/or URL to an incident.
Instructions:
a. Enter the following:
- Conference Number: The phone number of the conference call for the conference bridge. Phone numbers should be formatted like +1 415-555-1212,,,,1234#, where a comma (,) represents a one-second wait and pound (#) completes access code input.
- Conference URL: A URL for the conference bridge. This could be a link to a web conference or Slack channel.
- You may optionally add field references in either the Conference Number or URL above by clicking {+}, or entering
{{, and selecting your preferred field.
- You may optionally add field references in either the Conference Number or URL above by clicking {+}, or entering
b. Click Save.
Outputs
| Name | Description |
|---|---|
| Conference Number | The phone number of the conference call for the conference bridge. |
| Conference URL | A URL for the conference bridge. |
| Result | Value that shows if the action was successful or not. Either "Success" or "Failed." |
| Result Summary | Brief description of what the action did or if it failed. |
| Error | Brief description that is populated if the action failed. |
Add Responders
Description: Add users or escalation policies as responders to an incident.
Instructions:
a. Perform the following:
- Responders dropdown: Select the escalation policy (or policies) and/or user(s) you'd like to add as responders.
- Message (optional): Enter the message to be sent with the request. You may optionally add field references in the message by clicking {+}, or entering
{{, and selecting your preferred field.
b. Click Save.
Outputs
| Name | Description |
|---|---|
| Result | Value that shows if the action was successful or not. Either "Success" or "Failed." |
| Result Summary | Brief description of what the action did or if it failed. |
| Error | Brief description that is populated if the action failed. |
Add Stakeholders
Description: Subscribe Teams or users to status updates for an incident.
Instructions:
a. Perform the following:
- Stakeholders dropdown: Select the Team(s) and/or user(s) you'd like to add as stakeholders.
b. Click Save.
Outputs
| Name | Description |
|---|---|
| Result | Value that shows if the action was successful or not. Either "Success" or "Failed." |
| Result Summary | Brief description of what the action did or if it failed. |
| Error | Brief description that is populated if the action failed. |
Get the On-Call User From a Schedule [EIM]
Description: Get the user name and ID of the on-call user from a schedule.
Instructions:
a. In the Schedule dropdown, search and select your desired schedule.
b. Click Save.
Outputs
| Name | Description |
|---|---|
| On Call User ID | The User ID of the on-call user. |
| On Call User Name | The name of the on-call user. |
| Result | Value that shows if the action was successful or not. Either "Success" or "Failed." |
| Result Summary | Brief description of what the action did or if it failed. |
| Error | Brief description that is populated if the action failed. |
Reassign the Incident
Description: Reassign the incident to a different escalation policy or user.
Instructions:
a. In the Reassign to dropdown, select the Escalation Policy or User tab, and then search or select who you'd like to reassign the incident to.
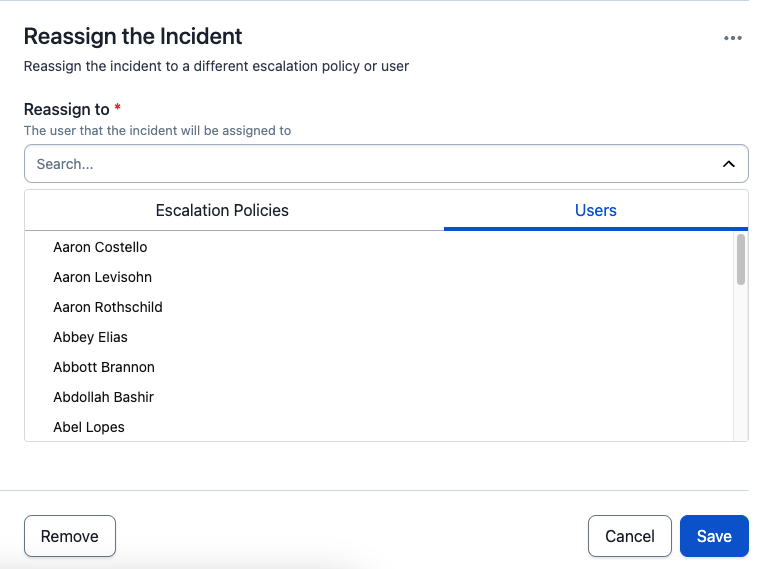
Select an escalation policy or user
b. Click Save.
Resolved Incidents
Please note that it is not possible to reassign resolved incidents. Running this action on a resolved incident will generate an error in the incident's timeline:
Failed to reassign the incident because it is already resolved.
Outputs
| Name | Description |
|---|---|
| Result | Value that shows if the action was successful or not. Either "Success" or "Failed." |
| Result Summary | Brief description of what the action did or if it failed. |
| Error | Brief description that is populated if the action failed. |
Run an Automation Action
Description: Run a PagerDuty Automation Action.
License Requirement
A PD Automation Actions user license is required for the following:
- Create a workflow that includes an Automation Action.
- Manually run a workflow that includes an Automation Action.
Please read Flexible Licensing for more information about assigning users a specific license type.
Instructions:
a. In the Automation Action dropdown, select an action.
b. Click Save.
Outputs
| Name | Description |
|---|---|
| Error | Brief description that is populated if the action failed. |
Send Status Update
Description: Post an update to the internal status page and notify subscribers.
Instructions:
a. Perform the following:
- In the Status Update Template dropdown, select Custom Message or a pre-configured Status Update Template. You will see a preview in the Message and Email sections below.
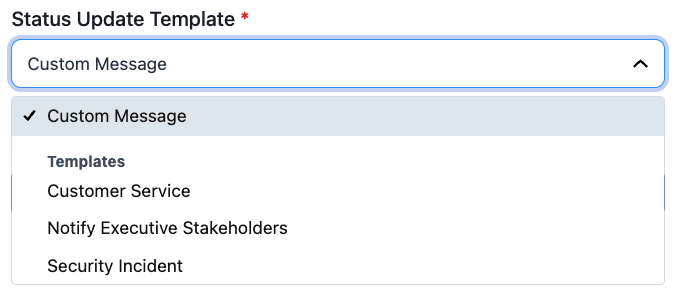
Select Custom Message or Status Update Template
- Note: If you select Custom Message, enter a Message to be sent with the request. You may optionally add field references to the message by clicking {+}, or entering
{{, and selecting your preferred field.
b. Click Save.
Outputs
| Name | Description |
|---|---|
| Result | Value that shows if the action was successful or not. Either "Success" or "Failed." |
| Result Summary | Brief description of what the action did or if it failed. |
| Error | Brief description that is populated if the action failed. |
Jira Cloud
Jira Cloud: Create an Issue for an Incident [EIM]
Description: Create Jira issues based on the workflow trigger condition(s) and the field options defined in the workflow configuration form.
Requirements: You must configure the Jira Cloud integration prior to using this action.
Inputs:
a. Perform the following:
| Name | Description |
|---|---|
| Project | Select the project to create an issue in. |
| Issue type | Select the type of issue to create. |
| Summary | Title for the issue. |
| Description | Description for the issue. |
| Additional Issue Fields | Click Add Jira Fields to fill out additional fields for this issue. |
b. After the Jira field options section is complete, click Create a test issue. Following a successful request, a new issue will be created in the Jira project associated with the workflow action.
c. Confirm that the issue was created successfully, and then click Save.
Outputs:
| Name | Description |
|---|---|
| Jira Issue Key | The key reference key for the created Jira issue. |
| Jira Issue Link | The link reference for the created Jira issue (URL). |
| Result | Value that shows if the action was successful or not. Either "Success" or "Failed". |
| Result Summary | Brief description of what the action did or if it failed. |
| Error | Brief description that is populated if the action failed. |
Learn More
Please see our Jira Cloud Integration Guide for more information on using this workflow action.
JSON
Lookup Value by Key
Description: Lookup a value in a JSON dictionary.
Instructions:
a. Perform the following:
- In the field Key to Lookup , enter the key to look up in the JSON dictionary.
- In the field JSON Dictionary, enter the JSON dictionary containing the values to look up, for example,
{"key1":"value1","key2":"value2"}.
Note: Both fields above support field references. Use a field reference by clicking {+}, or entering {{, and selecting your preferred field.
b. Click Save.
Outputs:
| Name | Description |
|---|---|
| Was the Key to Lookup Found | Whether or not the lookup value was found in the dictionary of values. |
| Lookup Result | The value associated with the lookup value in the dictionary. |
| Result | Value that shows if the action was successful or not. Either "Success" or "Failed". |
| Result Summary | Brief description of what the action did or if it failed. |
| Error | Brief description that is populated if the action failed. |
Logic
Logic actions control the flow of an Incident Workflow over the entirety of an incident's lifecycle. The three logic actions are Condition, Delay and Loop Until.
Condition [EIM]
Condition is an action that executes a series of steps when a condition is met.
-
In the section All of the following conditions must be met, specify what conditions must be met for the actions within the Condition to be executed.
- As an example, you can select
Field = “Status”, Operator = “Matches”, Value = “Resolved”if you would like the condition to execute only if the incident has been resolved at the time the Condition is checked, before proceeding to any actions after the Condition logic action.
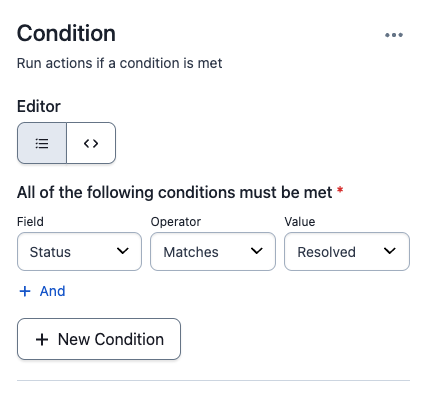
Condition example
- As an example, you can select
Delay [EIM]
Delay is an action that sets a time delay before moving to the next step.
-
In the Delay Period section, specify how long to delay before proceeding to the next action in the workflow.
- The duration format is
XXd XXh XXm. The minimum value is 5m and maximum value is 365d.
- The duration format is
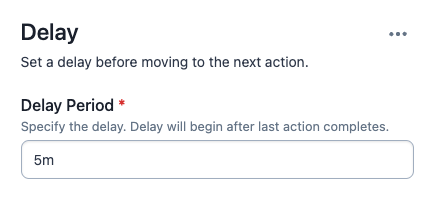
Set a delay period
Loop Until [EIM]
Loop Until is an action that executes a series of steps repeatedly until a condition is met.
- In the section All of the following conditions must be met, specify what conditions must be met for loop execution to halt.
- Note: The Loop Until action will not automatically terminate when an incident is resolved. If you’d like to halt a loop at resolution, you should define a condition that specifies:
Field = “Status”, Operator = “Matches”, Value = “Resolved”.
- Note: The Loop Until action will not automatically terminate when an incident is resolved. If you’d like to halt a loop at resolution, you should define a condition that specifies:
- In the section Delay between loops, specify how long to delay between each loop of the action. Duration format is
XXd XXh XXm.- The minimum value is 5m and maximum value is 365d.
- In the section Maximum loops, specify the maximum number of times the loop should executed if the condition has not yet been met.
- The minimum value is 1 and maximum value is 1000.
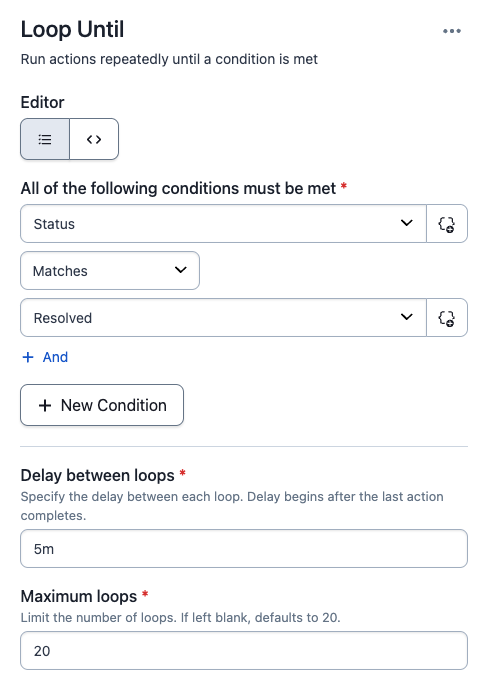
Loop until example
Microsoft Teams
Create a Dedicated Chat in Microsoft Teams
Description: Add a Microsoft Teams dedicated chat to an incident. The chat will include an incident notification card with real-time updates and incident action buttons. It will also automatically add responders that have been added to the incident.
Instructions:
a. Perform the following:
- Microsoft Teams Organization: Select the name of the Microsoft Teams Organization the meeting is in.
- Chat Name: Enter your preferred chat name. You may optionally add field references to the channel name by clicking {+}, or entering
{{, and selecting your preferred field. If you do not enter a meeting name, it will default toincident_{incident-number}.
b. Click Save.
Outputs
| Name | Description |
|---|---|
| Chat URL | The URL for the MS Teams chat. This will be a direct link to the MS Teams chat. |
| Result | Value that shows if the action was successful or not. Either "Success" or "Failed." |
| Result Summary | Brief description of what the action did or if it failed. |
| Error | Brief description that is populated if the action failed. |
Create Conference Bridge in Microsoft Teams
Description: Add a Microsoft Teams conference bridge to an incident.
Instructions:
a. Perform the following:
- Microsoft Teams Organization: Select the name of the Microsoft Teams Organization the meeting is in.
- Meeting Name: Enter your preferred meeting name. You may optionally add field references to the channel name by clicking {+}, or entering
{{, and selecting your preferred field. If you do not enter a meeting name, it will default toincident_{incident-number}.
b. Click Save.
Outputs
| Name | Description |
|---|---|
| Conference Bridge URL | The URL for the conference bridge. This will be a direct link to the MS Teams meeting. |
| Result | Value that shows if the action was successful or not. Either "Success" or "Failed." |
| Result Summary | Brief description of what the action did or if it failed. |
| Error | Brief description that is populated if the action failed. |
Roles
Assign a Role [EIM]
Description: Assign an Incident Role to a User.
Instructions:
a. Perform the following:
- In the Role dropdown, select your desired Incident Role.
- Select a user from the Assignee dropdown. Note: The user must be a responder on the incident.
b. Click Save.
Outputs
| Name | Description |
|---|---|
| Result | Value that shows if the action was successful or not. Either "Success" or "Failed." |
| Result Summary | Brief description of what the action did or if it failed. |
| Error | Brief description that is populated if the action failed. |
Unassign a Role [EIM]
Description: Remove the user assigned to a role, leaving it unassigned.
Instructions:
a. In the Role dropdown, select the name of the role to unassign.
b. Click Save.
Outputs
| Name | Description |
|---|---|
| Result | Value that shows if the action was successful or not. Either "Success" or "Failed." |
| Result Summary | Brief description of what the action did or if it failed. |
| Error | Brief description that is populated if the action failed. |
ServiceNow
ServiceNow ITSM: Create an Incident [EIM]
Description: Create a ServiceNow Incident.
Requirements: You must have the ServiceNow v8 integration configured prior to using this action.
Instructions:
a. Perform the following:
- ServiceNow Connection: Select the ServiceNow instance you would like to connect with.
b. Click Save.
c. You may add multiple ServiceNow instances by repeating the steps above.
Outputs
| Name | Description |
|---|---|
| Incident URL | The URL for a direct link to the ServiceNow Incident. |
| Incident Number | The Number for the ServiceNow Incident. |
| Result | Value that shows if the action was successful or not. Either "Success" or "Failed." |
| Result Summary | Brief description of what the action did or if it failed. |
| Error | Brief description that is populated if the action failed. |
Slack
Create a Slack Channel for an Incident
Description: Create a new Slack channel for an incident.
Instructions:
a. Perform the following:
- Workspace: Select the Slack Workspace with your desired channel from the list in the dropdown, or click Connect Another Slack Workspace to add a new one.
- Channel Name (optional): Enter the name of the channel to create in Slack. You may optionally add field references to the channel name by clicking {+}, or entering
{{, and selecting your preferred field. If you do not enter a channel name, it will default toincident_{incident-number}. - Channel Visibility: Select Public (default) or Private from the dropdown.
b. Click Save.
Channel Name Formatting
Slack channel names must be 80 characters or less, and can only contain lowercase letters, numbers, hyphens and underscores. When the Incident Workflow runs, PagerDuty will reformat any uppercase letters to lowercase, and replace invalid characters with a hyphen.
PagerDuty can truncate channel names that are longer than 80 characters. If the channel name already exists, PagerDuty will truncate the name to 75 characters and append a unique digit, (e.g.,
channel-name-1,channel-name-2, etc. ).
Outputs
| Name | Description |
|---|---|
| Channel Name | Name of the newly created Slack channel. |
| Channel Link | URL that links to the newly created Slack channel. |
| Result | Value that shows if the action was successful or not. Either "Success" or "Failed." |
| Result Summary | Brief description of what the action did or if it failed. |
| Error | Brief description that is populated if the action failed. |
Link a Slack Channel to an Incident
Description: Link an existing Slack channel to an incident.
Instructions:
a. Perform the following:
- Slack Workspace Name: Select the name of the Slack workspace the channel is in.
- Channel Name: Enter the name of the channel to link in Slack.
b. Click Save.
Outputs
| Name | Description |
|---|---|
| Channel Name | Name of the channel that was linked. |
| Channel Link | URL that links to the newly created Slack channel. |
| Result | Value that shows if the action was successful or not. Either "Success" or "Failed." |
| Result Summary | Brief description of what the action did or if it failed. |
| Error | Brief description that is populated if the action failed. |
Prompt to Add a Note to the Incident [EIM]
Description: Send a Slack message to a channel with a button to add a note for the incident.
Instructions:
a. Enter the following:
- Workspace: Select the Slack Workspace with your desired channel from the list in the dropdown, or click Connect Another Slack Workspace to add a new one.
- Channel: Select Dedicated Incident Channel or A specific channel to determine where the message is sent.
- If you select Dedicated Incident Channel, the action will run on the channel associated with the incident. If there is no dedicated slack channel for the incident, the action will fail.
- If you select A specific channel, choose your desired channel from the Select the Channel dropdown. Note: If you have not already done so, you or an administration may need to link your Slack account before your workspace's channels will appear in the dropdown.
- Message: Enter the message body. This field supports Slack mrkdwn formatting and emojis. You may optionally add field references to the message by clicking
{+}, or entering{{, and selecting relevant fields.
b. Click Save.
Outputs
| Name | Description |
|---|---|
| Result | Value that shows if the action was successful or not. Either "Success" or "Failed" |
| Result Summary | Brief description of what the action did or if it failed. |
| Error | Brief description that is populated if the action failed. |
Prompt to Add Responders to the Incident [EIM]
Description: Send a Slack message to a channel with a button to Add Responders to the incident.
Instructions:
a. Enter the following:
- Workspace: Select the Slack Workspace with your desired channel from the list in the dropdown, or click Connect Another Slack Workspace to add a new one.
- Channel: Select Dedicated Incident Channel or A specific channel to determine where the message is sent.
- If you select Dedicated Incident Channel, the action will run on the channel associated with the incident. If there is no dedicated slack channel for the incident, the action will fail.
- If you select A specific channel, choose your desired channel from the Select the Channel dropdown. Note: If you have not already done so, you or an administration may need to link your Slack account before your workspace's channels will appear in the dropdown.
- Message: Enter the message body. This field supports Slack mrkdwn formatting and emojis. You may optionally add field references to the message by clicking
{+}, or entering{{, and selecting relevant fields.
b. Click Save.
Outputs
| Name | Description |
|---|---|
| Result | Value that shows if the action was successful or not. Either "Success" or "Failed". |
| Result Summary | Brief description of what the action did or if it failed. |
| Error | Brief description that is populated if the action failed. |
Prompt to Escalate the Incident [EIM]
Description: Send a Slack message to a channel with a button to escalate the incident.
Instructions:
a. Enter the following:
- Workspace: Select the Slack Workspace with your desired channel from the list in the dropdown, or click Connect Another Slack Workspace to add a new one.
- Channel: Select Dedicated Incident Channel or A specific channel to determine where the message is sent.
- If you select Dedicated Incident Channel, the action will run on the channel associated with the incident. If there is no dedicated slack channel for the incident, the action will fail.
- If you select A specific channel, choose your desired channel from the Select the Channel dropdown. Note: If you have not already done so, you or an administration may need to link your Slack account before your workspace's channels will appear in the dropdown.
- Message: Enter the message body. This field supports Slack mrkdwn formatting and emojis. You may optionally add field references to the message by clicking
{+}, or entering{{, and selecting relevant fields.
b. Click Save.
Outputs
| Name | Description |
|---|---|
| Result | Value that shows if the action was successful or not. Either "Success" or "Failed". |
| Result Summary | Brief description of what the action did or if it failed. |
| Error | Brief description that is populated if the action failed. |
Prompt to Reassign the Incident [EIM]
Description: Send a Slack message to a channel with a button to reassign the incident.
Instructions:
a. Enter the following:
- Workspace: Select the Slack Workspace with your desired channel from the list in the dropdown, or click Connect Another Slack Workspace to add a new one.
- Channel: Select Dedicated Incident Channel or A specific channel to determine where the message is sent.
- If you select Dedicated Incident Channel, the action will run on the channel associated with the incident. If there is no dedicated slack channel for the incident, the action will fail.
- If you select A specific channel, choose your desired channel from the Select the Channel dropdown. Note: If you have not already done so, you or an administration may need to link your Slack account before your workspace's channels will appear in the dropdown.
- Message: Enter the message body. This field supports Slack mrkdwn formatting and emojis. You may optionally add field references to the message by clicking
{+}, or entering{{, and selecting relevant fields.
b. Click Save.
Outputs
| Name | Description |
|---|---|
| Result | Value that shows if the action was successful or not. Either "Success" or "Failed". |
| Result Summary | Brief description of what the action did or if it failed. |
| Error | Brief description that is populated if the action failed. |
Prompt to Run an Automation Action on the Incident [EIM]
Description: Send a Slack message to a channel with a button to run an Automation Action on the incident.
Instructions:
a. Enter the following:
- Workspace: Select the Slack Workspace with your desired channel from the list in the dropdown, or click Connect Another Slack Workspace to add a new one.
- Channel: Select Dedicated Incident Channel or A specific channel to determine where the message is sent.
- If you select Dedicated Incident Channel, the action will run on the channel associated with the incident. If there is no dedicated slack channel for the incident, the action will fail.
- If you select A specific channel, choose your desired channel from the Select the Channel dropdown. Note: If you have not already done so, you or an administration may need to link your Slack account before your workspace's channels will appear in the dropdown.
- Message: Enter the message body. This field supports Slack mrkdwn formatting and emojis. You may optionally add field references to the message by clicking
{+}, or entering{{, and selecting relevant fields.
b. Click Save.
Outputs
| Name | Description |
|---|---|
| Result | Value that shows if the action was successful or not. Either "Success" or "Failed". |
| Result Summary | Brief description of what the action did or if it failed. |
| Error | Brief description that is populated if the action failed. |
Prompt to Run an Incident Workflow on the Incident [EIM]
Description: Send a Slack message to a channel with a button to run an Incident Workflow on the incident.
Instructions:
a. Enter the following:
- Workspace: Select the Slack Workspace with your desired channel from the list in the dropdown, or click Connect Another Slack Workspace to add a new one.
- Channel: Select Dedicated Incident Channel or A specific channel to determine where the message is sent.
- If you select Dedicated Incident Channel, the action will run on the channel associated with the incident. If there is no dedicated slack channel for the incident, the action will fail.
- If you select A specific channel, choose your desired channel from the Select the Channel dropdown. Note: If you have not already done so, you or an administration may need to link your Slack account before your workspace's channels will appear in the dropdown.
- Message: Enter the message body. This field supports Slack mrkdwn formatting and emojis. You may optionally add field references to the message by clicking
{+}, or entering{{, and selecting relevant fields.
b. Click Save.
Outputs
| Name | Description |
|---|---|
| Result | Value that shows if the action was successful or not. Either "Success" or "Failed". |
| Result Summary | Brief description of what the action did or if it failed. |
| Error | Brief description that is populated if the action failed. |
Prompt to Send a Status Update for the Incident [EIM]
Description: Send a Slack message to a channel with a button to send a status update for the incident.
Instructions:
a. Enter the following:
- Workspace: Select the Slack Workspace with your desired channel from the list in the dropdown, or click Connect Another Slack Workspace to add a new one.
- Channel: Select Dedicated Incident Channel or A specific channel to determine where the message is sent.
- If you select Dedicated Incident Channel, the action will run on the channel associated with the incident. If there is no dedicated slack channel for the incident, the action will fail.
- If you select A specific channel, choose your desired channel from the Select the Channel dropdown. Note: If you have not already done so, you or an administration may need to link your Slack account before your workspace's channels will appear in the dropdown.
- Message: Enter the message body. This field supports Slack mrkdwn formatting and emojis. You may optionally add field references to the message by clicking
{+}, or entering{{, and selecting relevant fields.
b. Click Save.
Outputs
| Name | Description |
|---|---|
| Result | Value that shows if the action was successful or not. Either "Success" or "Failed". |
| Result Summary | Brief description of what the action did or if it failed. |
| Error | Brief description that is populated if the action failed. |
Prompt to Update Priority on the Incident [EIM]
Description: Send a Slack message to a channel with a button to update the priority on the incident.
Instructions:
a. Enter the following:
- Workspace: Select the Slack Workspace with your desired channel from the list in the dropdown, or click Connect Another Slack Workspace to add a new one.
- Channel: Select Dedicated Incident Channel or A specific channel to determine where the message is sent.
- If you select Dedicated Incident Channel, the action will run on the channel associated with the incident. If there is no dedicated slack channel for the incident, the action will fail.
- If you select A specific channel, choose your desired channel from the Select the Channel dropdown. Note: If you have not already done so, you or an administration may need to link your Slack account before your workspace's channels will appear in the dropdown.
- Message: Enter the message body. This field supports Slack mrkdwn formatting and emojis. You may optionally add field references to the message by clicking
{+}, or entering{{, and selecting relevant fields.
b. Click Save.
Outputs
| Name | Description |
|---|---|
| Result | Value that shows if the action was successful or not. Either "Success" or "Failed". |
| Result Summary | Brief description of what the action did or if it failed. |
| Error | Brief description that is populated if the action failed. |
Send a Direct Message [EIM]
Description: Send a message to a Slack user.
Instructions:
a. Enter the following:
- Workspace: Select the Slack Workspace with your desired channel from the list in the dropdown, or click Connect Another Slack Workspace to add a new one.
- User: The user to send this message to. You will only be able to select users who have linked their PagerDuty and Slack accounts.
- Message: Enter the message body. This field supports Slack mrkdwn formatting and emojis. You may optionally add field references to the message by clicking
{+}, or entering{{, and selecting relevant fields.
b. Click Save.
Outputs
| Name | Description |
|---|---|
| Result | Value that shows if the action was successful or not. Either "Success" or "Failed" |
| Result Summary | Brief description of what the action did or if it failed. |
| Error | Brief description that is populated if the action failed. |
Send an Ephemeral Message [EIM]
Description: Send a temporary message, visible only to a specific user.
Instructions:
a. Enter the following:
- Workspace: Select the Slack Workspace with your desired channel from the list in the dropdown, or click Connect Another Slack Workspace to add a new one.
- Channel: Select Dedicated Incident Channel or A specific channel to determine where the message is sent.
- If you select Dedicated Incident Channel, the action will run on the channel associated with the incident. If there is no dedicated slack channel for the incident, the action will fail.
- If you select A specific channel, choose your desired channel from the Select the Channel dropdown. Note: If you have not already done so, you or an administration may need to link your Slack account before your workspace's channels will appear in the dropdown.
- User: Only the selected user can see the message. The user must be a member of the selected channel and active in Slack to receive the message. You will only be able to select users who have linked their PagerDuty and Slack accounts.
- Message: Enter the message body. This field supports Slack mrkdwn formatting and emojis. You may optionally add field references to the message by clicking
{+}, or entering{{, and selecting relevant fields.
b. Click Save.
Outputs
| Name | Description |
|---|---|
| Result | Value that shows if the action was successful or not. Either "Success" or "Failed" |
| Result Summary | Brief description of what the action did or if it failed. |
| Error | Brief description that is populated if the action failed. |
Send a Message to a Channel
Description: Send a message to a Slack channel.
Instructions:
a. Enter the following:
- Workspace: Select the Slack Workspace with your desired channel from the list in the dropdown, or click Connect Another Slack Workspace to add a new one.
- Channel: Select Dedicated Incident Channel or A specific channel to determine where the message is sent.
- If you select Dedicated Incident Channel, the action will run on the channel associated with the incident. If there is no dedicated slack channel for the incident, the action will fail.
- If you select A specific channel, choose your desired channel from the Select the Channel dropdown. Note: If you have not already done so, you or an administration may need to link your Slack account before your workspace's channels will appear in the dropdown.
- Message: Enter the message body. This field supports Slack mrkdwn formatting and emojis. You may optionally add field references to the message by clicking
{+}, or entering{{, and selecting relevant fields. - Pinned Message: You can pin important messages to the channel/conversation header. Select Yes or No (default) from the dropdown.
b. Click Save.
Outputs
| Name | Description |
|---|---|
| Result | Value that shows if the action was successful or not. Either "Success" or "Failed". |
| Result Summary | Brief description of what the action did or if it failed. |
| Error | Brief description that is populated if the action failed. |
Send a Message to a Channel with an Incident Action [EIM]
Description: Send a message to a channel in Slack with an Incident Action.
Instructions:
a. Enter the following:
- Workspace: Select the Slack Workspace with your desired channel from the list in the dropdown, or click Connect Another Slack Workspace to add a new one.
- Channel: Select Dedicated Incident Channel or A specific channel to determine where the message is sent.
- If you select Dedicated Incident Channel, the action will run on the channel associated with the incident. If there is no dedicated slack channel for the incident, the action will fail.
- If you select A specific channel, choose your desired channel from the Select the Channel dropdown. Note: If you have not already done so, you or an administration may need to link your Slack account before your workspace's channels will appear in the dropdown.
- Message: Enter the message body. This field supports Slack mrkdwn formatting and emojis. You may optionally add field references to the message by clicking
{+}, or entering{{, and selecting relevant fields. - Incident Action to Include with the Message: Select an incident action to include with the message. The incident action will be included as a button below the message.
b. Click Save.
Outputs
| Name | Description |
|---|---|
| Result | Value that shows if the action was successful or not. Either "Success" or "Failed". |
| Result Summary | Brief description of what the action did or if it failed. |
| Error | Brief description that is populated if the action failed. |
Set a Channel Topic
Description: Set a Slack channel's topic.
Instructions:
a. Enter the following:
- Workspace: Select the Slack Workspace with your desired channel from the list in the dropdown, or click Connect Another Slack Workspace to add a new one.
- Channel: Select Dedicated Incident Channel or A specific channel to determine where the message is sent.
- If you select Dedicated Incident Channel, the action will run on the channel associated with the incident. If there is no dedicated slack channel for the incident, the action will fail.
- If you select A specific channel, choose your desired channel from the Select the Channel dropdown. Note: If you have not already done so, you or an administration may need to link your Slack account before your workspace's channels will appear in the dropdown.
- Topic: Enter the channel topic. The topic must be less than 250 characters, and will overwrite the existing channel topic when this action is invoked.
b. Click Save.
Outputs
| Name | Description |
|---|---|
| Result | Value that shows if the action was successful or not. Either "Success" or "Failed." |
| Result Summary | Brief description of what the action did or if it failed. |
| Error | Brief description that is populated if the action failed. |
Text
Generate Random Positive Adjective
Description: Generates a random adjective from a list of positive adjectives.
Instructions:
a. Select the action.
b. Click Save.
c. Reference the Adjective output field reference in a subsequent action, such as further customizing Slack or Microsoft Teams channel names.
Outputs
| Name | Description |
|---|---|
| Adjective | The randomly generated adjective. |
| Result | Value that shows if the action was successful or not. Either "Success" or "Failed". |
| Result Summary | Brief description of what the action did or if it failed. |
| Error | Brief description that is populated if the action fails. |
Generate Random Animal
Description: Generates a random animal from a list of animals.
Instructions:
a. Select the action.
b. Click Save.
c. Reference the Animal output field reference in a subsequent action, such as further customizing Slack or Microsoft Teams channel names.
Outputs
| Name | Description |
|---|---|
| Animal | The randomly generated animal. |
| Result | Value that shows if the action was successful or not. Either "Success" or "Failed". |
| Result Summary | Brief description of what the action did or if it failed. |
| Error | Brief description that is populated if the action fails. |
Generate Random Color
Description: Generates a random color from a list of colors.
Instructions:
a. Select the action.
b. Click Save.
c. Reference the Color output field reference in a subsequent action, such as further customizing Slack or Microsoft Teams channel names.
Outputs
| Name | Description |
|---|---|
| Color | The randomly generated color. |
| Result | Value that shows if the action was successful or not. Either "Success" or "Failed". |
| Result Summary | Brief description of what the action did or if it failed. |
| Error | Brief description that is populated if the action fails. |
Incident Tasks
Create a Task [EIM]
Description: Create and assign an Incident Task to a responder on an incident.
Instructions:
a. Enter the following:
- Task Name: Enter a name for the task. You may optionally add field references to the task name by clicking
{+}, or entering{{, and selecting relevant fields. - Status: The status you would like the task to have when it is created. Select To Do, In Progress, Done, or Skipped from the dropdown.
- Assignee: Select a user from the dropdown. The task will be assigned to them when it is created.
- Details: Enter any additional details related to completing the task. You may optionally add field references to the details by clicking
{+}, or entering{{, and selecting relevant fields.
b. Click Save.
Outputs
| Name | Description |
|---|---|
| Task ID | ID of the newly created task. |
| Result | Value that shows if the action was successful or not. Either "Success" or "Failed" |
| Result Summary | Brief description of what the action did or if it failed. |
| Error | Brief description that is populated if the action failed. |
Update Task Assignee [EIM]
Description: Update the user assigned to an Incident Task.
Instructions:
a. Enter the following:
- Task ID: Enter the ID of the task you'd like to update. Please read Action-Specific Field References for more information about how to retrieve a value from an Incident Workflow action.
- Assignee: Select the user you'd like to reassign the task to from the dropdown.
b. Click Save.
Outputs
| Name | Description |
|---|---|
| Task ID | ID of the newly created task. |
| Result | Value that shows if the action was successful or not. Either "Success" or "Failed" |
| Result Summary | Brief description of what the action did or if it failed. |
| Error | Brief description that is populated if the action failed. |
Update Task Details [EIM]
Description: Update the details of an Incident Task.
Instructions:
a. Enter the following:
- Task ID: Enter the ID of the task you'd like to update. Please read Action-Specific Field References for more information about how to retrieve a value from an Incident Workflow action.
- Details: Enter the updated details related to completing the task. You may optionally add field references to the details by clicking
{+}, or entering{{, and selecting relevant fields.
b. Click Save.
Outputs
| Name | Description |
|---|---|
| Task ID | ID of the newly created task. |
| Result | Value that shows if the action was successful or not. Either "Success" or "Failed" |
| Result Summary | Brief description of what the action did or if it failed. |
| Error | Brief description that is populated if the action failed. |
Update Task Name [EIM]
Description: Update the name of an Incident Task.
Instructions:
a. Enter the following:
- Task ID: Enter the ID of the task you'd like to update. Please read Action-Specific Field References for more information about how to retrieve a value from an Incident Workflow action.
- Task Name: Enter the updated name for the task. You may optionally add field references to the task name by clicking
{+}, or entering{{, and selecting relevant fields.
b. Click Save.
Outputs
| Name | Description |
|---|---|
| Task ID | ID of the newly created task. |
| Result | Value that shows if the action was successful or not. Either "Success" or "Failed" |
| Result Summary | Brief description of what the action did or if it failed. |
| Error | Brief description that is populated if the action failed. |
Update Task Status [EIM]
Description: Update the status of an Incident Task.
Instructions:
a. Enter the following:
- Task ID: Enter the ID of the task you'd like to update. Please read Action-Specific Field References for more information about how to retrieve a value from an Incident Workflow action.
- Status: The update status you would like the task have. Select To Do, In Progress, Done, or Skipped from the dropdown.
b. Click Save.
Outputs
| Name | Description |
|---|---|
| Task ID | ID of the newly created task. |
| Result | Value that shows if the action was successful or not. Either "Success" or "Failed" |
| Result Summary | Brief description of what the action did or if it failed. |
| Error | Brief description that is populated if the action failed. |
Web API
Send DELETE Request [EIM]
Description: Sends a DELETE request to a given URL with given headers.
Instructions:
a. Enter the following:
- Request URL: Enter the URL to send the request to.
- Authentication Headers: Select a Workflow Integration or click New Web API Connection to establish a new one.
- Headers: Enter a list of headers to include on the request, one per line, e.g.,
Content-Type: application/json.
Security Tip
Do not include sensitive headers. We recommend creating a new Web API connection above and using that instead.
b. Click Save.
Outputs
| Name | Description |
|---|---|
| Response Status Code | The status code of the response. |
| Successful Status Code Response | Whether or not the response status code indicates success (2XX). |
| Response Body | The Body attached to the response. |
| JSON Response Body | The response body parsed into a JSON object, if the content-type is application/json. |
| Response Headers | The HTTP headers set in the response. |
| Response Time in Milliseconds | The time in milliseconds taken for a response to be sent to the request. |
| Result | Value that shows if the action was successful or not. Either "Success" or "Failed." |
| Result Summary | Brief description of what the action did or if it failed. |
| Error | Brief description that is populated if the action failed. |
Send GET Request [EIM]
Description: Sends a GET request to a given URL with given headers.
Instructions:
a. Enter the following:
- Request URL: Enter the URL to send the request to.
- Authentication Headers: Select a Workflow Integration or click New Web API Connection to establish a new one.
- Headers: Enter a list of headers to include on the request, one per line, e.g.,
Content-Type: application/json.
Security Tip
Do not include sensitive headers. We recommend creating a new Web API connection above and using that instead.
b. Click Save.
Outputs
| Name | Description |
|---|---|
| Response Status Code | The status code of the response. |
| Successful Status Code Response | Whether or not the response status code indicates success (2XX). |
| Response Body | The Body attached to the response. |
| JSON Response Body | The response body parsed into a JSON object, if the content-type is application/json. |
| Response Headers | The HTTP headers set in the response. |
| Response Time in Milliseconds | The time in milliseconds taken for a response to be sent to the request. |
| Result | Value that shows if the action was successful or not. Either "Success" or "Failed." |
| Result Summary | Brief description of what the action did or if it failed. |
| Error | Brief description that is populated if the action failed. |
Send HEAD Request [EIM]
Description: Sends a HEAD request to a given URL with given headers.
Instructions:
a. Enter the following:
- Request URL: Enter the URL to send the request to.
- Authentication Headers: Select a Workflow Integration or click New Web API Connection to establish a new one.
- Headers: Enter a list of headers to include on the request, one per line, e.g.,
Content-Type: application/json.
Security Tip
Do not include sensitive headers. We recommend creating a new Web API connection above and using that instead.
b. Click Save.
Outputs
| Name | Description |
|---|---|
| Response Status Code | The status code of the response. |
| Successful Status Code Response | Whether or not the response status code indicates success (2XX). |
| Response Body | The Body attached to the response. |
| JSON Response Body | The response body parsed into a JSON object, if the content-type is application/json. |
| Response Headers | The HTTP headers set in the response. |
| Response Time in Milliseconds | The time in milliseconds taken for a response to be sent to the request. |
| Result | Value that shows if the action was successful or not. Either "Success" or "Failed." |
| Result Summary | Brief description of what the action did or if it failed. |
| Error | Brief description that is populated if the action failed. |
Send PATCH Request [EIM]
Description: Sends a PATCH request to a given URL with given headers and body.
Instructions:
a. Enter the following:
- Request URL: Enter the URL to send the request to.
- Authentication Headers: Select a Workflow Integration or click New Web API Connection to establish a new one.
- Headers: Enter a list of headers to include on the request, one per line, e.g.,
Content-Type: application/json.
Security Tip
Do not include sensitive headers. We recommend creating a new Web API connection above and using that instead.
- Body: The body to attach to the request.
b. Click Save.
Outputs
| Name | Description |
|---|---|
| Response Status Code | The status code of the response. |
| Successful Status Code Response | Whether or not the response status code indicates success (2XX). |
| Response Body | The Body attached to the response. |
| JSON Response Body | The response body parsed into a JSON object, if the content-type is application/json. |
| Response Headers | The HTTP headers set in the response. |
| Response Time in Milliseconds | The time in milliseconds taken for a response to be sent to the request. |
| Result | Value that shows if the action was successful or not. Either "Success" or "Failed." |
| Result Summary | Brief description of what the action did or if it failed. |
| Error | Brief description that is populated if the action failed. |
Send POST Request [EIM]
Description: Sends a POST request to a given URL with given headers and body.
PagerDuty Events API
POSTrequests to the PagerDuty Events API is currently blocked from Incident Workflows.
Instructions:
a. Enter the following:
- Request URL: Enter the URL to send the request to.
- Authentication Headers: Select a Workflow Integration or click New Web API Connection to establish a new one.
- Headers: Enter a list of headers to include on the request, one per line, e.g.,
Content-Type: application/json.
Security Tip
Do not include sensitive headers. We recommend creating a new Web API connection above and using that instead.
- Body: The body to attach to the request.
b. Click Save.
Outputs
| Name | Description |
|---|---|
| Response Status Code | The status code of the response. |
| Successful Status Code Response | Whether or not the response status code indicates success (2XX). |
| Response Body | The Body attached to the response. |
| JSON Response Body | The response body parsed into a JSON object, if the content-type is application/json. |
| Response Headers | The HTTP headers set in the response. |
| Response Time in Milliseconds | The time in milliseconds taken for a response to be sent to the request. |
| Result | Value that shows if the action was successful or not. Either "Success" or "Failed." |
| Result Summary | Brief description of what the action did or if it failed. |
| Error | Brief description that is populated if the action failed. |
Send PUT Request [EIM]
Description: Sends a PUT request to a given URL with given headers and body.
Instructions:
a. Enter the following:
- Request URL: Enter the URL to send the request to.
- Authentication Headers: Select a Workflow Integration or click New Web API Connection to establish a new one.
- Headers: Enter a list of headers to include on the request, one per line, e.g.,
Content-Type: application/json.
Security Tip
Do not include sensitive headers. We recommend creating a new Web API connection above and using that instead.
- Body: The body to attach to the request.
b. Click Save.
Outputs
| Name | Description |
|---|---|
| Response Status Code | The status code of the response. |
| Successful Status Code Response | Whether or not the response status code indicates success (2XX). |
| Response Body | The Body attached to the response. |
| JSON Response Body | The response body parsed into a JSON object, if the content-type is application/json. |
| Response Headers | The HTTP headers set in the response. |
| Response Time in Milliseconds | The time in milliseconds taken for a response to be sent to the request. |
| Result | Value that shows if the action was successful or not. Either "Success" or "Failed." |
| Result Summary | Brief description of what the action did or if it failed. |
| Error | Brief description that is populated if the action failed. |
Send a Webhook POST
Description: Send a POST request with a customized body and headers.
PagerDuty Events API
POSTrequests to the PagerDuty Events API is currently blocked from Incident Workflows.
Instructions:
a. Enter the following:
- URL: Enter the URL to send the webhook request to.
- Authentication Headers: Select a Workflow Integration or click New Web API Connection to establish a new one.
- Headers: Enter a list of headers to include on the request, one per line, e.g.,
Content-Type: application/json
Security Tip
Do not include sensitive headers. We recommend using a Web API connection for improved security.
- Body: The body to attach to the request.
b. Click Save.
Outputs
| Name | Description |
|---|---|
| Response Status Code | The status code of the response. |
| Successful Status Code Response | Whether or not the response status code indicates success (2XX). |
| Response Headers | The HTTP headers set in the response. |
| Response Time in Milliseconds | The time in milliseconds taken for a response to be sent to the request. |
| Result | Value that shows if the action was successful or not. Either "Success" or "Failed." |
| Result Summary | Brief description of what the action did or if it failed. |
| Error | Brief description that is populated if the action failed. |
Webhook IP Addresses
Incident Workflows does not use a static list of IP addresses for webhook actions. We recommend using Authentication Headers, rather than source IP address, to validate requests.
Zoom
Create a Zoom Meeting
Description: Add a Zoom Meeting to an incident.
Instructions:
a. Once selected, click Save.
Outputs
| Name | Description |
|---|---|
| Meeting Number | The dial in number associated with the created Zoom meeting. |
| Meeting URL | The URL for the conference bridge. This will be a direct link to the Zoom meeting. |
| Result | Value that shows if the action was successful or not. Either "Success" or "Failed." |
| Result Summary | Brief description of what the action did or if it failed. |
| Error | Brief description that is populated if the action failed. |
FAQ
Why can't I add a trigger to all services?
Expand
Users can only select services that they have edit permissions on. To apply the trigger to a service you don't have edit permissions on, you'll need to request edit permissions on that service.
What happens if I change the trigger in a draft?
Expand
Incident Workflows in a draft state will not trigger under any circumstance. No changes made in a draft will affect live, published Workflows or incidents. Changes will only take effect after publishing.
Why can't I see a specific Incident Workflow in the Run a Workflow dropdown menu?
Expand
To run a Workflow manually, the Workflow must have a manual trigger. From the trigger, you can configure which services to associate with the Workflow.
If a Workflow is not appearing from the Run a Workflow menu on the incident, it is because of one of the following reasons:
- The Workflow does not have a manual trigger.
- The service or incident is not associated with the Workflow.
- The Workflow is associated to the incident, but did not meet the trigger conditions and is not available.
Do Incident Workflow actions run sequentially?
Expand
Yes. The order in which you add actions to an Incident Workflow defines the sequence in which they execute. For example, if you subscribe stakeholders and then send a status update, those stakeholders will be subscribed to the incident before the status update is generated.
Can I configure Incident Workflows using Terraform or the REST API?
Expand
Yes. Please refer to our Terraform Provider for PagerDuty and Incident Workflows REST API documentation for more information.
How much data can an Incident Workflow action return?
Expand
Incident Workflow actions can return up to 5MB of data in a response. If an action exceeds this limit, an Incident Workflow completed with error log entry is added to the incident with the message Encountered a system error after the action completed.
Are there any restrictions on the Web API actions?
Expand
Incident Workflows Web API Actions are subject to an account-wide rate limit of 500 MBs per minute. If your account exceeds that limit, all workflow actions will be paused for the remainder of the minute. Triggers will continue to fire without limitation, but workflow actions will not execute until the minute has passed. Please take care with workflows that run often and send or receive large amounts of data, since that can result in slowing down other, potentially more urgent workflows.
Updated 1 day ago