Custom Incident Actions
Custom Incident Actions allow incident responders to quickly execute custom logic that is housed outside of the PagerDuty system. Customers can host their own custom scripts that execute when these actions are triggered, which provides users with a nearly limitless number of possible actions.
Create a Custom Incident Action
Required User Permissions
- Managers, Global Admins and the Account Owner can create custom incident actions.
- Responder users with a Manager Team role can create custom incident actions for services associated with their Team.
- In the PagerDuty web app, navigate to Integrations Extensions.
- With the Service Extensions tab selected, click New Extension. In the Select an Extension dropdown, search and select Custom Incident Action, as the Extension Type.
- In the modal window that appears, click Open.
- You will be taken to the Custom Incident Action extension page; click New Action.
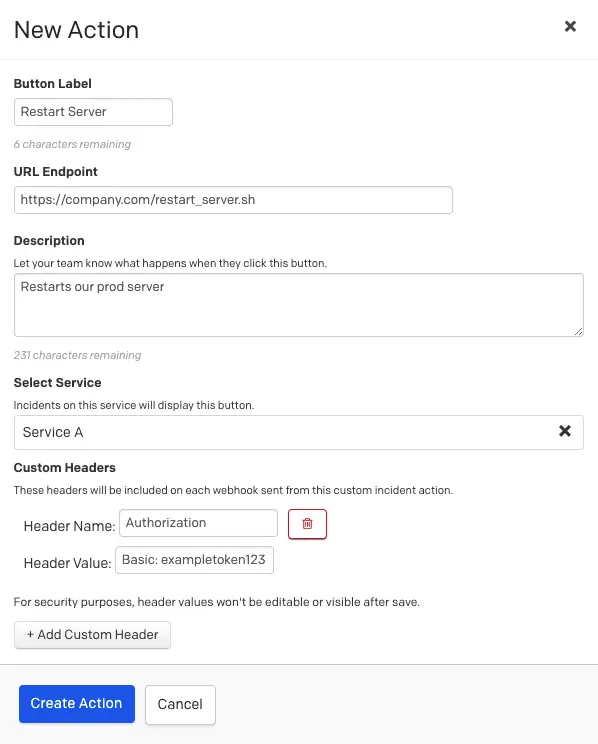
- Enter the following fields:
| Field | Instructions |
|---|---|
| Button Label | Enter a name for the button that will appear in PagerDuty incidents. |
| URL Endpoint | Enter the URL endpoint where PagerDuty will be send the HTTP POST request when a user selects the Custom Incident Action's button. |
| Description | Enter a description of what will happen when users click the Custom Incident Action button. |
| Select Service | Select the service where you would like incidents to display this button. |
| Custom Headers (Optional) | Click Add Custom Header and enter a Header Name and Header Value. These headers will be included on each webhook sent from this custom incident action. You may click Add Custom Header again to add multiple custom headers. Note: With V3 Webhook Subscriptions, all header names must be unique . To delete a custom header, click to the right. |
- When you have finished configuring your custom action, click Create Action.
For more information about the payload you will receive through a PagerDuty webhook, please visit our Developer Documentation.

Create a Custom Incident Action
Copy the Custom Incident Action Webhook ID
- Navigate to Integrations Extensions and find Custom Incident Action in the extensions list. Click Edit on the Custom Incident Actions Extension page to the right.
- Click to the right of your desired custom incident action and select Copy webhook ID.
Edit a Custom Incident Action
- Navigate to Integrations Extensions and find Custom Incident Action in the extensions list. Click Edit on the Custom Incident Actions Extension page to the right.
- Click to the right of your desired custom incident action and select Edit.
- Make the necessary changes and then click Save Changes.
Remove a Custom Incident Action
- Navigate to Integrations Extensions and find Custom Incident Action in the extensions list. Click Edit on the Custom Incident Actions Extension page to the right.
- Click to the right of your desired custom incident action and select Remove.
- In the confirmation dialog, click Delete.
Execute a Custom Incident Action
Required User Permissions
Responders, Managers, Global Admins and Account Owners can execute custom incident actions. Observers can execute custom incident actions on incidents they are assigned to.
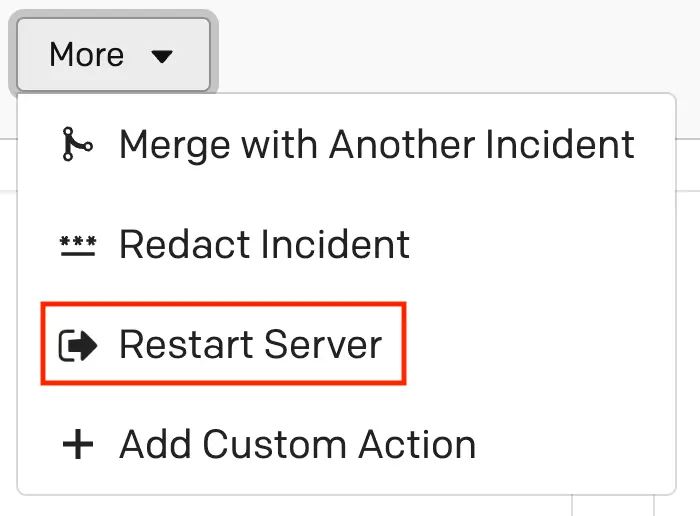
After you have created a custom action, you will see the action button available on all incidents on that service under the More dropdown menu.

Execute a Custom Incident Action
When a user clicks the Custom Incident Action's button in a PagerDuty incident, it will send an HTTP POST request with data on the incident to the action's configured endpoint URL. You can then build a script that listens for this request, for example, and executes custom logic when a request is received.
Product Limit
There is a maximum of three Custom Incident Actions per service.
Common Use Cases
Restart Server
Create a Restart Server button on your incidents that, when selected, restarts the server associated with the incident. The custom action's POST request will include details on the incident that would allow a single script to dynamically determine the server in need of a restart.
Add Diagnostics
Create an Add Diagnostics button that fetches diagnostic data on the affected infrastructure and appends the data as a note on your PagerDuty incident. This gives your users visibility into key infrastructure data directly in the PagerDuty incident.
Revert Last Commit
Create a Revert Last Commit button that reverts the last commit in the repository that houses the affected service's source code. This allows your users to quickly roll-back a bad deploy without leaving the PagerDuty platform.
Update Status Page
Create an Update Status Page button that will let your users update your status page with one click. This lets your users update your customers as soon as an incident occurs.
Updated 8 months ago
