Escalation Policies and Schedules
Connect a schedule to a service via escalation policy
On-call schedules represent your teams’ on-call responsibilities in PagerDuty, while escalation policies allow you to connect services to on-call schedules, and they ensure that the right people are notified at the right time. Schedule members will receive incident notifications once the schedule is added to an escalation policy, and a service uses that escalation policy.
Availability
Free accounts are limited to one schedule and one escalation policy. All other pricing plans offer unlimited schedules and escalation policies.
Connect a Schedule to a Service via Escalation Policy
To connect an on-call schedule to a service:
- In the web app, go to People Escalation Policies click next to your desired escalation policy or create a new escalation policy.
- Add your schedule to the escalation policy at the appropriate level and click Save.
- For more information about configuring escalation policies, please see Escalation Policy Basics.
- Navigate to Services Service Directory select your desired service or create a new service.
- Assign your escalation policy to the service:
- If you’re editing an existing service, please read Edit a Service’s Escalation Policy.
- If you’re creating a new service, please read Create a Service.
Deactivate Schedules via Escalation Policies
If you would like to pause or deactivate notifications from a service connected to a particular schedule, you can change the escalation policy that the service uses.
To change the escalation policy a service uses:
- Navigate to Services Service Directory.
- Find the service that notifies the schedule you would like to pause or deactivate select the Settings tab click Edit in the Assign and Notify section.
- In the Assign to escalation policy section, select an escalation policy that does not use the schedule you wish to pause or deactivate.
- Click Save Changes.
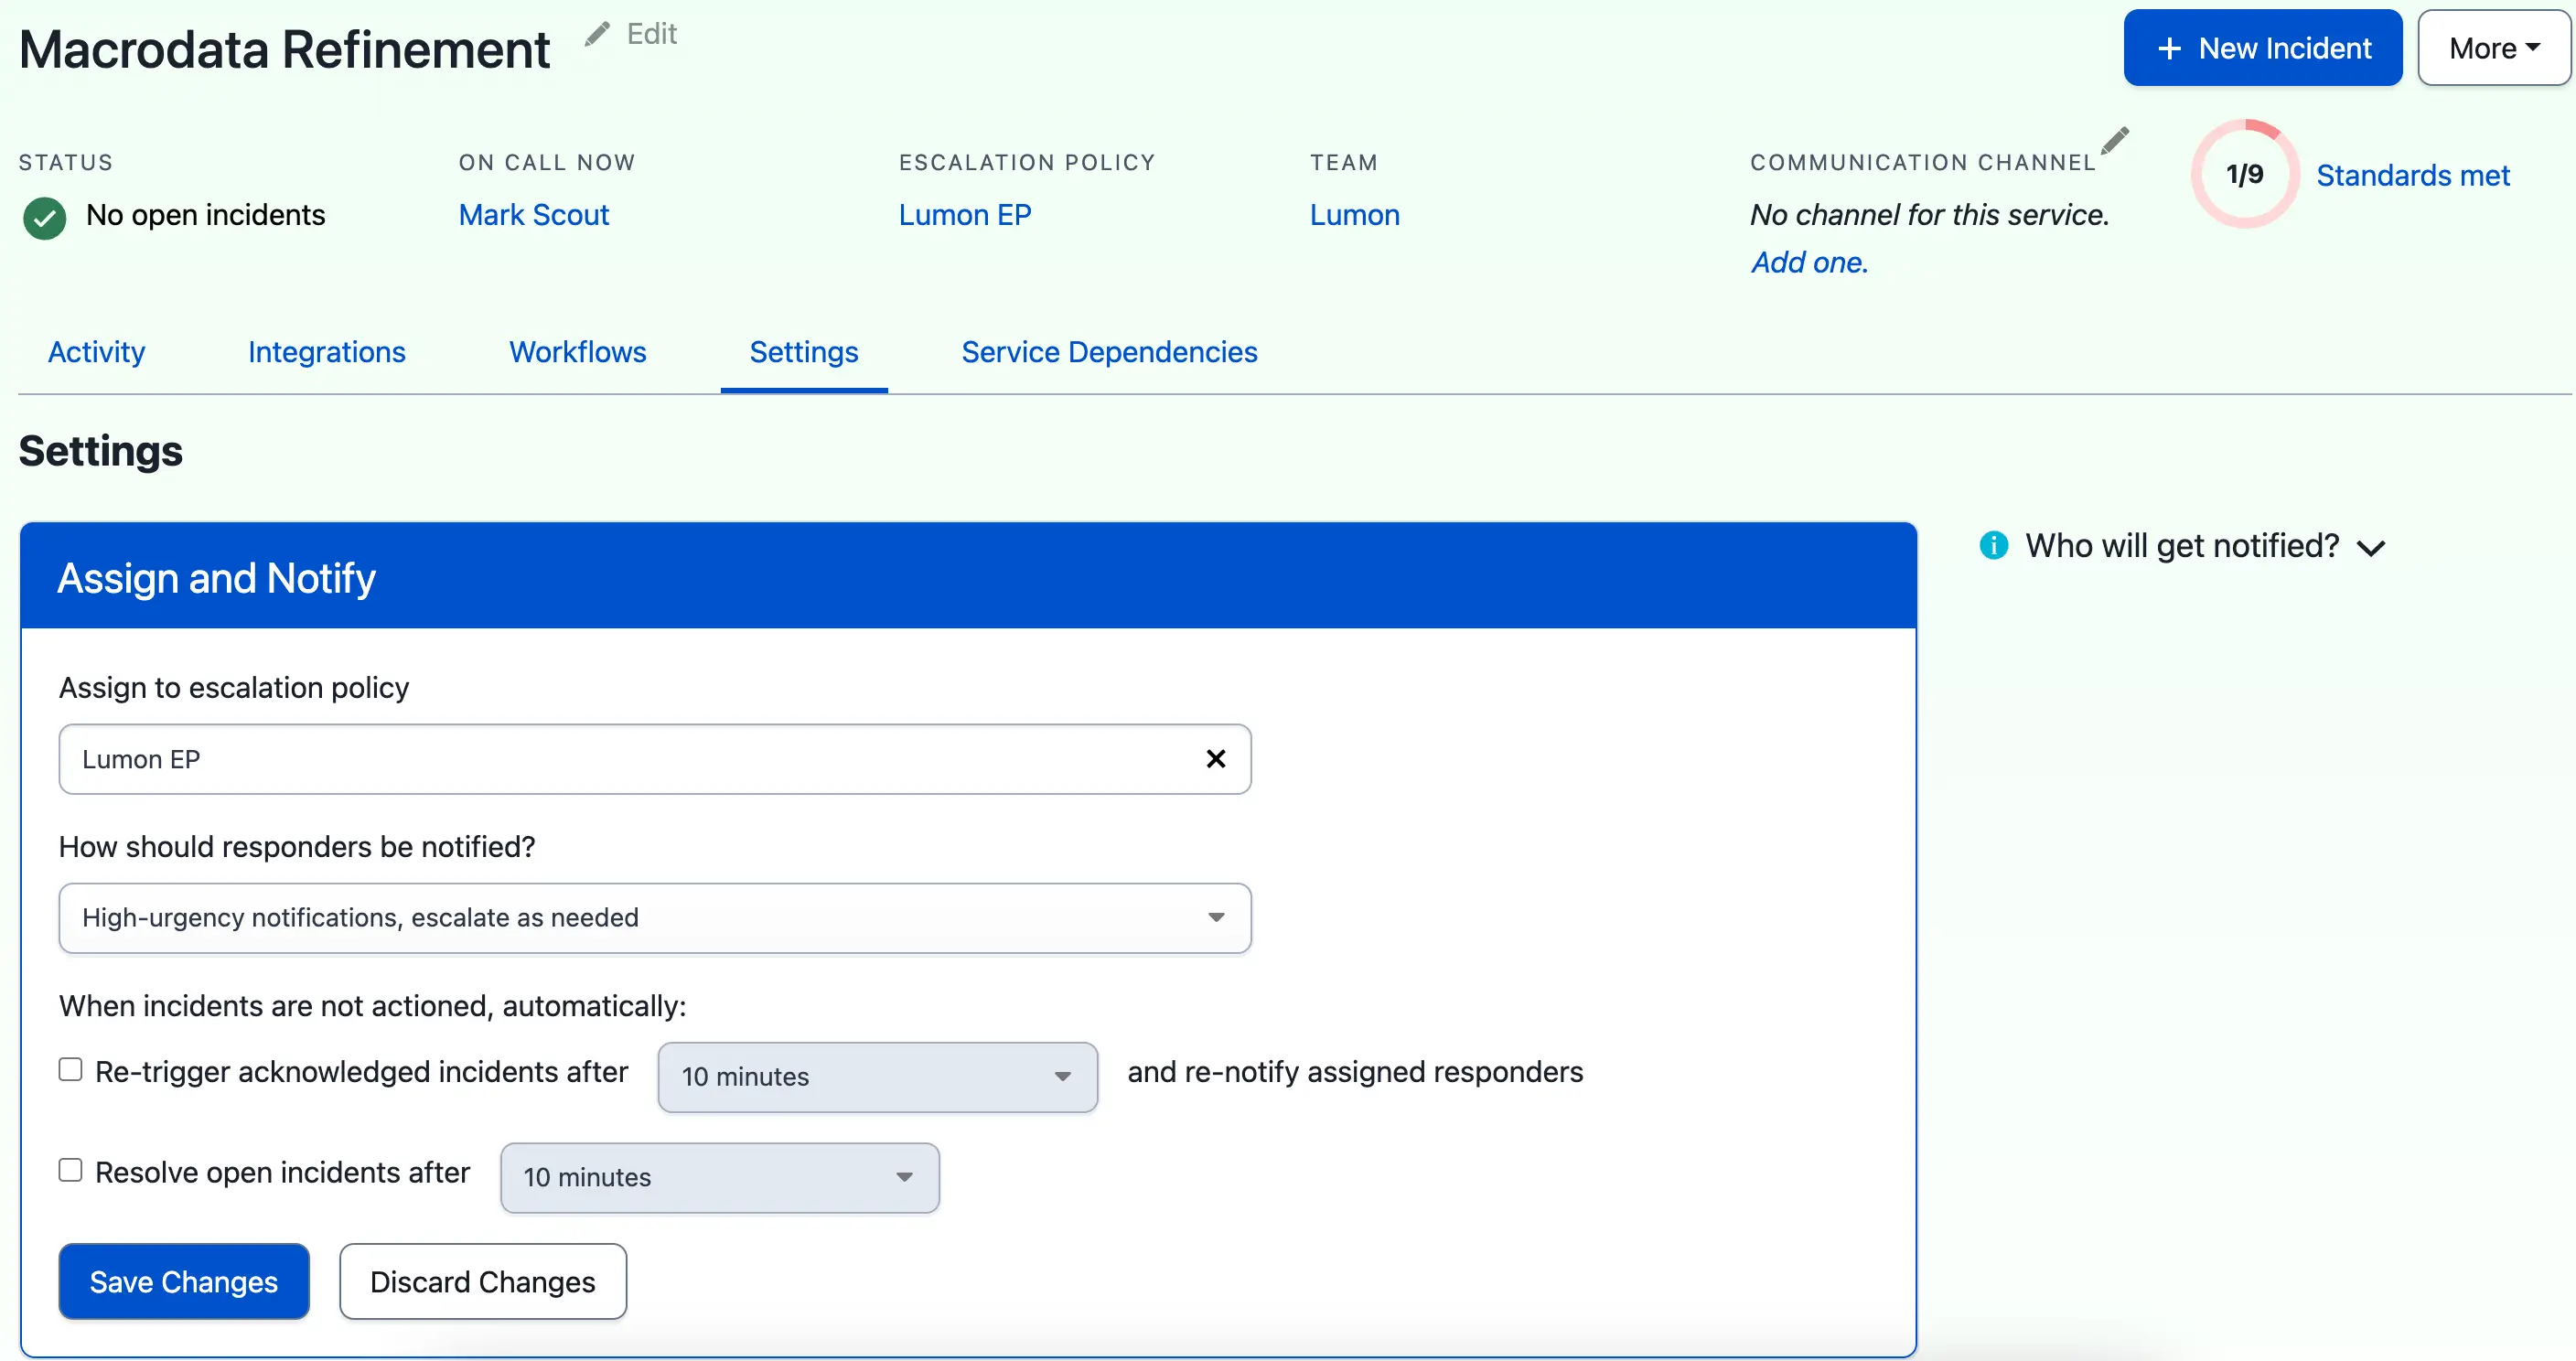
Assign a different escalation policy to a service
Note: If any other services use the same escalation policy, you’ll need to repeat this process for those services.
Escalation Policy and Schedule Use Cases
Escalation policies and schedules can be configured in many ways to fit your team’s needs. Below are examples of common methods of configuring these features together:
- Notify a secondary responder when the primary does not respond
- On-Call Shadowing
- Notify multiple users during specific times
Notify a Secondary Responder When the Primary Does Not Respond
It is a common need to set up a backup, secondary responder in case the primary responder does not acknowledge an incident. To create primary and secondary on-call users:
- Create schedules for the primary and secondary on-call levels.
- Add each schedule to the appropriate escalation level.
Create Schedules for the Primary and Secondary On-Call Levels
In this example, we will create a Primary schedule and a Secondary schedule. Both schedules rotate weekly on Monday at 0900 and have multiple people in the rotation. The person from the Primary schedule is the first responder and the person from the Secondary schedule is the backup, in case the first responder does not take action on an incident.

Primary schedule

Secondary schedule
Schedule Layer Precedence
Please see the section Schedule Layer Precedence for more information about why two schedules are required for a primary/secondary setup.
Add Each Schedule to the Appropriate Escalation Level
Once we have created on-call schedules to represent primary and secondary levels, we can add each schedule to an escalation policy.
In the screenshot below, the Primary schedule is the first escalation level and the Secondary schedule is the second escalation level. The expected behavior for this escalation policy is as follows:
- When an incident triggers, it will be immediately assigned to whomever is on call in the Primary schedule.
- The Primary schedule user has 30 minutes to take action on the incident (i.e., acknowledge, resolve or reassign the incident)
- If the user on the Primary schedule does not take action on the incident within 30 minutes, the incident will escalate to the on-call user at the second escalation level.
- If the person on the Secondary schedule does not take action on the incident within 30 minutes, then the incident is reassigned and escalated to the person on the Primary schedule (Repeats 3 times If no one acknowledges incidents).
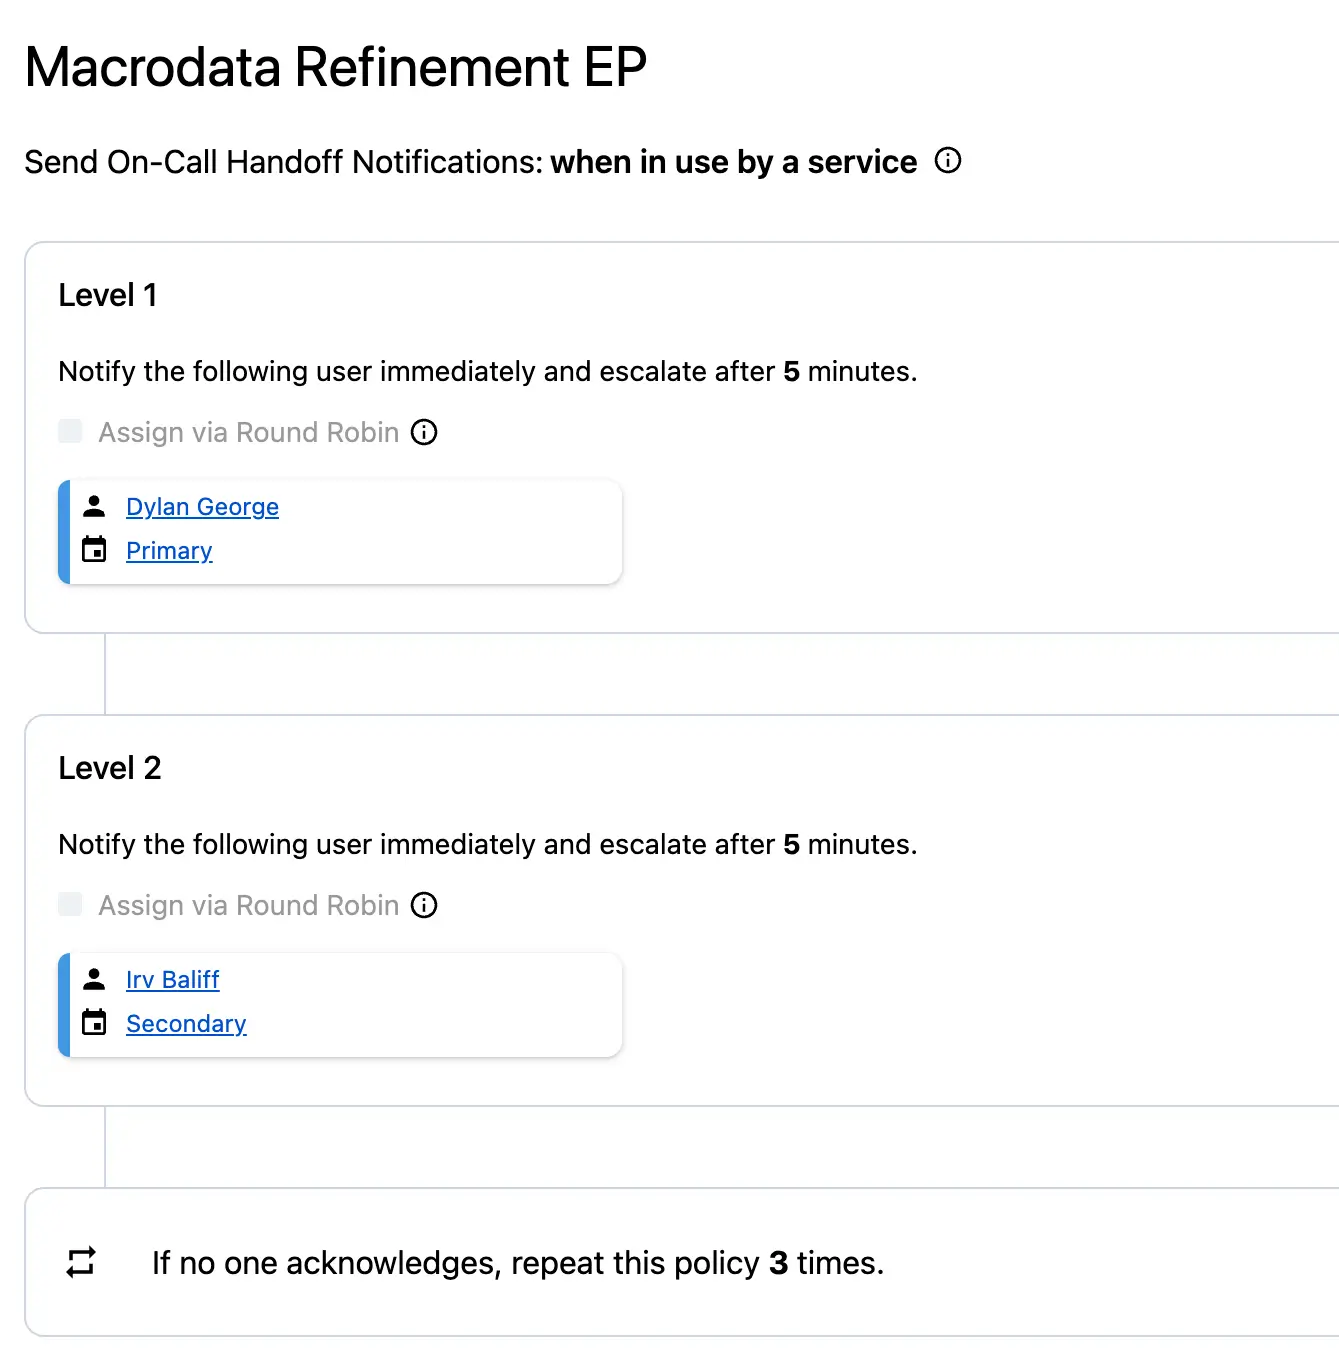
Primary and Secondary schedules added to an escalation policy
Alternatively, if you would like both your Primary and Secondary on-call users to be notified when an incident triggers, you can add both schedules to the same escalation level.
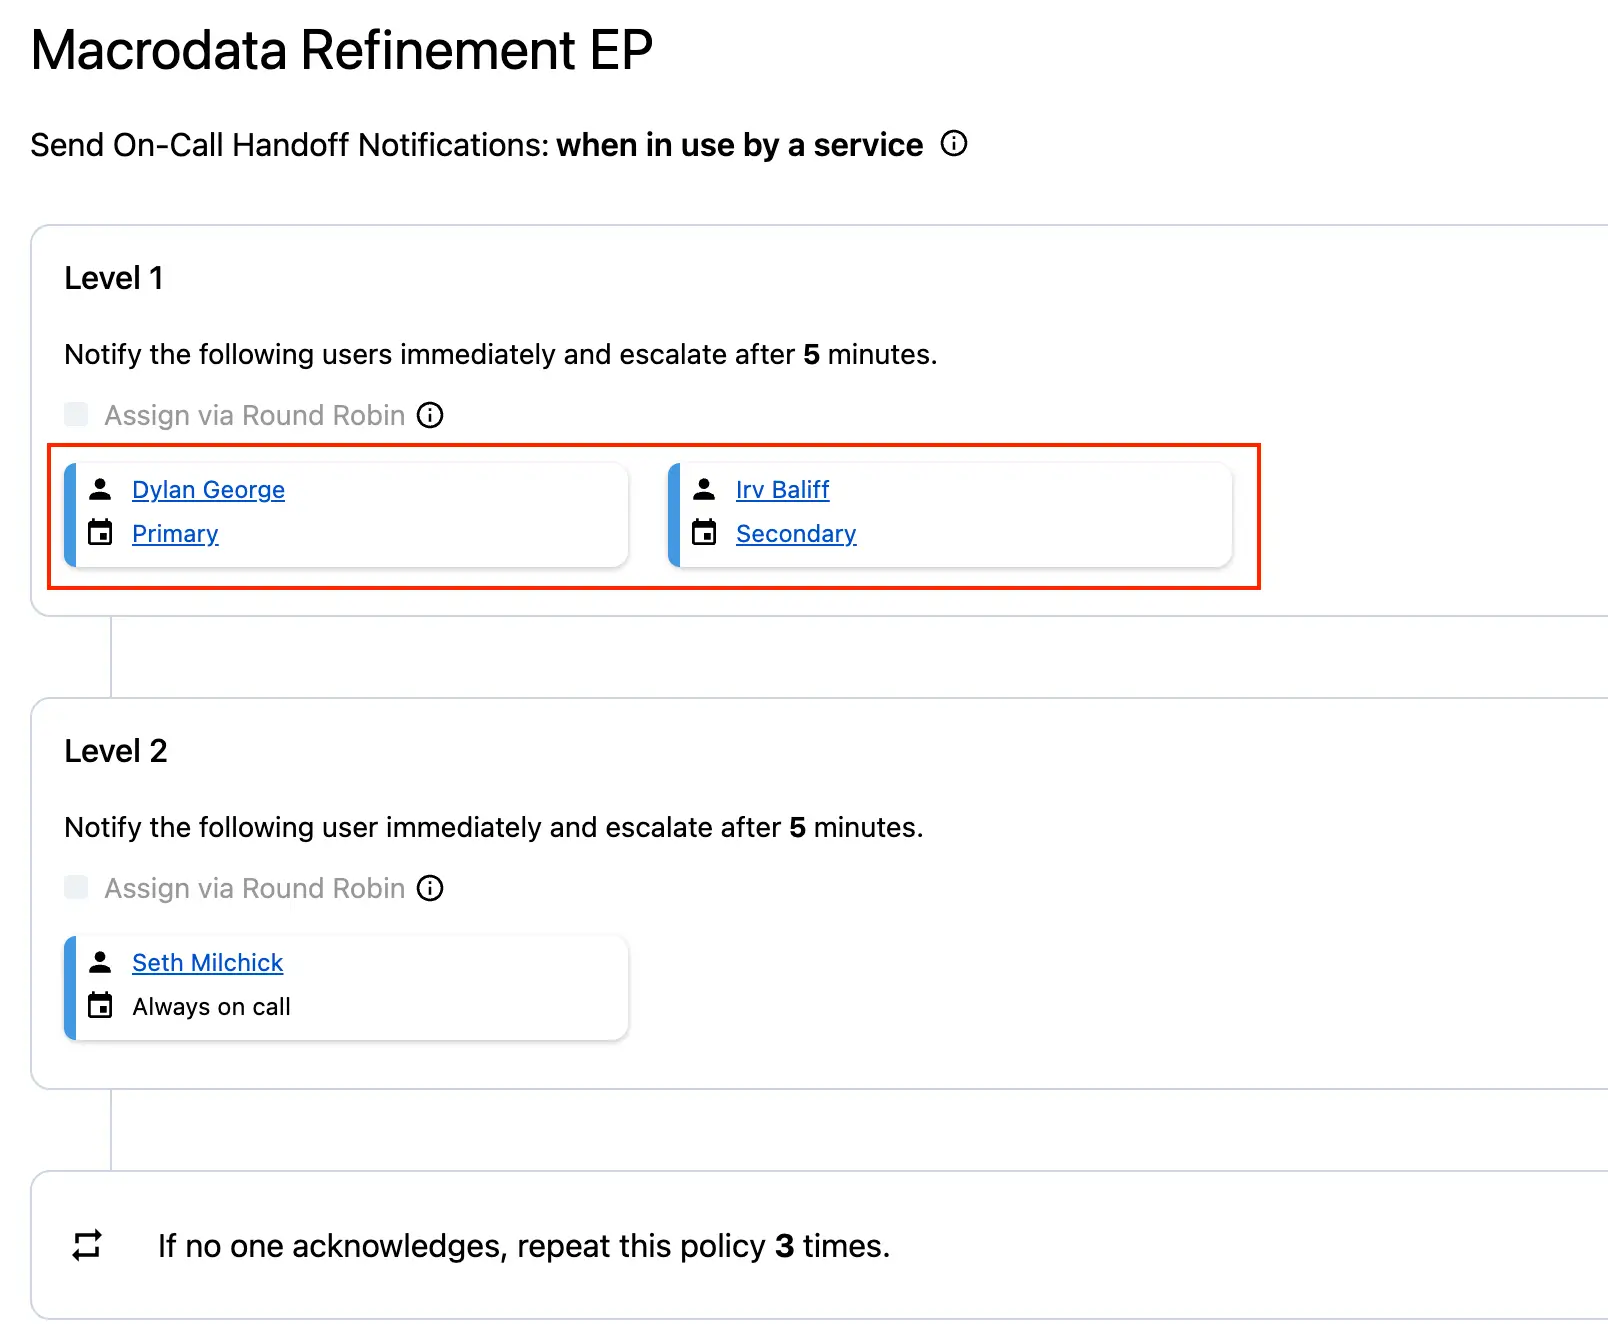
Primary and Secondary schedules at the same escalation level
Tip
You must have a minimum of five minutes between escalation levels if you have more than one person/schedule in an escalation level.
On-Call Shadowing
A common practice for new hires is to have them shadow the primary on-call responder, so they can gain experience before taking on responsibility for a service. You can achieve this by creating a dedicated shadow schedule, and placing it along side the primary on-call schedule on the escalation policy.
Create a Shadow Schedule with a Placeholder User
- In the PagerDuty web app, navigate to People Schedules and click New Schedule.
- Enter a Schedule Name (e.g., On-call Shadow), select a placeholder user in schedule Layer 1, and click Save Schedule.
Add the Shadow Schedule to your Escalation Policy
- Navigate to People Escalation Policies.
- Select your preferred escalation policy and click Edit Escalation Policy.
- Add the schedule you created in the previous step to the first escalation level and click Save.
Add the Shadowing User to the Shadow Schedule
- Add the shadowing user to the shadow schedule, either by adding them to the rotation or as an override for the appropriate amount of time.
Notify Multiple Users During Specific Times
In many cases, you will have a group of people on call during business hours and a different group of people on call after business hours, or different groups of people on call at various times of the day. The intended use of an escalation policy is to notify one person at a time, but you may have situations when you’d like to notify multiple people at the same time.
To notify multiple users at the same time, but only during specific times, you will want to:
- Create individual on-call schedules for each person.
- Add the schedules to the appropriate level of an escalation policy.
To demonstrate this, we'll use the following example:
- User 1 and User 2 are on call during business hours, Monday through Friday 0800 – 1700, and should be notified at the same time.
- User 3 and User 4 on call after business hours, Monday through Friday 1700 – 0800, and should be notified at the same time.
- User 5 and User 6 are on call during the weekend, Friday 1700 – Monday 0800, and should be notified at the same time.
Create Individual On-Call Schedules For Each Person
The first step is to create an on-call schedule for each user, reflecting their specific on-call times.
Let’s look at examples for each of the three shifts. Here is what User 1’s schedule would look like. User 1 is on call Monday through Friday from 0800 to 1700:
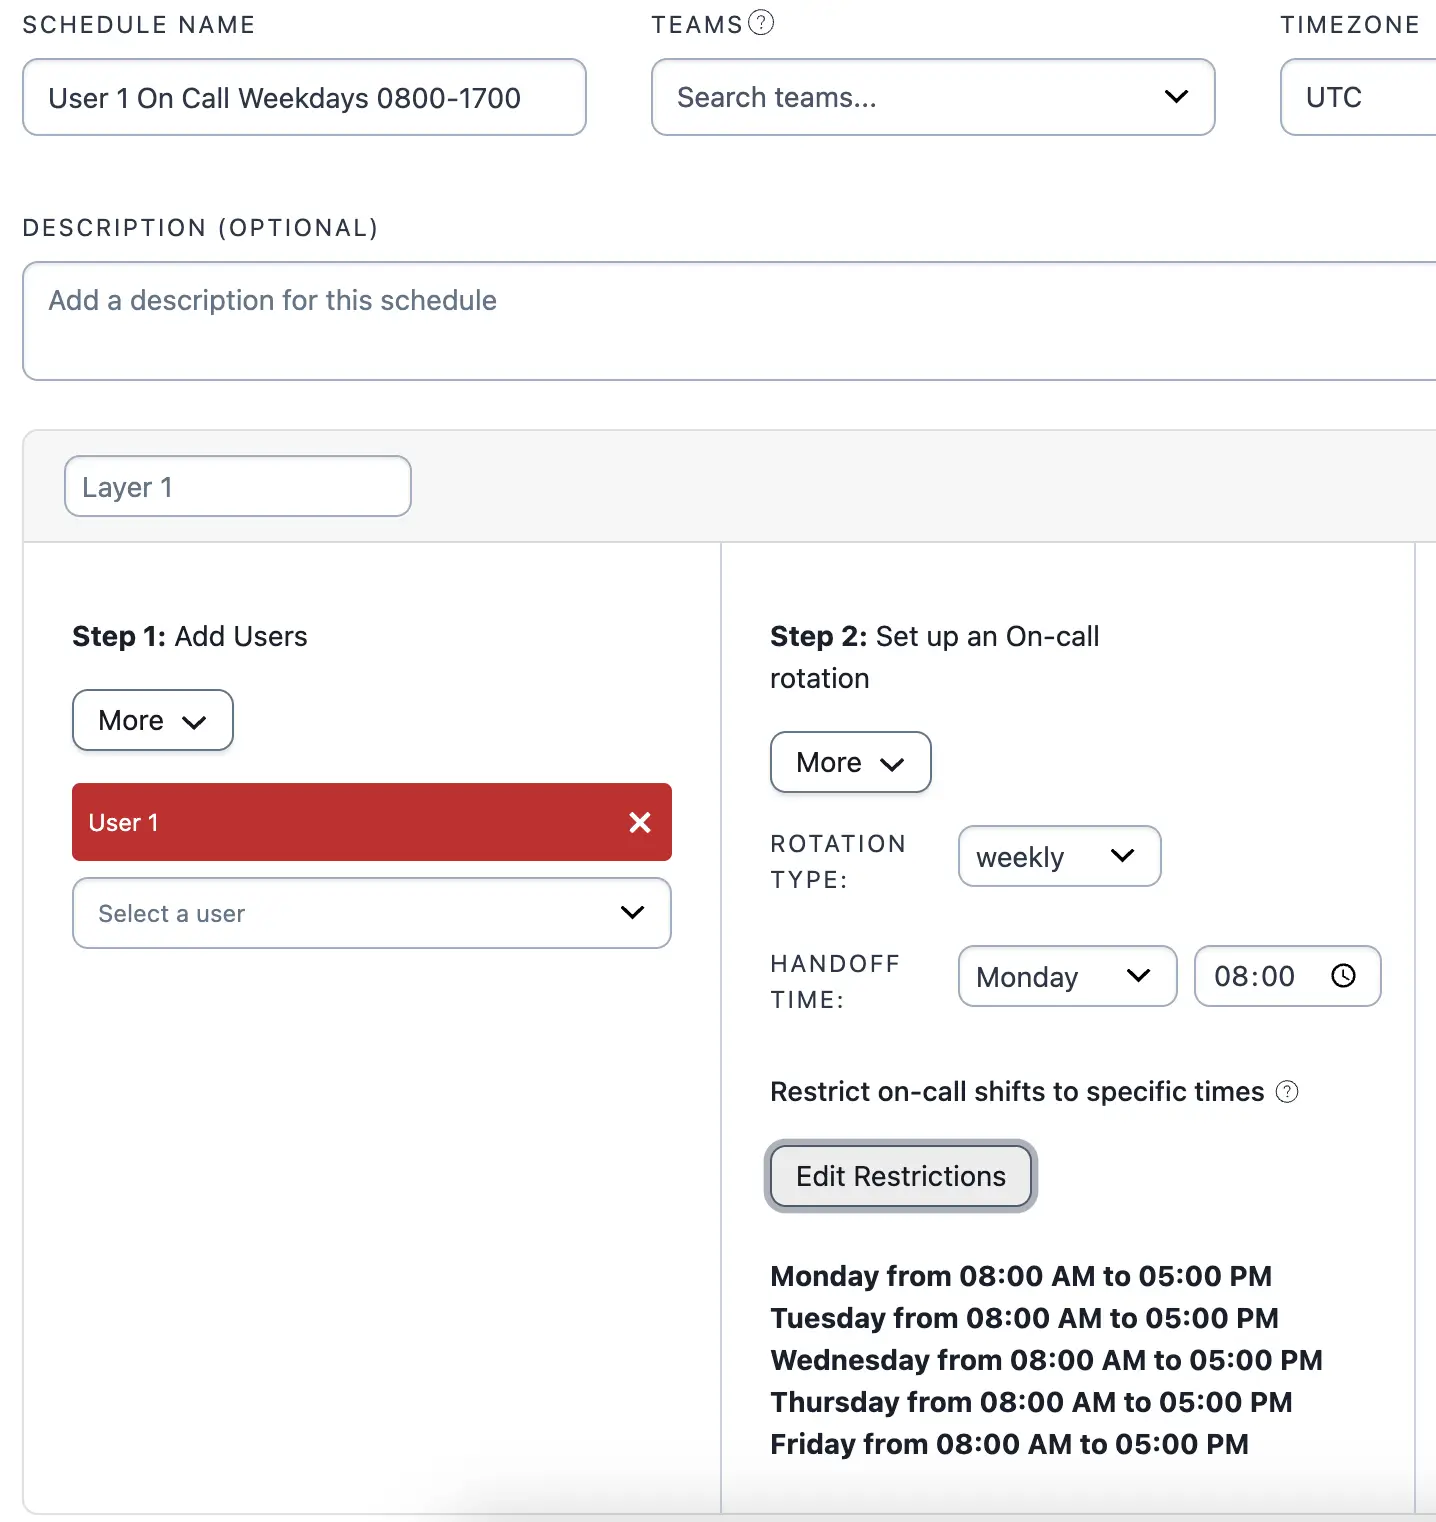
User 1's restricted weekday shifts
User 3 is on call during the week from 1700 to 0800:
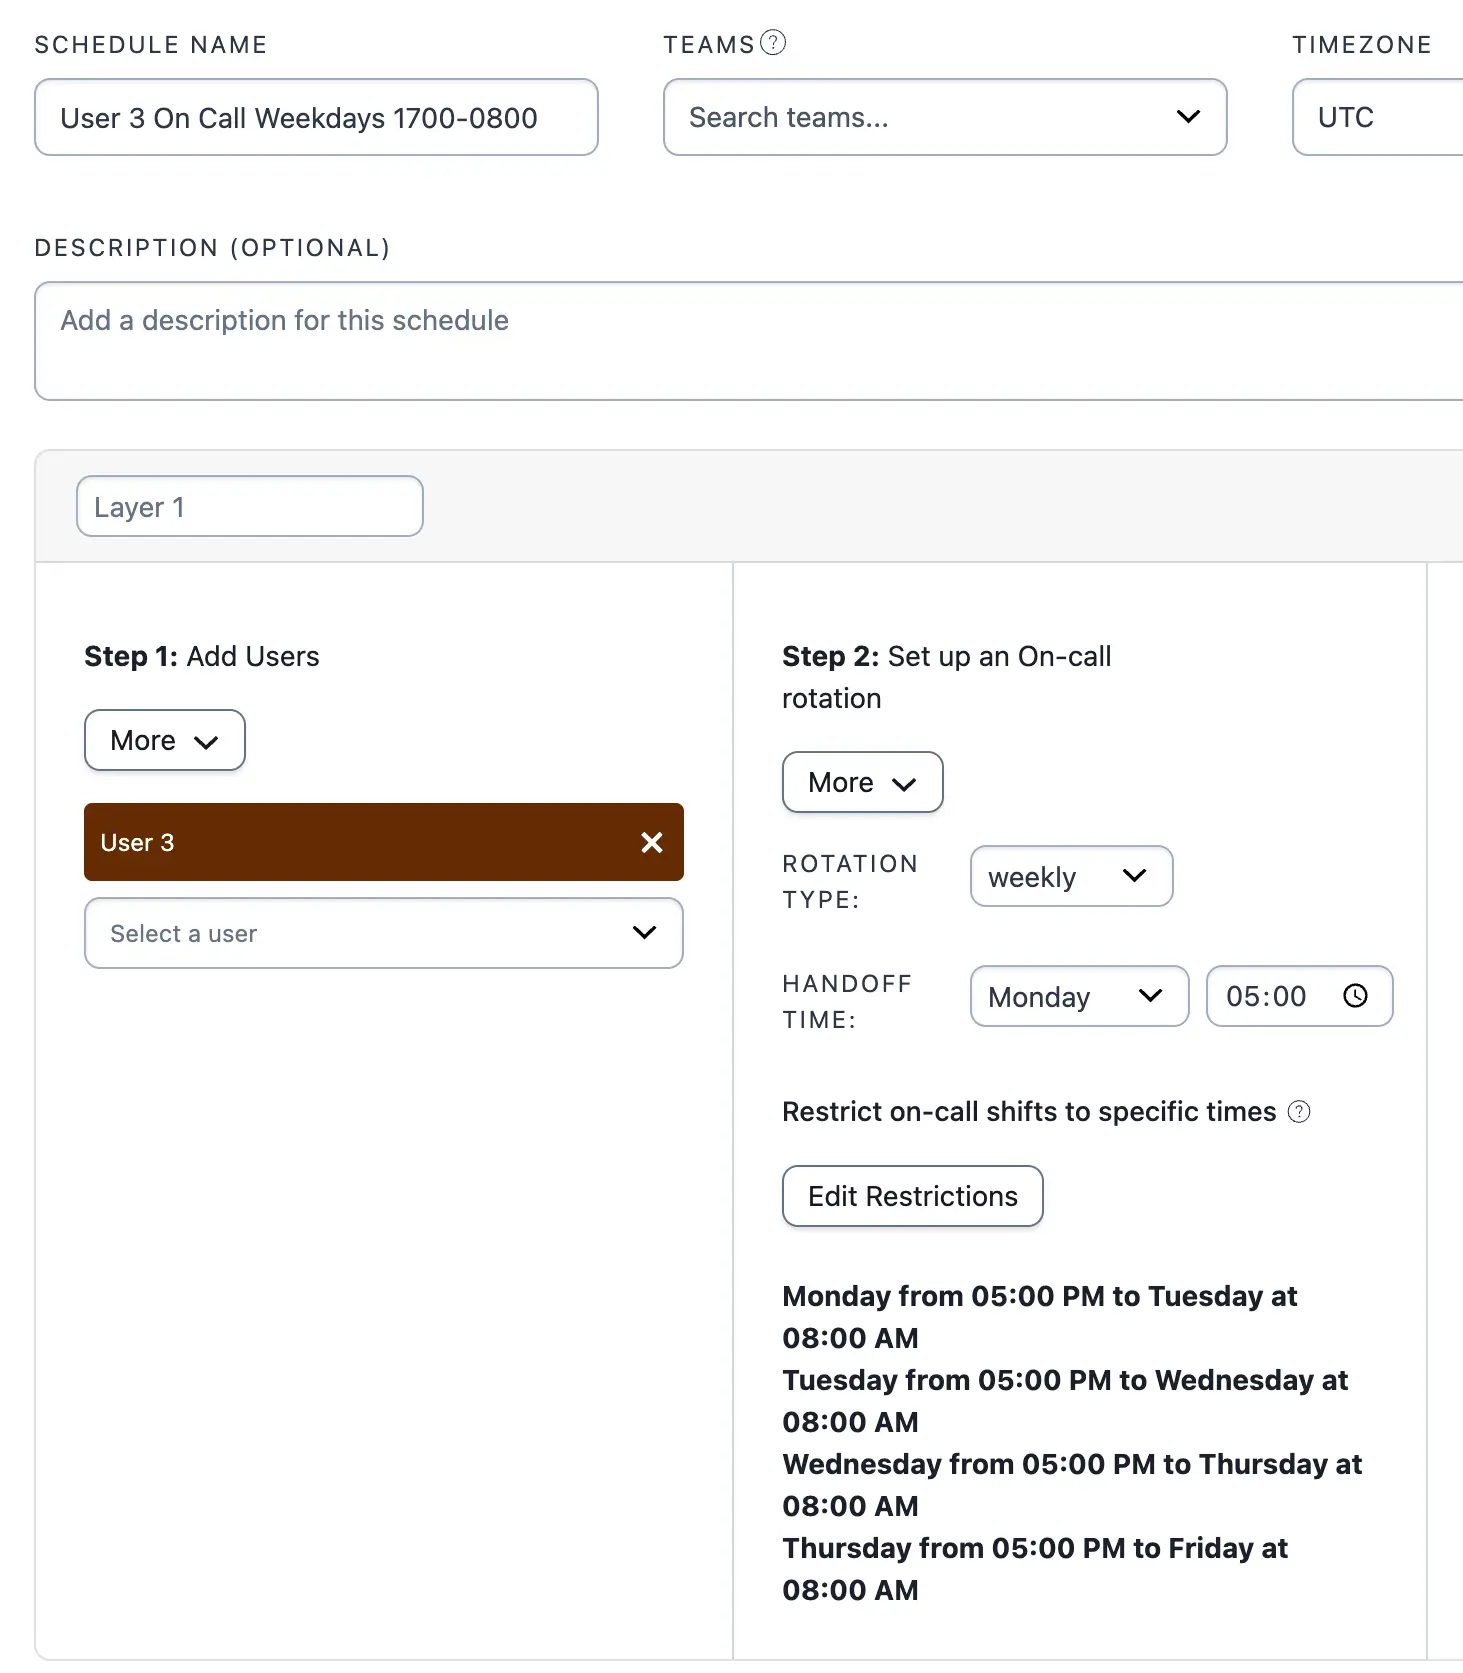
User 3's restricted weekday shifts
User 5 is on call over the weekend, from Friday 1700 to Monday 0800:
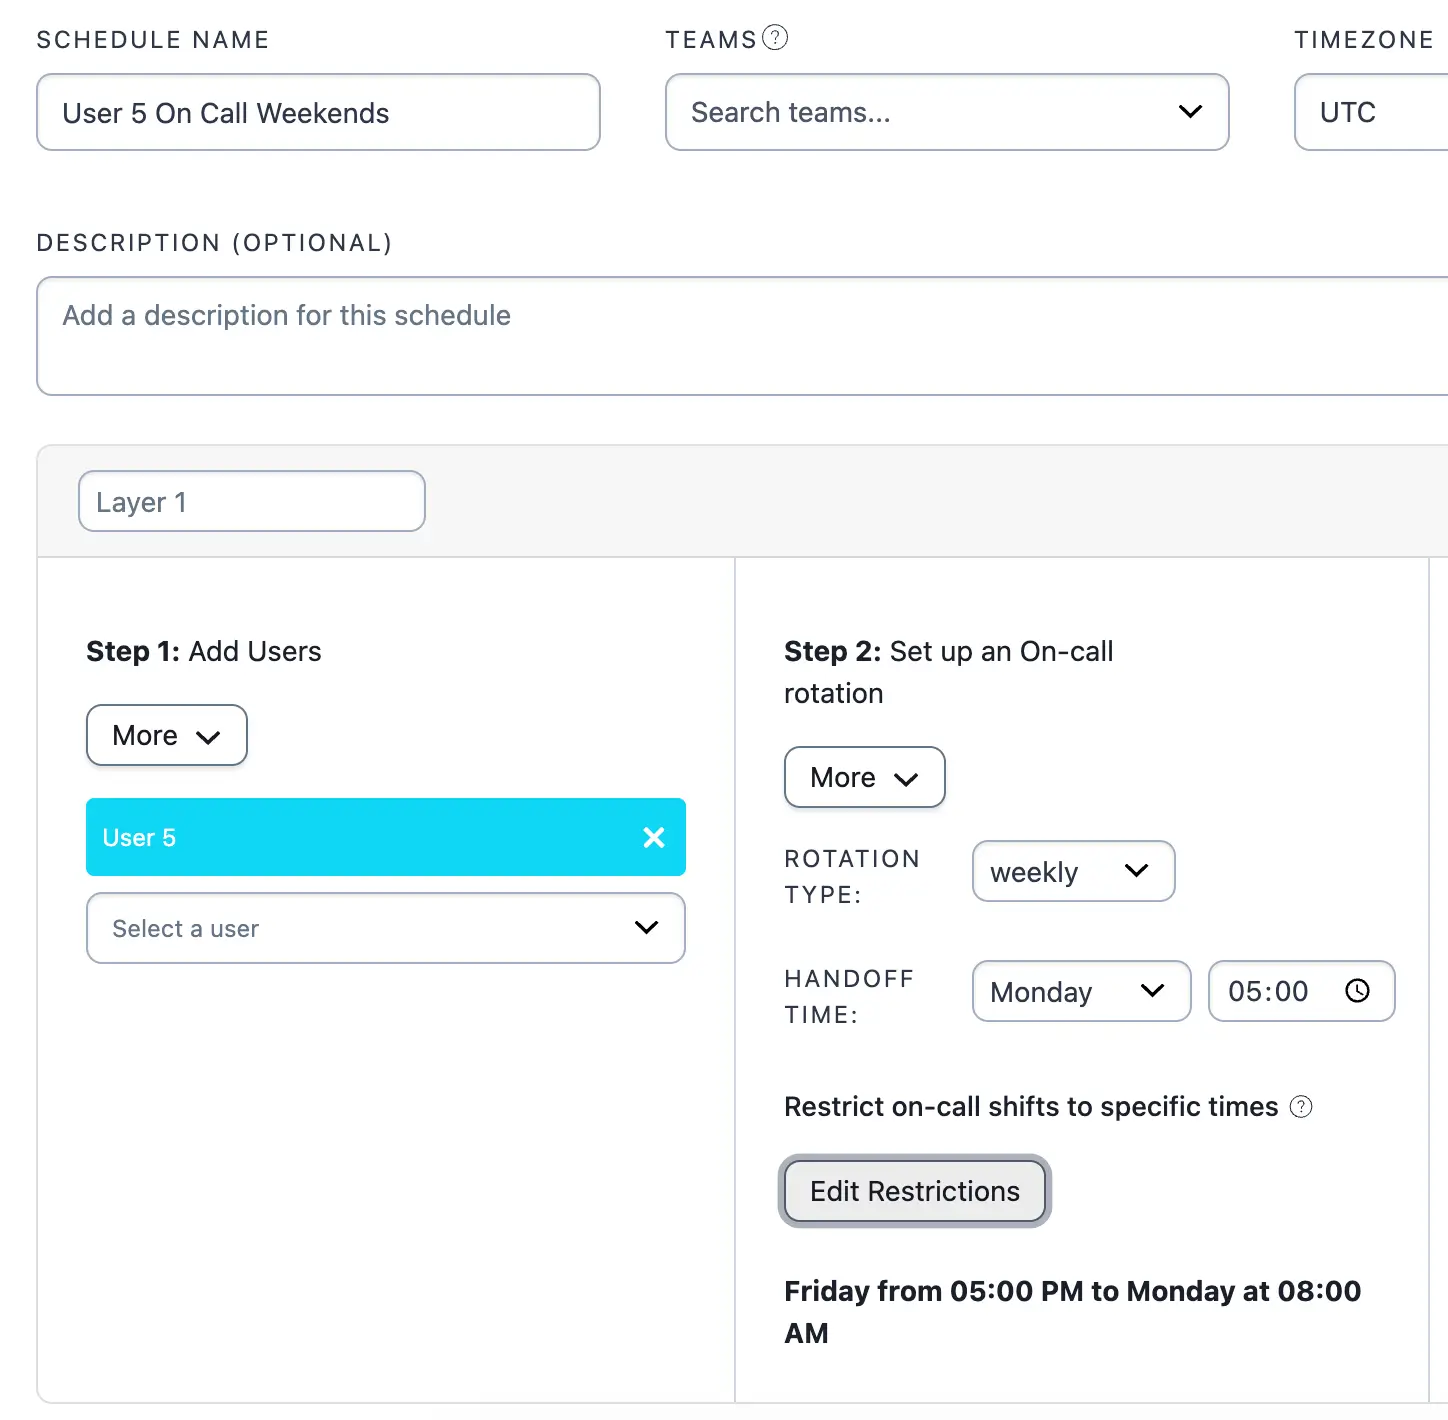
User 5's restricted weekend shift
Add Schedules to an Escalation Policy
Once you have created a schedule for each user, you can add them to an escalation policy.
The image below shows all six schedules in the first level of the escalation policy. With this configuration, if an incident triggers Monday through Friday between 0800 and 1700, User 1 and User 2 will be notified and assigned to the incident, since they are the only users who are on call at that escalation level during those times.
If an incident triggers Monday through Friday 1700 and 0800, User 3 and User 4 will both be assigned to the incident and notified, since they are the only users who are on call at that escalation level during those times.
On the weekends, Friday 1700 to Monday 0800, only User 5 and User 6 will be assigned to incidents and notified.
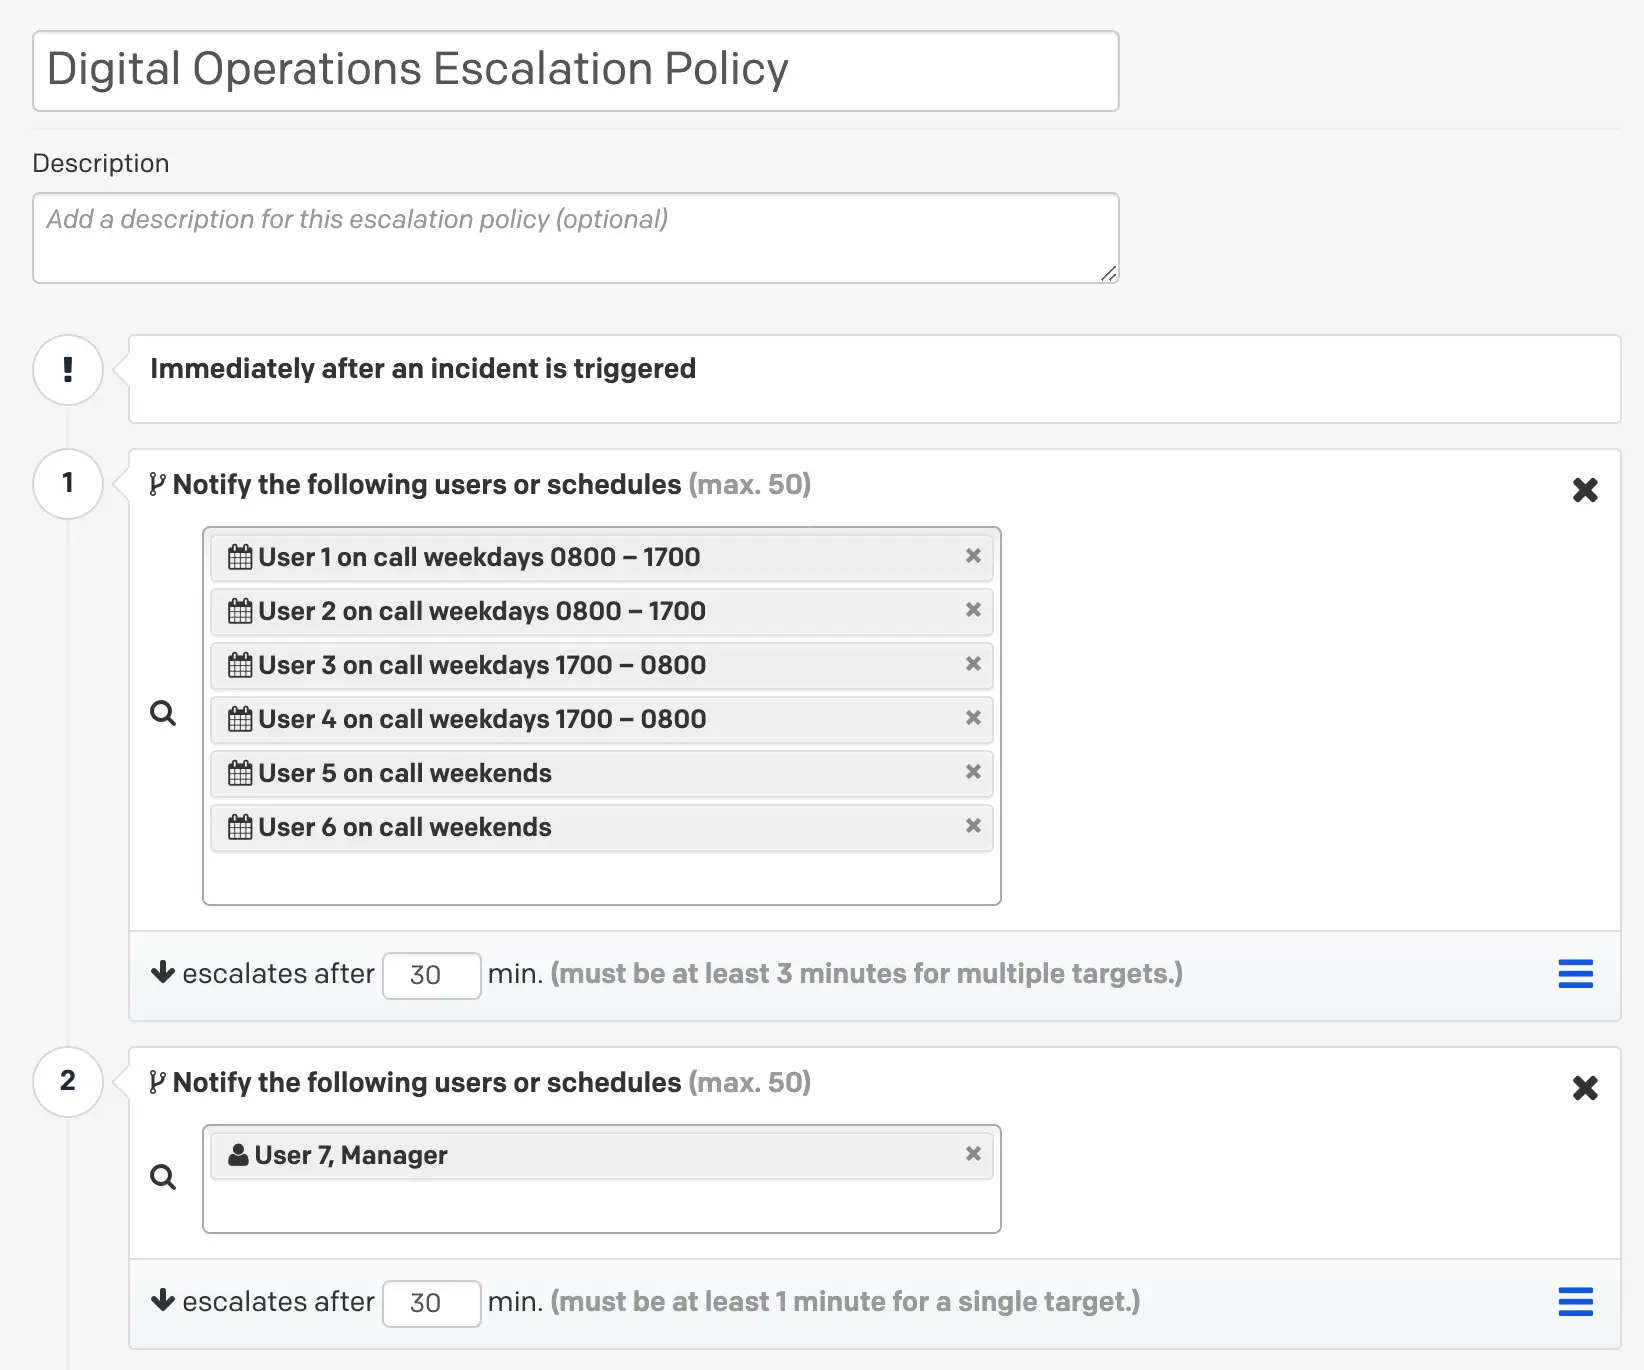
Schedules added to an escalation policy
In this example, we have set up our escalation policy so that if an incident is not acknowledged or resolved within 30 minutes, it will escalate to the team’s manager, User 7.
Schedule Layer Precedence
An important concept to grasp is that only one user per schedule can be on call. In other words, you cannot notify multiple users at once using a single schedule. With the goal of notifying multiple users at once, a natural first instinct would be to add multiple layers to a schedule — one layer for each on-call responder, for example. The way PagerDuty schedules work, however, is that the lowest layer on a schedule takes precedence over any others.
The following screenshot demonstrates what will happens when multiple schedule layers are stacked on top of each other, i.e., Layer 3 takes precedence over Layers 1 and 2:
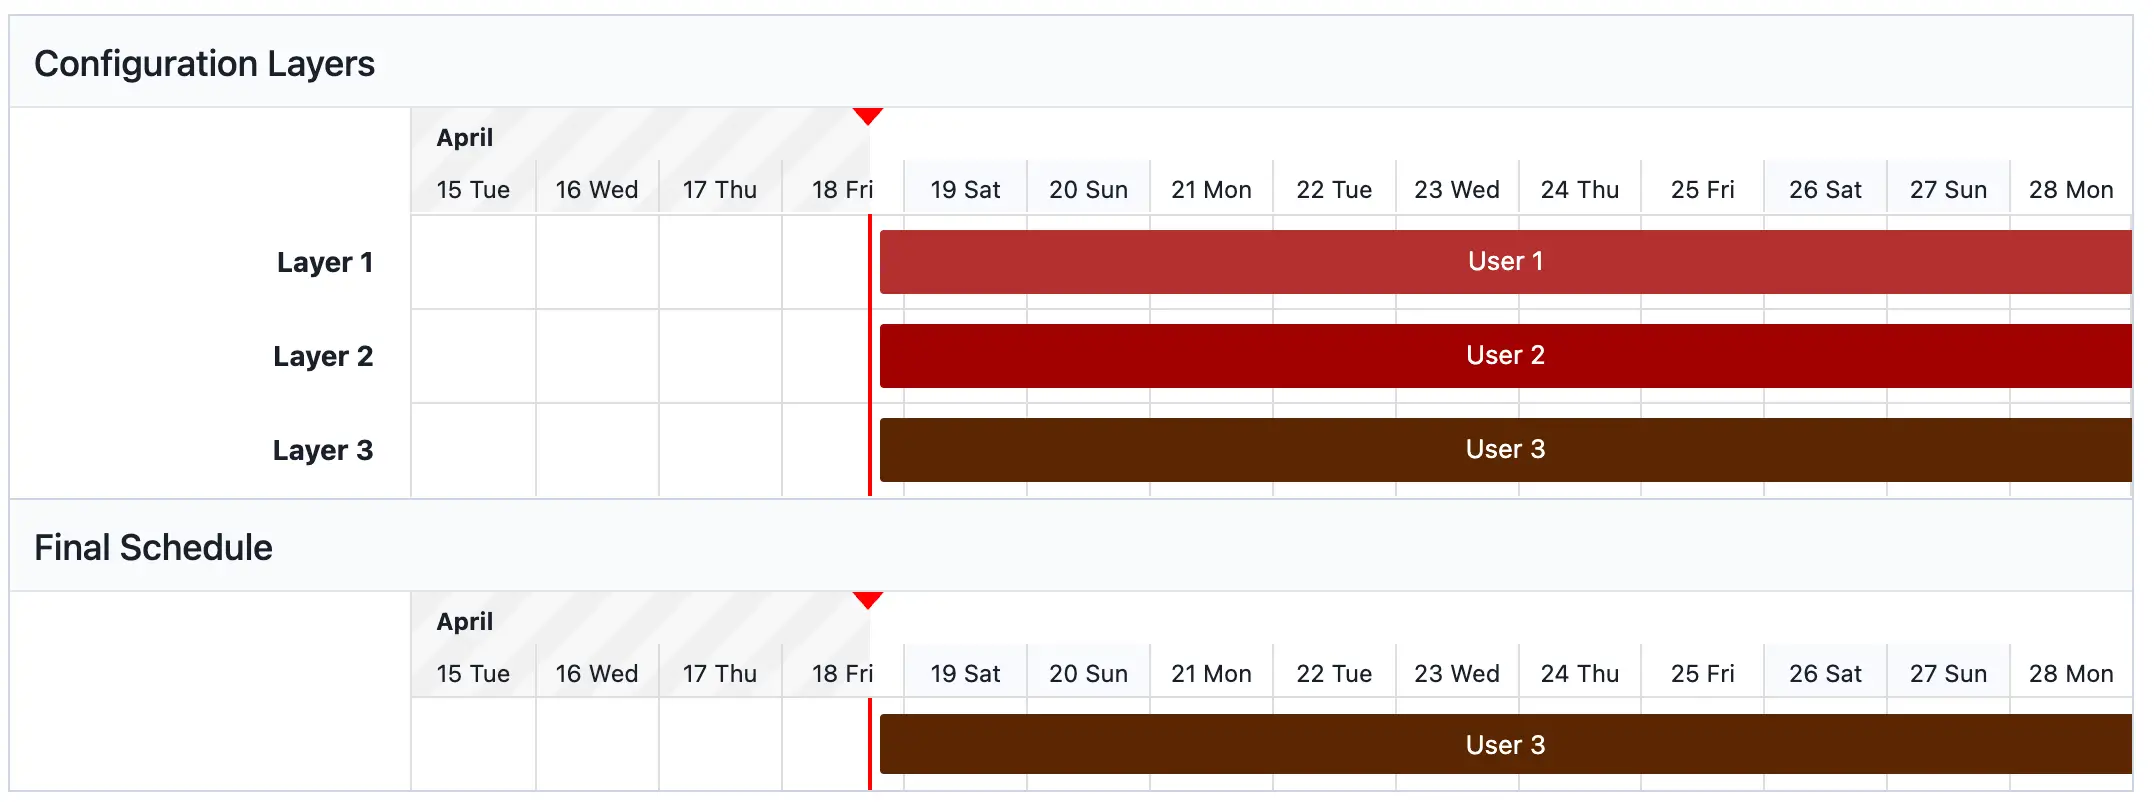
Bottom schedule layer precedence
With this in mind, adding multiple schedules and/or users to an escalation policy is the only way to notify multiple users at once.
Updated 8 months ago
