
Jira Cloud User Guide
Using the Jira Cloud integration after installation
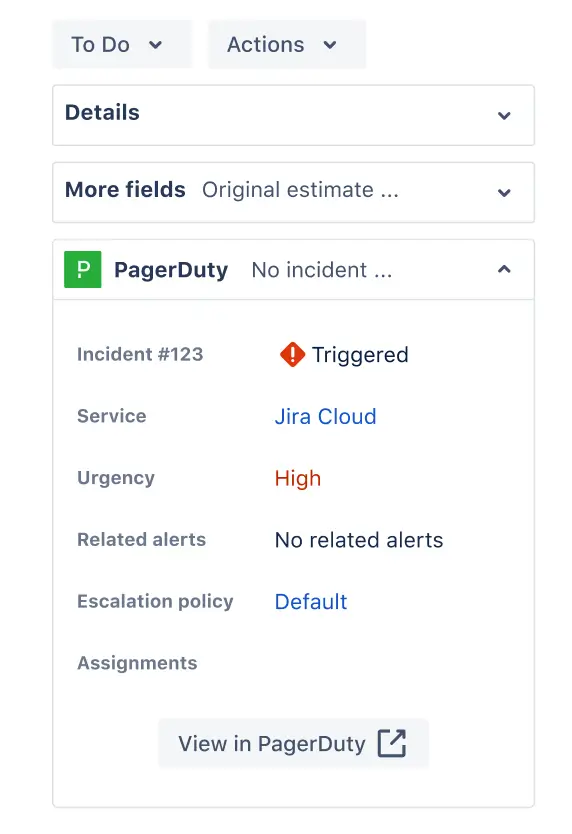
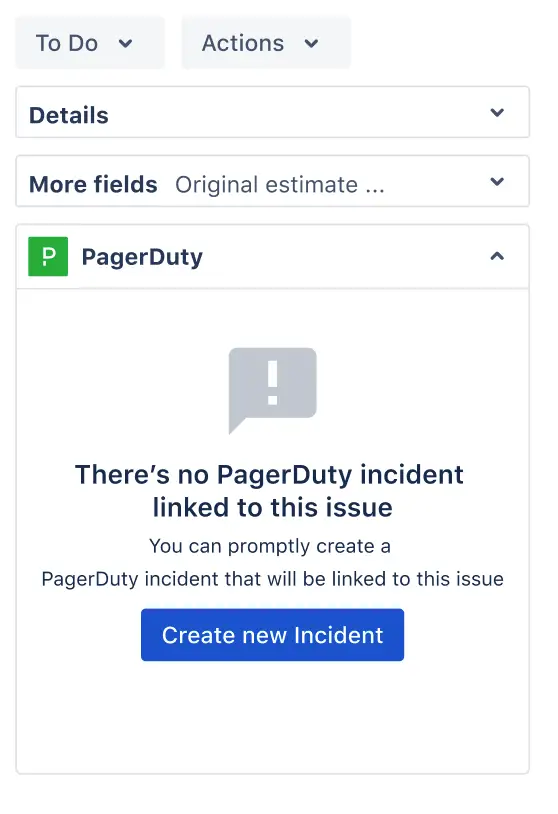
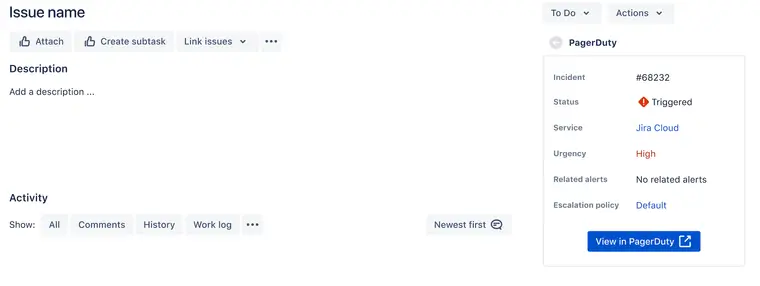
Jira Issue Sidebar
Required User PermissionsJira Project Admin role is required remove the PagerDuty widget from the sidebar in a specific Jira Project.
PagerDuty displays as a standalone application in the Jira issue sidebar. In the expanded pane, users are able to:
- View the linked incident in PagerDuty
- Manually trigger an incident for the Jira issue.
- If a PagerDuty incident is linked to the issue, the expanded application modal will also include the incident details.
The PagerDuty application may not be first in order in the sidebar (it may appear towards the middle or bottom). At this time, Atlassian does not have any features available which would allow users to modify the order of the widgets in the issue sidebar.
NoteBy default, PagerDuty will not display on the sidebar for all Jira projects. See Step 9 in the Jira Integration Guide to enable this feature.
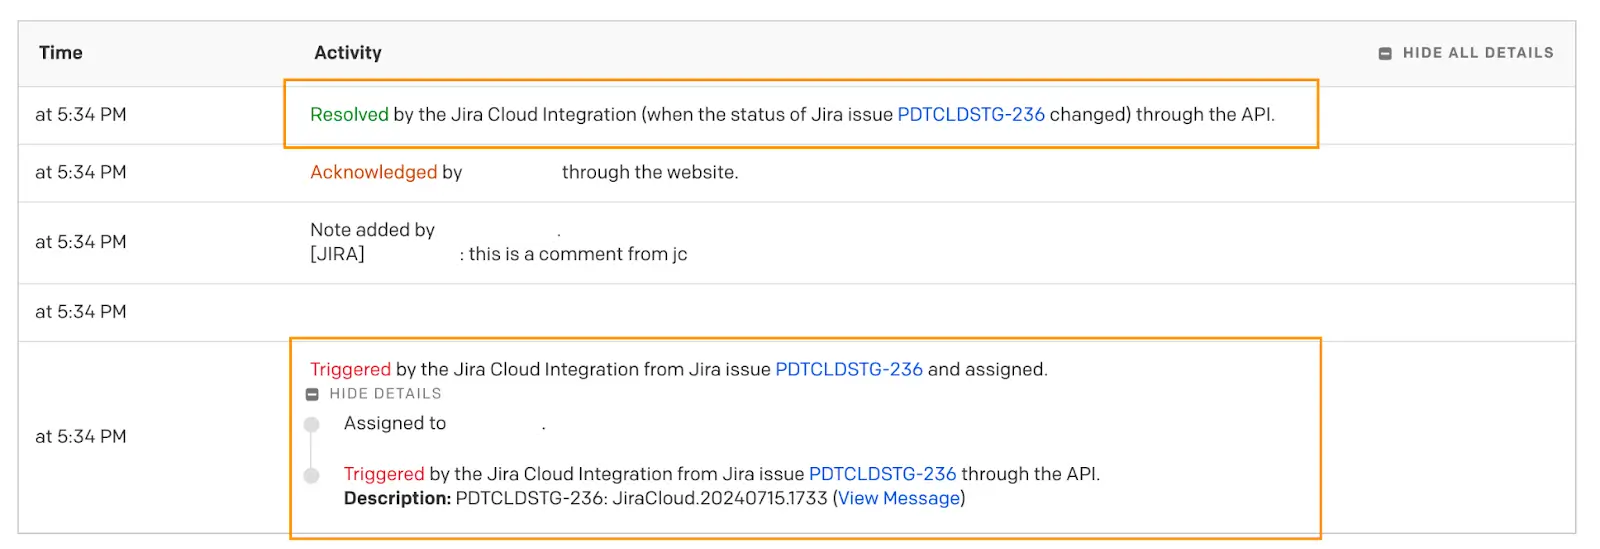
Sync Incident Notes and Jira Issue Comments
Create a Comment in Jira Cloud:
- In Jira Cloud: The comment associates to the Jira user who posted the comment.
- In PagerDuty: The incident timeline will show the following:
Note added by [Integration Actor]. [Jira] [Jira User]: [Comment]
Create an Incident Note in PagerDuty:
- In PagerDuty: The incident note associates to the PagerDuty user who created the incident note.
- In Jira Cloud: The comment record will showing the following:
PagerDuty [PagerDuty User]: [Incident Note]
Create a Jira Issue From a PagerDuty Incident
If you configured your Jira Cloud integration to create issues manually:
- Create a PagerDuty incident, or click an open incident’s Title to view its details page.
- Click the More dropdown and select Create Jira Issue.
- You then will see a confirmation dialog appear with a link to view the Jira issue. You may also view the Jira issue any time by clicking More and selecting View Jira Issue.
If you configured your Jira Cloud integration to create issues automatically:
- Create a PagerDuty incident.
- In your Jira Cloud instance, an issue will automatically generate.
Create a PagerDuty Incident From a Jira Issue
If you configured your Jira Cloud integration to create incidents manually:
- Create a Jira issue, or click an issue’s Title to view its details page.
- In the right panel, click PagerDuty Incident. The Incident Title will auto-populate the issue’s title. You may enter an optional description. Click Create New Incident. Note: You may need to scroll down to view the Create New Incident button.
- You will then see the incident’s details within the Jira issue. You may view the incident in PagerDuty by clicking View in PagerDuty.
If you configured your integration to create PagerDuty incidents based on issues matching a JQL statement:
- Create or update a Jira issue that matches the preconfigured JQL statement.
- In your PagerDuty instance, an incident will automatically trigger.
Integration Actor
Required User PermissionsThe Integration Actor must have a base role of Responder or higher. Changing the Jira Integration Actor requires a base role of Manager or higher.
When the integration triggers, updates, or resolves a PagerDuty incident, these actions perform on behalf of a PagerDuty user with a base role of Responder or higher. This user is the Integration Actor. The Integration Actor allows the integration to sync Jira actions back to PagerDuty via webhooks.
Edit the Integration Actor
By default, the Integration Actor is the PagerDuty Account Owner, but you can modify this from the Jira Cloud Integration page:
- In PagerDuty, navigate to Integrations Your Integrations Jira Cloud.
- Click the menu in the upper right and select Edit Jira Integration Actor.
- In the modal that appears, select a new Integration Actor from the dropdown and click Save.
When you delete an Integration Actor from PagerDuty, the PagerDuty Account Owner will automatically become the new Integration Actor, since they are the default user.
Incident Timeline
Incident actions invoked on behalf of the Integration Actor – e.g. trigger, resolve, update priority – attribute to the Jira Cloud Integration on the incident timeline. The timeline record will indicate that these actions originated from Jira, and will also include the Jira Issue link.
When an issue comment syncs to PagerDuty, the timeline record will start with [Jira] to denote the origin. The timeline record will also include the name of the Jira user who posted the issue comment.
If you want the note record to show that it was ‘added by PagerDuty Integration’ instead:
- In PagerDuty, create a user named ‘PagerDuty Integration’.
- Designate ‘PagerDuty Integration’ as the Integration Actor.
Jira Cloud Incident Workflow Action
Configure Incident Workflow ActionsThe following sections detail the capabilities of the Jira Cloud: Create an Issue for an Incident workflow action. For more information on how to configure this workflow action, please see our Incident Workflows article.
Requirements
- The Jira Cloud Incident Workflow Action is available on our Professional, Business and Enterprise pricing plans.
- PagerDuty Account Owners and Global Admins can create and edit all Incident Workflows. Other users can edit workflows and triggers for services where they have Manager access.
Create a Jira Issue With an Incident Workflow
In alignment with the conditional workflow trigger, the action to create a Jira Cloud issue will initiate using the data provided in the workflow configuration form.
The integration will validate the connection between Jira Cloud and PagerDuty, in addition to the following Jira Cloud information:
- Jira Cloud project
- Jira Cloud issue type
- Jira Cloud issue fields
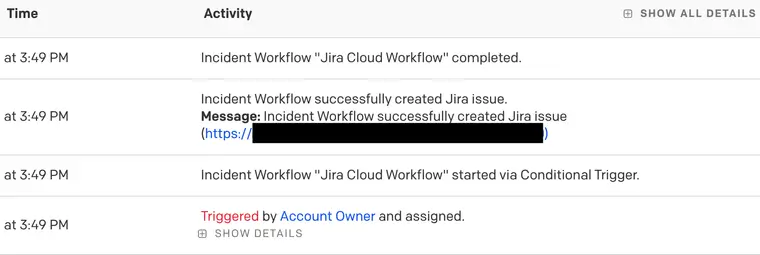
It then sends an API request to create a Jira issue in accordance with the data provided in the workflow configuration form. Following a successful request, the integration will create a new issue in the associated project (created in the Open state).
No Synchronization of Data
There is no synchronization of data between the linked Jira issue and the PagerDuty incident, thus maintaining the intended separation between these two processes. Updates to the Jira issue will not cause a corresponding change to the PagerDuty incident, and updates to the PagerDuty incident will not cause a corresponding change to the Jira issue.
The linked Jira issue functions as a snapshot, capturing the PagerDuty incident state as it was when the Jira issue was created.
After the Workflow Executes
LimitThere is a maximum of 50 linked issues across all integrated applications.
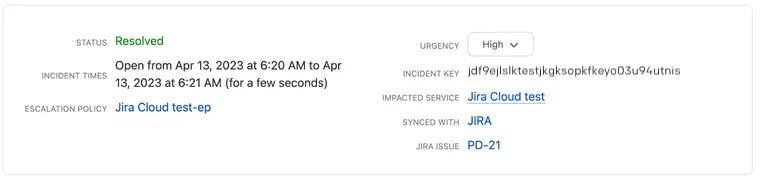
- The Jira issue link will display on the incident details page in PagerDuty as an external reference (Linked Records) field.
- A workflow log entry will appear on the incident timeline, indicating the workflow and issue creation status.
- The linked Jira issue will include a snapshot of the PagerDuty incident details, along with the incident link. Users can reference this information in the PagerDuty sidebar.
Example
Supported Jira Fields and Data Types
The currently supported data types for a workflow action:
- text
- integer
- decimal
- date
- dateTime
- boolean
- singleChoice
- multipleChoice
- json
- connection
- trigger
The workflow action supports both standard and custom Jira fields. Users can send any value accessible from the configuration form to Jira. Once the user selects a Jira field, the dropdown menu will display all of the compatible PagerDuty fields.
Field Mapping
Mapping PagerDuty fields to Jira issue fields:
- PagerDuty text → Jira short text, paragraph (but no rich editor support), label
- PagerDuty integer → Jira integer
- PagerDuty URL → Jira URL
- PagerDuty multi-select → Jira checkbox
- PagerDuty single-select → Jira radio button, select list (single choice)
- PagerDuty datetime → Jira date time picker
- PagerDuty assignee → Jira assignee (user picker)
Separate the Workflow Action From Existing Jira Cloud Configurations
As part of the integration walkthrough, users define the configuration rules between their Jira projects and PagerDuty services. This section highlights the separation between configuration rules and workflow actions, which are two separate and distinct processes.
Execute the Jira Workflow Without Configuration Rules
When executing the workflow manually or automatically, if there are no configuration rules defined between the PagerDuty service and Jira project:
- In PagerDuty: The workflow will create a Jira issue and add the link to the Linked Records field.
- In Jira: The PagerDuty sidebar includes the incident link, as well as a snapshot of the incident state at the time of issue creation.
- No Synchronization: Updates to the PagerDuty incident will not cause a corresponding change to the linked Jira issue. Updates to the linked Jira issue will not cause a corresponding change to the PagerDuty incident.
Execute the Jira Workflow with Configuration Rules Defined
When executing the workflow manually or automatically, if there are existing configuration rules defined between the PagerDuty service and Jira project:
Jira Issue Created by Configuration Rules
- In PagerDuty: The configuration rule will create a separate issue, and link the issue in the Jira Issue field.
- In Jira: The PagerDuty sidebar will include the Incident link and incident details.
- Synchronization: Updates to the Jira issue will result in a corresponding change to the PagerDuty incident. Updates to the PagerDuty incident will result in a corresponding change to the Jira issue.
- Workflow actions do not affect the issue: This is a separate issue, so workflow actions will not apply.
Jira Issue Created by the Workflow
- In PagerDuty: The workflow will create a separate Jira issue, and link the issue in the Linked Records field.
- In Jira: The PagerDuty sidebar will include the incident link, as well as a snapshot of the incident state at the time of issue creation.
- No Synchronization: Updates to the PagerDuty incident will not cause a corresponding change to the linked Jira issue. Updates to the linked Jira issue will not cause a corresponding change to the PagerDuty incident.
- Configuration rules do not affect the issue: This is a separate issue, so configuration rules will not apply.
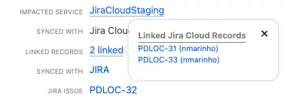
Linked Records field for an incident
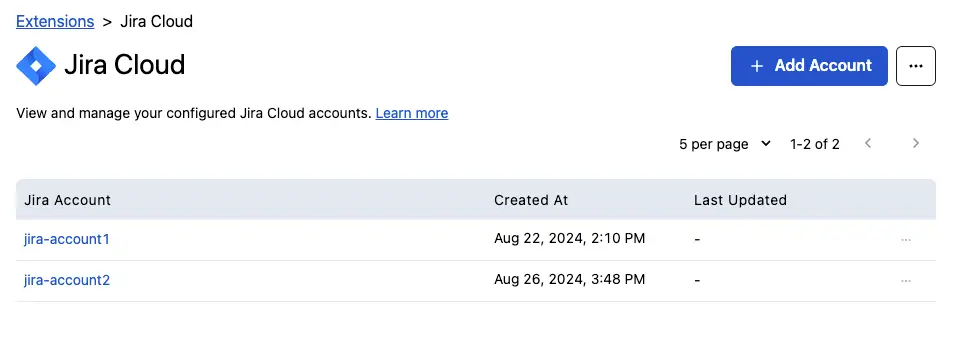
Add Multiple Jira Accounts to one PagerDuty Account
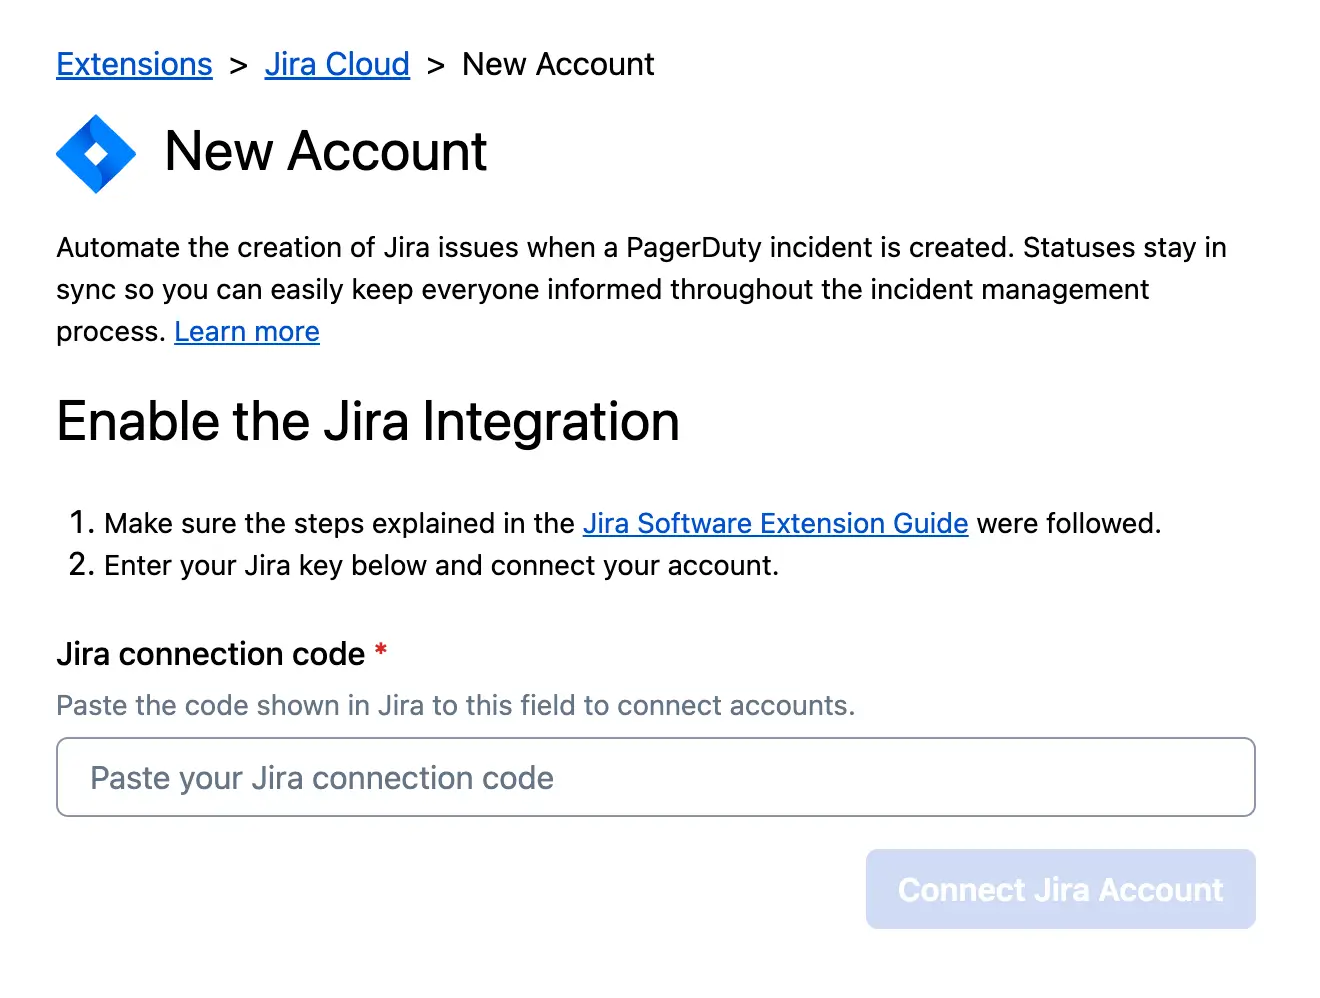
You can add multiple Jira accounts by following these steps:
-
Go to Integrations Jira Cloud and click Add Account.
-
On the next page, paste the Jira connection code and then click Connect Jira Account.
-
You should then see the newly added account in the accounts list.
Disconnect a Jira Account
WarningDisconnecting an account will remove all of its configurations and it cannot be restored.
Required User PermissionsYou must have an Account Owner, Global Admin, or Manager base role to remove a configuration.
Disconnecting a Jira account removes the connection between the PagerDuty service and the associated Jira project and issue type. Disconnecting a single account will not cause all of the other accounts to be deleted.
To disconnect a Jira account:
- In the PagerDuty web app, navigate to Integrations Jira Cloud.
- Locate the account you would like to remove, and click the menu to the right.
- Select Disconnect Account.
- A confirmation dialog will appear. Click Disconnect to disconnect the account.
- If you need to re-connect the account, please follow the steps to Add an Account above.
-
- If you want to disconnect the account permanently: Follow the prompt to uninstall the PagerDuty app in Jira.
- If you want to change the PagerDuty account linked to Jira: You do not need to uninstall the app; you can simply re-configure the app by getting a new token and paste it in the PagerDuty Jira account configuration.
Uninstall the Jira Cloud Integration
WarningBy uninstalling the Jira Cloud Integration you will remove all of the configurations. Please be aware that this action cannot be undone, and PagerDuty Support is unable to restore these configurations after the integration has been deleted.
Uninstall the Jira Cloud Integration in PagerDuty
Required User PermissionsYou must have an Account Owner or Global Admin base role to uninstall the Jira Cloud integration.
- In the PagerDuty web app, navigate to Integrations Jira Cloud.
- Before uninstalling, you will first need to disconnect all Jira accounts.
- Once your Jira accounts have been disconnected, click the menu in the top right corner, and select Disconnect Jira Cloud Integration. Note: This option will be greyed out if you have not disconnected your Jira accounts in the previous step.
- A confirmation dialog will appear. Select Disconnect.
Uninstall the PagerDuty Application in Jira Cloud
Required User PermissionsYou must have Jira Admin permissions to uninstall the PagerDuty application in Jira Cloud.
- In Jira Cloud, navigate to Manage Apps.
- Locate the PagerDuty app and click Uninstall.
FAQ
Please read Jira Cloud Integration FAQ for answers to common questions.
Updated 4 months ago