Schedule Basics
Create a basic on-call schedule and learn foundational concepts for more complex schedules
On-call schedules are used to map out your coverage needs, and determine who will be notified when an incident is triggered. Only one user per schedule can be on-call at a time, and when an incident is impacting a service, notifications are sent to that user on the service's associated escalation policy.
Create a Schedule
Basic schedules are most often comprised of a single schedule layer, where you’ll add users on a daily or weekly rotation. You can use layers to organize shifts visually, so that you can tell at a glance what days and hours a shift covers. Note: Free plans are limited to one schedule.
Required User Permissions
Users with the following roles can create, edit and delete on-call schedules:
- User
- Manager base roles and team roles.
- Manager team roles can only manage schedules associated with their team.
- Admin/Global Admin
- Account Owner
To create a new schedule in the web app:
-
Navigate to People Schedules and click New Schedule.
-
Enter a Schedule Name (required) and an optional Description. If your account has Advanced Permissions you may optionally assign the schedule to a Team using the Teams dropdown.
- Note: Emojis are supported in both the Schedule Name and Description fields, however schedule names are limited to 255 characters and descriptions are limited to 1024 characters.
-
Review the Time Zone.
- The time zone is set to the account-level time zone by default. You may use the dropdown to change the time zone, if desired.
-
Step 1: Add Users: In the Select a User dropdown, select all of the users you’d like to add to the rotation. Users rotate through their on-call responsibilities from top to bottom. You can drag and drop users to adjust their on-call order.
- If someone does not appear in the dropdown, Admin users or higher can select Invite your team to PagerDuty to add users to your account.
Required User Permissions
All users, with the exception of Limited and Full Stakeholders, can be added to schedules.
If you're not sure what role you have, or if you need your permissions adjusted, visit our sections on Check Your User Role or Edit User Roles.
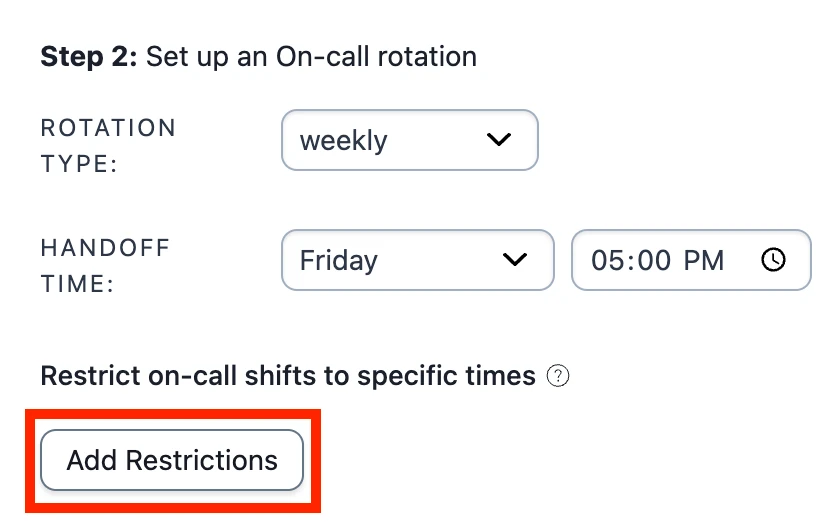
- Step 2: Set Up an On-Call Rotation: In the Rotation type dropdown, select daily, weekly or custom.
- This value determines how frequently the users from Step 1 change on-call responsibilities.
- For custom rotation types, enter a value for Shift length and then select hours, days or weeks.
- Select a Handoff time via the time picker to determine specifically when responsibilities should rotate.
- Optional: Configure the schedule to Restrict on-call shifts to specific times.
- Please see the section on schedule restrictions for more information.
- Step 3: Start Time for This Layer: The Start time for this layer is automatically populated from the information in Step 2, however you can optionally change it so that it takes effect at a future date and time.
Final Schedule
In some cases, such as when updating handoff times or setting a future start date for a schedule layer, the user order may differ between the schedule layer and the final schedule, in order to preserve the rotation order. Please refer to the Final Schedule section at the bottom of the page for a preview of what the schedule will look like after saving changes.
- Review the Final Schedule section at the bottom of the page and click Save Schedule.
- Note: A schedule must have at least one layer before you can save it, i.e., you cannot save a schedule with no layers.
Connect a Schedule to a Service
Important: You will need to connect the schedule to a service via an escalation policy. After associating a schedule with an escalation policy, on-call users can be notified about incidents on any service(s) that use the escalation policy. If you do not add your schedule to an escalation policy, incident notifications will not be sent to users on-call on the schedule.
Once you have created an escalation policy, follow the instructions in Connect a Schedule to a Service via Escalation Policy.
Edit a Schedule
Please review our Edit Schedules article for more information.
Delete a Schedule
Warning
- Deleting a schedule is permanent and it cannot be restored afterwards.
- If you would instead like to deactivate a schedule, please see Pause or Deactivate an On-Call Schedule.
- Go to People Schedules and select a schedule.
- From the actions on the right, select Delete this Schedule.
- Confirm your selection in the dialog window.
Optional Schedule Components
Depending on your organization’s needs, you may find these features helpful when developing your PagerDuty schedules.
Schedule Layers
A schedule layer consists of a group of people who will rotate on-call responsibilities through the same shift. In a basic weekly schedule, you create a single layer where each member is on-call for one week, with a set day and time for transferring on-call responsibility. A schedule layer is also the foundation for more complex schedules that you can tailor to your team’s needs. Schedule layers are expandable and collapsible to help save screen space while you are creating or editing a schedule.
PagerDuty’s schedule builder enables you to create multiple layers for one schedule. This feature can be useful for international companies that need to create a follow-the-sun schedule, where each time zone can be grouped as a layer.
Schedule Layer Limit
Schedules can contain a maximum of 60 layers.
Schedule Layer Precedence
When a schedule has multiple layers, the last layer created (the bottom layer on the schedule creation page) has precedence over any previous layers. The example below illustrates this:
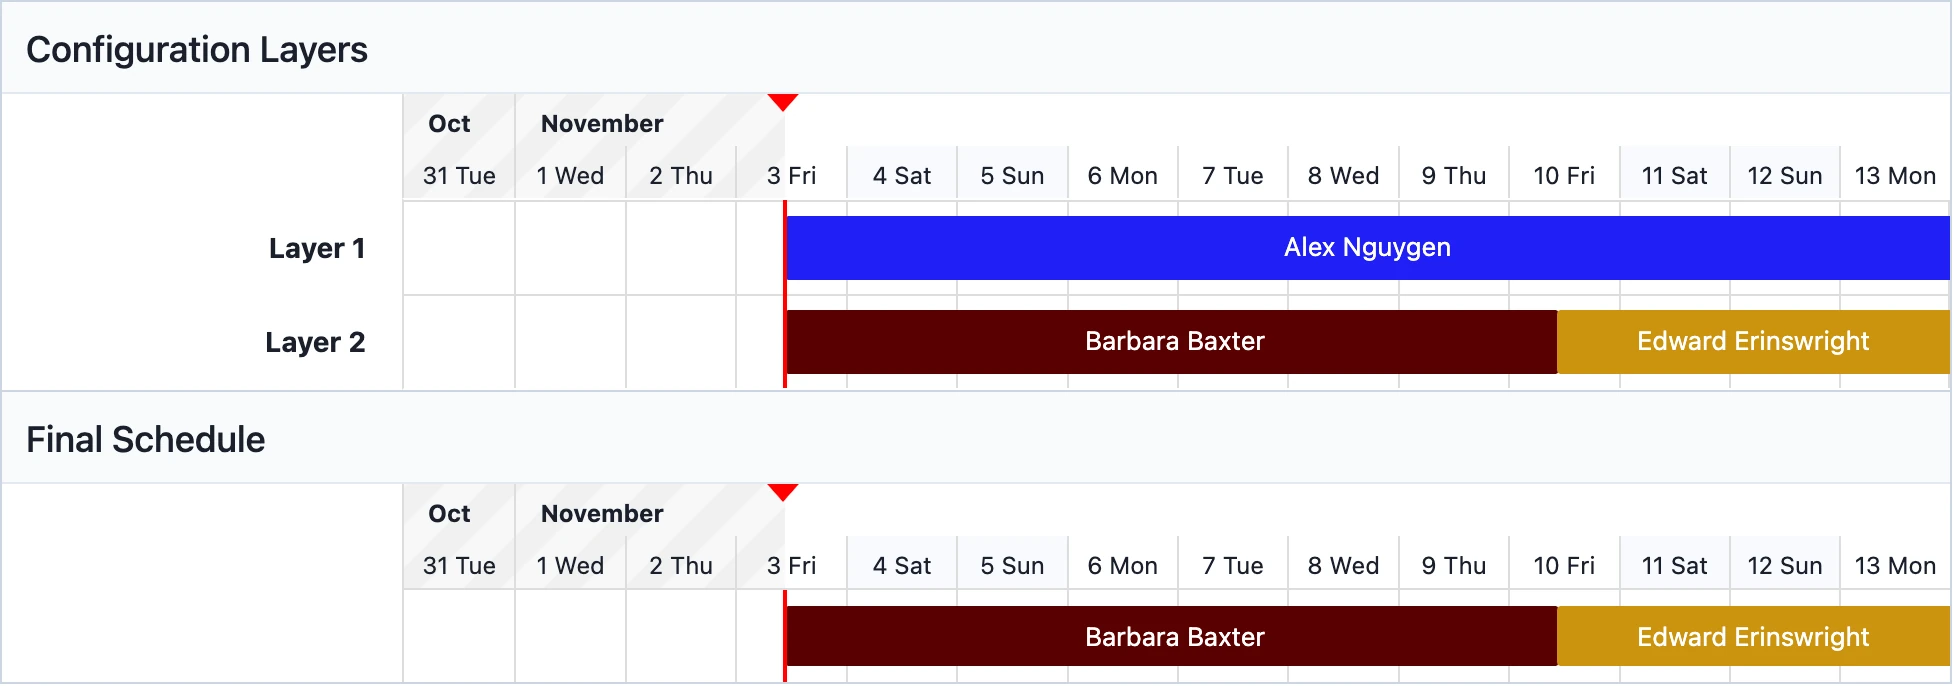
Last layer precedence over previous layers
Alex is scheduled consistently in Layer 1, but since Layer 2 has Barbara and Edward scheduled over the time that Alex had in Layer 1, their layer takes precedence in the Final Schedule.
This allows for complex schedules where different users fill in gaps in coverage. For example, lets say that we want Alex to be on call during the work week, and we want Barbara and Edward to be on call on the weekends. We would create restrictions so that Layer 1 and Layer 2 fit together to create continuous coverage in the Final Schedule:
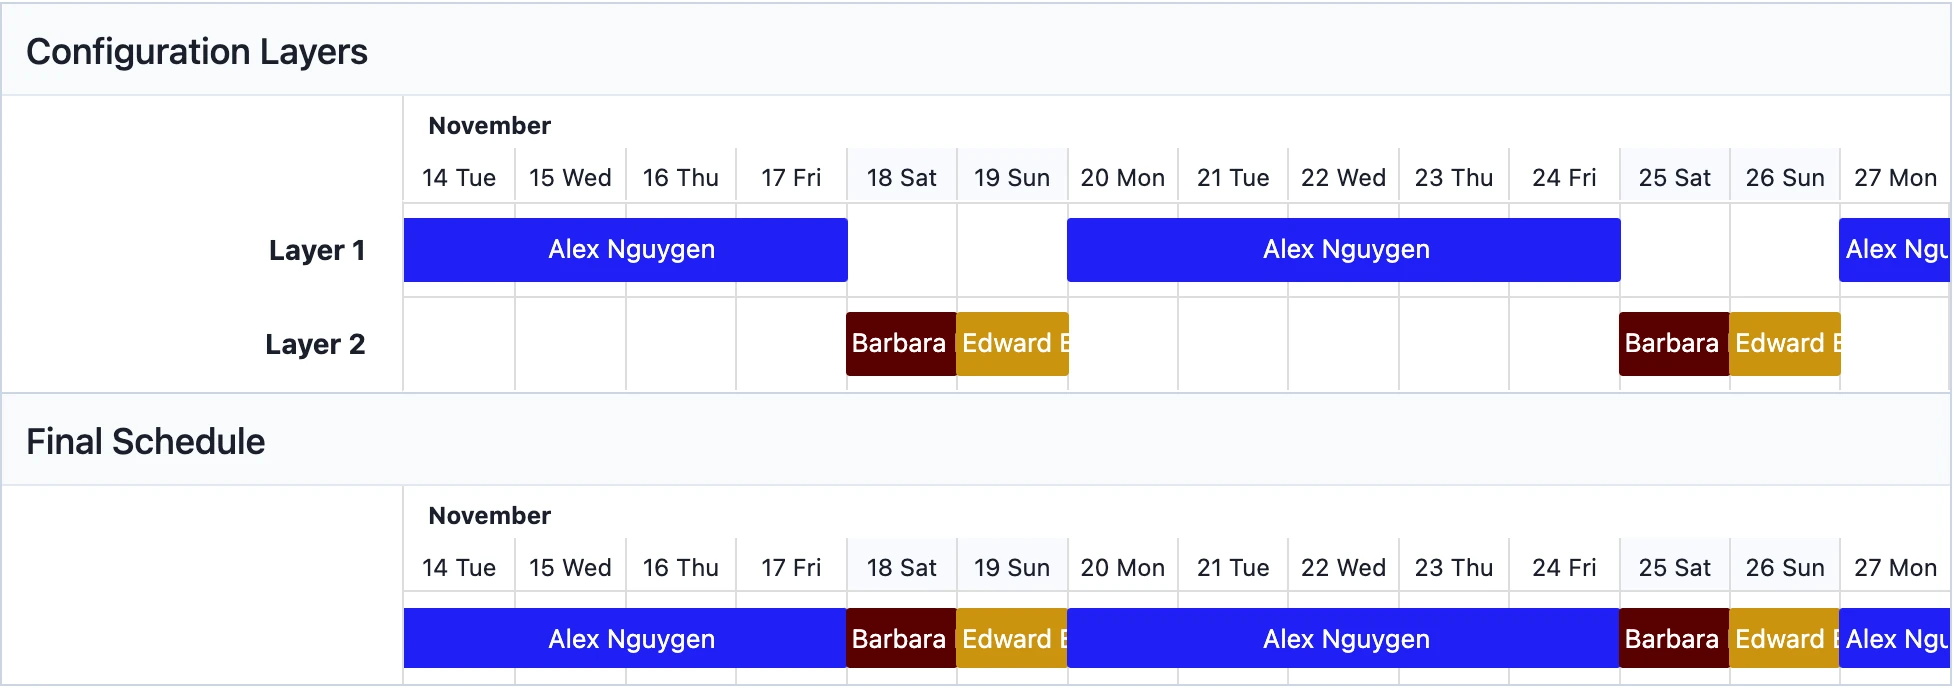
Delete a Schedule Layer
- To delete a schedule layer while creating a schedule, select More Delete Layer in the top-right of the layer you would like to delete. This will delete a layer immediately if the schedule was not saved.
- To preserve historical accuracy, PagerDuty does not delete schedule layers after they have been saved to the schedule. If you would like to remove a previously-saved layer from an on-call schedule, you can set an end-date (instructions below).
Layer Requirement
You must have a layer in order to save the schedule.
End-Date a Schedule Layer
To preserve historical accuracy, PagerDuty does not delete schedule layers after they have been created. If you would like to remove a layer from an on-call schedule, you can set an end-date.
To end-date a schedule layer:
- Navigate to People Schedules.
- To the right of your desired schedule, select Edit.
- To the right of the schedule layer that you want to remove, select Delete Layer.
- In the Schedule Layer Removal modal, enter a date and time to remove the layer and click Remove Layer.
- If you would like to remove the layer immediately, leave the date and time as they are.
- Click Save Schedule.
When a schedule layer has been end-dated, it will appear up until the date that it was set to be removed. For example, Barbara Baxter was on Layer 2 of this schedule, and then it was end-dated for November 8th. This layer will continue to appear until November 8th, and then disappear afterwards:
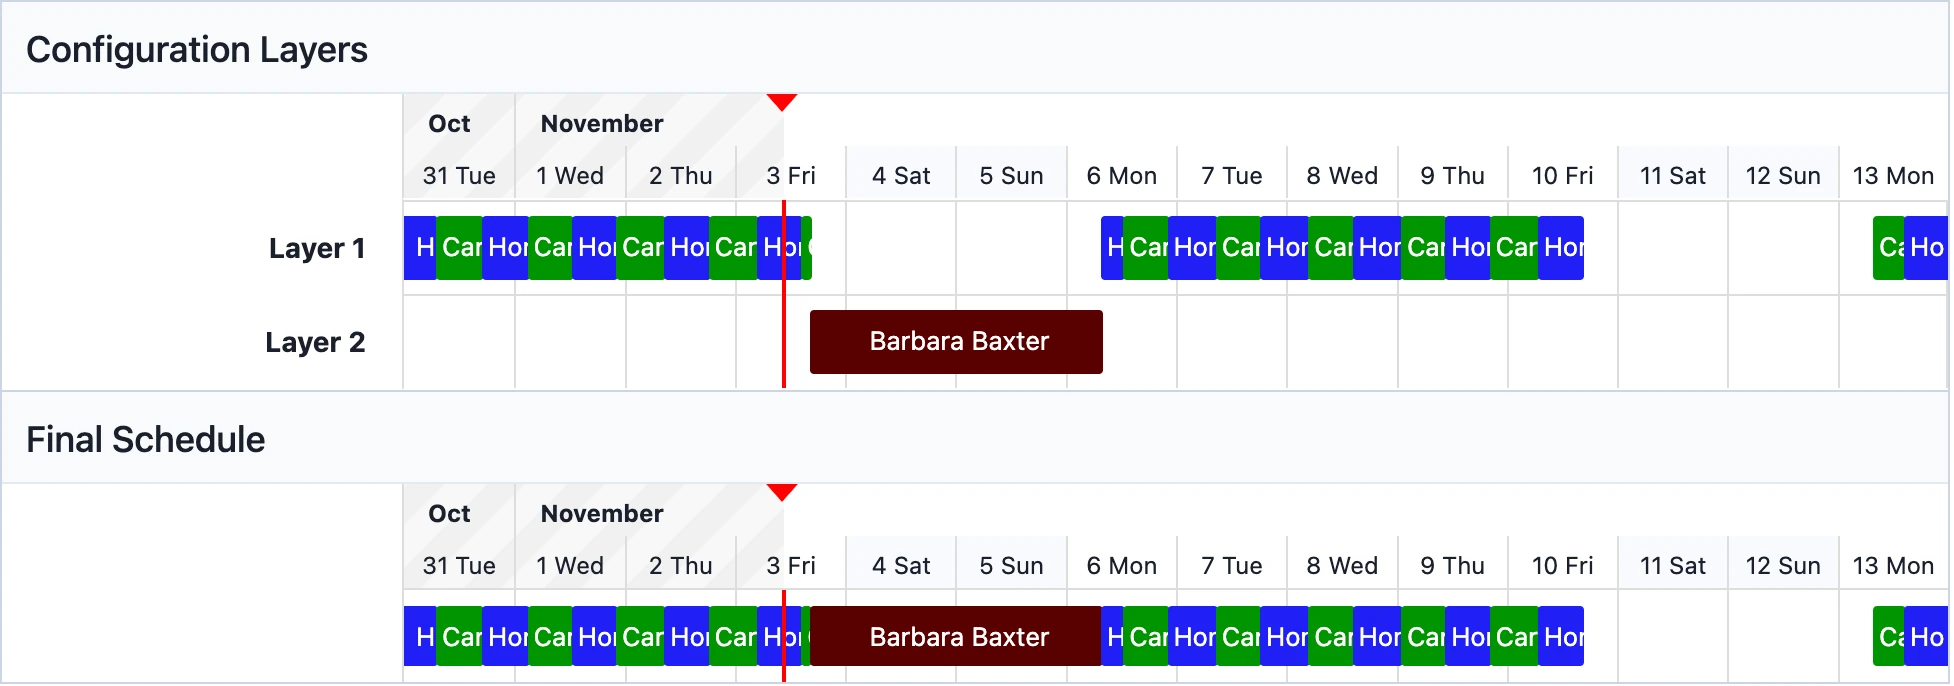
Edit an End-Dated Schedule Layer
If a layer’s end-date is still in the future, you will have the option to edit or undo the end-date.
- Go to People Schedules and select Edit to the right of your preferred schedule.
- On the end-dated layer, select your preferred action: Edit or Undo. Edit will allow you to schedule a new deletion date, while Undo will restore the layer and remove the end-date.
- Click Save Schedule at the bottom-left of the page.
Schedule Restrictions
By default, PagerDuty distributes on-call shifts over a 24-hour period. You may wish, however, to limit the times and days that users are on call. PagerDuty offers two methods to do this depending on how much fine tuning you need:
- Restrict on-call duty to specific times of the day: This option will create uniform shifts for every day of the week. Please note that this option does not allow you to modify individual days. (E.g., if you select a shift from 17:00 - 09:00, every day of the week will have that shift by default. You will not be able to set Monday to have a different shift from Tuesday.)
- Restrict on-call duty to specific times of the week: This option allows you to set different shifts for every day of the week. (E.g., you can set Monday to have a shift from 17:00 - 09:00 and Tuesday to have a shift from 13:00-20:00, etc.)
Schedule Coverage Gaps
Please be aware that restricting hours creates coverage gaps in a schedule when no one is on call. This may be the desired behavior, but there are some items to keep in mind.
In relation to an escalation policy, if the schedule is on the first level and no one is on call, the incident will immediately escalate to the next escalation level. If no one is on-call on the entire escalation policy, an incident will not be created.
If you try to create a new incident in the web app on a service where no one is on call, you will get an error message that the Incident cannot be assigned. Similarly, any trigger events sent to an integration where no one is on call will not trigger an incident.
You can also fill coverage gaps with other layers, as in follow-the-sun or weekend/weekday schedules.
Restrict On-Call Duty to Specific Times of the Day:
This option lets you restrict a schedule so that users are on call every day, but only for specific hours.
- Go to People Schedules.
- Select a schedule and click Edit this Schedule.
- Select the Rotation type from the drop-down menu.
- Set the Handoff time to the beginning of the shift via the time picker.
- Under Restrict on-call shifts to specific times, click Add Restrictions.
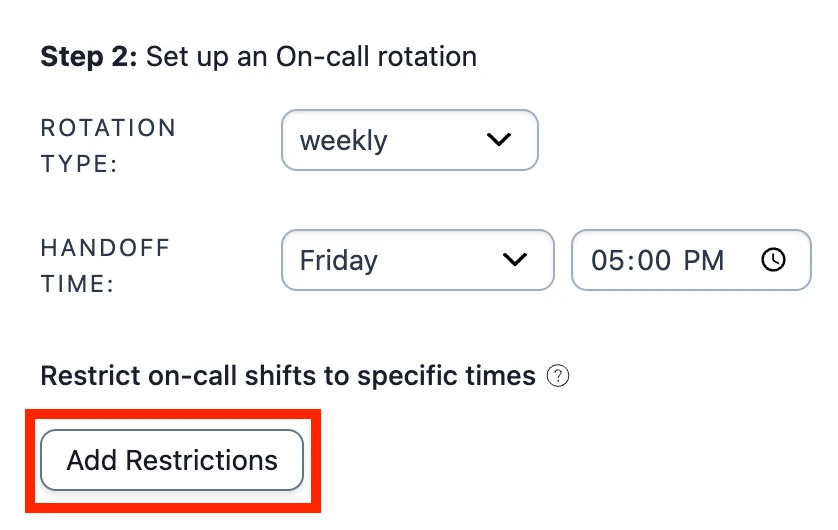
Add schedule restrictions
- In the modal window, select Restrict on-call duty to specific times-of-the-day and enter from and to values, or click 🕓 to use the time picker to select appropriate times.
- Click Apply.
- Click Save Changes.
Example:
If you wanted users on this schedule to only be on call from 5:00 PM to 9:00 AM after business hours you would select the following.

Restricted to specific times of the day
Restrict On-Call Duty to Specific Times of the Week
If you’d like more fine-grained control, you can create individual restrictions for each day of the week.
- Go to People Schedules.
- Select a schedule and click Edit this Schedule.
- Select the checkbox Restrict on-call shifts to specific times.
- Under Restrict on-call shifts to specific times, click Add Restrictions.
Add schedule restrictions
- Use the dropdown and time picker to specify the days and times users should be on call.
- Click Apply.
- Click Save Changes.
Example
If you wanted after hours coverage from 17:00 to 09:00 on weekdays, but also have continuous coverage over the weekend, you would input the following (the last day/time selections cover the weekend from Friday-Monday).

Restricted to specific times and days of the week
Assign a Schedule to a Team via Escalation Policy
Schedules can be associated with Teams via escalation policies. If you would like to assign a Team to your schedule, add your schedule to an escalation policy and then add that escalation policy to your Team.
On the other hand, you have the option to associate a schedule with a Team when you create the schedule, but not while editing it. This is to accommodate the following use case:
With Advanced Permissions, some users are only allowed to edit their Team's objects (e.g., schedules, services and escalation policies). If one of these users wishes to create a new schedule and put it inside their Team's escalation policy, they can only do so if that schedule is assigned to their team.
Schedules List
The schedules list provides an overview of every schedule where users can see at a glance who is currently on call, what escalation policy the schedule uses and upcoming shifts. Users can filter all schedules by date range, Teams and users, and they can easily search and compare schedules. The schedules list can be found in the web app under People Schedules.
Parameters
Date
To filter all schedules in the list by date, you may use the following options:
- Click the Time Period dropdown to select one of the following:
- 1 Day
- 4 Days
- 1 Week
- 2 Weeks
- 30 Days
- Click the button to move back an iteration of the time period (specified above), or click the button to move forward an iteration of the time period. For example, if you selected 1 Week from the Time Period dropdown, clicking would move you forward by one week.
- Click Today to view all schedules from today’s date.
Teams
To filter by Team, click the Teams dropdown and select from All Teams, My Teams or you may search and select a specific Team.
User
To filter by user, click the User dropdown and search and select your preferred user. If you would like to remove the user filter, click the to the right of the user’s name and the filter will be cleared.
Search
To search for a specific schedule, enter the schedule’s name in the Search field and hit enter.
View Details
- Schedules: Click the schedule’s name to view its full details.
- On Call Now: The user currently on call will be listed with a Now pill to the right of their name. Click the user’s name to view their details.
- Shifts: Click a shift to view its full details, or to create an override.
- Escalation Policies: If the schedule has only one escalation policy, click the escalation policy name to view its details. If the schedule has more than one escalation policy, click [x] Escalation Policies and then select the escalation policy you would like to view from the modal.
- Teams: If a schedule has only one Team, click the Team name to view its details. If the schedule has more than one Team, click [x] Teams and then select the Team you would like to view from the modal.
Actions
Users may also take the following actions from this page:
- Create a New Schedule
- Export a Schedule
- Click to select from the following options:
Updated 7 months ago
