
Schedule Examples
Common use cases for different schedule types
Schedule Examples
PagerDuty schedules handle complex on-call scenarios through layered configurations, time restrictions, and custom rotations. The examples below demonstrate various scheduling patterns — from basic schedules, irregular shifts, and split rotations to follow-the-sun coverage and primary/secondary backup systems.
- Example 1: Basic 9 to 5 Schedules
- Example 2: Complex Irregular Schedules
- Example 3: Complex Schedule for 2 Users on a 2-Day Rotation with Separate Weekends
- Example 4: Complex Split Shift Rotation
- Example 5: Complex Schedule with Restrictions
- Example 6: Create Primary and Secondary On-Call Schedules
- Example 7: Inverse Schedules
- Example 8: Follow-the-Sun Schedule
- Example 9: Schedule Users Every Other Week
- Example 10: Weekend/Weekday Schedule
Example 1: Basic 9 to 5 Schedules
This schedule is for teams that follow a standard weekday 9 AM–5 PM rotation, with each team member taking the daily shift in turn. It is ideal for consistent weekday coverage without overlapping on-call periods or complex week-to-week variations.
Basic ScheduleThis example illustrates the most straightforward on-call setup. It provides standard weekday coverage from 9 AM to 5 PM and does not include evening or weekend shifts, which should be factored in when planning full-time coverage.
Ex. 1 Schedule Requirements
This schedule rotates daily between team members, providing 9 AM–5 PM coverage each weekday.
- Each user is on call for one full day at a time.
- Shifts rotate automatically every morning at 9:00 AM.
- The daily rotation ensures equal coverage and predictable scheduling.
- There is no evening or weekend coverage with this schedule.
Ex. 1 Schedule Configuration
Layer 1 includes the team members in a daily rotation.
- Rotation type: Daily
- Handoff time: 9:00 AM
- Restricted hours: 9:00 AM–5:00 PM
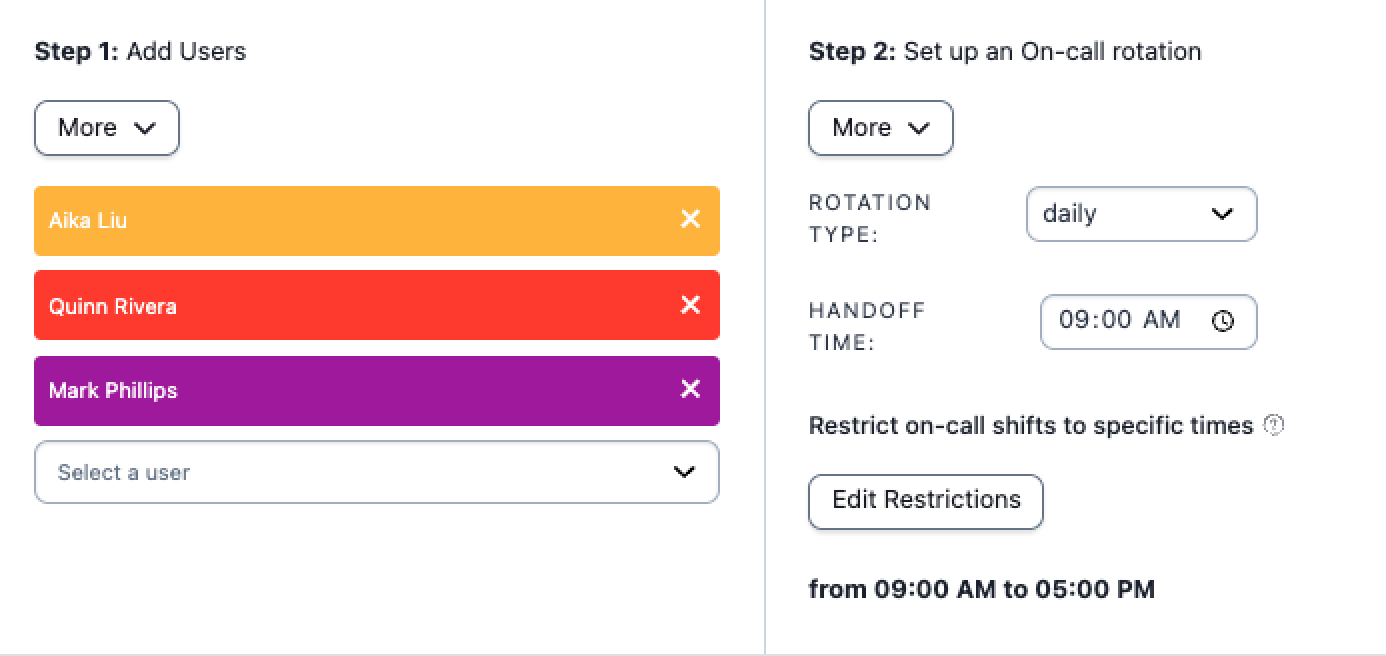
Example 1 configuration
Ex. 1 Final Schedule
The final schedule automatically rotates daily coverage between team members. One person is scheduled from 9:00 AM to 5:00 PM, ensuring weekday coverage with predictable handoff times.
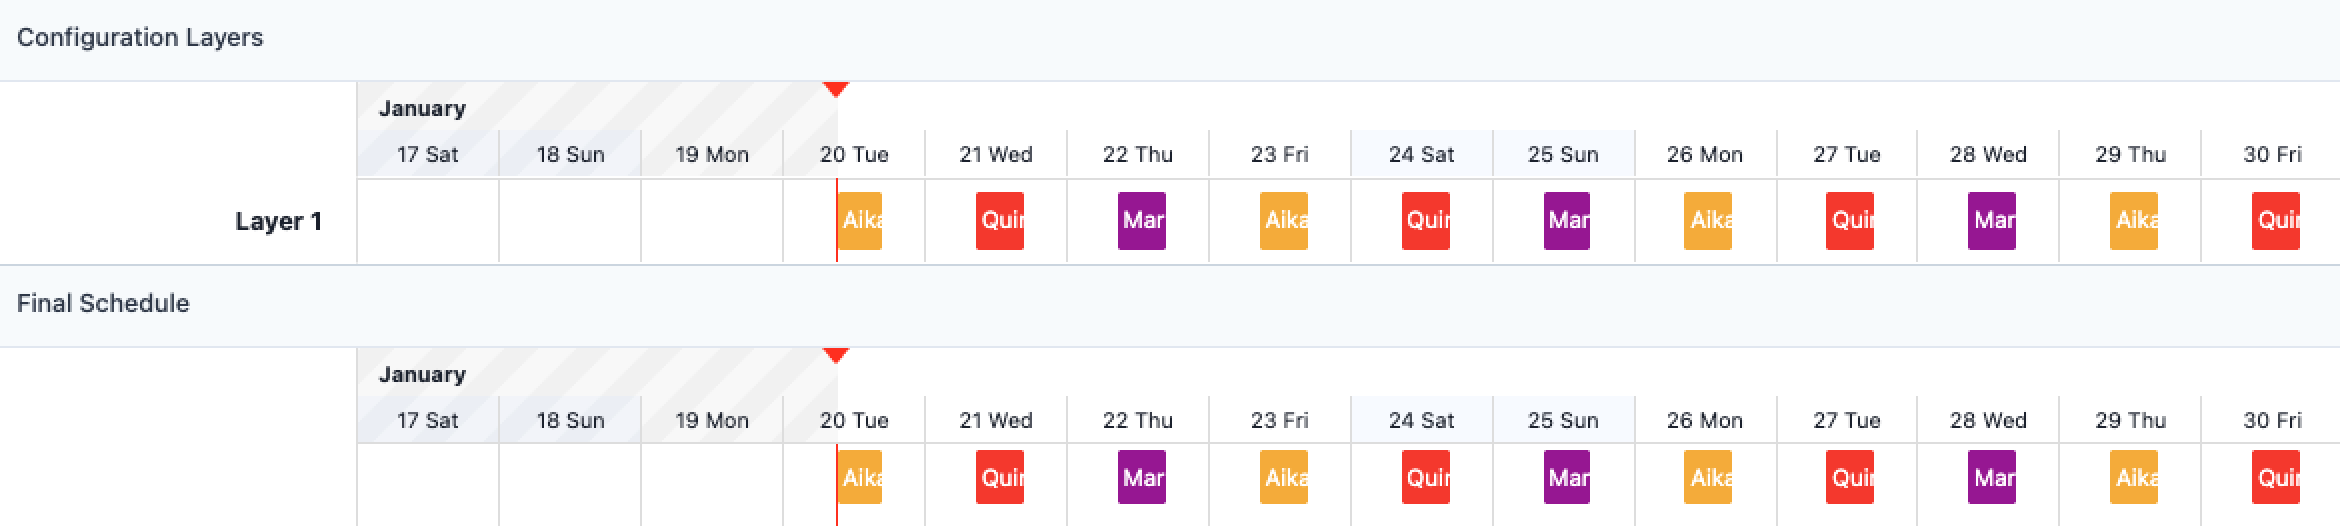
Example 1 final schedule
Example 2: Complex Irregular Schedules
This schedule is for teams that rotate 12-hour shifts, on call for one week and then off call for a few.
Ex. 2 Schedule Requirements
This schedule has six users that alternate shifts every other week. One week, they work Sunday-Tuesday-Thursday-Saturday (STTS). The next week, they work Monday-Wednesday-Friday (MWF). There are two six-week rotations in total — one where everyone rotates through the MWF schedule, and one staggered by three weeks where they work through STTS.
Ex. 2 Schedule Configuration
Layer 1 rotates weekly with a handoff time at the beginning of the first time restriction, Sunday at 12:00 AM. It covers the STTS days by restricting on-call duty to specific times-of-the-week.
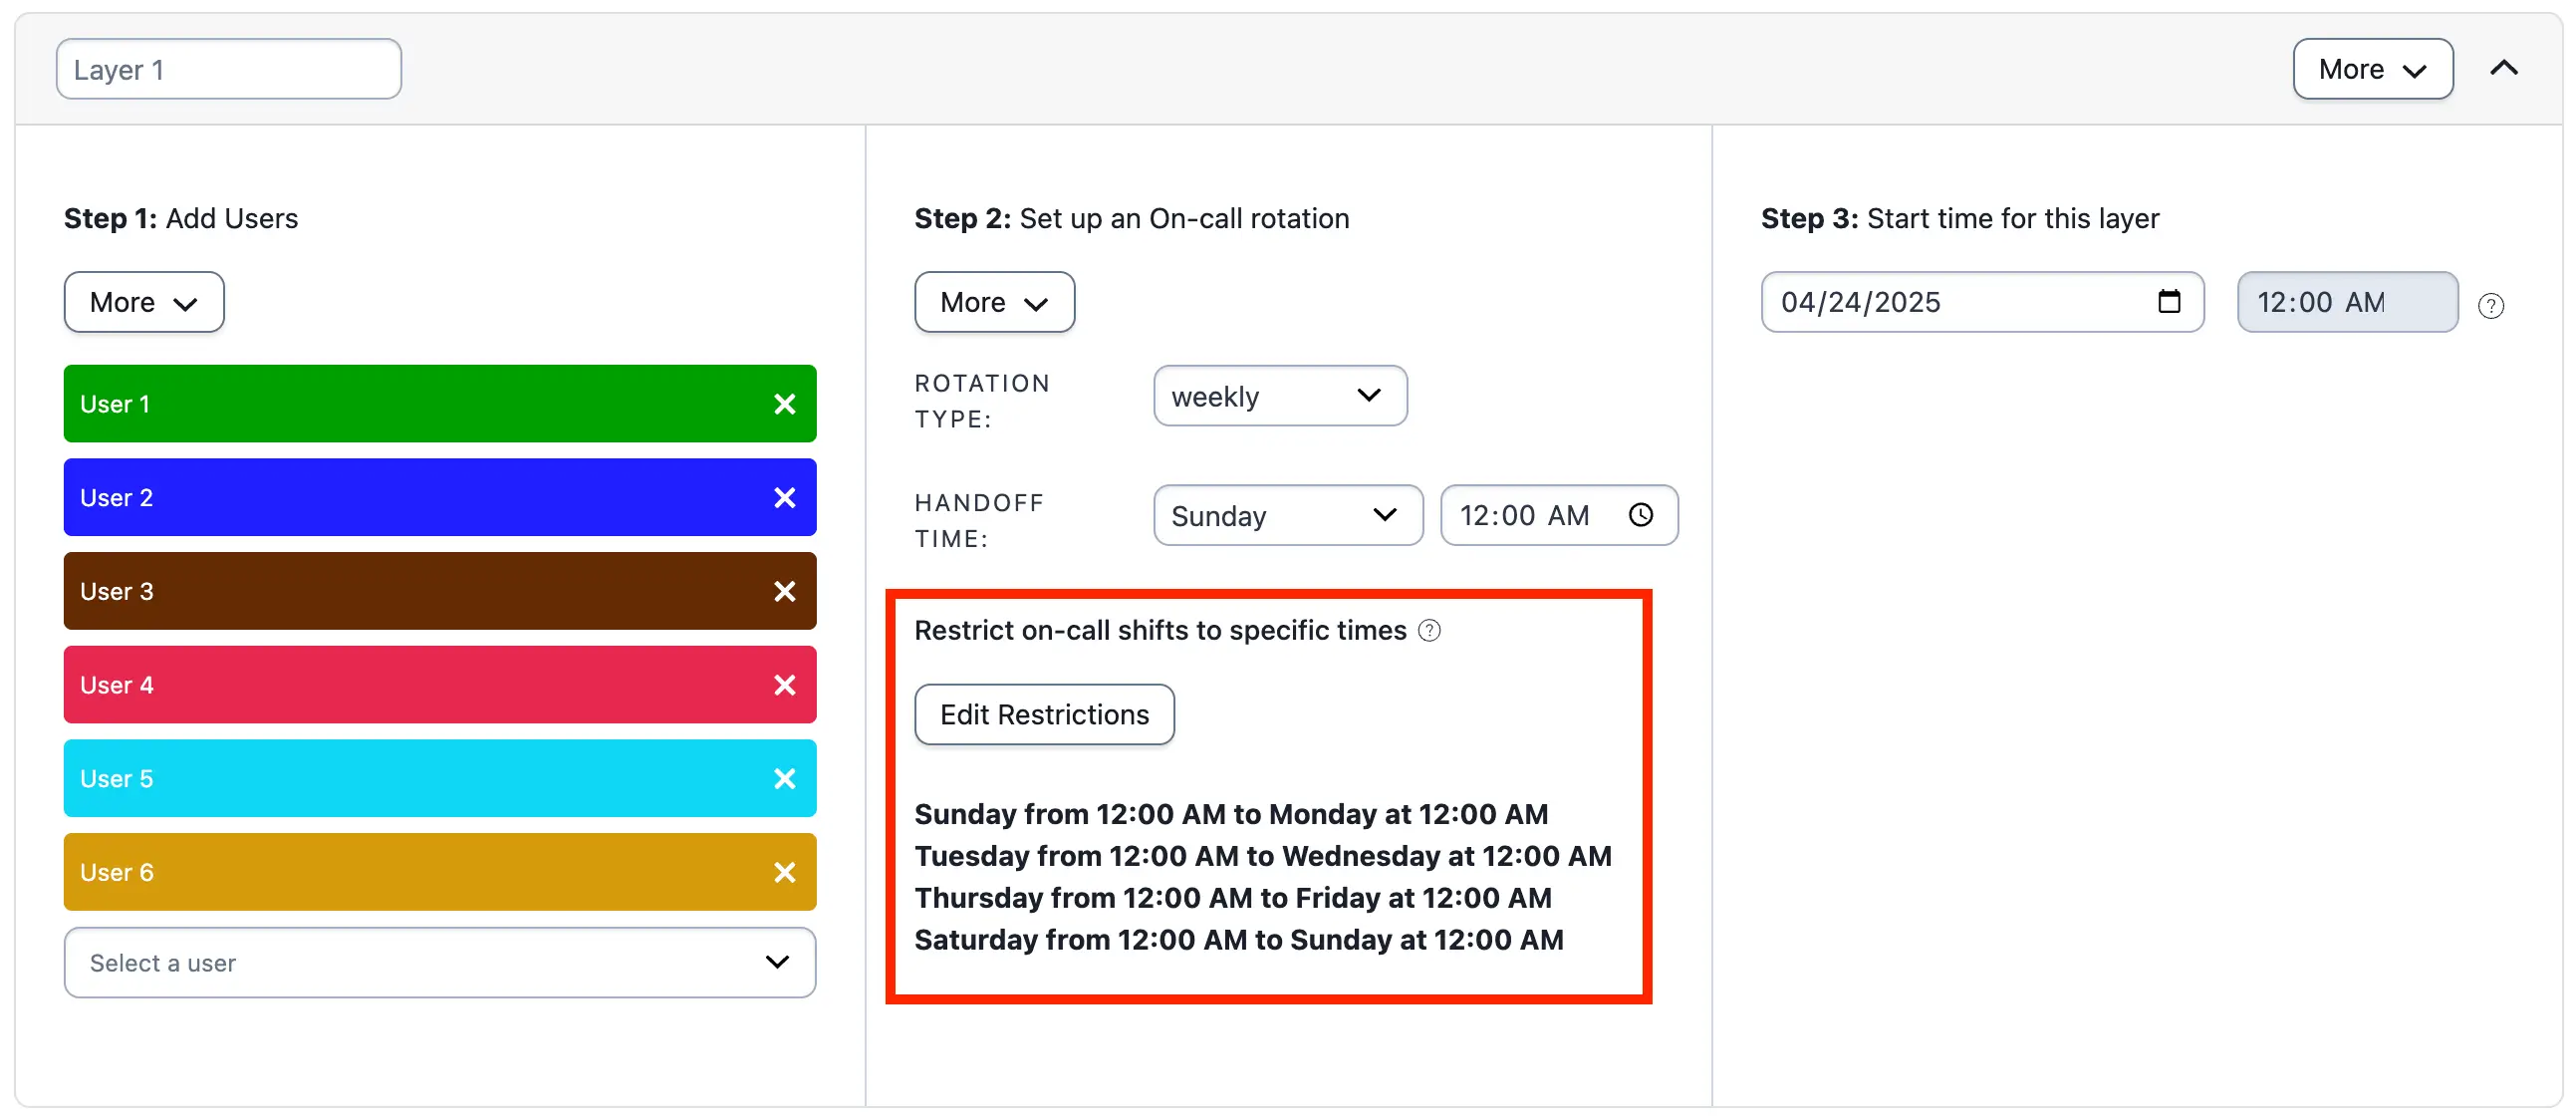
Example 2, layer 1
Layer 2 rotates weekly with a handoff time at the beginning of its first time restriction, Monday at 12:00 AM. It covers MWF by restricting on-call duty to specific times-of-the-week.
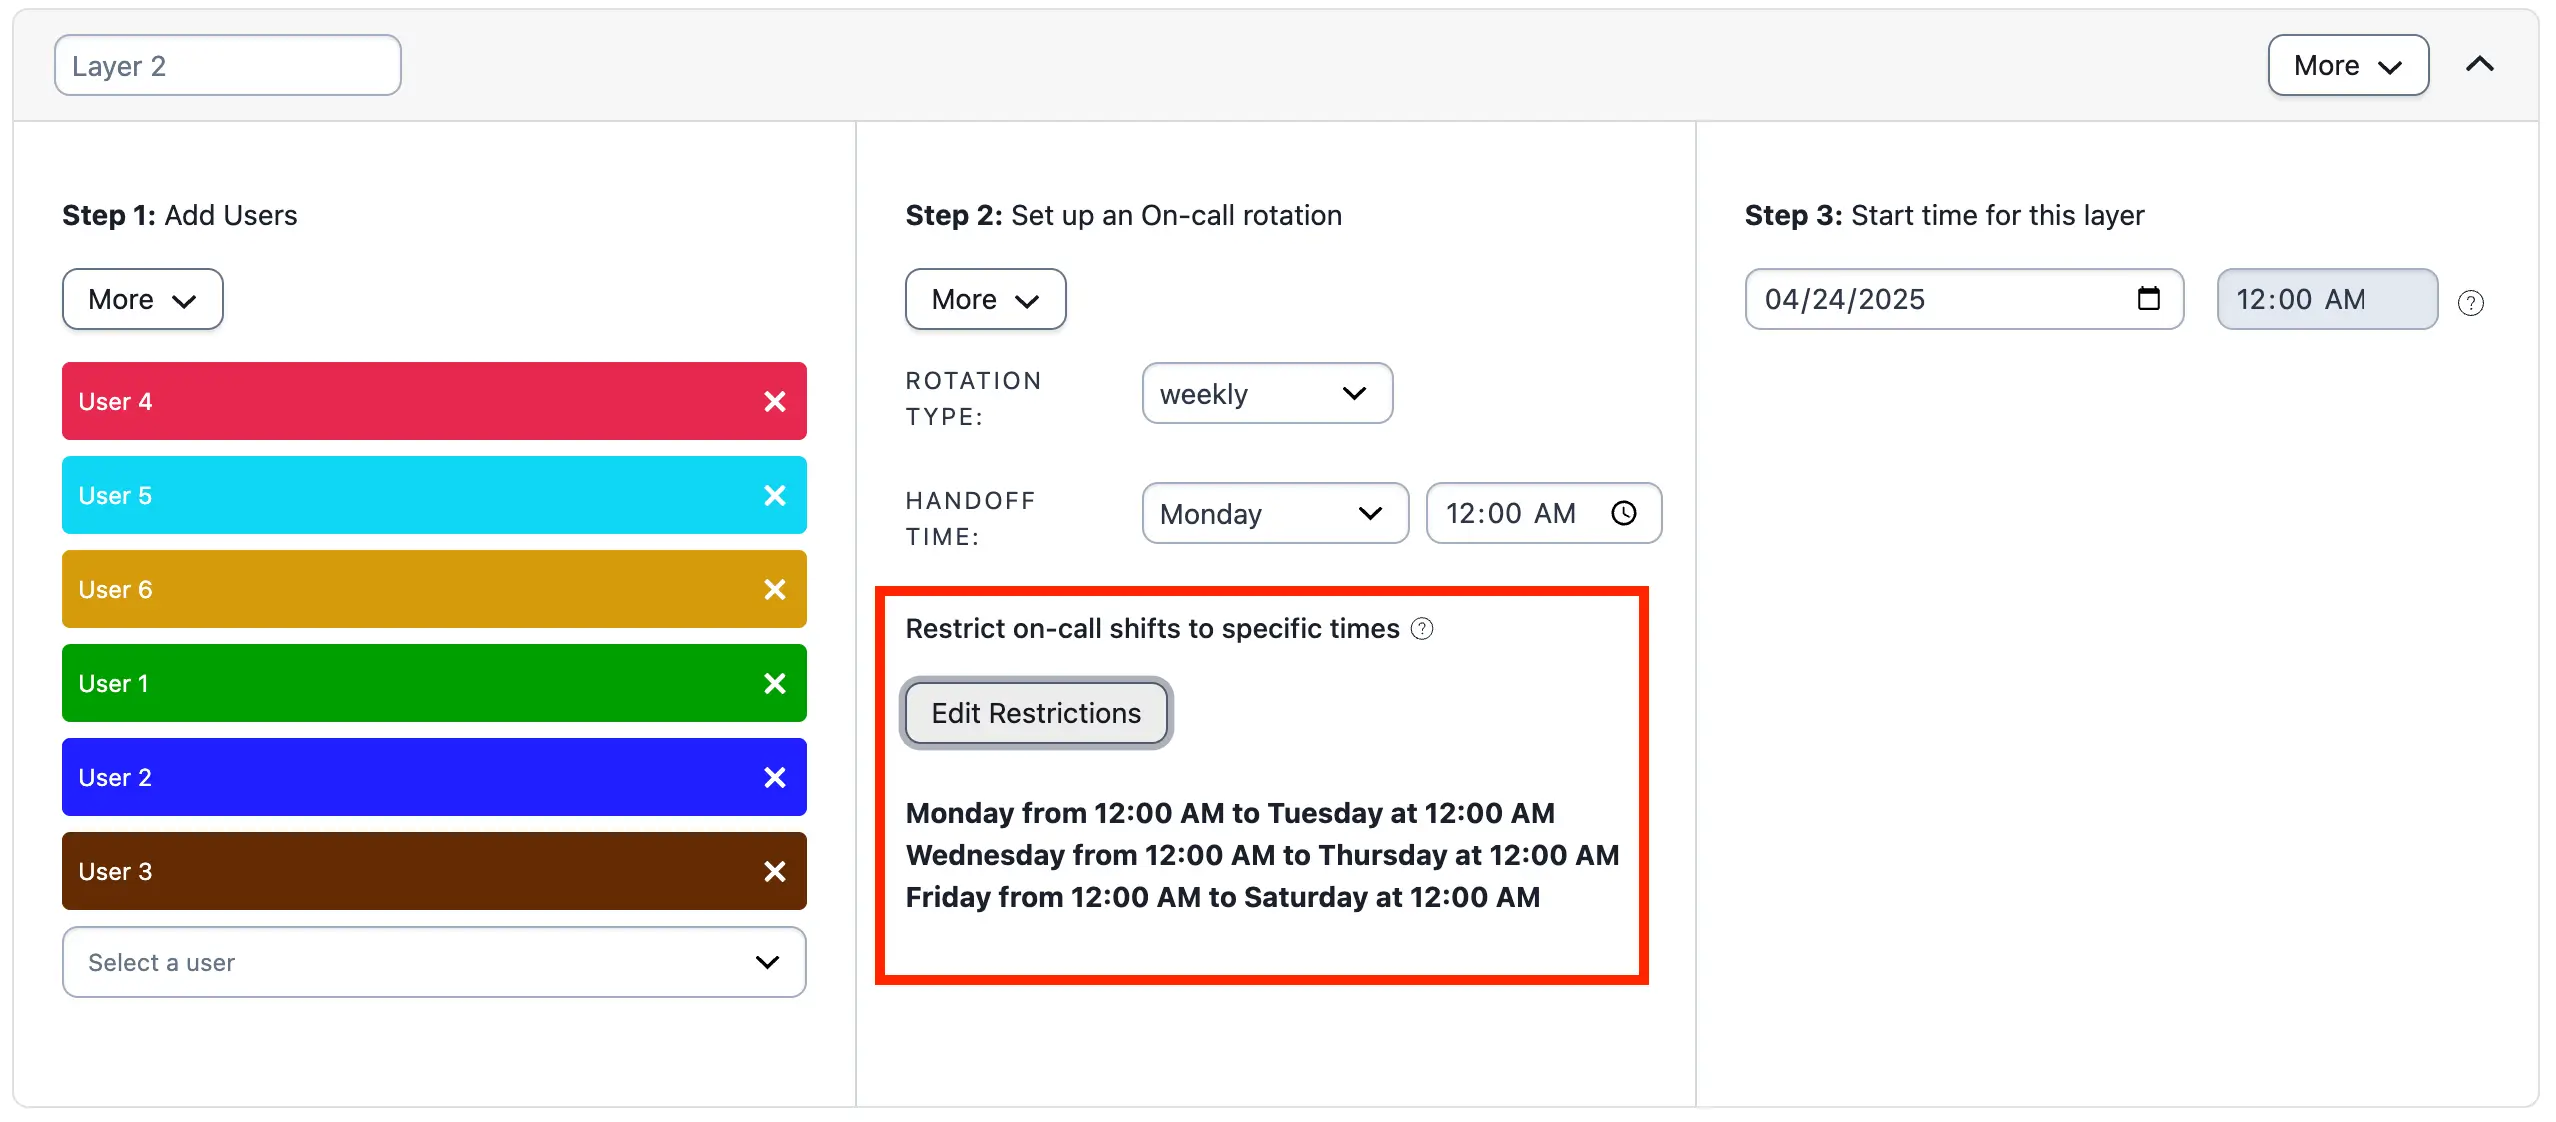
Example 2, layer 2
Ex. 2 Final Schedule
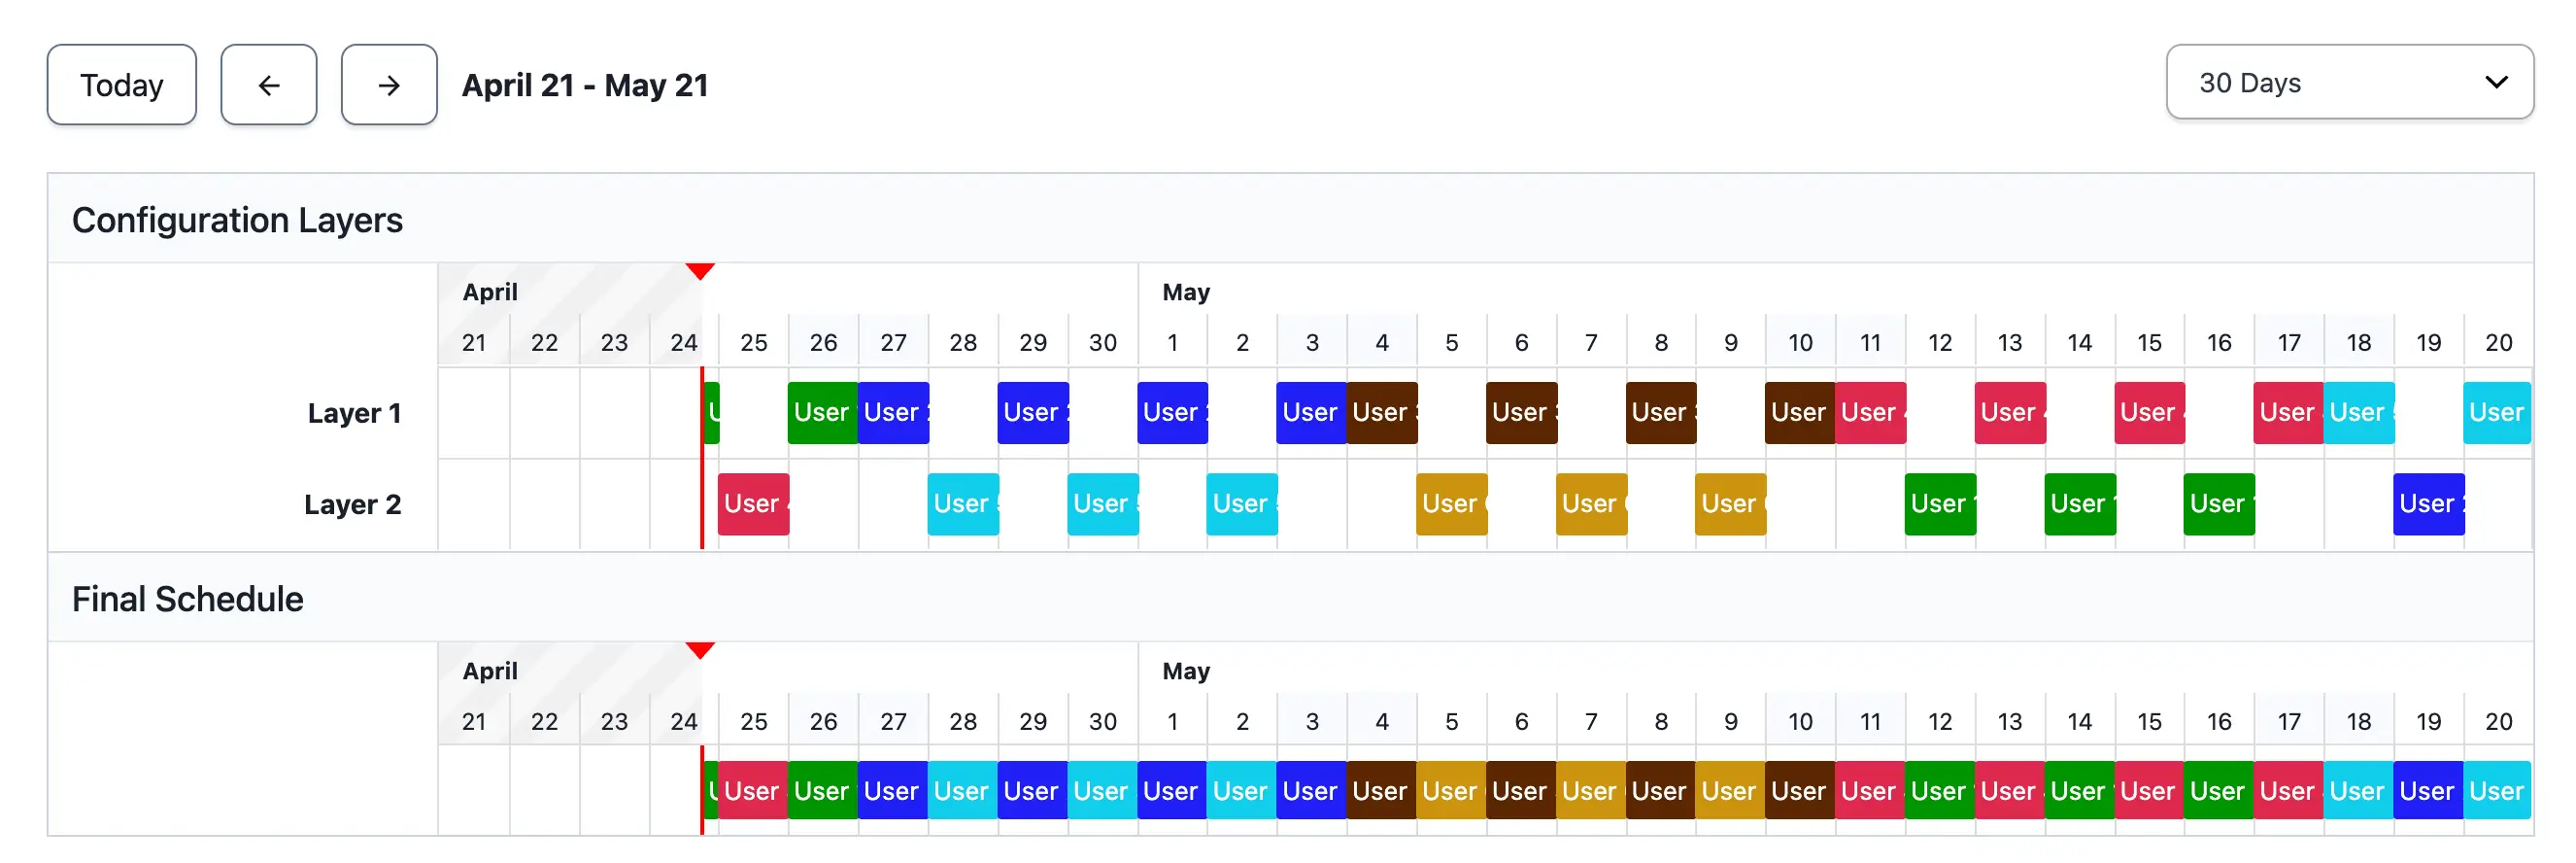
Example 2 final schedule
Example 3: Complex Schedule for 2 Users on a 2-Day Rotation with Separate Weekends
This example shows a complex schedule for two users on a two-day rotation. They are on call in the evenings from 5:00 PM to 8:00 AM. On Saturday and Sunday, responders are on call for 24 hours from 8:00 AM until 8:00 AM the next day.
Ex. 3 Schedule Requirements
During the weekdays, User 1 and User 2 are on call from 5:00 PM to 8:00 AM. They take turns covering the weekends from Friday at 5:00 PM to Monday at 8:00 AM. Shifts are:
- User 1 is on call Tuesday and Wednesday from 5:00 PM to 8:00 AM.
- User 2 is on call Thursday and Friday from 5:00 PM to 8:00 AM.
- User 1 is on call Saturday at 8:00 AM to Sunday at 8:00 AM.
- User 2 is on call Sunday at 8:00 AM to Monday 8:00 AM, and Monday 5:00 PM to Tuesday 8:00 AM.
Ex. 3 Configuration
Create four layers, each with its own weekly rotation that fulfills one of the requirements listed in the previous section.
The handoff time should be the day and time that the first restriction begins. The effective date of change should be the first date that a layer's restriction begins on. The date in Step 3 for each layer will therefore be different.
Layer 1
User 1 is on call Tuesday and Wednesday from 5:00 PM to 8:00 AM.
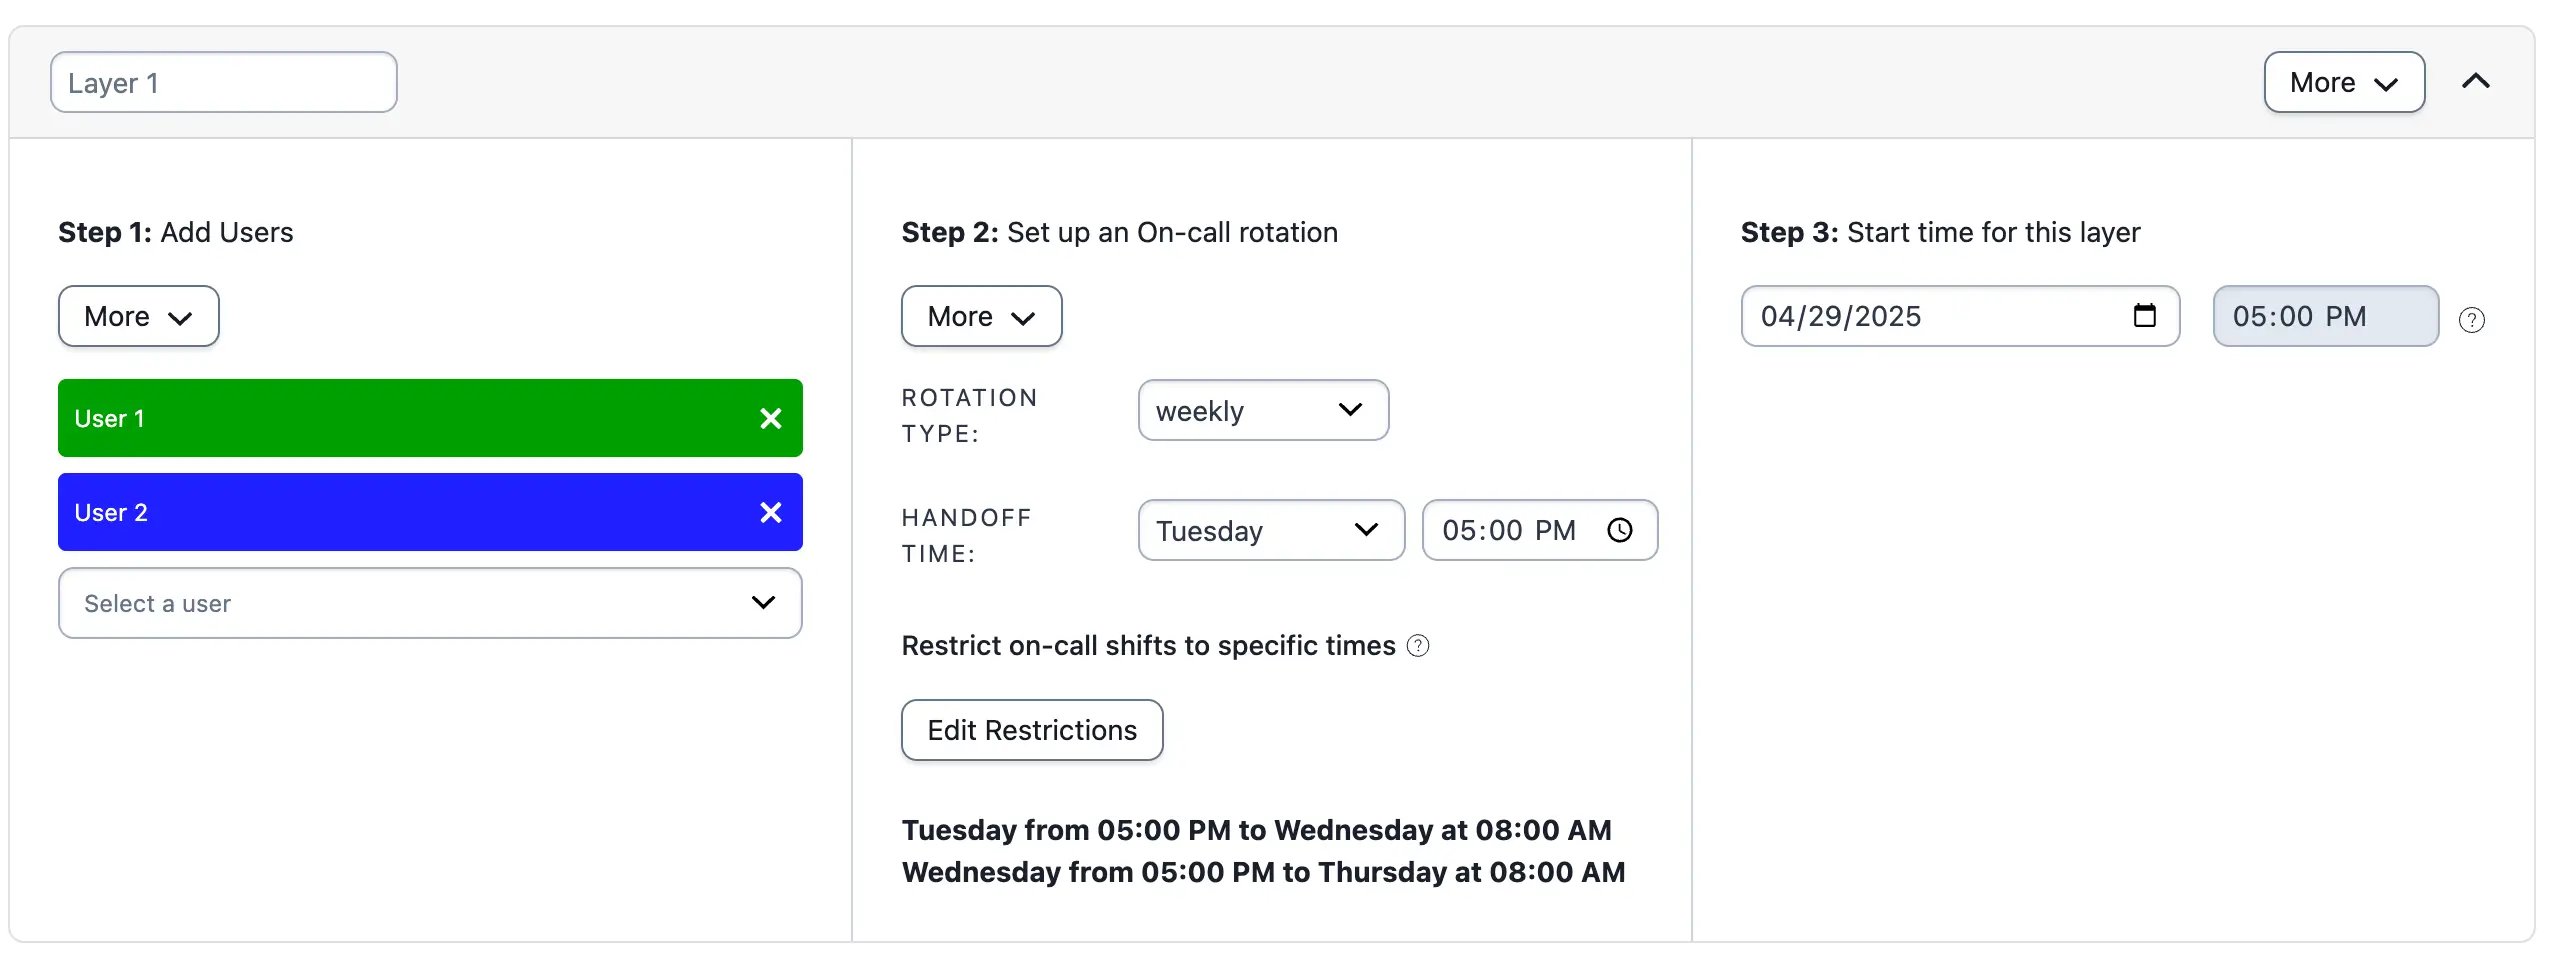
Example 3, layer 1
Layer 2
User 2 is on call Thursday and Friday from 5:00 PM to 8:00 AM. Note the change in Step 3 for the Start time — the date selected is a Thursday.
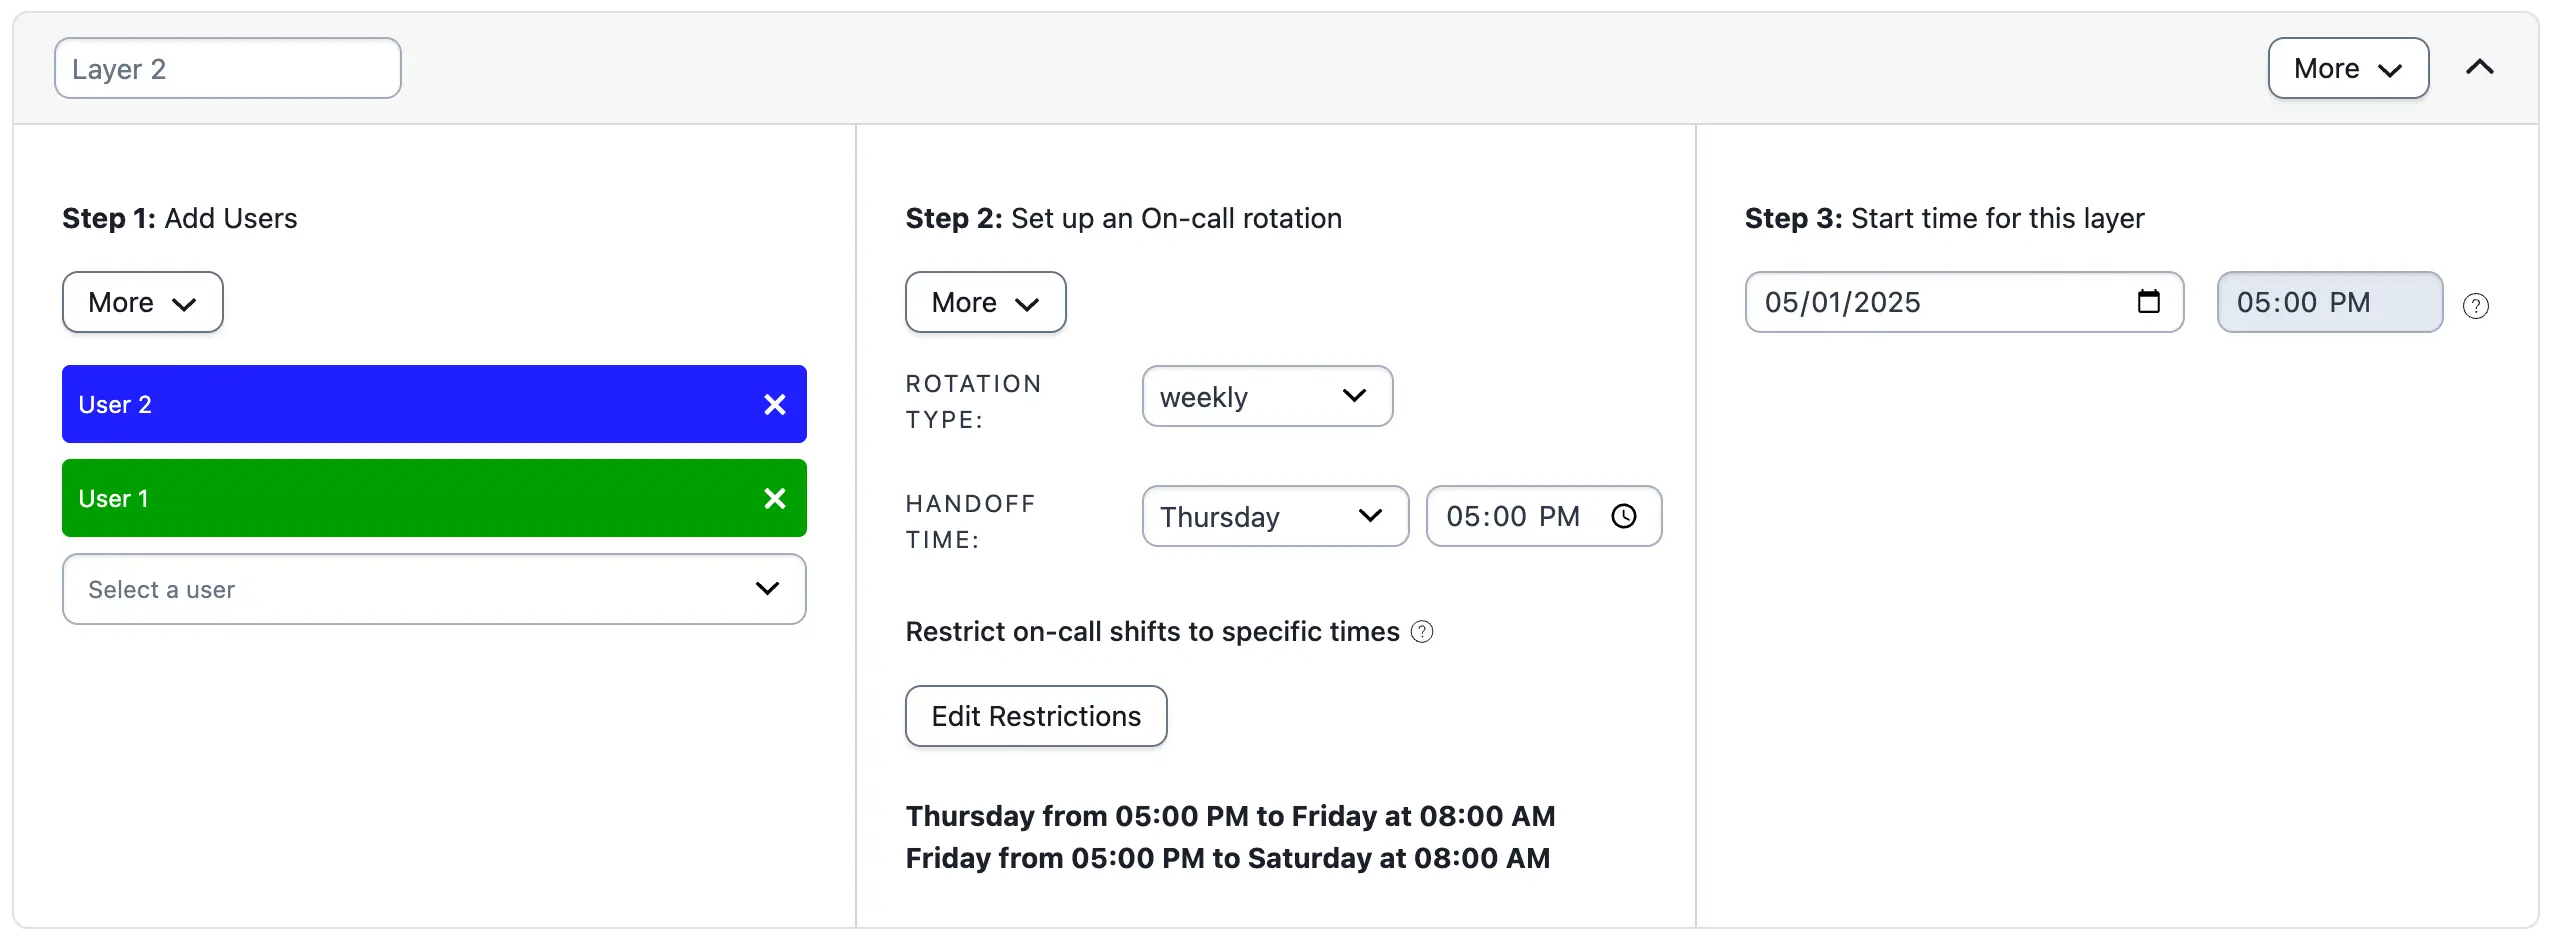
Example 3, layer 2
Layer 3
User 1 is on call Saturday at 8:00 AM to Sunday at 8:00 AM.
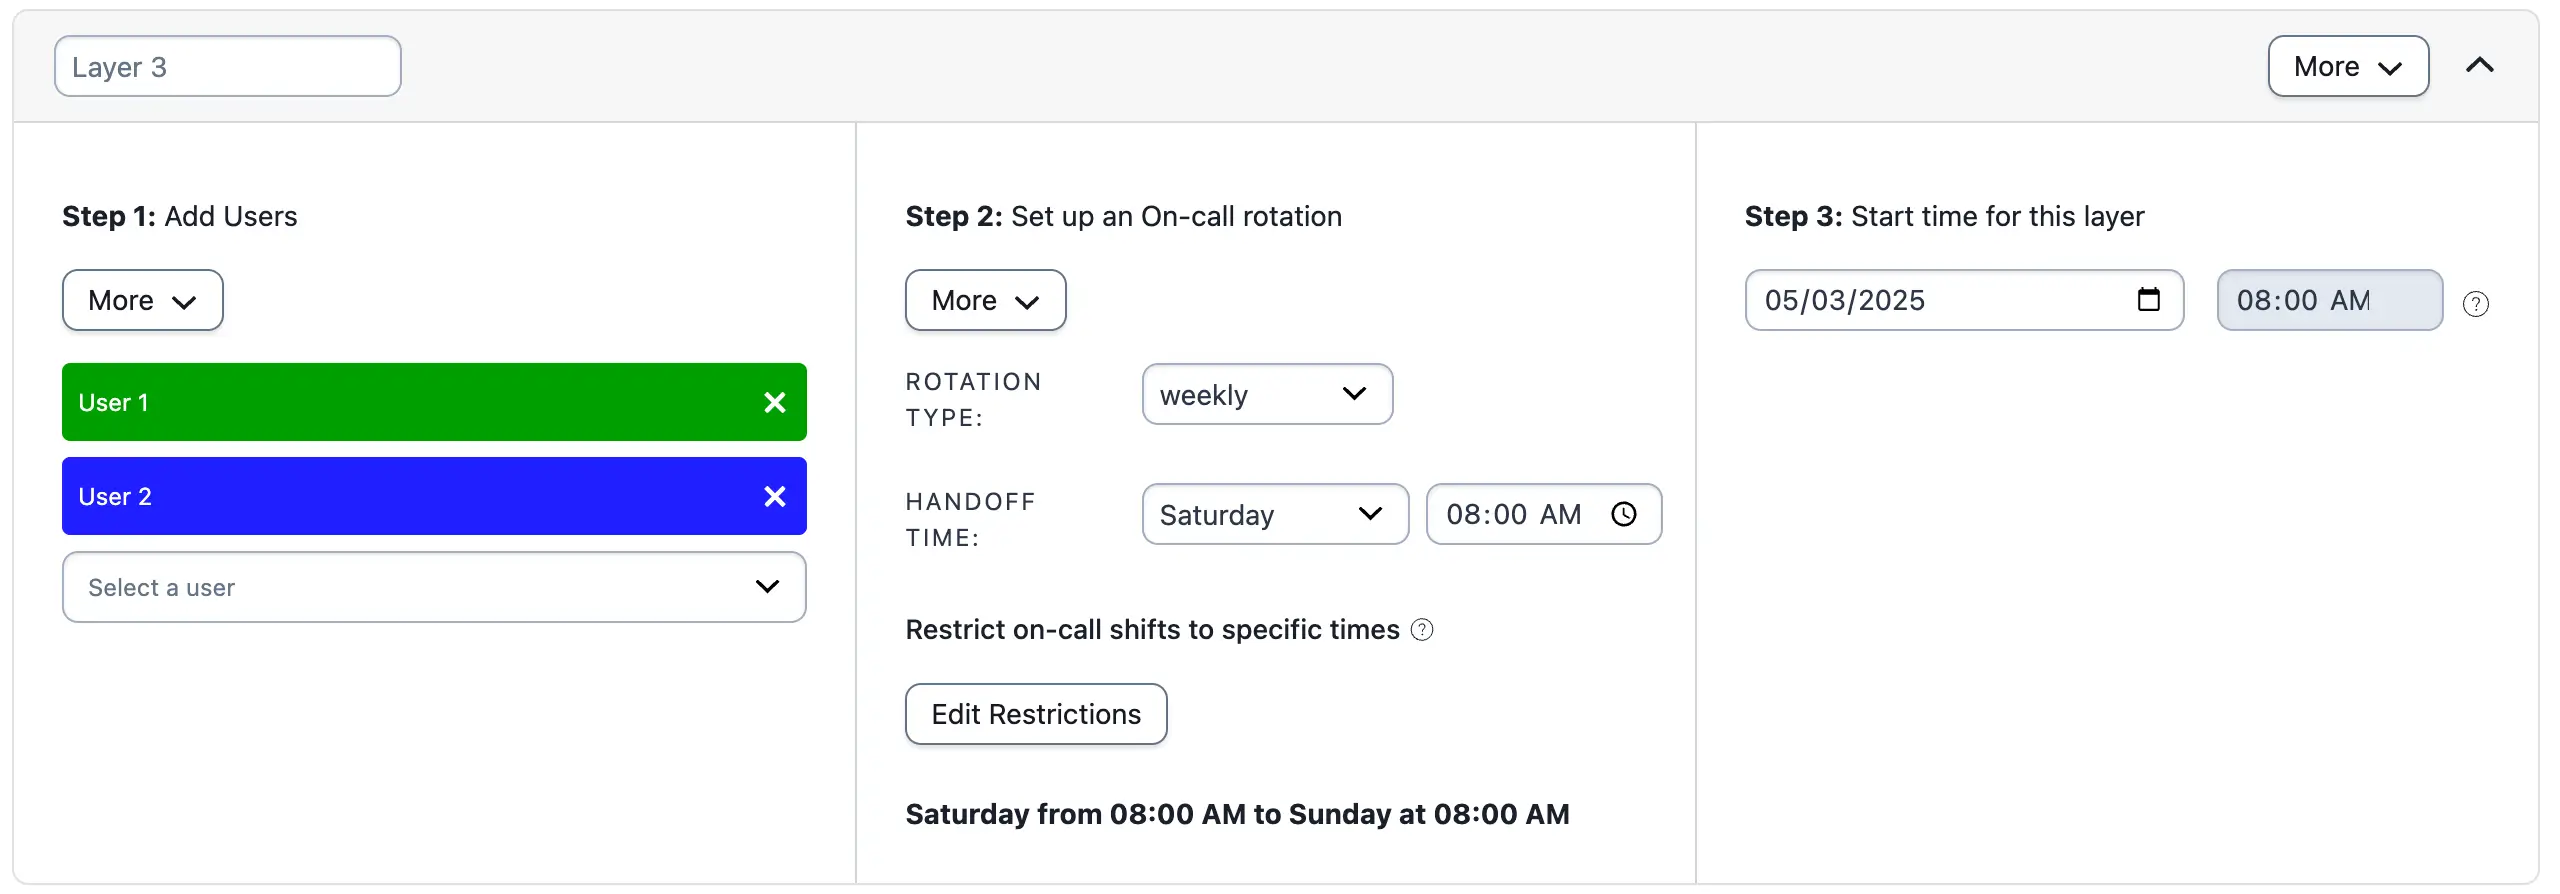
Example 3, layer 3
Layer 4
User 2 is on call Sunday at 8:00 AM to Monday 8:00 AM, and Monday 5:00 PM to Tuesday 8:00 AM.
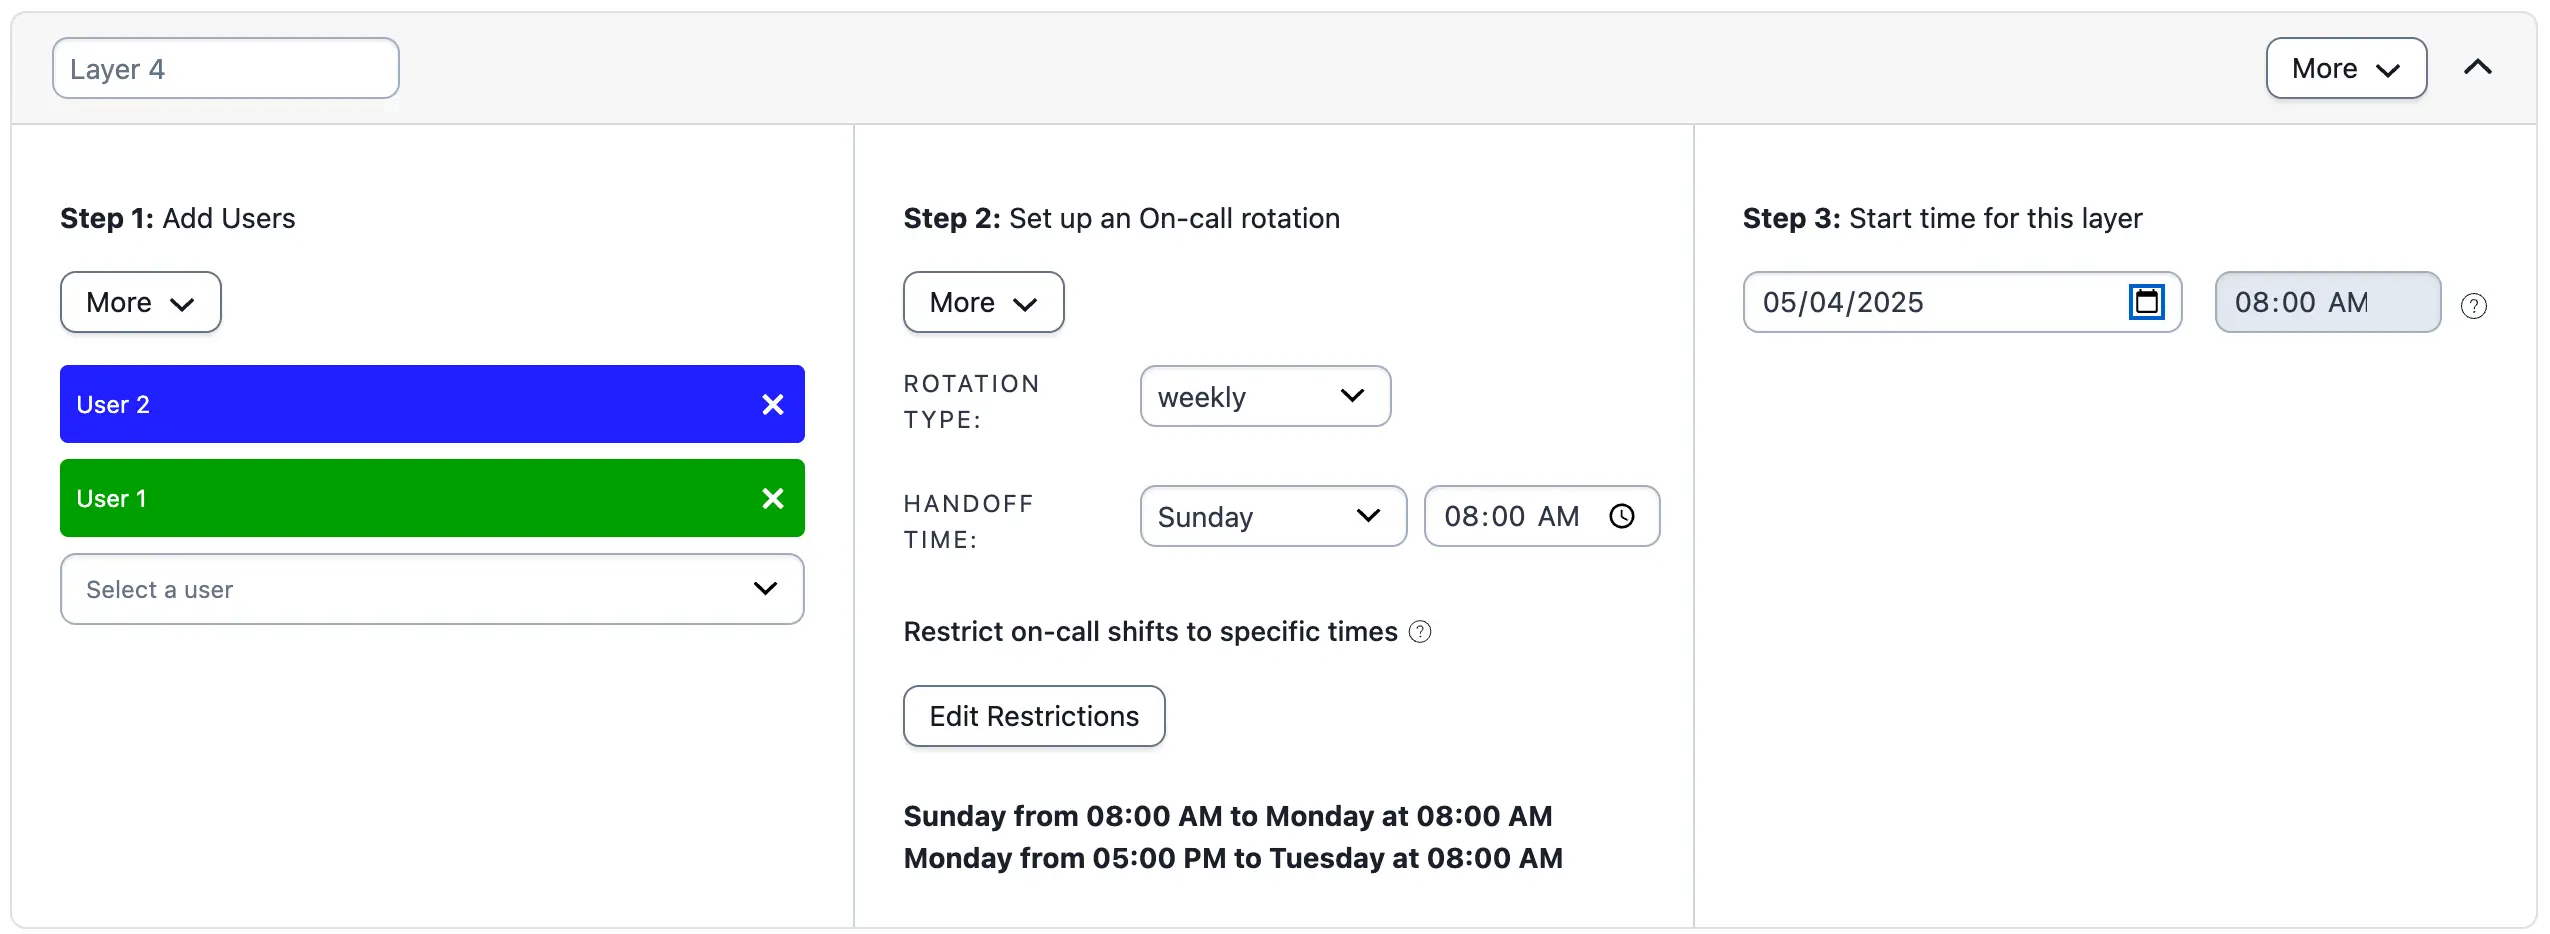
Example 3, layer 4
Ex. 3 Final Schedule
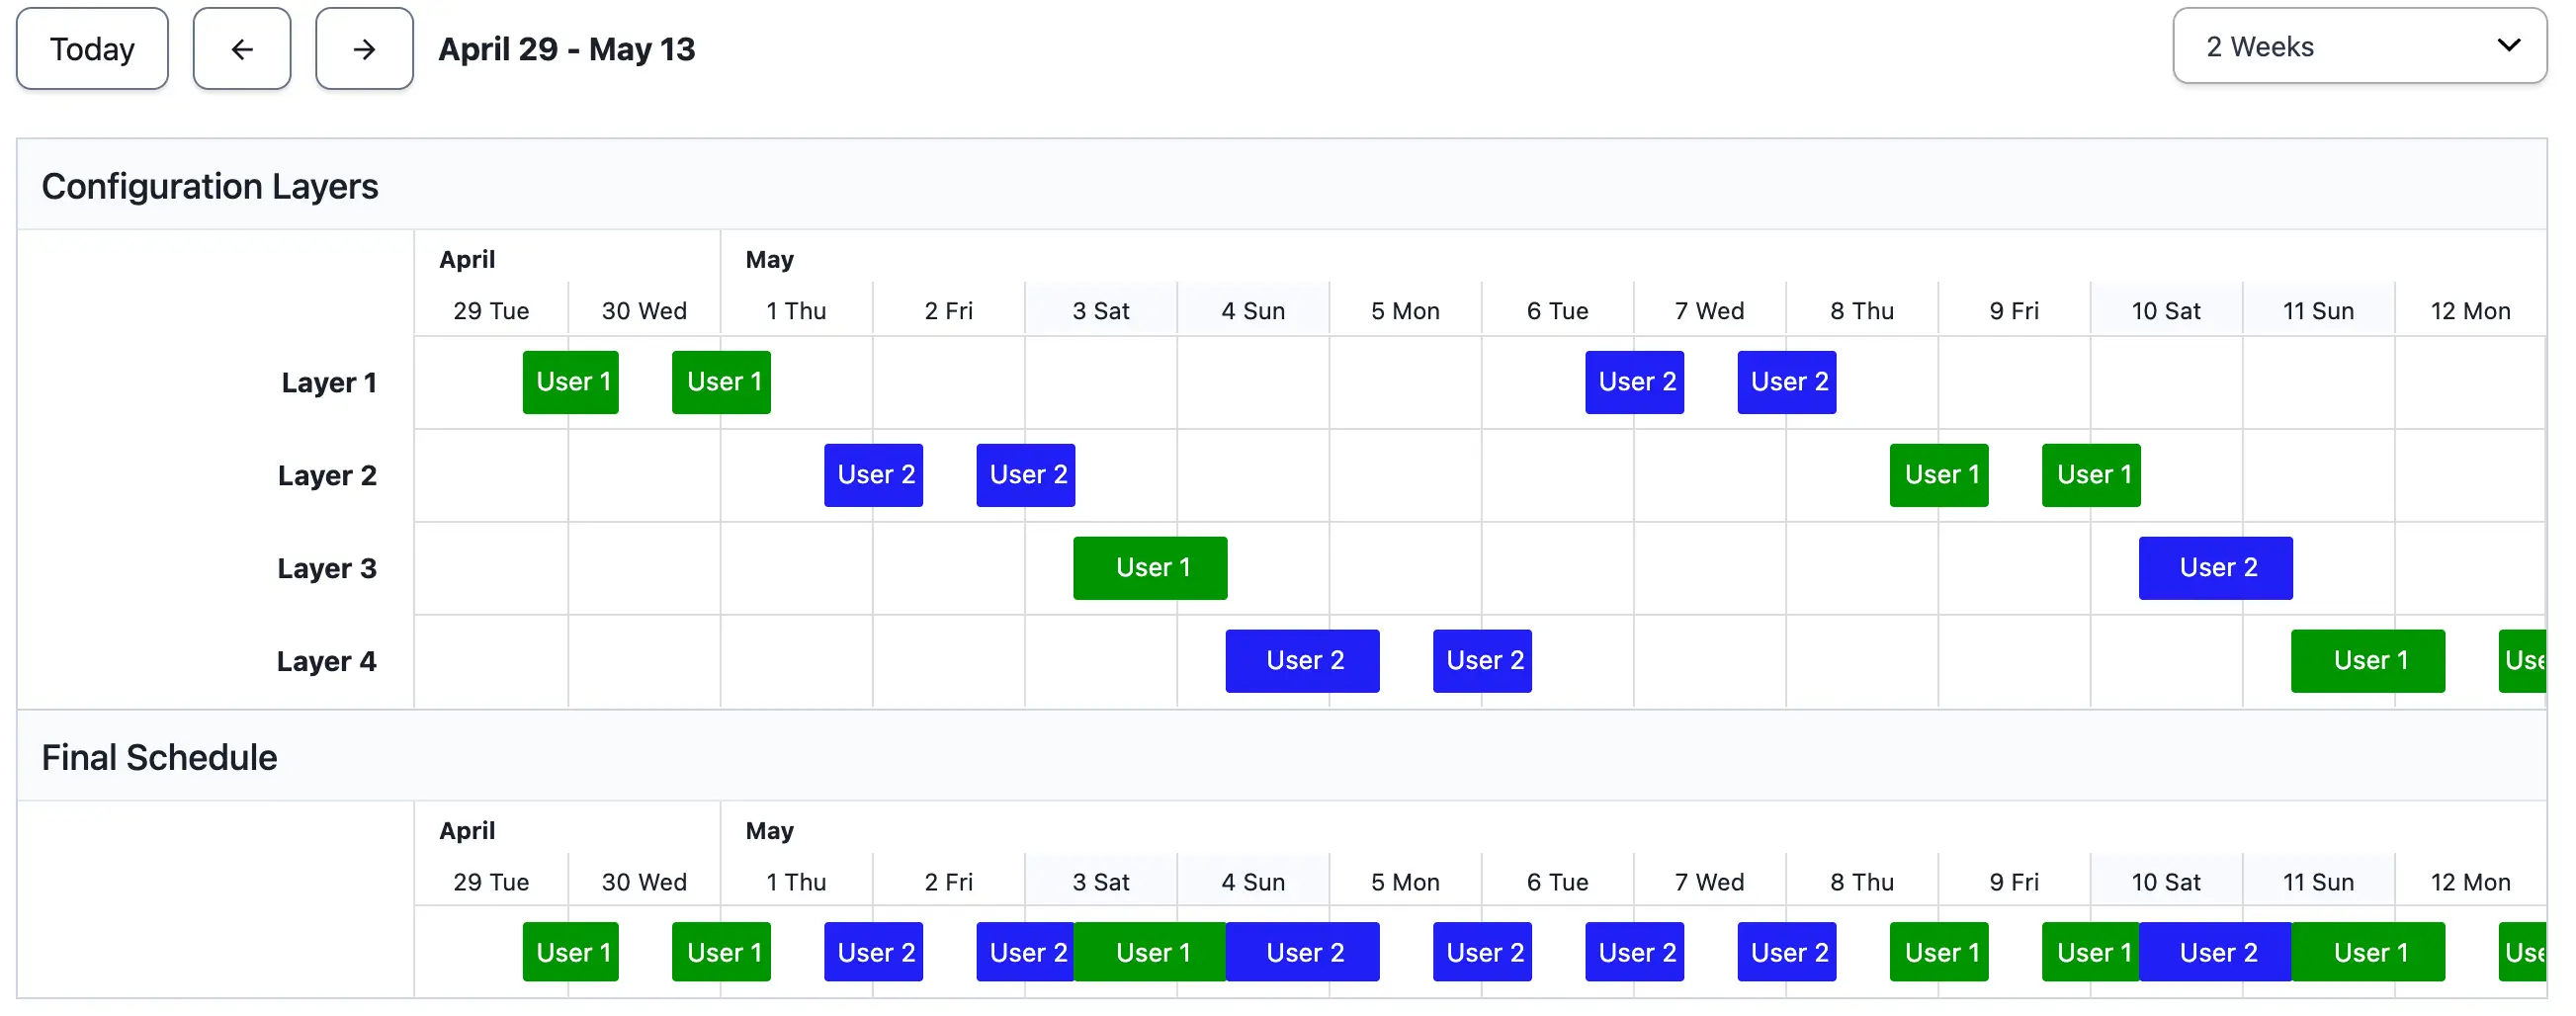
Example 3 final schedule
Example 4: Complex Split Shift Rotation
This example shows how to create a time-restricted four-person rotation where two users split each shift.
Ex. 4 Schedule Requirements
These users are on call between 12:00 AM and 10:00 AM with a shift length of five hours. After five hours, the next user comes on call to cover the schedule until 10:00 AM.
Ex. 4 Configuration
- Add four users to the schedule in Step 1.
- Under Restrict on-call shifts to specific times, click Edit Restrictions.
- Select Restrict on-call duty to specific times-of-the-day and click Add Restriction. Restrict the schedule from 12:00 AM to 10:00 AM.
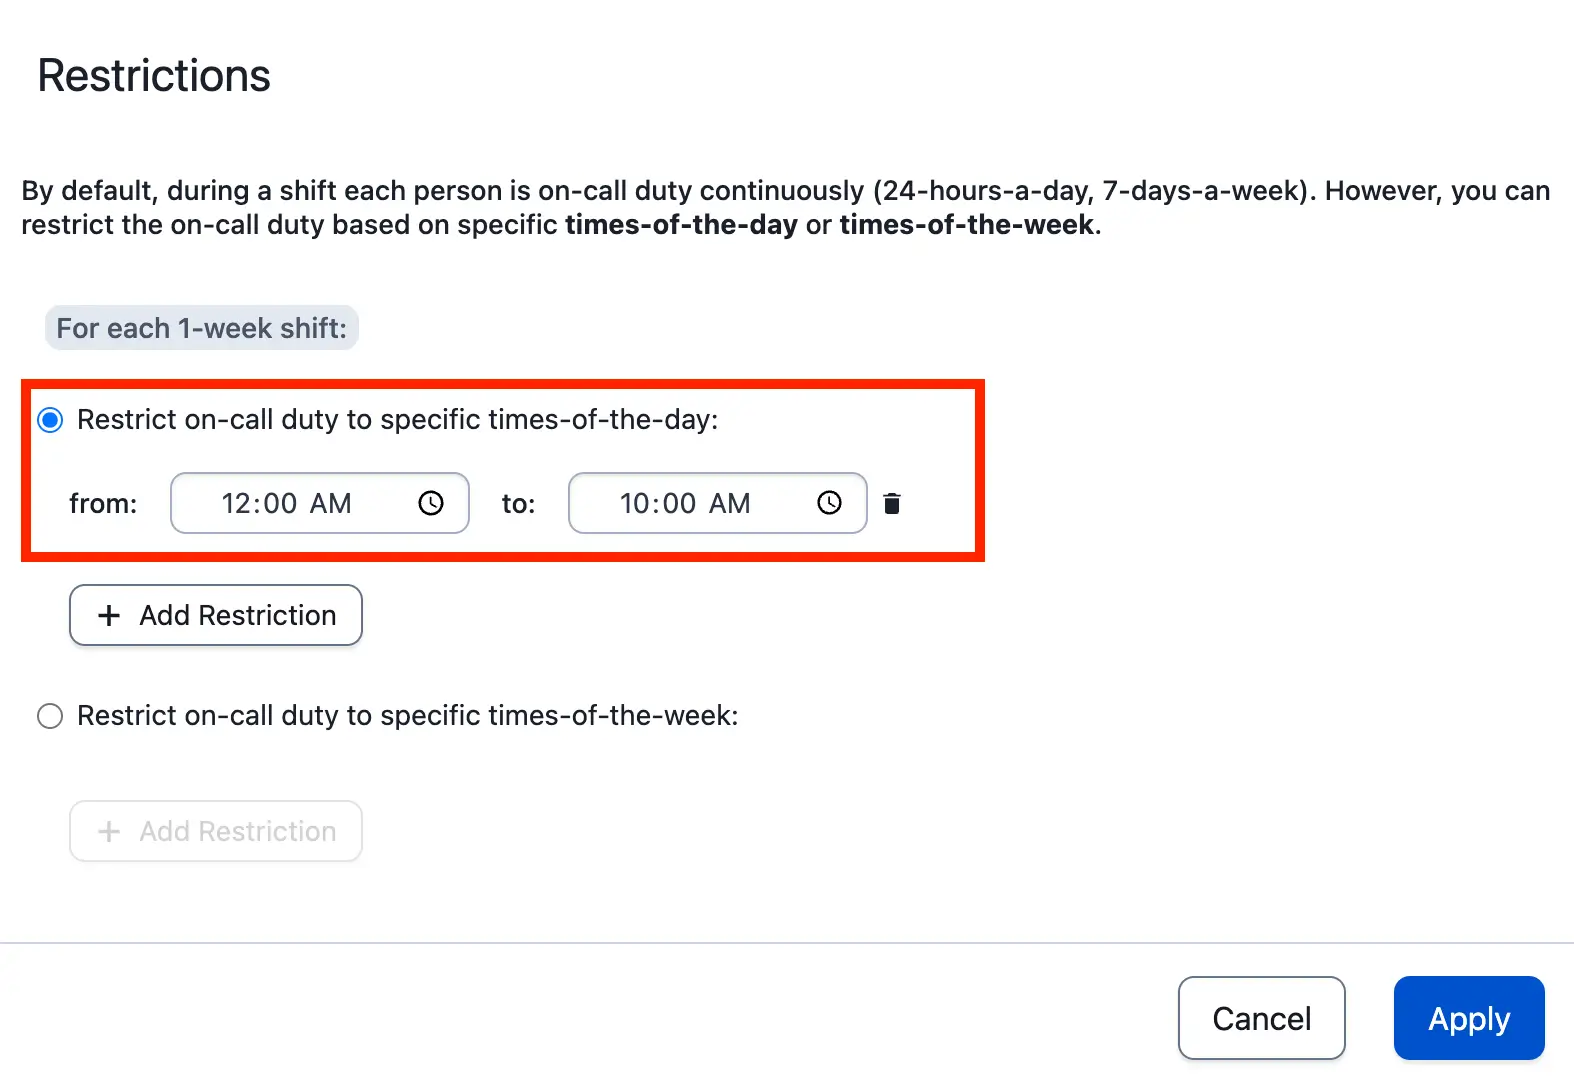
Example 4 restrictions
- Create a custom rotation type with a shift length of 12 hours. Set the handoff time to halfway through the shift: 5:00 AM.
- A 12-hour shift is required to ensure that shifts consistently begin at 12:00 AM and 5:00 AM.
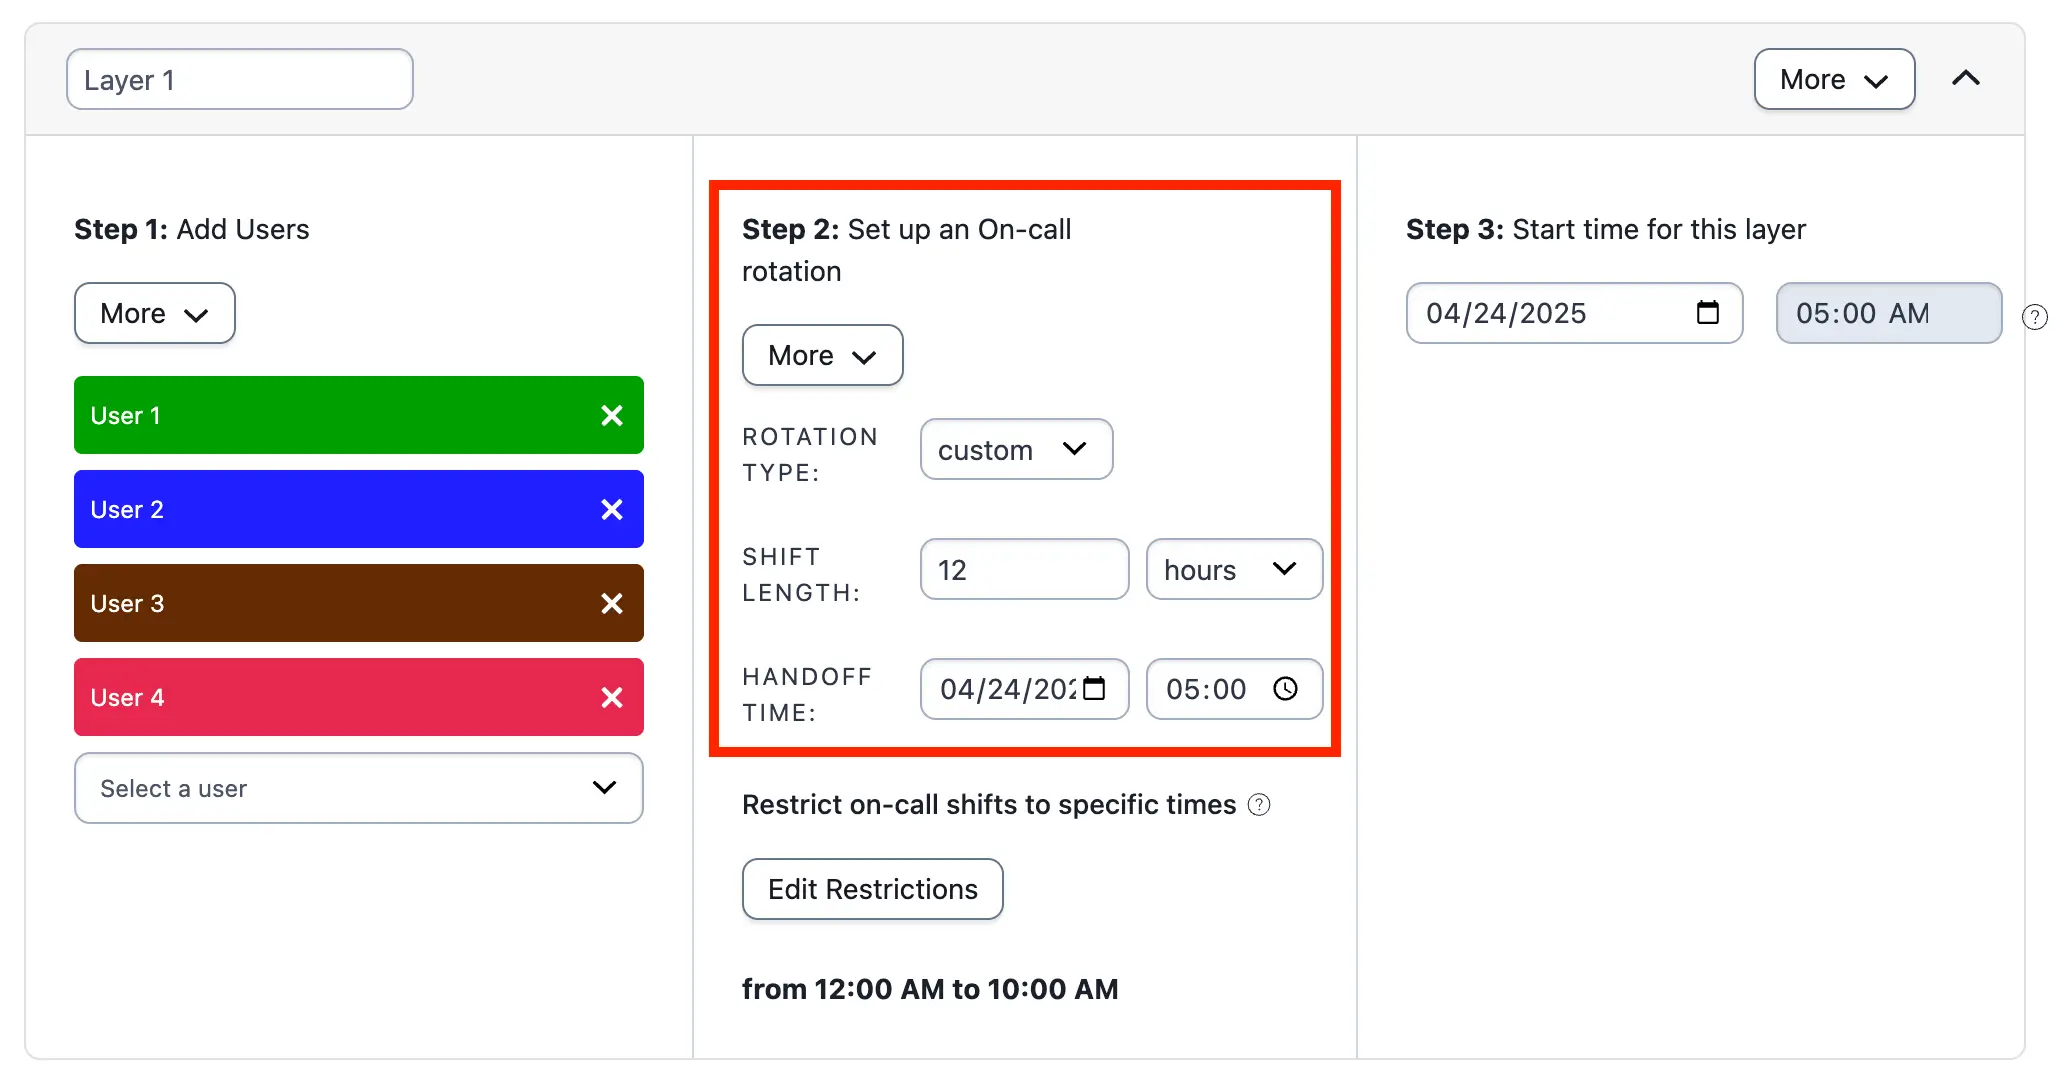
Example 4 rotation configuration
Ex. 4 Final Schedule

Example 4 final schedule
Example 5: Complex Schedule with Restrictions
In this example, User 5 and User 6 trade off the early morning shift. User 3 takes the morning and User 4 takes the evening shift during a four-day week. User 1 and User 2 take shifts on the elongated weekend:
- Monday and Wednesday: User 5 for seven hours, then User 3 for six hours, then User 4 for 11 hours.
- Tuesday and Thursday: User 6 for seven hours, User 3 for six hours, User 4 for 11 hours.
- Friday, Saturday, and Sunday: User 1 for 12 hours, User 2 for 12 hours.
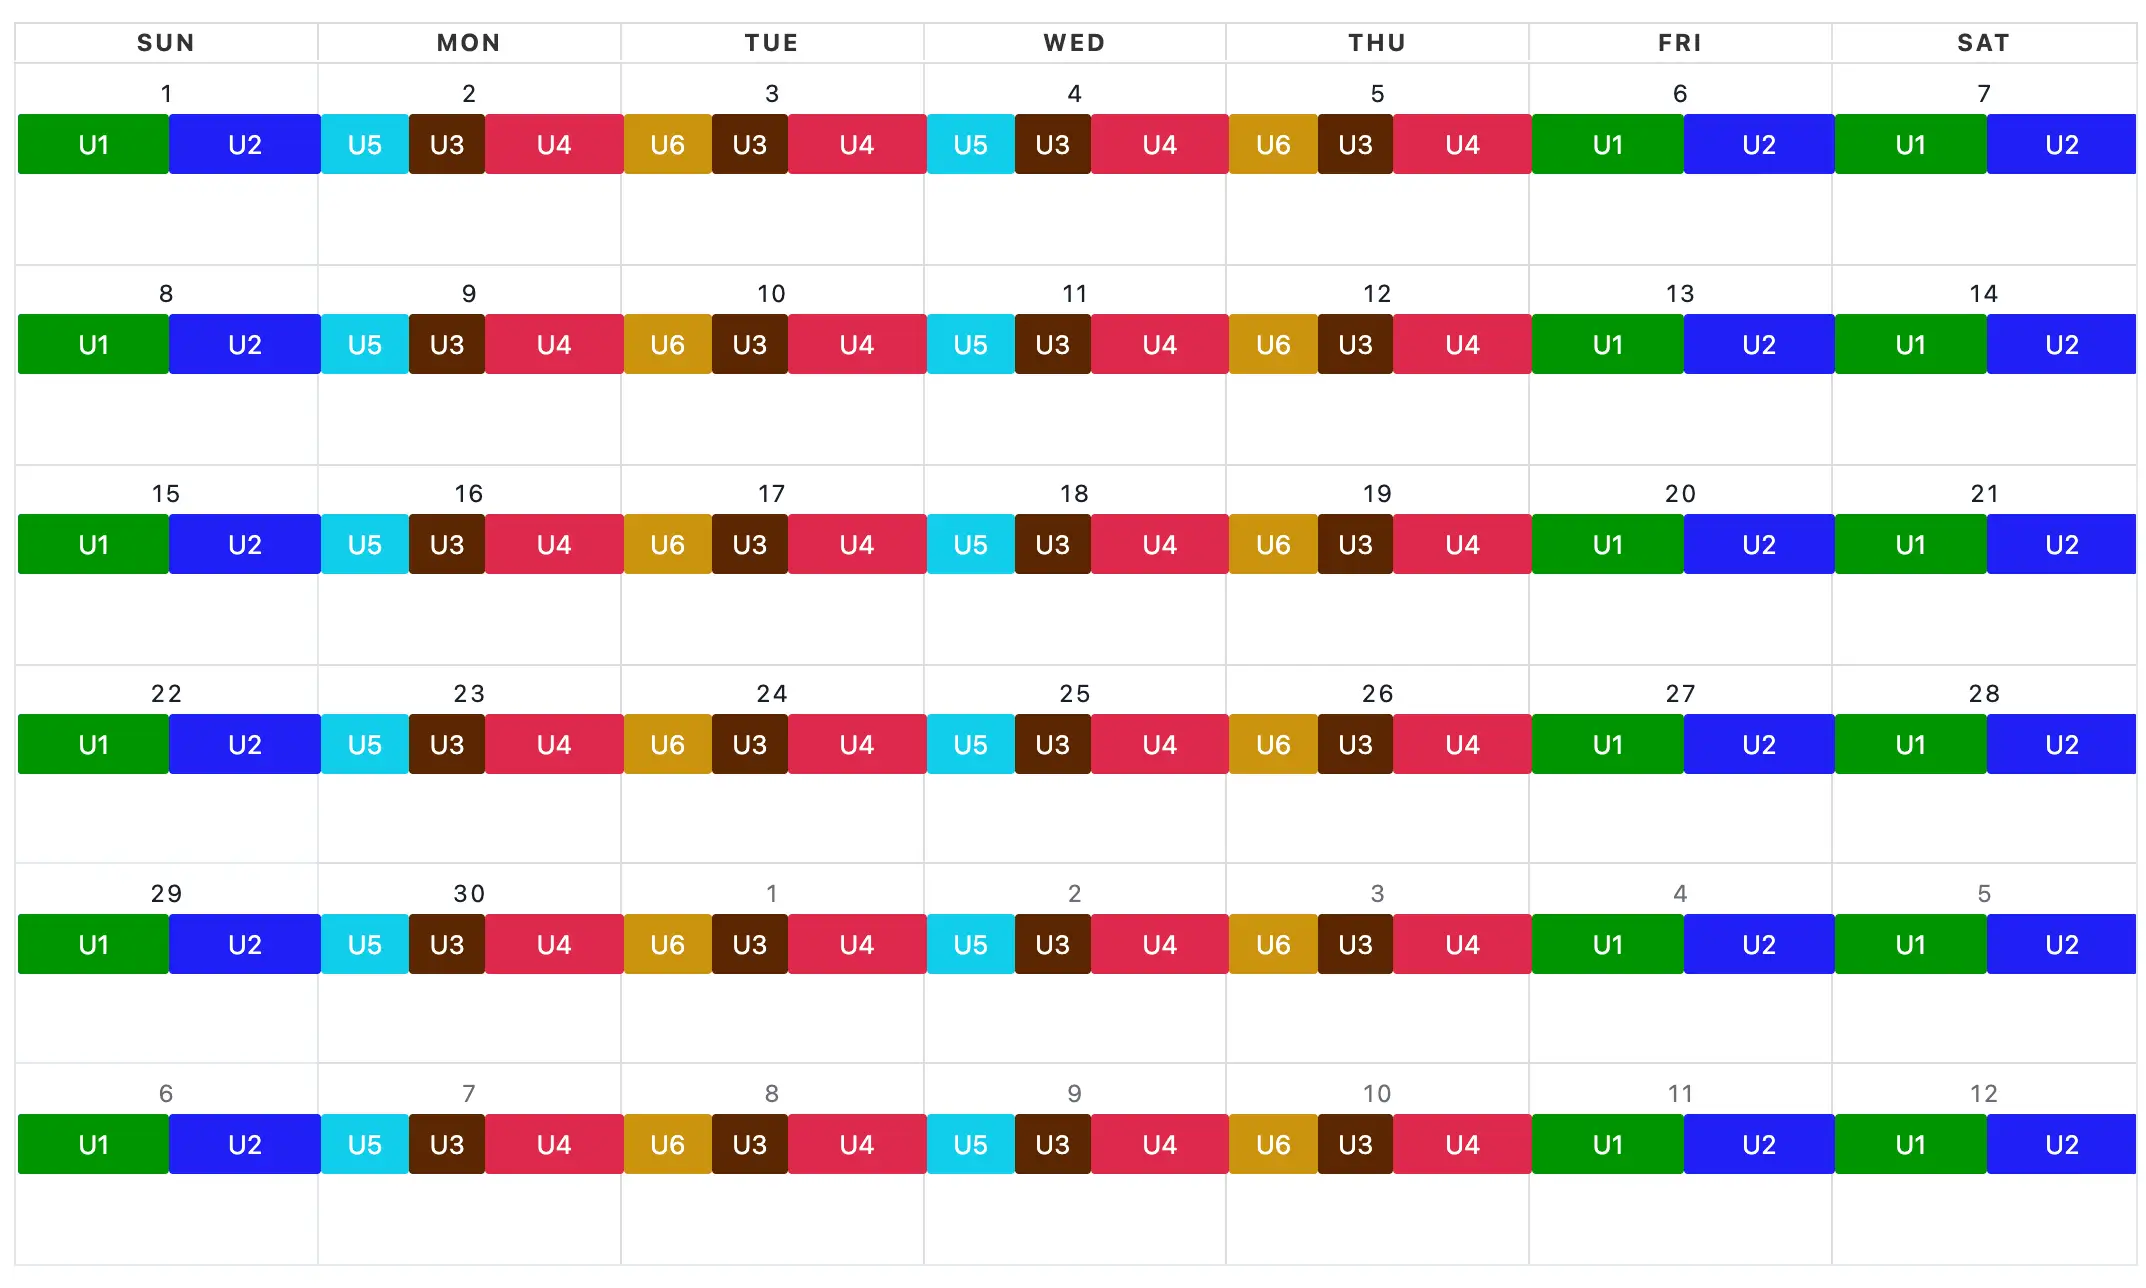
Example 5
User 1 and User 2 are straightforward to schedule because they have consistent shifts. Create a layer for each remaining user and restrict on-call duty to specific times of the week based on their scheduled shifts.
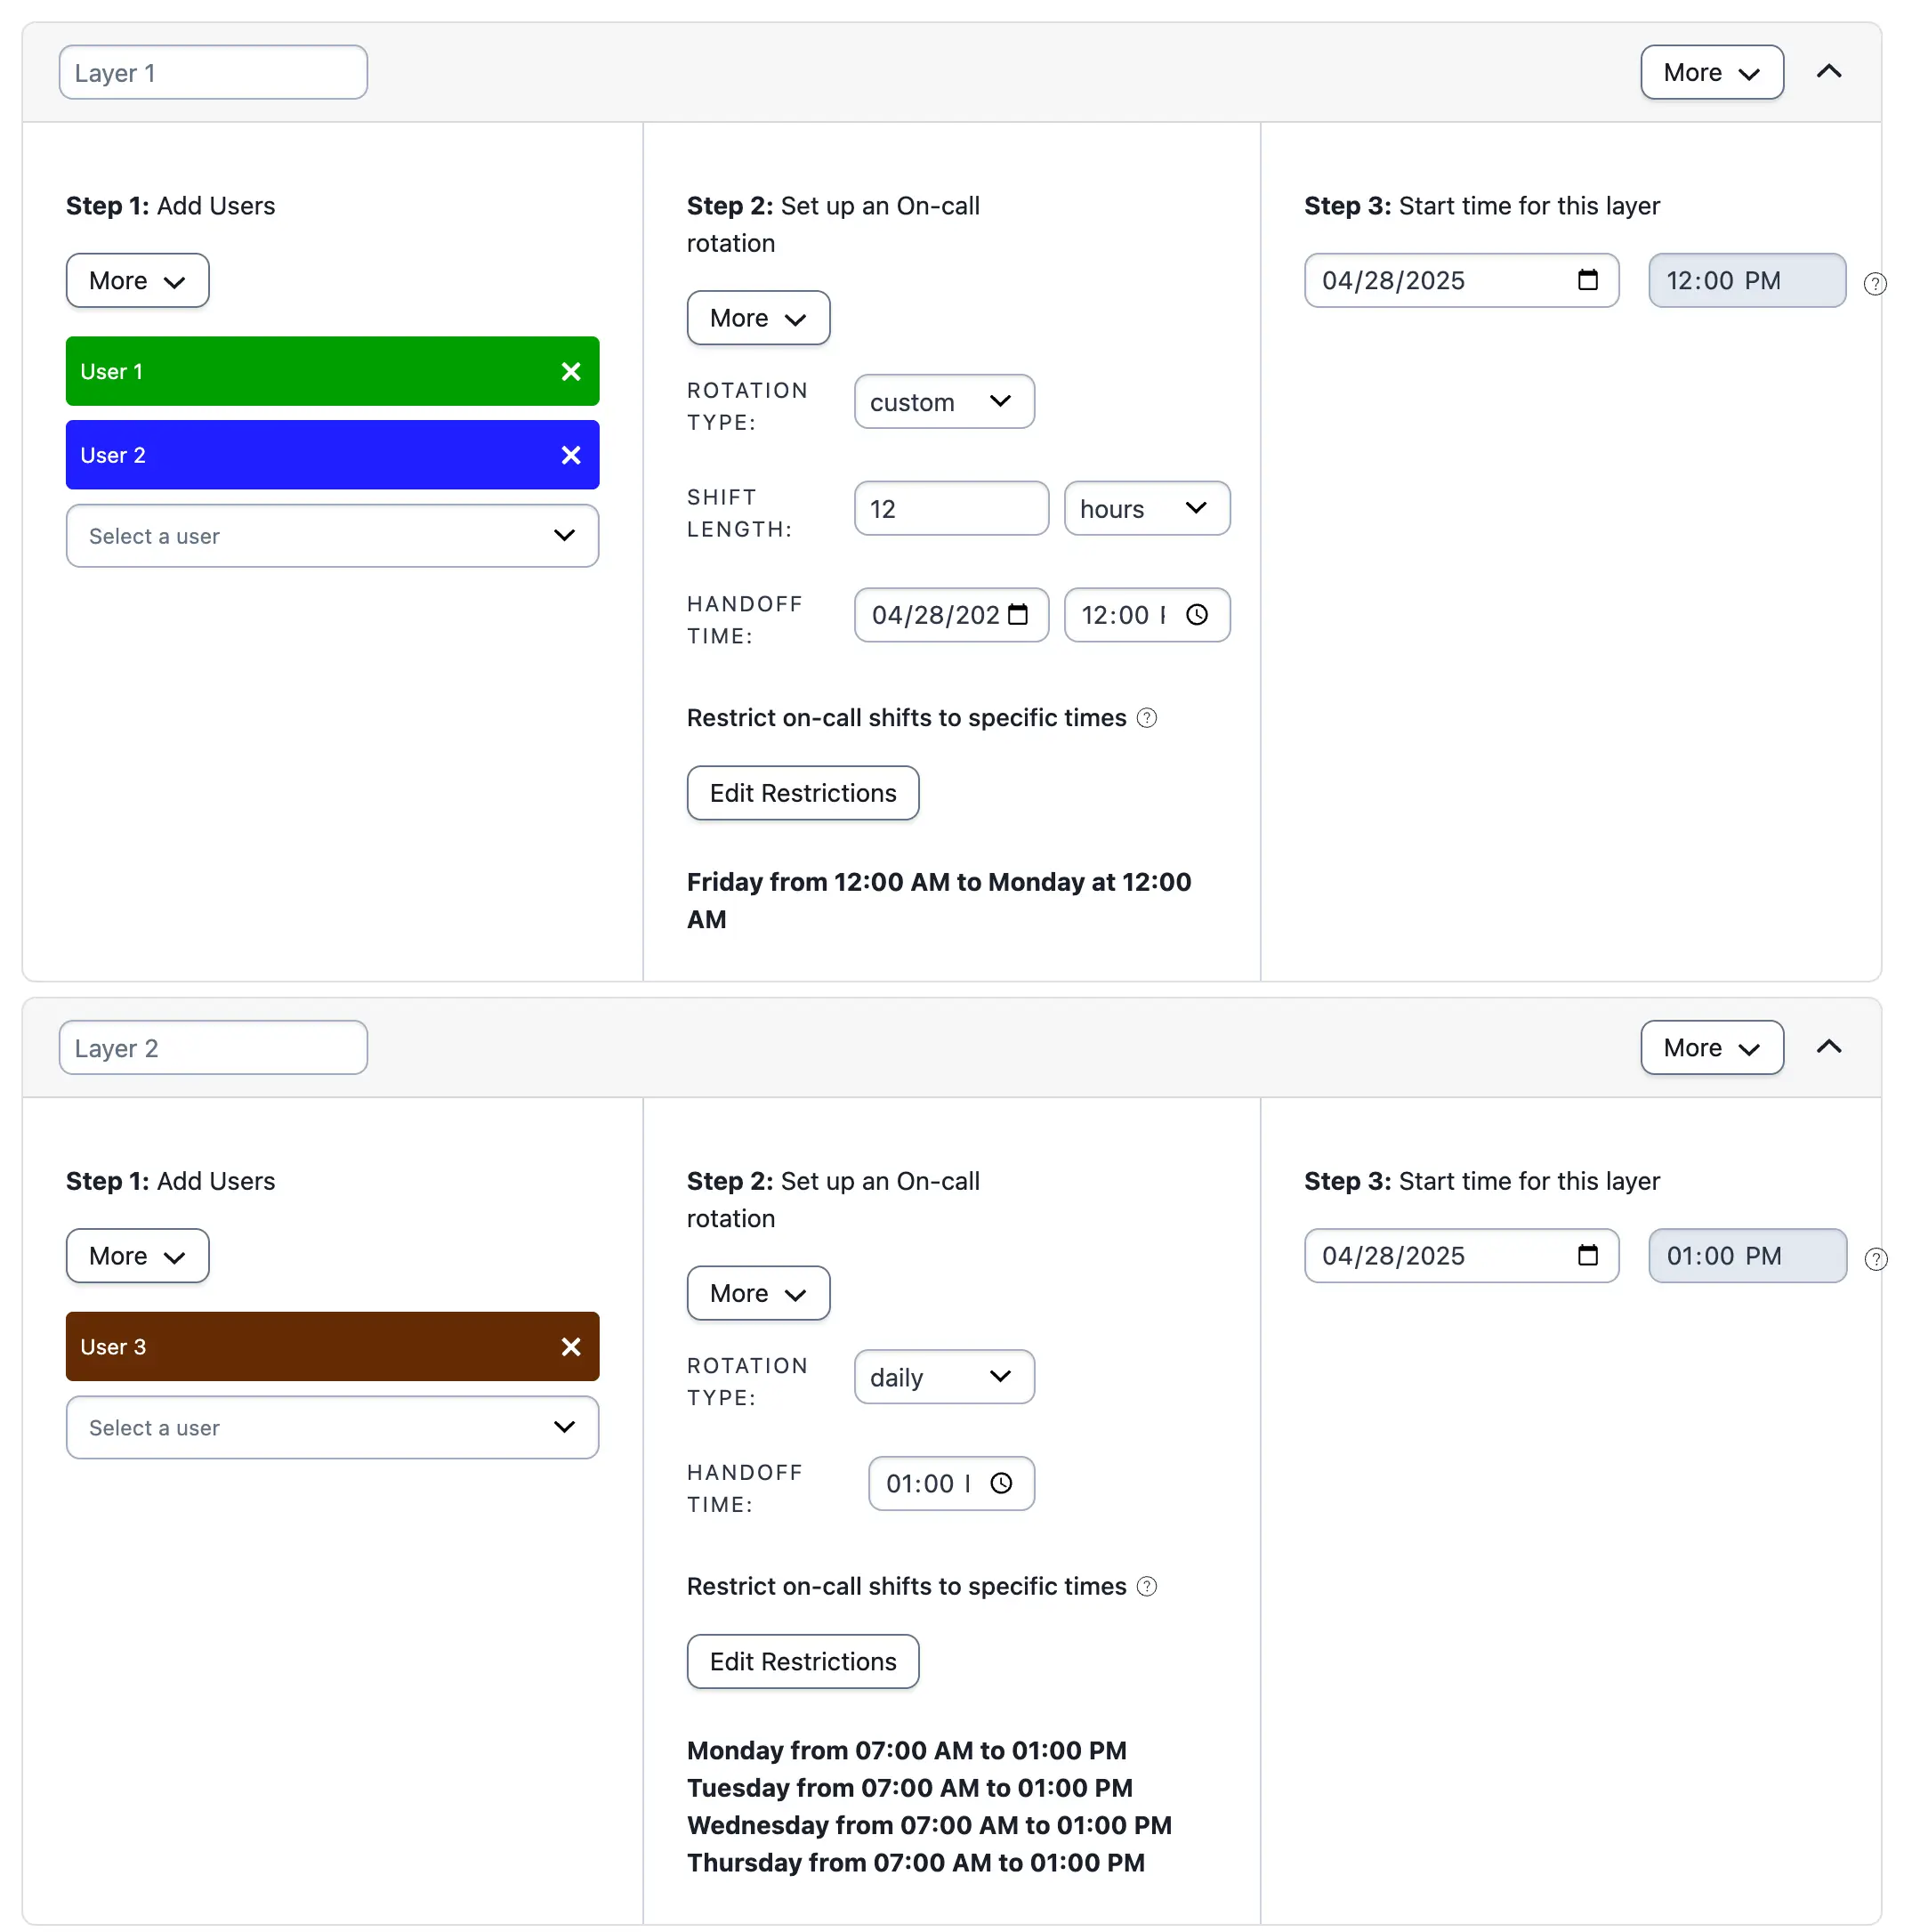
Example 5, layers 1 and 2
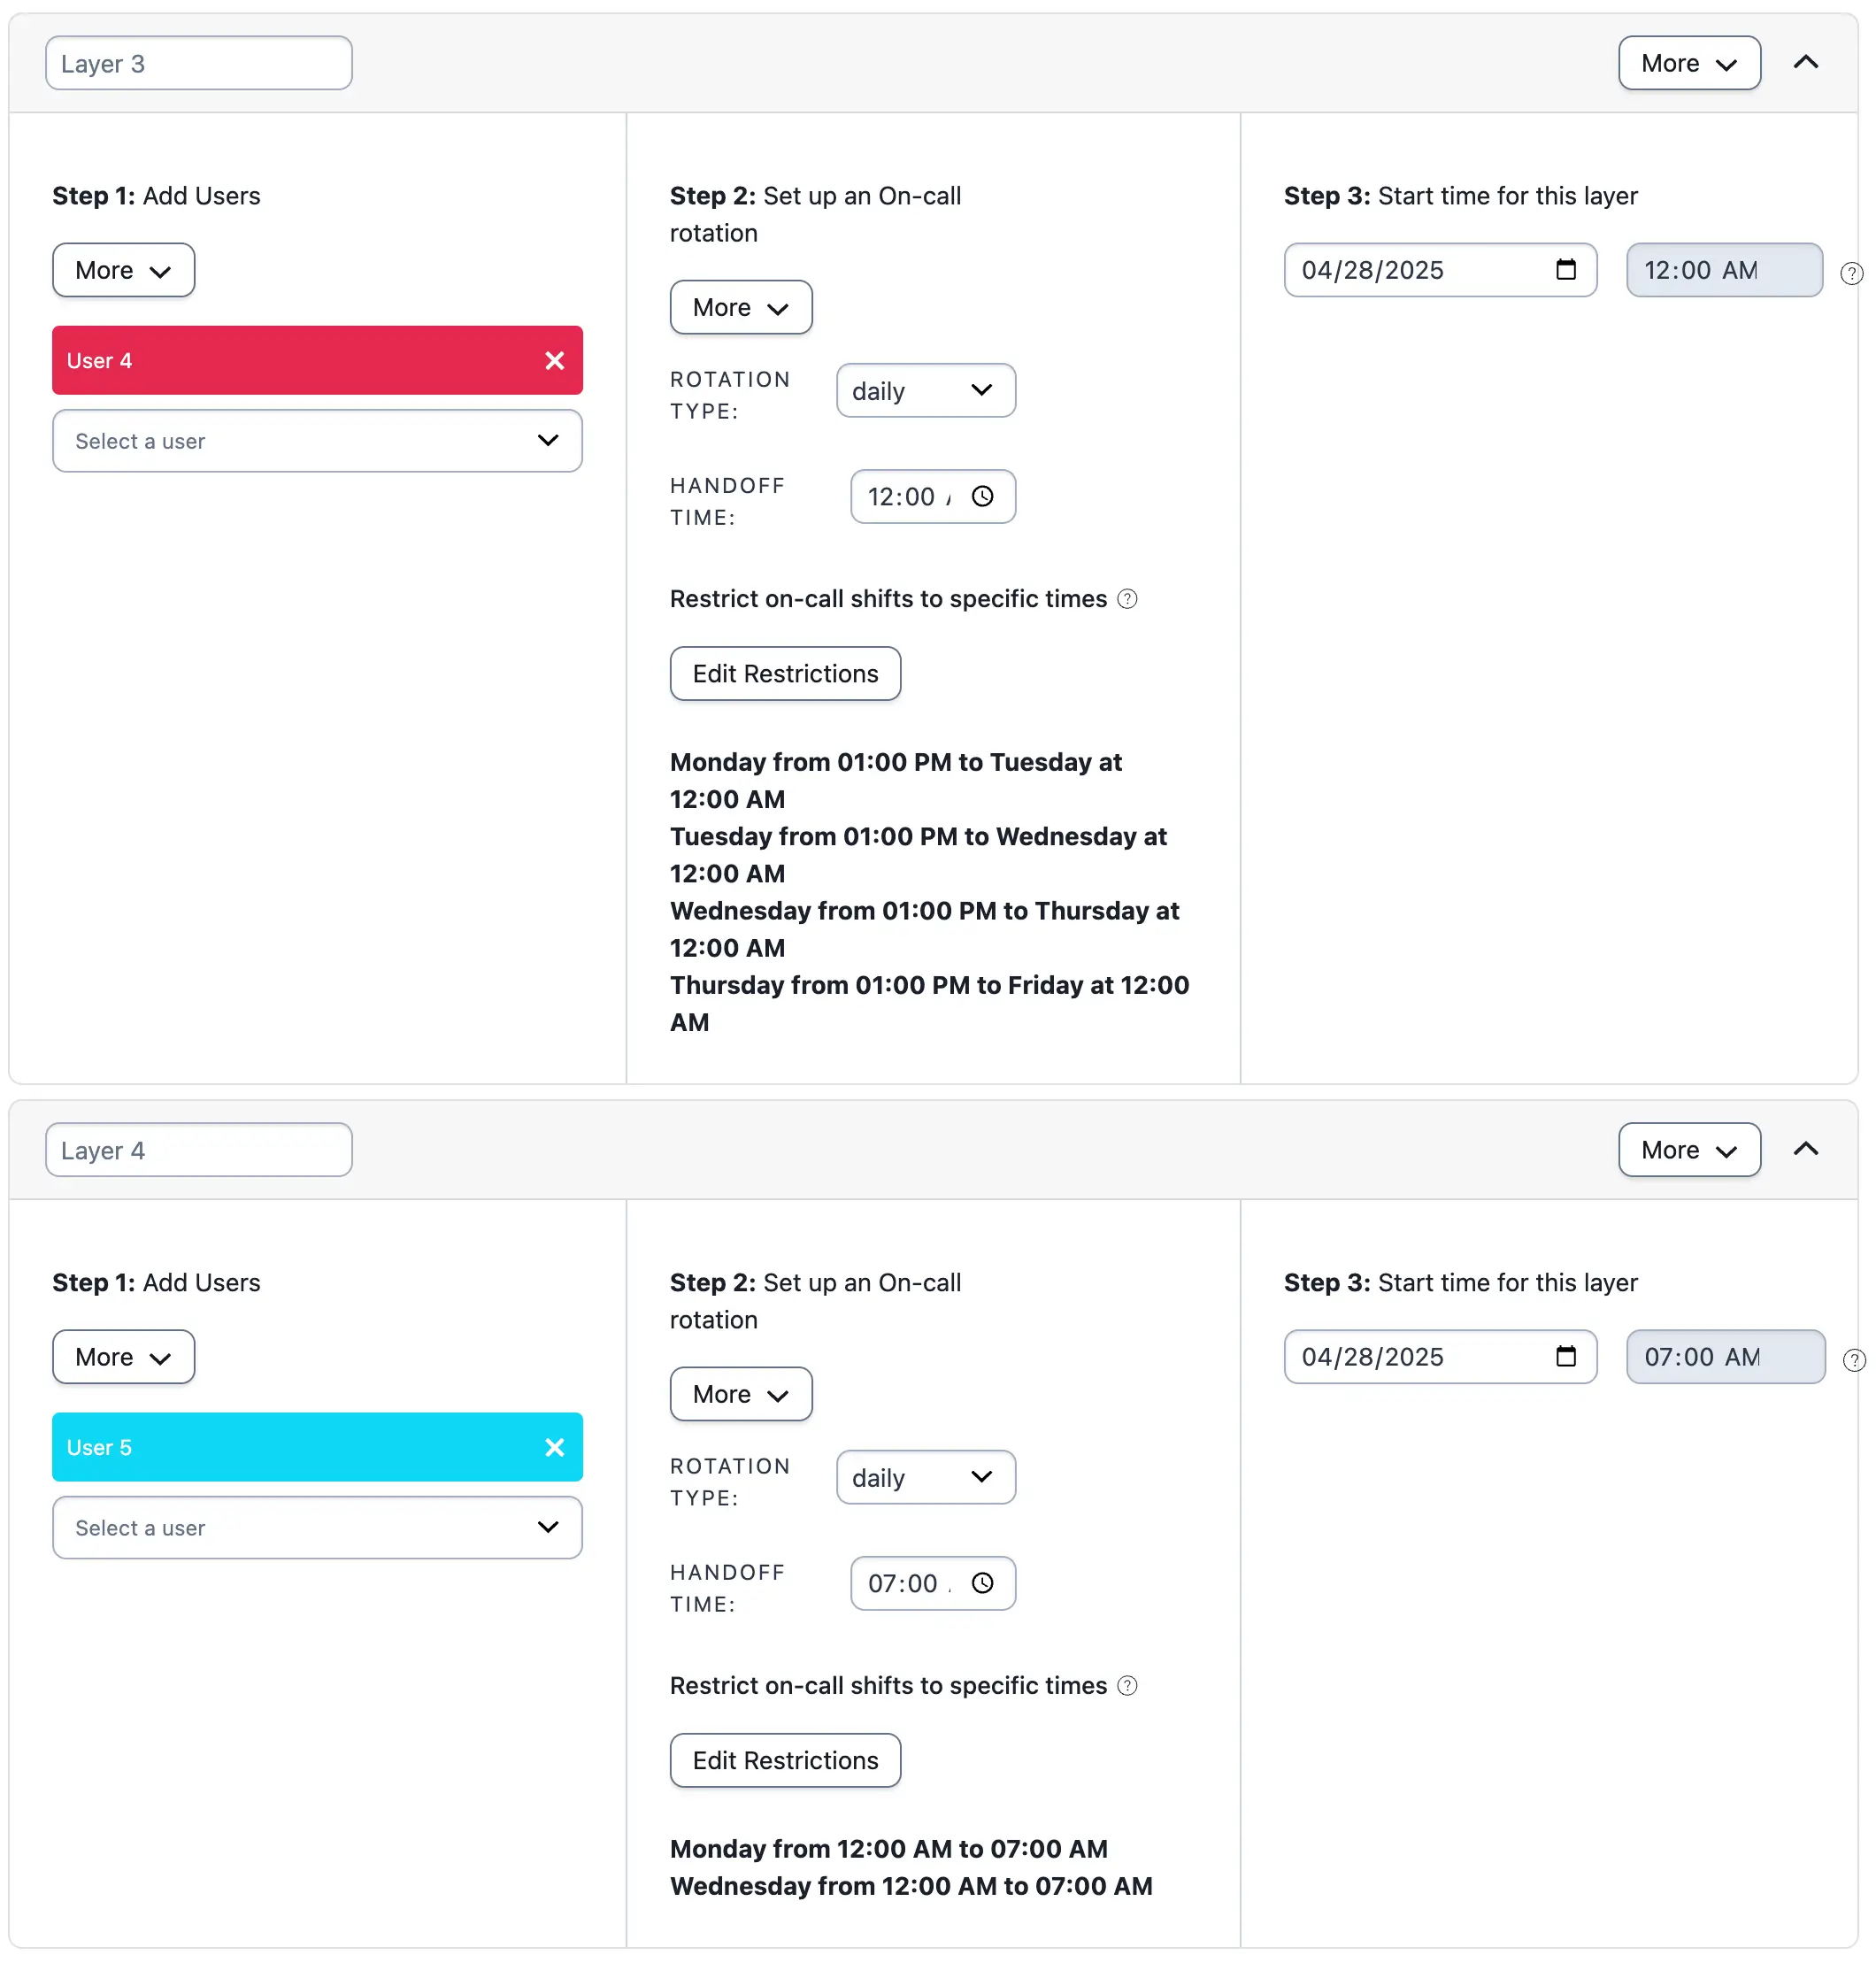
Example 5, layers 3 and 4
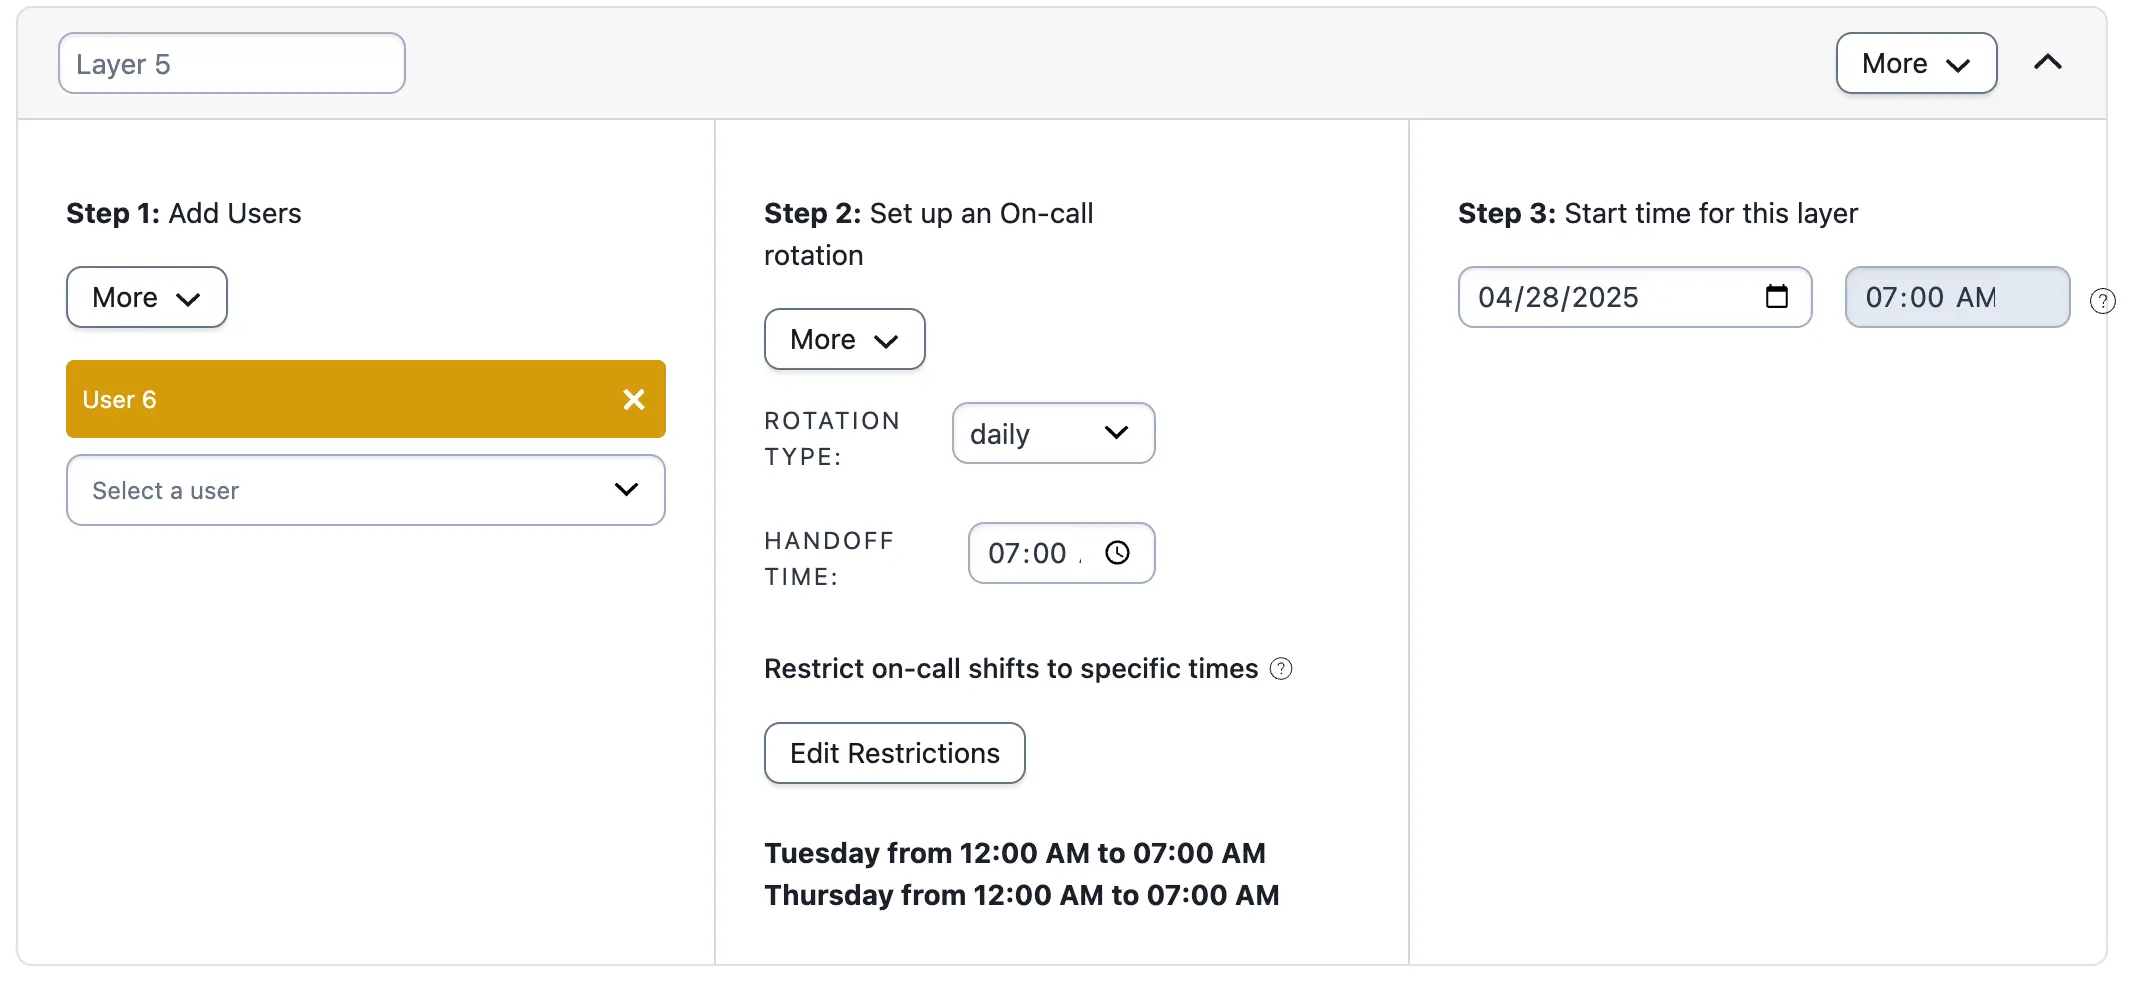
Example 5, layer 5
The final schedule follows:
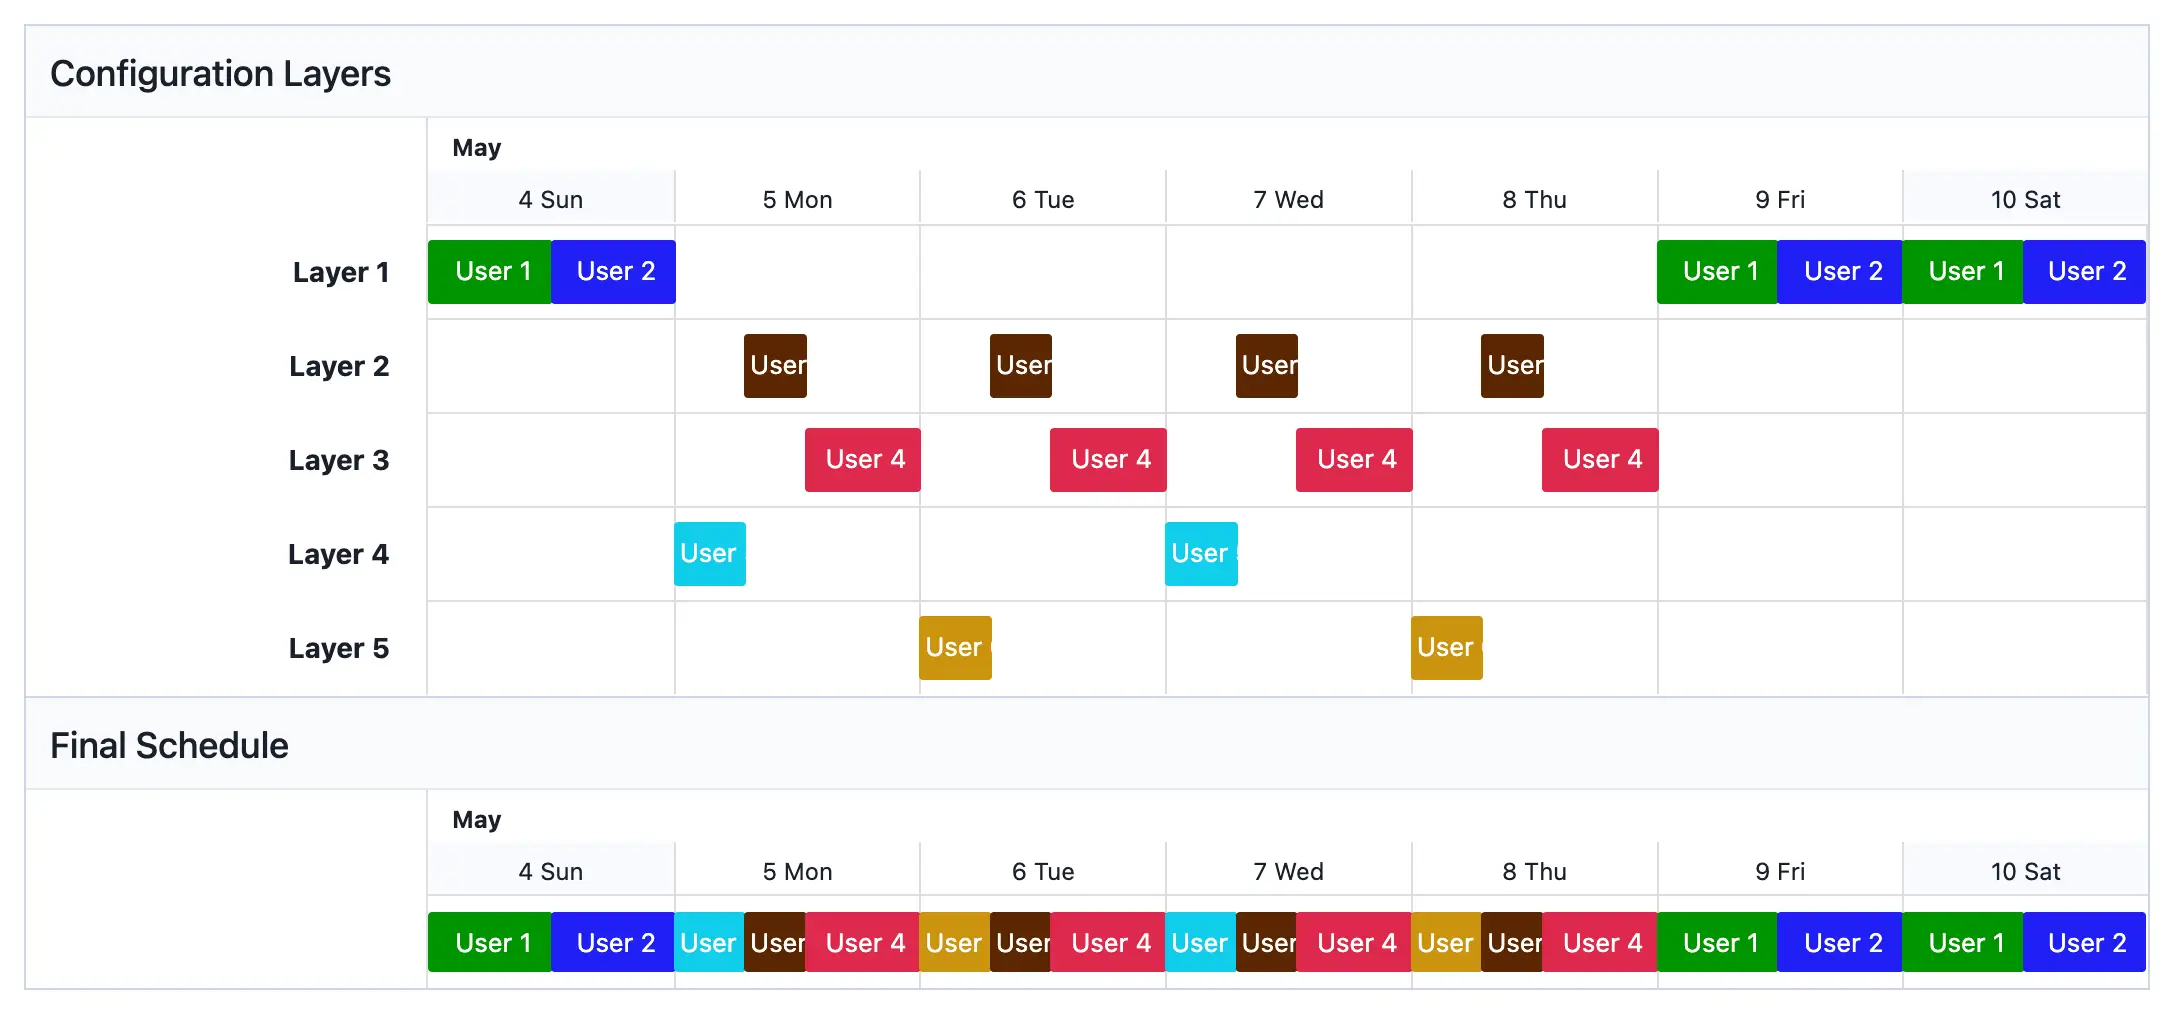
Example 5 with all layers
You can overlap layers to simplify the schedule. Moving the layer with User 1 and User 2 to the bottom — since lower schedule layers take precedence over higher layers — lets you simplify some of the restrictions. For example, Users 3, 4, and 5 then only need to be restricted by time of day.
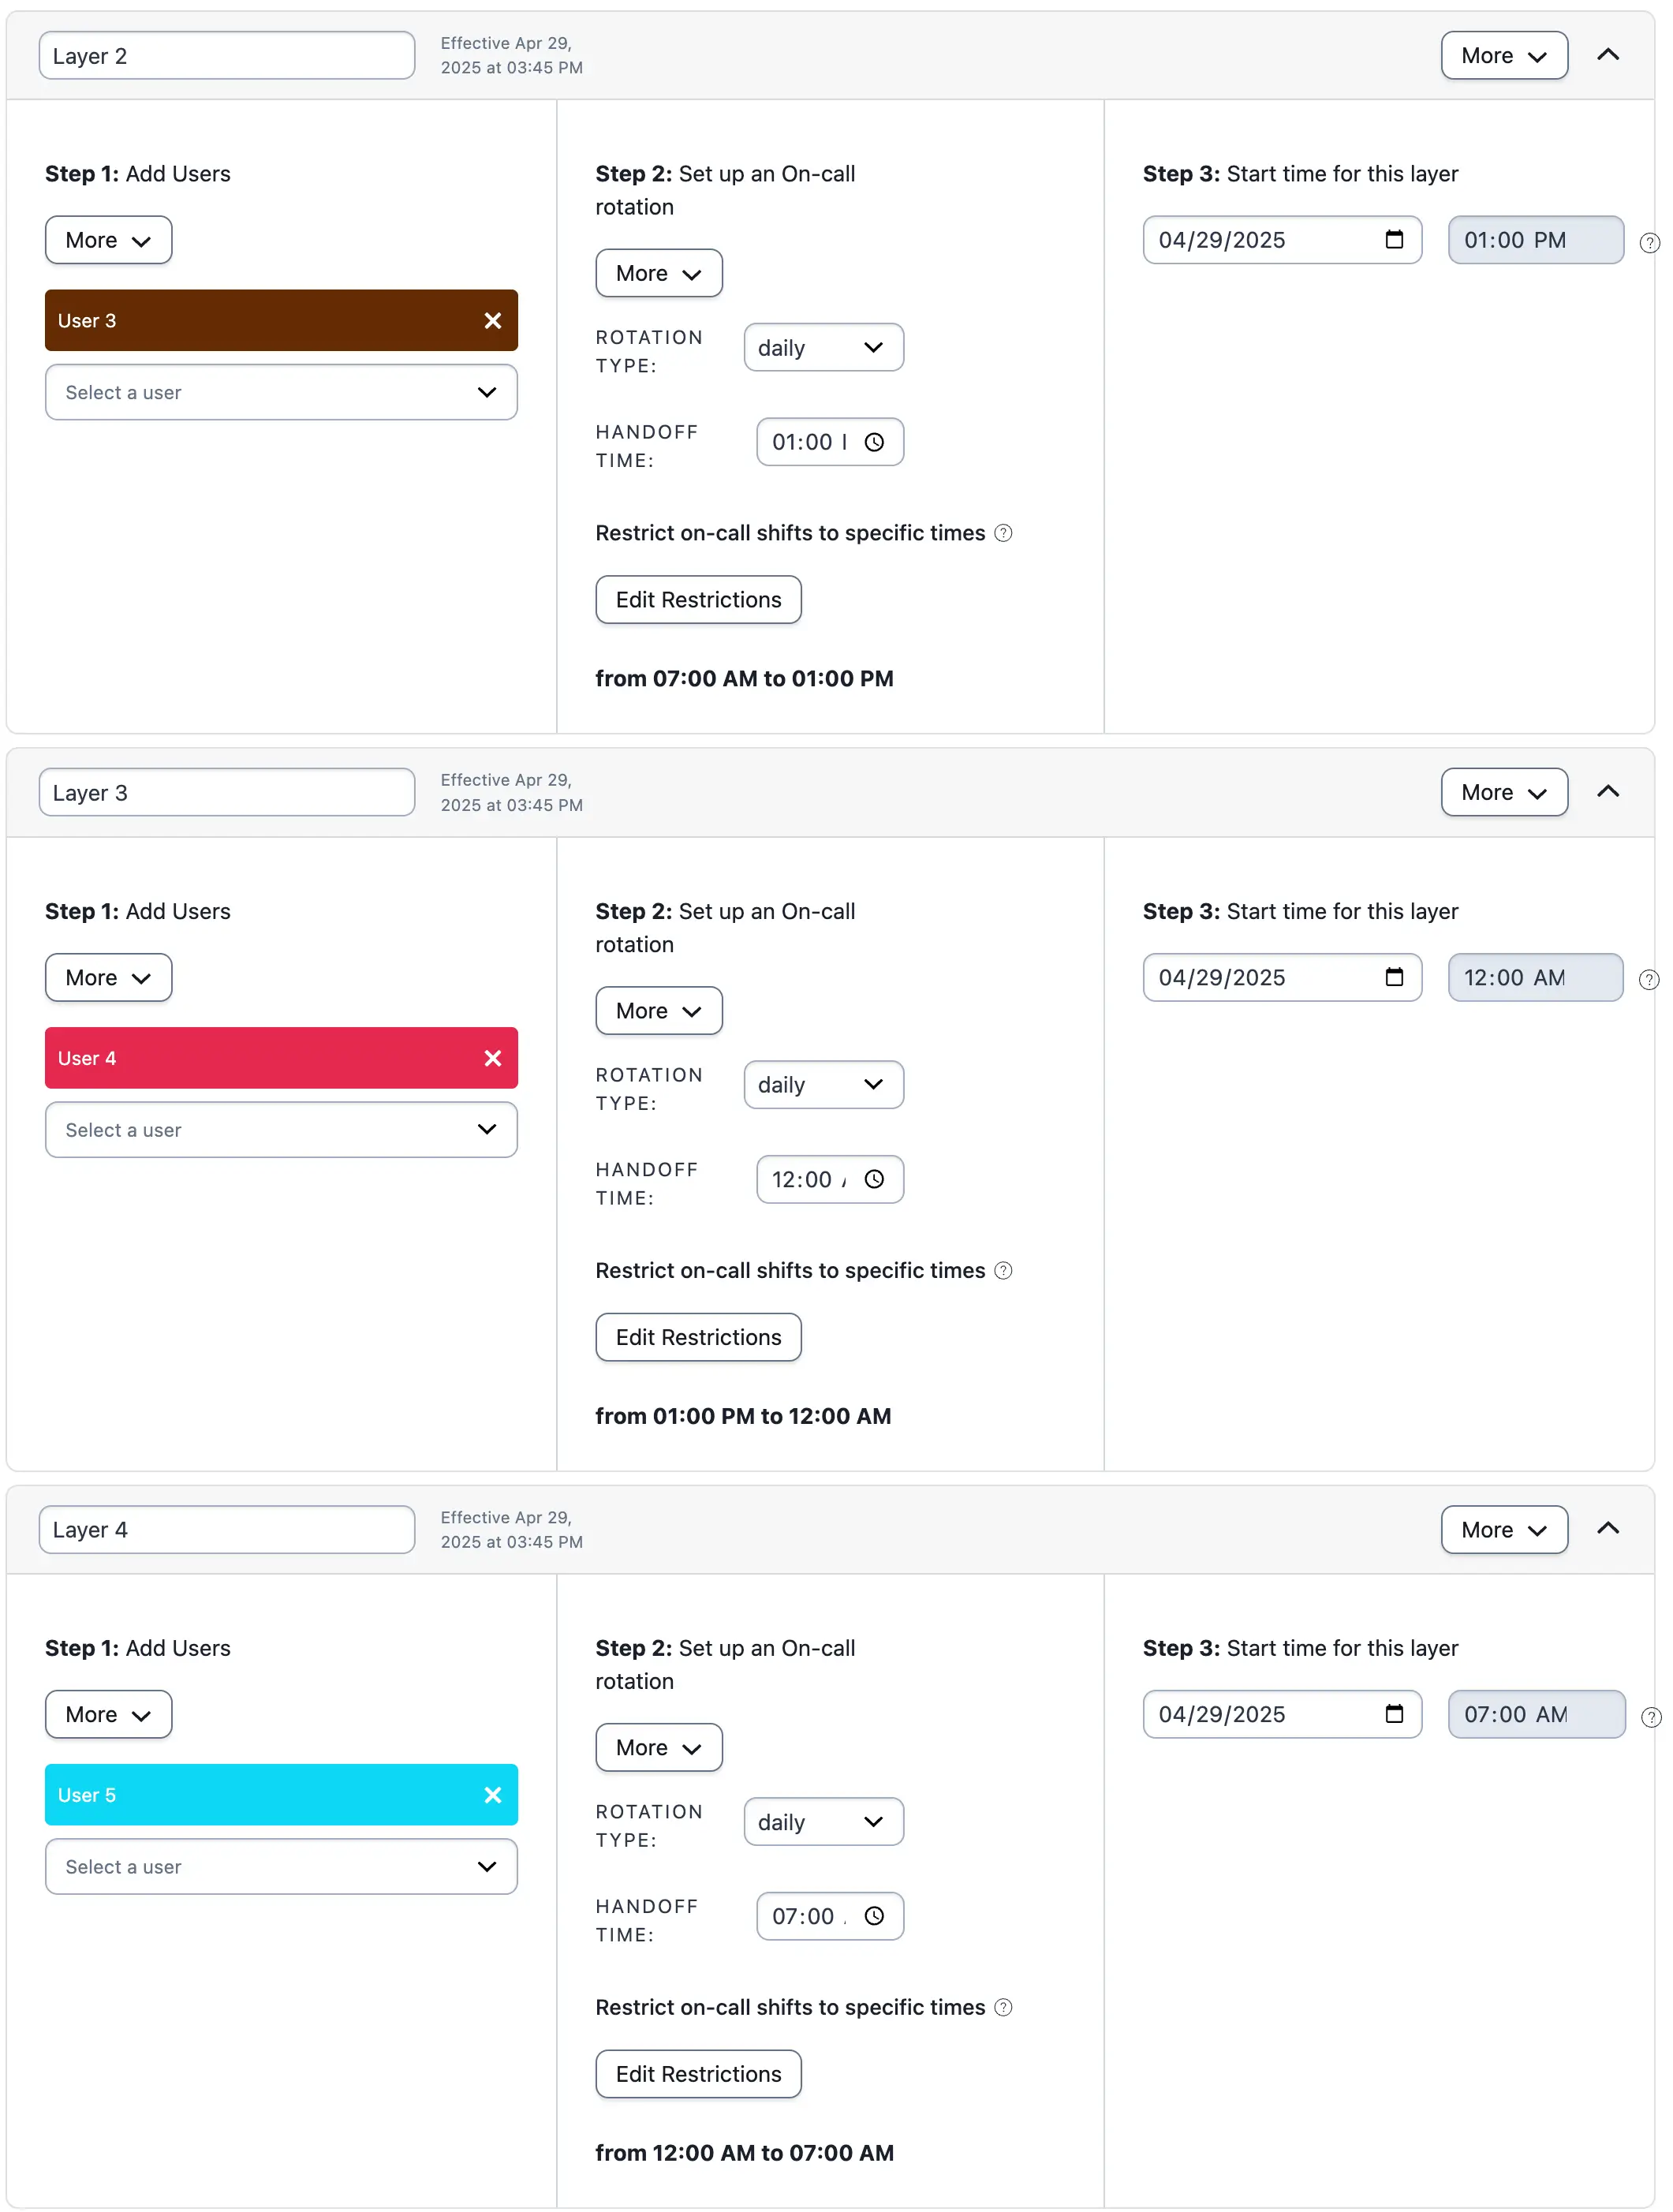
Example 5, layers 2, 3 and 4 alternative
Ex. 5 Final Schedule
By moving the layer with Users 1 and 2 to the bottom and keeping the restrictions for User 6 the same, these layers overwrite the higher layers. This produces the same final schedule as before, but with fewer restrictions outlined.
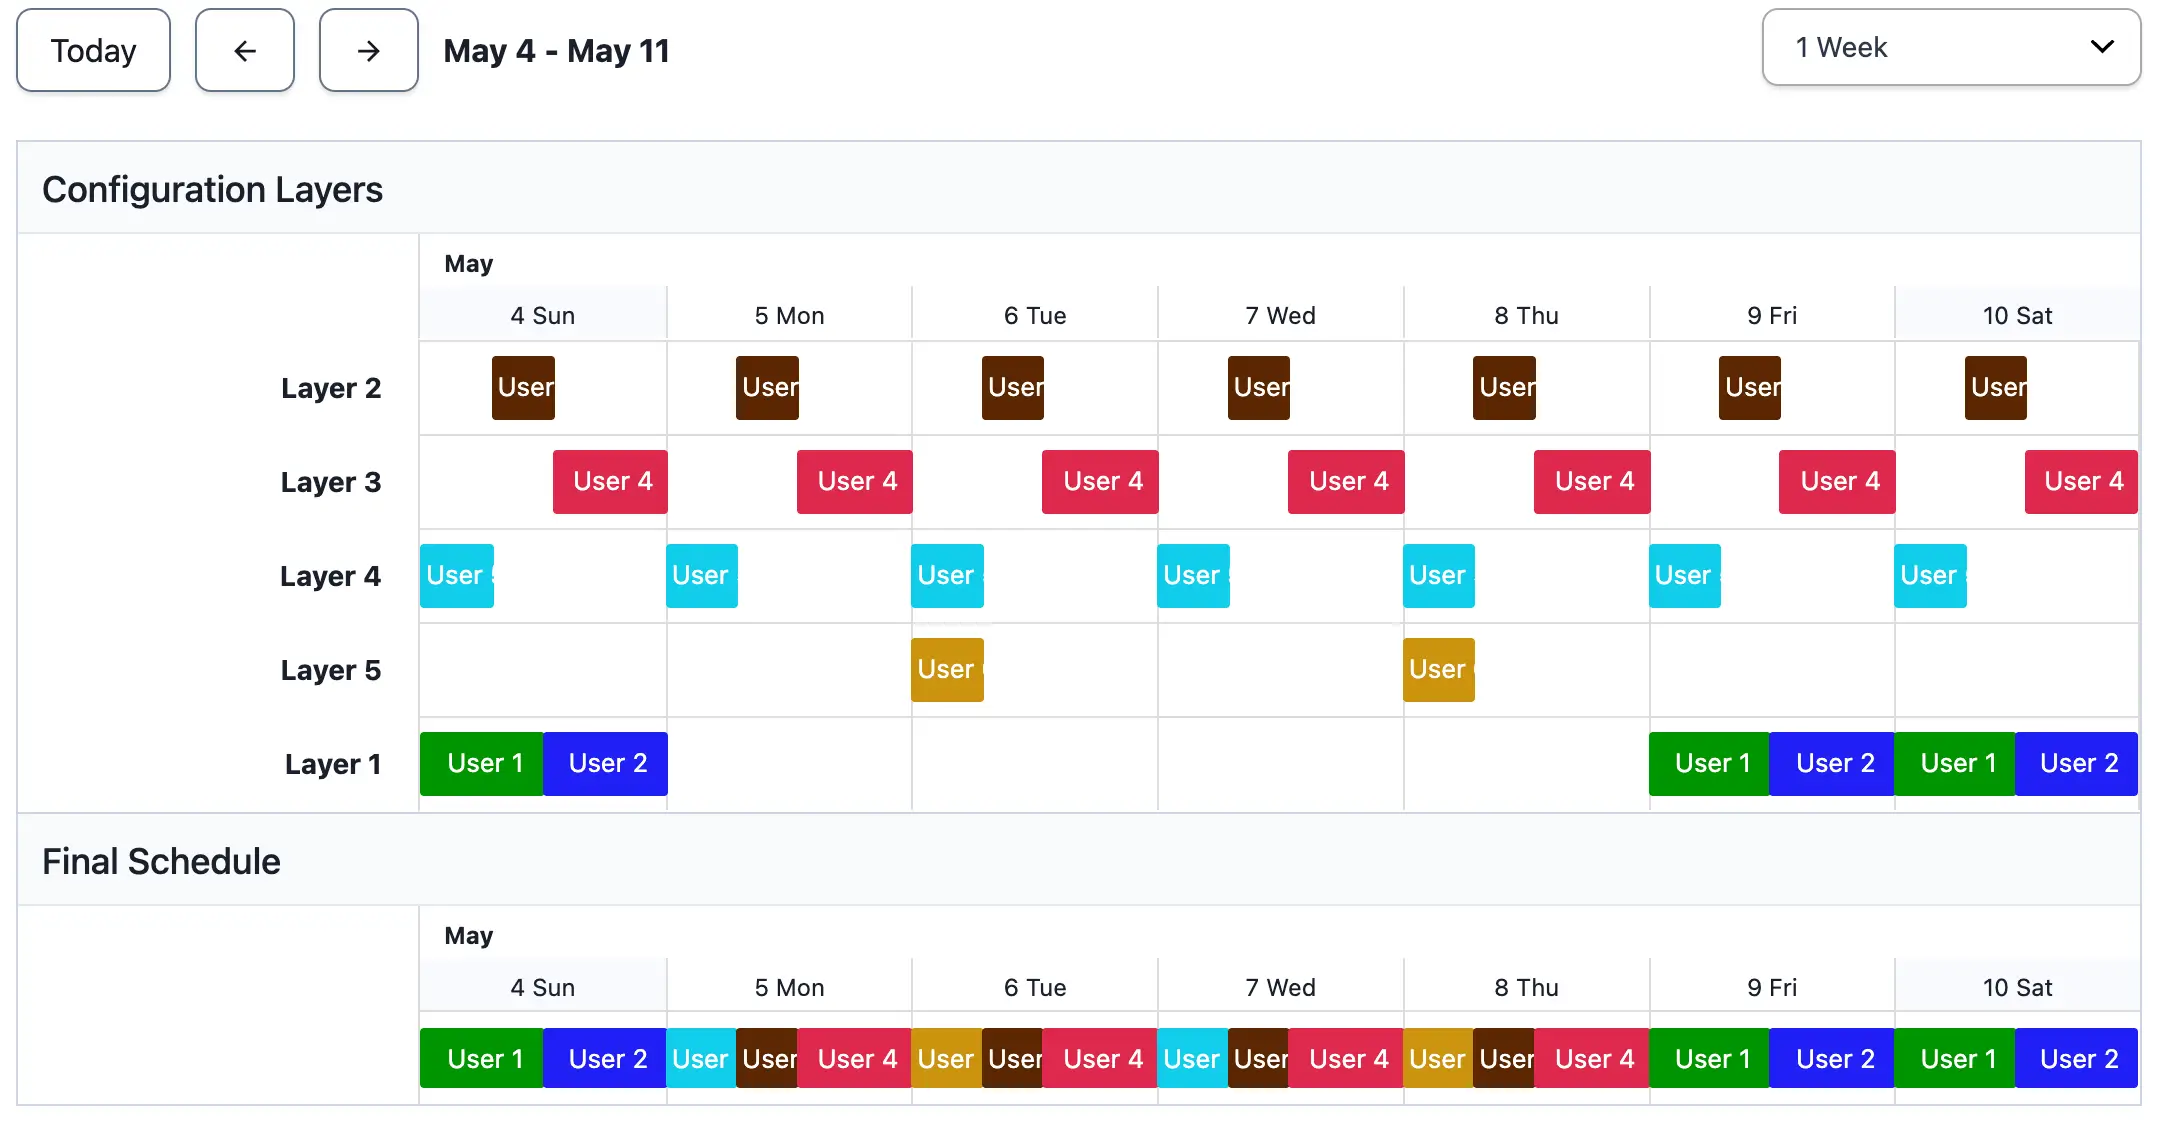
Example 5 final schedule using overlapping layers
Example 6: Create Primary and Secondary On-Call Schedules
Creating primary and secondary schedules is helpful when the primary responder misses a notification. This example uses a primary and secondary schedule. You may add more backup schedules to an escalation policy as needed.
Create a Primary On-Call Schedule
- Navigate to People Schedules and click New Schedule.
- Enter a Schedule name, and optionally enter a description and adjust the Time zone.
- Configure the schedule to meet your primary on-call needs:
| Field | Value |
|---|---|
| Users | Select users from the dropdown list. |
| Rotation type | Select the desired rotation type from the dropdown menu. |
| Handoff Time | Set the desired handoff time. |
| Start time | Set the schedule start time. |
| Add Restrictions | If necessary, add restrictions to the on-call shifts. |
- Review the schedule and click Save Schedule.
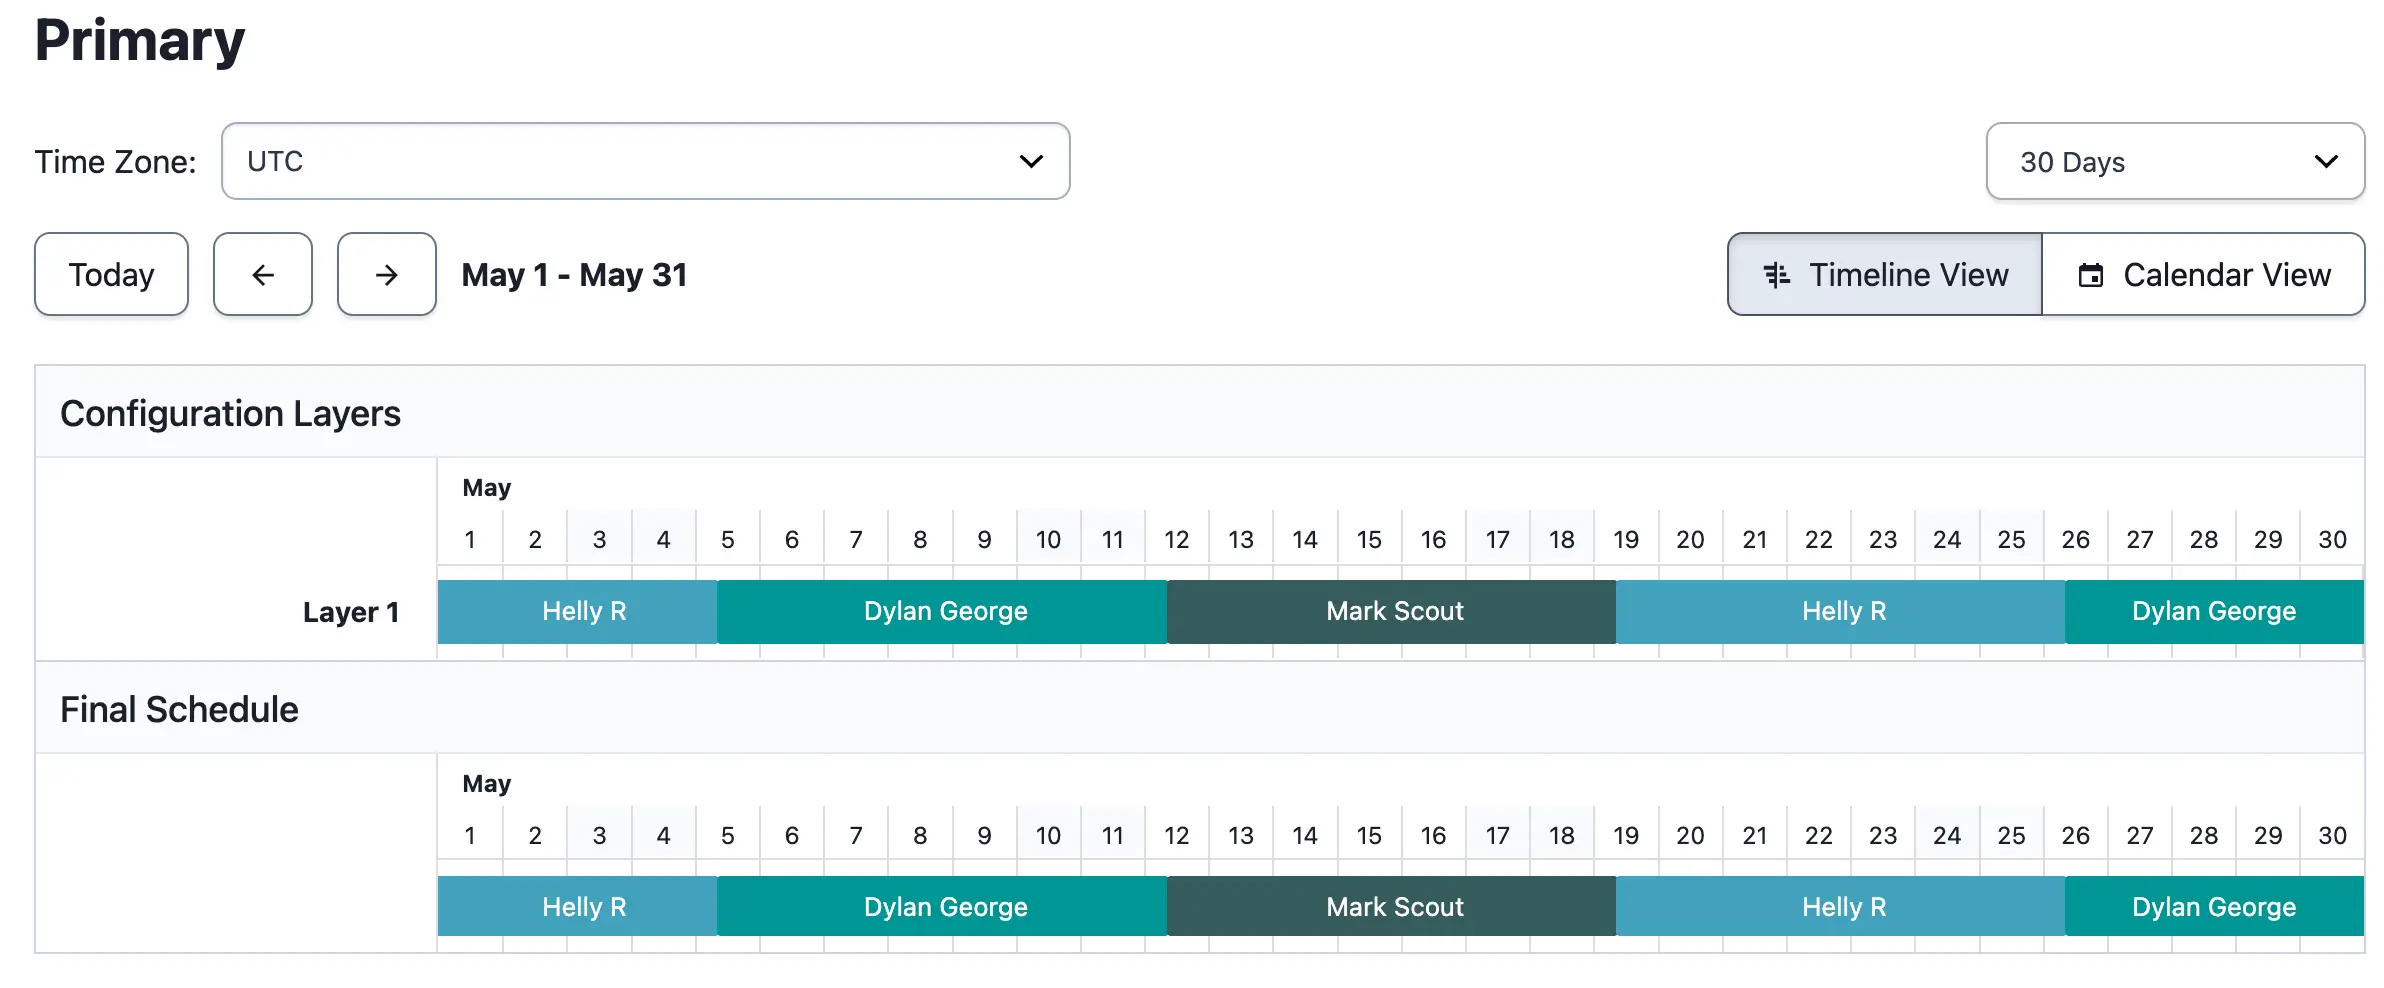
Example 6, primary schedule
Create a Secondary On-Call Schedule
- Repeat the configuration steps from the primary on-call schedule setup, or navigate to the primary schedule you just created and select Copy this Schedule.
- Adjust the user order so that it is staggered from the primary schedule.
- Review the schedule and click Save Schedule.
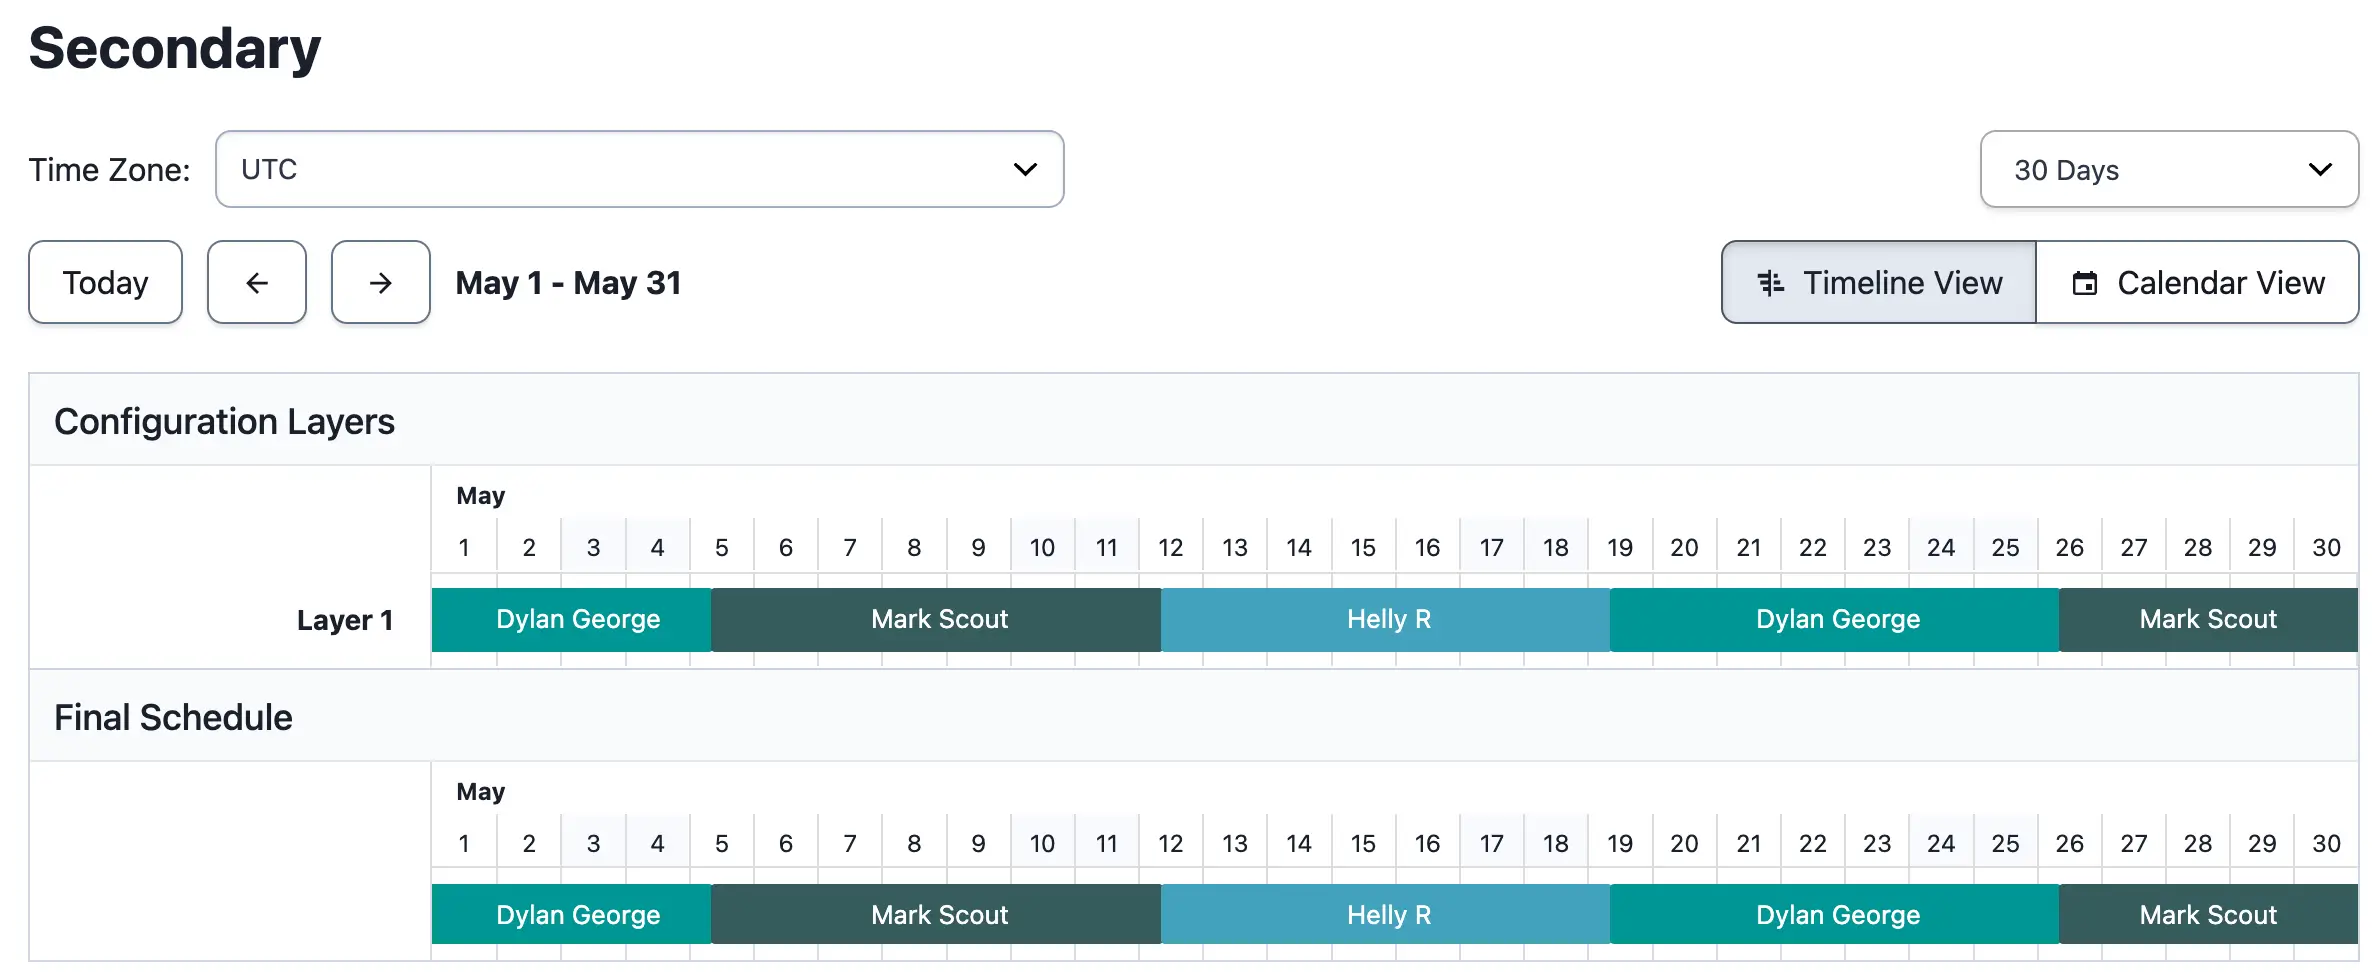
Example 6, secondary schedule
Create an Escalation Policy
Create an escalation policy with the primary schedule at level one and the secondary schedule at level two. For more information about creating and configuring escalation policies, read Create an Escalation Policy.
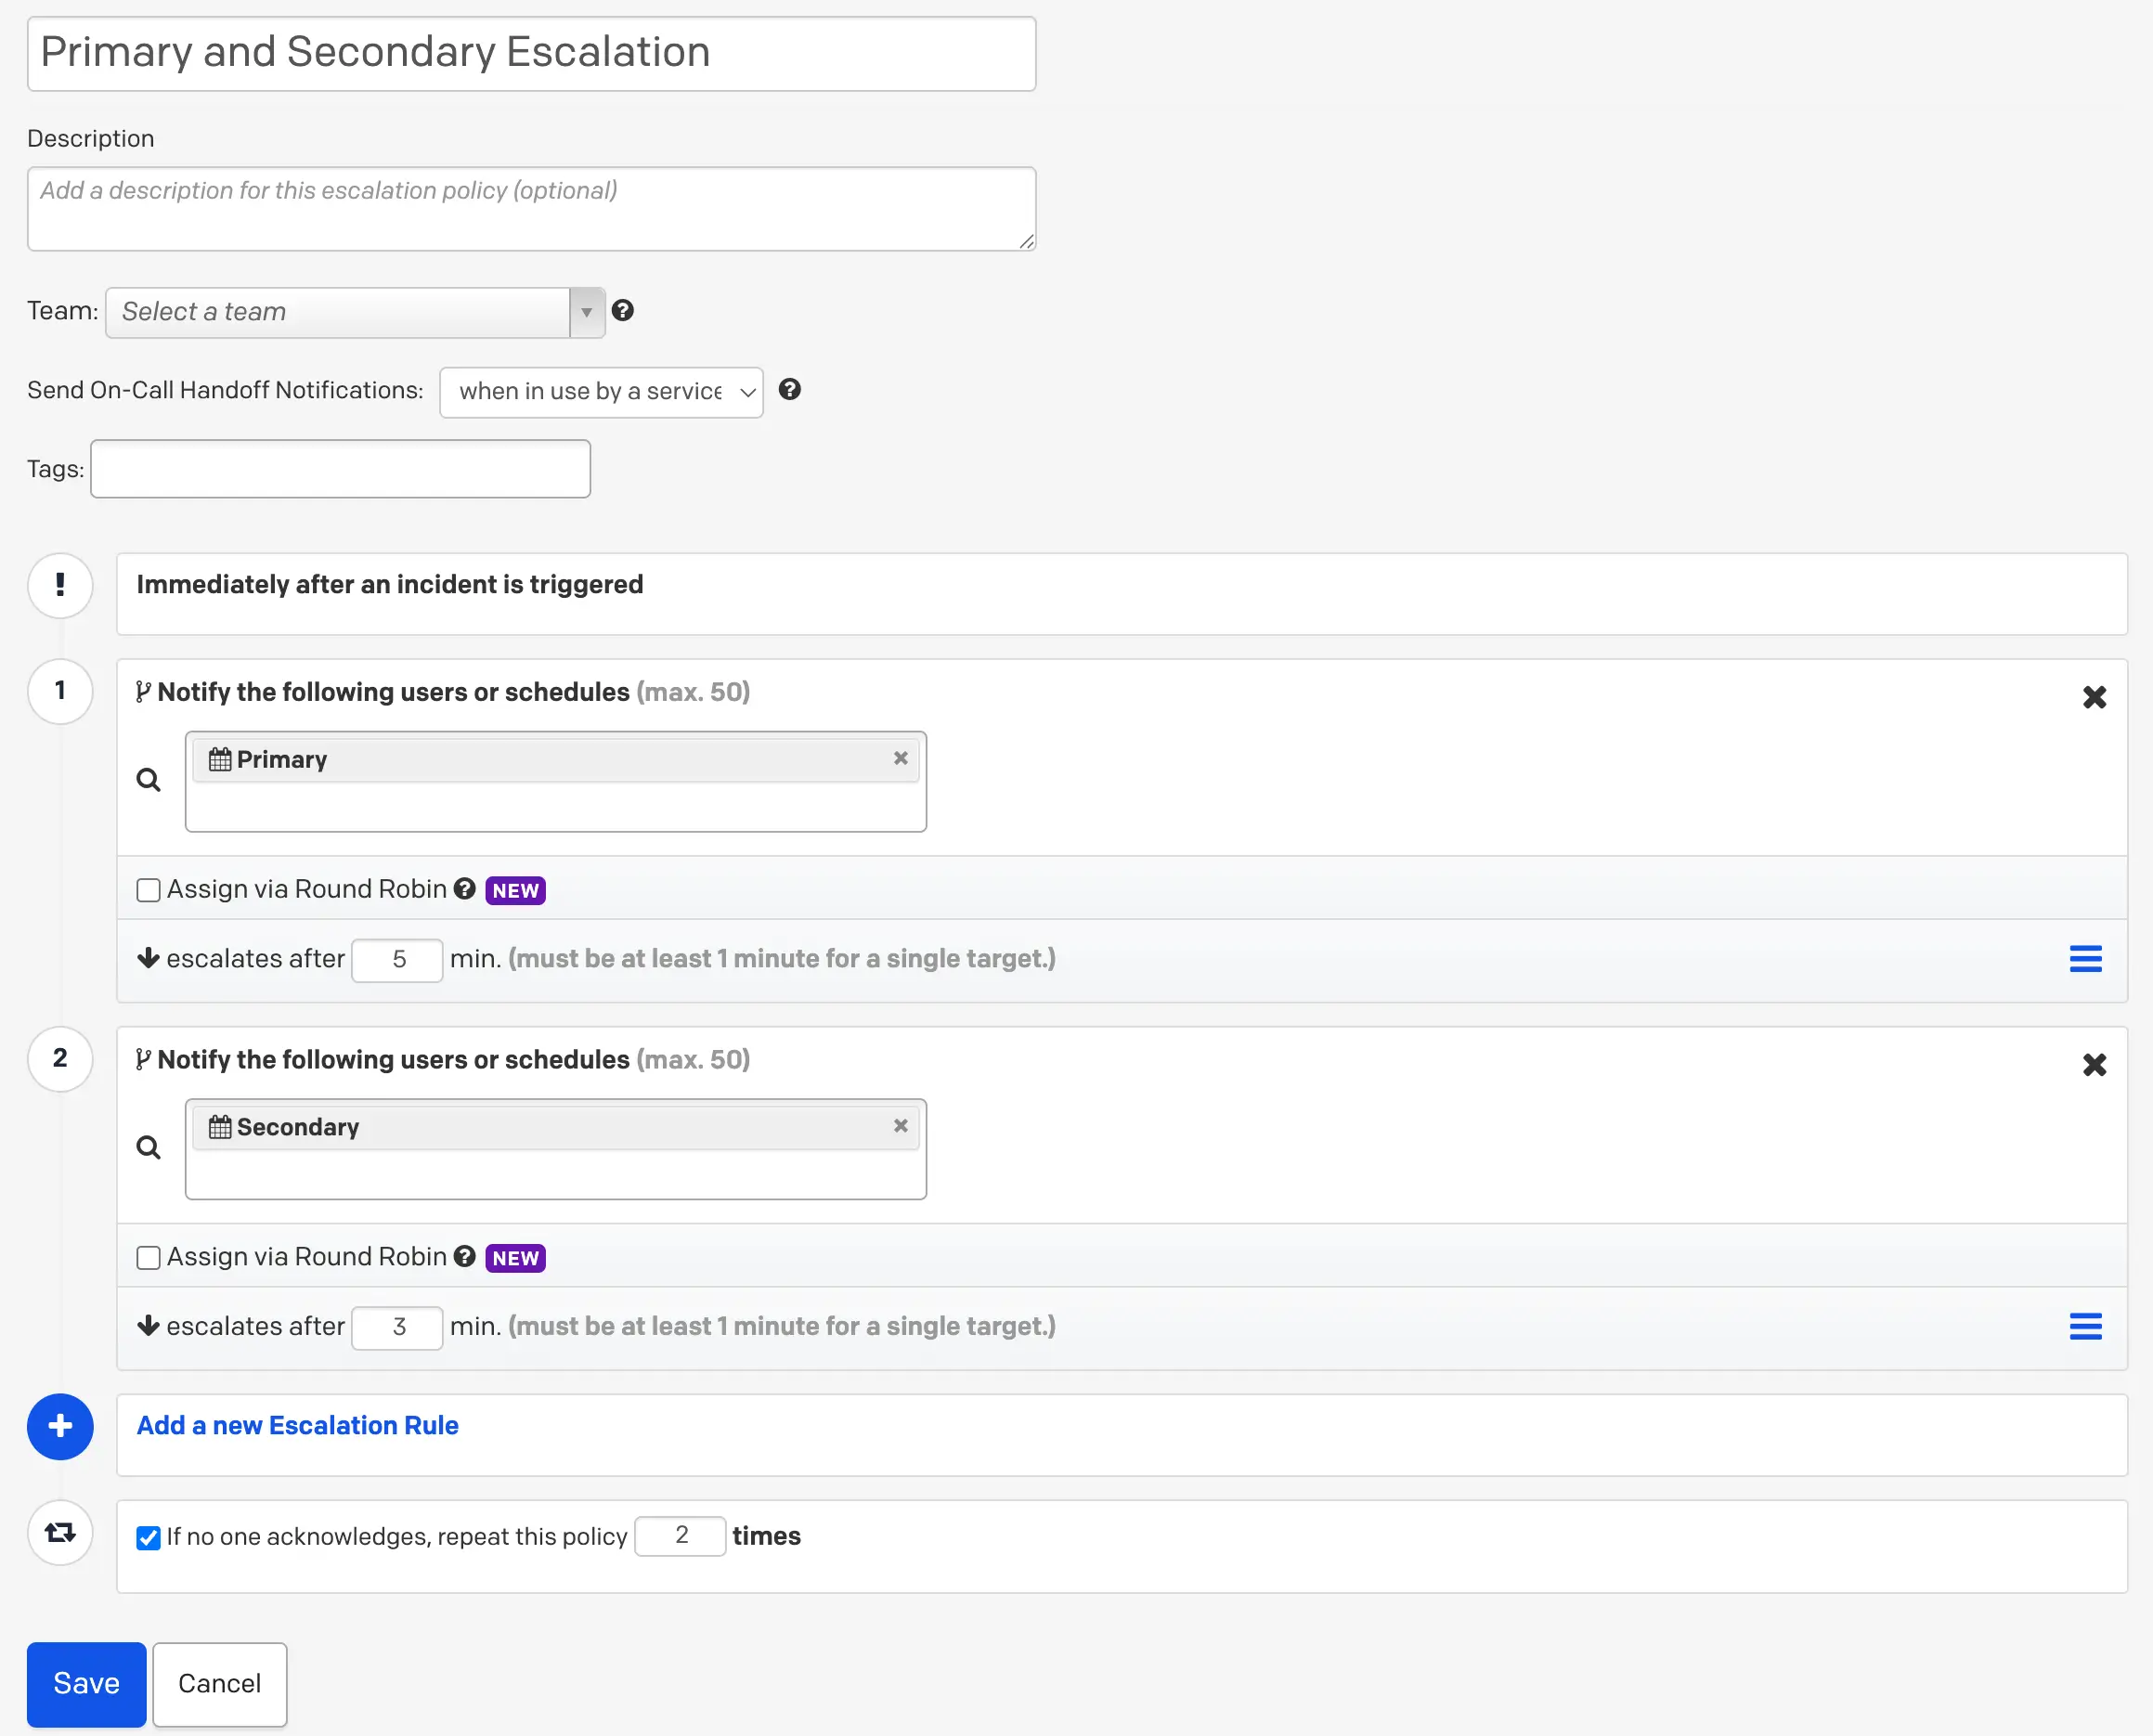
Example 6, escalation policy
Example 7: Inverse Schedules
This setup is similar to Example 6, but with two users and the following conditions:
- When User 1 is the primary on-call, User 2 is the secondary on-call.
- When User 2 is the primary on-call, User 1 is the secondary on-call.
This requires two on-call schedules, each added to a separate level of an escalation policy.
Ex. 7 Schedule Requirements
This schedule has two users on call. When User 1 is the first point of escalation, User 2 is the backup, receiving all incidents that User 1 does not respond to. When User 2 is the first point of escalation, User 1 is the backup, receiving all incidents that User 2 does not respond to.
Ex. 7 Configuration
Create two schedules — one for escalation level one and one for level two.
Schedule 1
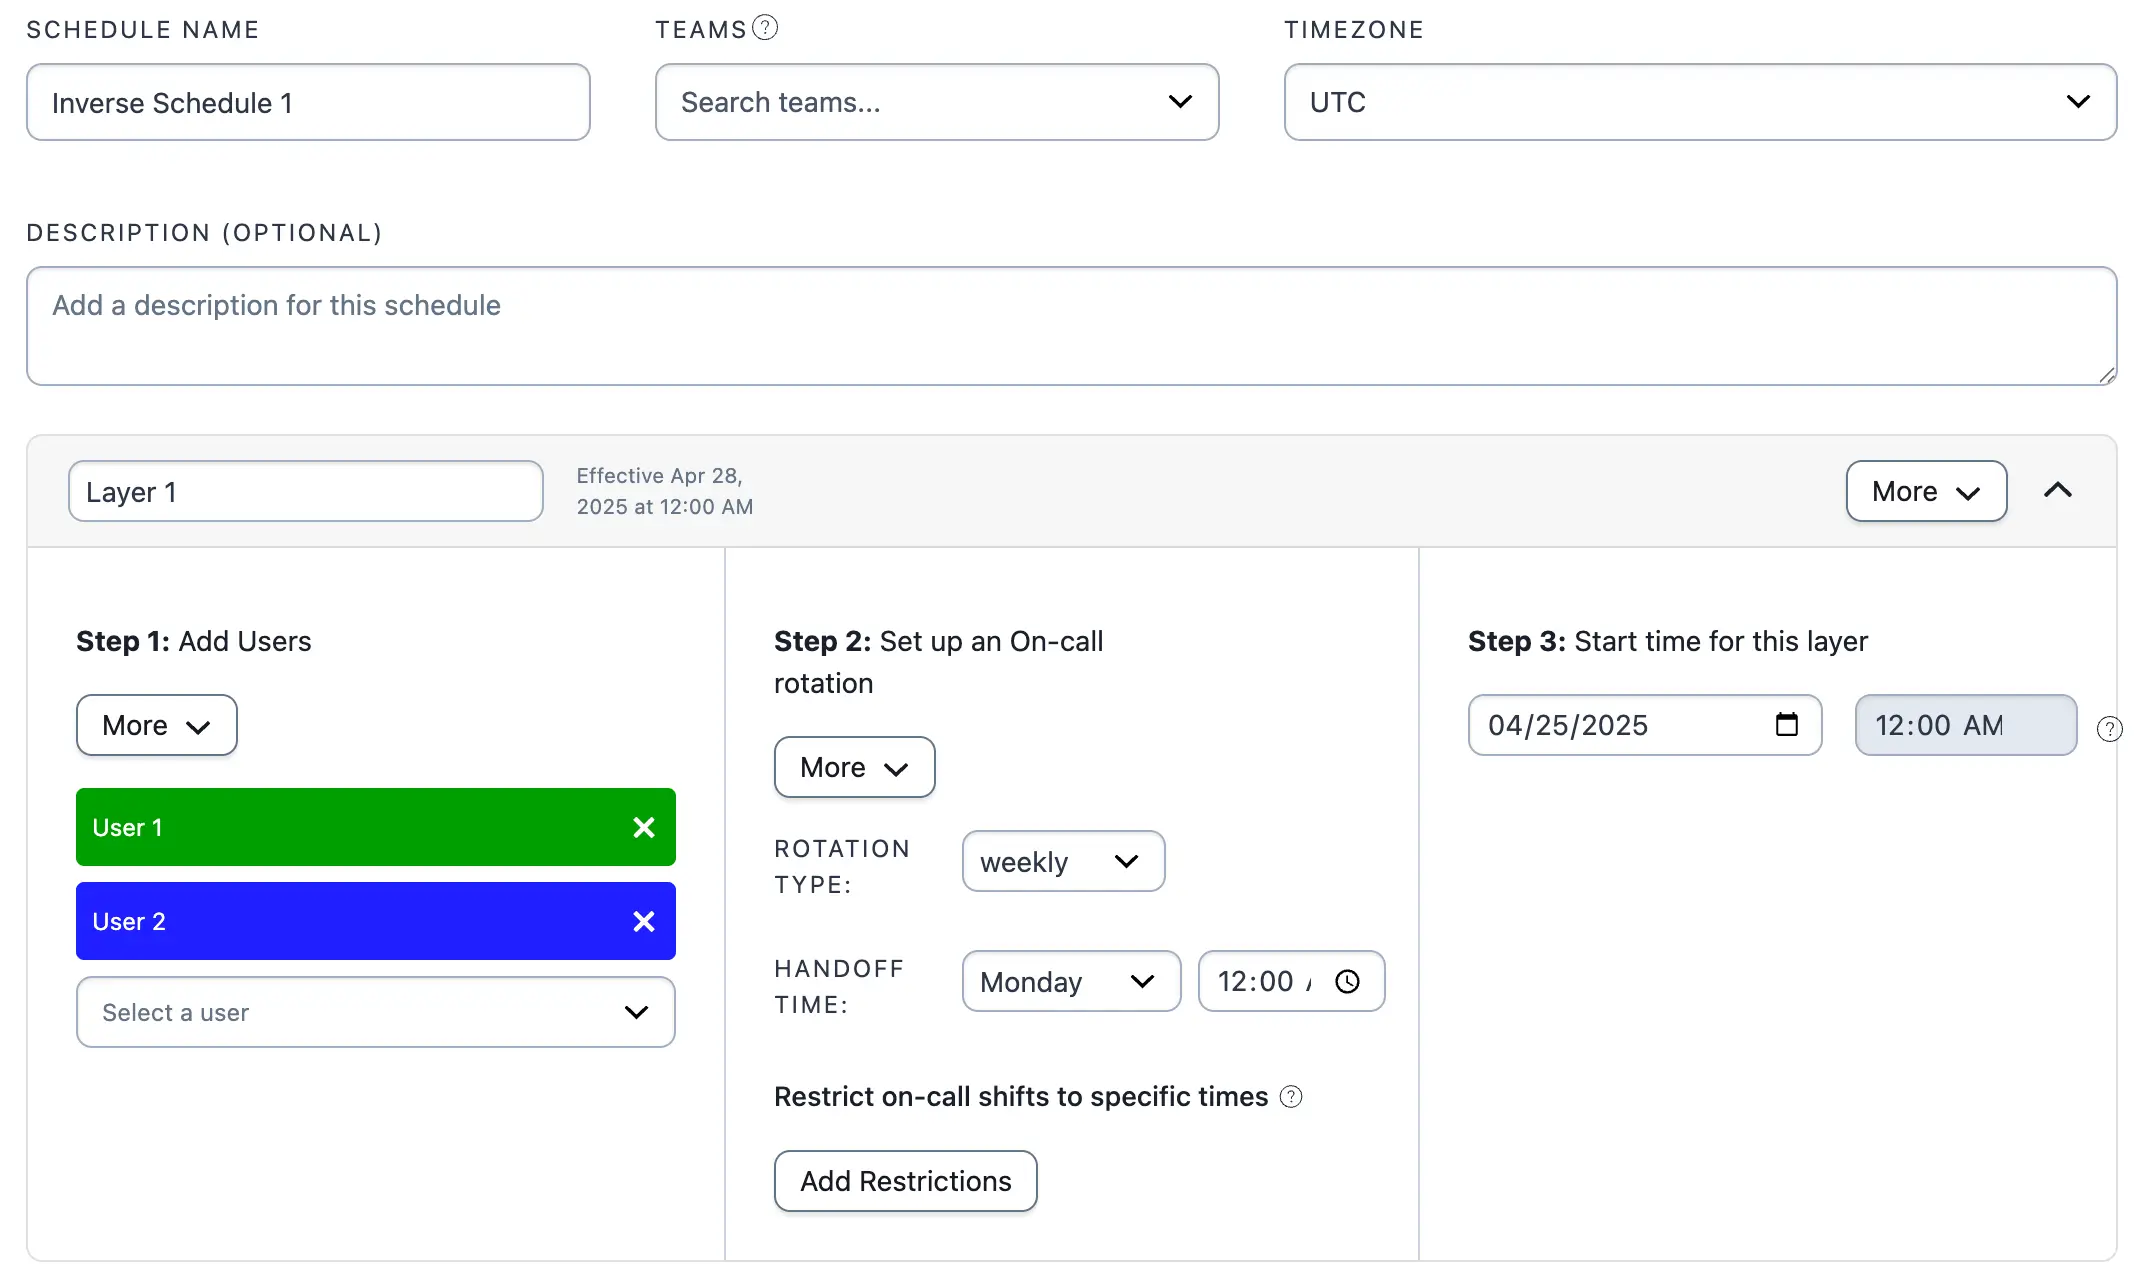
Example 7, schedule 1
Schedule 2
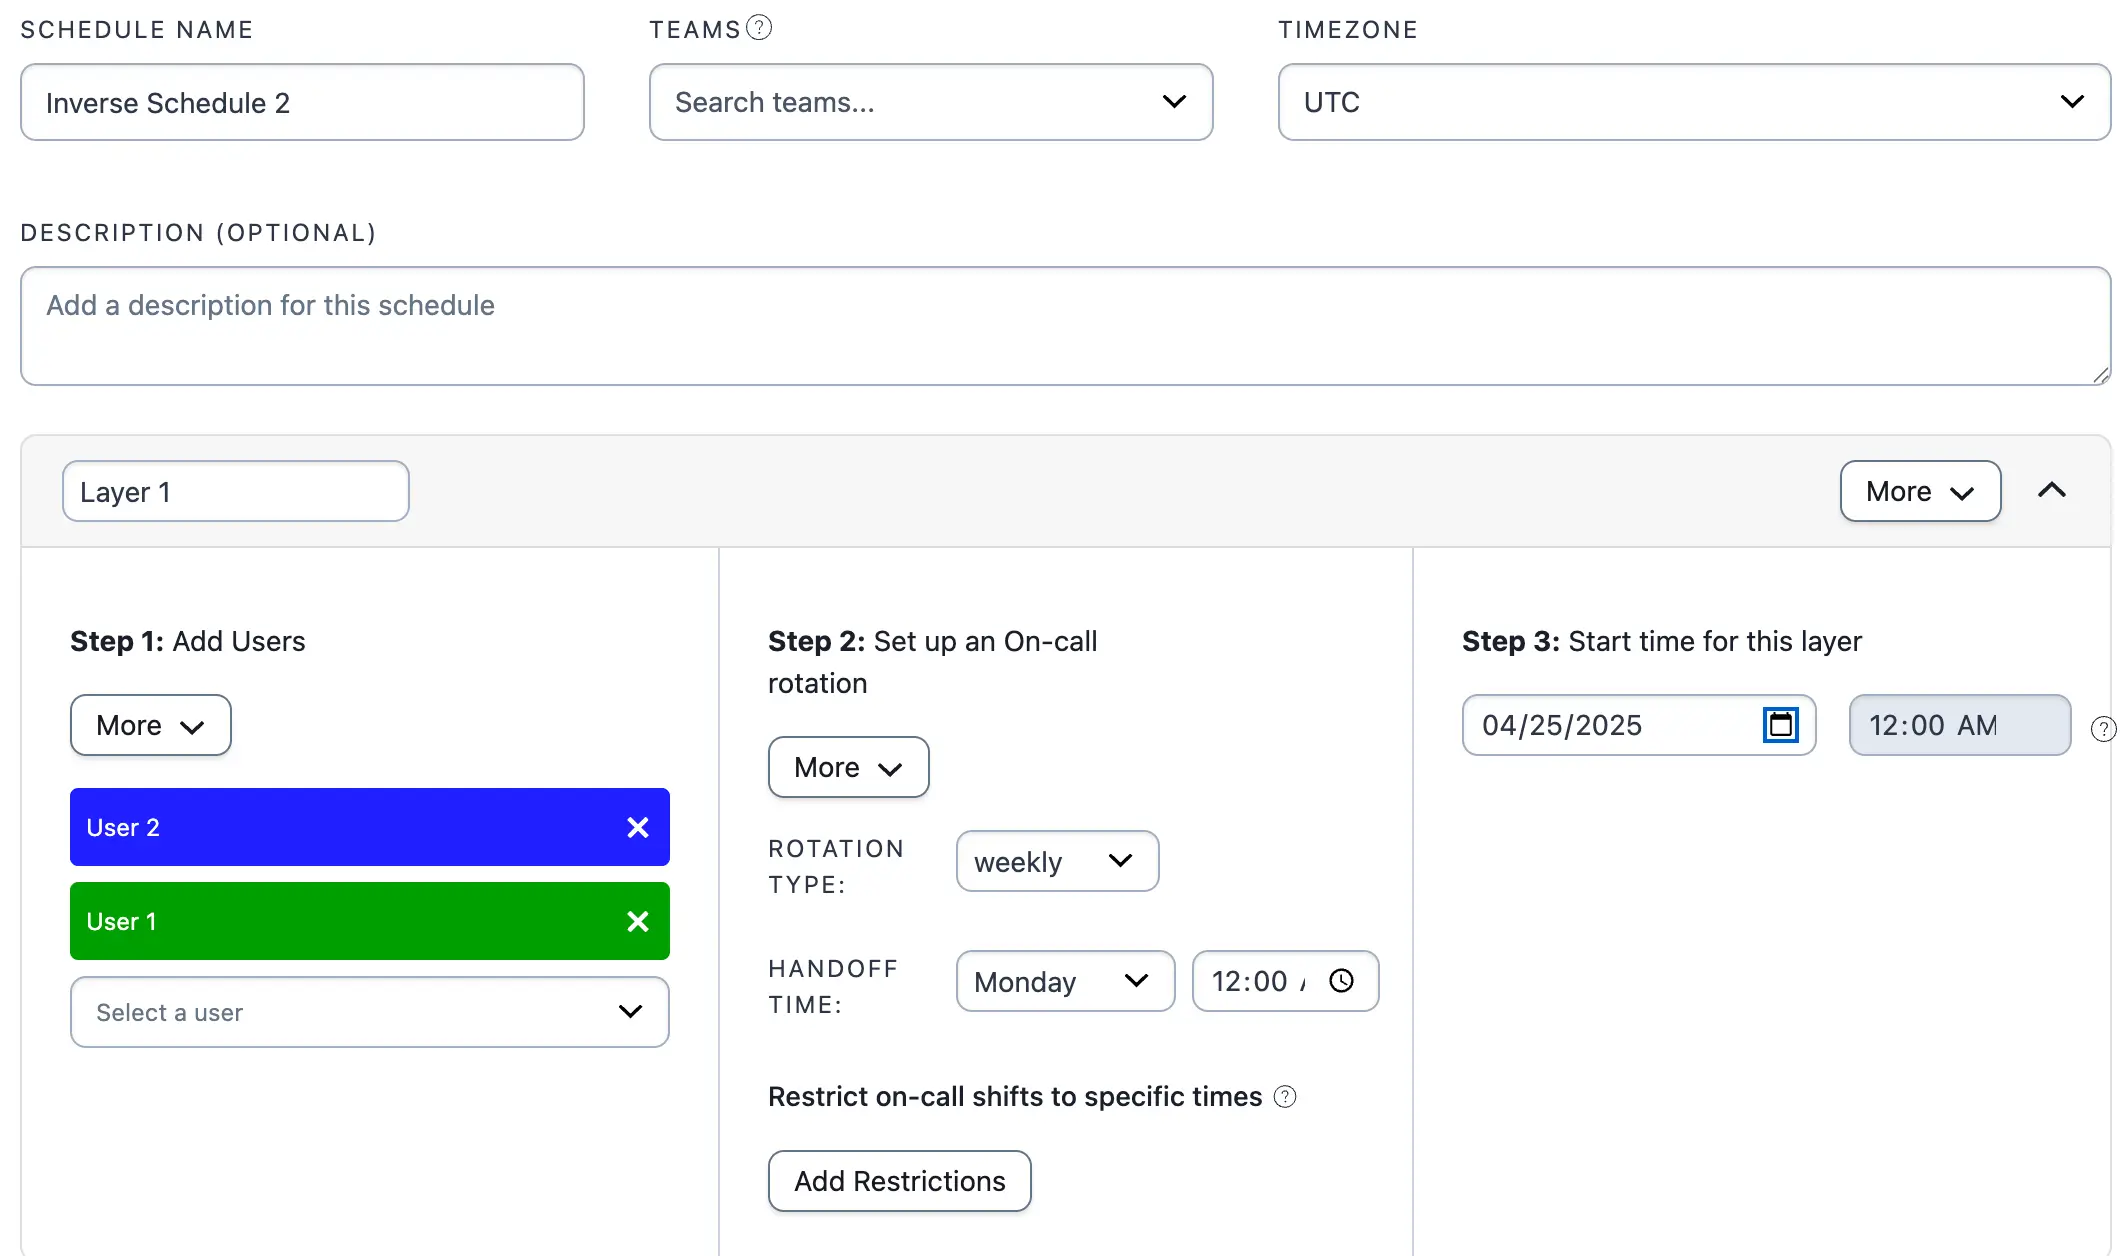
Example 7, schedule 2
TipSelect Copy this Schedule to clone a schedule and then reorder the users. When viewing a specific schedule, this option appears on the right side of the page.
Ex. 7 Escalation Policy
- Navigate to People Escalation Policies and either click New Escalation Policy or edit an existing one.
- Add Schedule 1 to Level 1 of the escalation policy.
- Click Add a new Escalation Rule and add Schedule 2 to Level 2 of the escalation policy.
- Click Save.
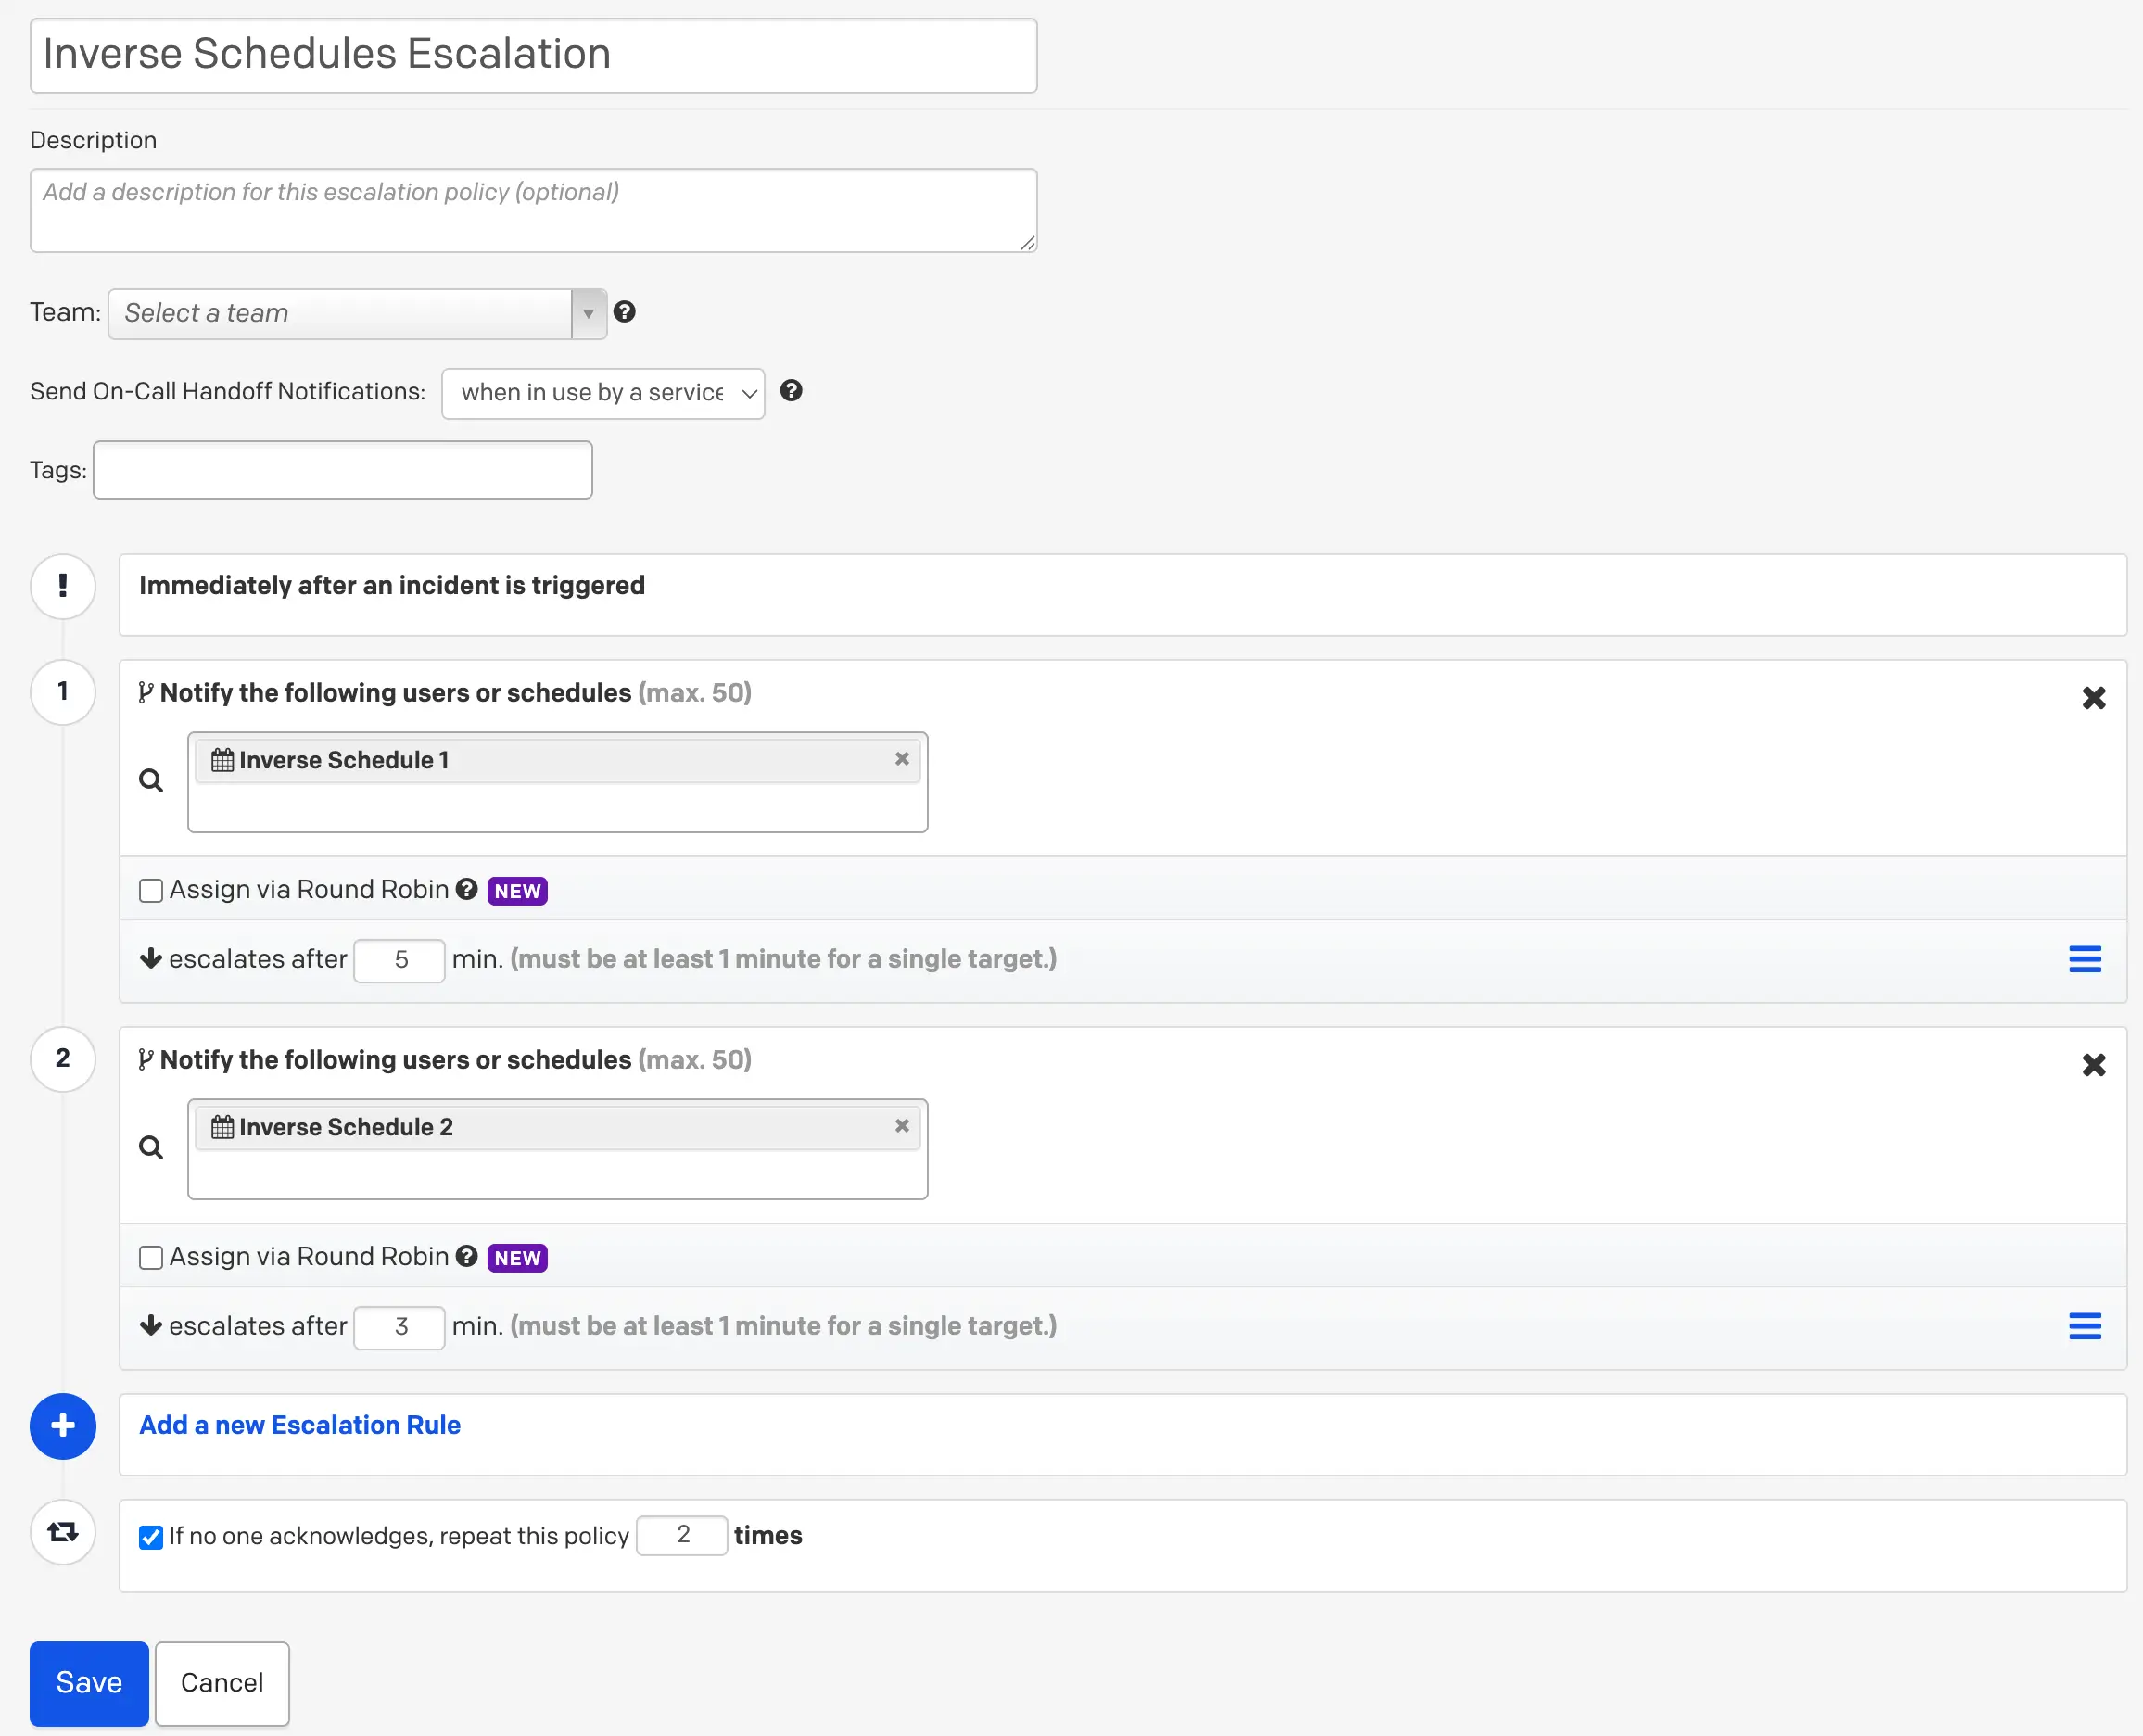
Example 7, escalation policy
Example 8: Follow-the-Sun Schedule
A follow-the-sun schedule is common for international teams across different time zones and ensures 24/7 coverage. This schedule has three sets of users on call at different times of the day and week. This example uses a US team and an India team.
Ex. 8 Schedule Requirements
This schedule has three rotating shifts, or layers. The first layer — for users in the US — consists of User 1 and User 2. They are on call weekdays from 8:00 AM to 8:00 PM US Pacific Time (PT) and rotate on a weekly basis.
The India layer consists of User 3 and User 4. They are on call weekdays starting at 8:00 PM PT until 8:00 AM PT the following day.
The third layer covers the weekends and includes all four users. The person on call during the weekend covers the entire weekend and rotates weekly. In this example, the weekend begins at Friday 8:00 PM Pacific and ends Sunday 8:00 PM Pacific.
Ex. 8 Configuration
- In the PagerDuty web app, navigate to People Schedules and click New Schedule.
- Enter a Schedule name and optionally adjust the time zone. All times you select are local to this time zone.
Team 1 (US)
- Add the US users (User 1 and User 2) by selecting Select a User in Layer 1.
- Select weekly as the rotation type and set the Handoff time to the beginning of the shift.
- Under Restrict on-call shifts to specific times, click Add Restrictions.
- With Restrict on-call duty to specific times-of-the-day selected, enter 8:00 AM to 8:00 PM.
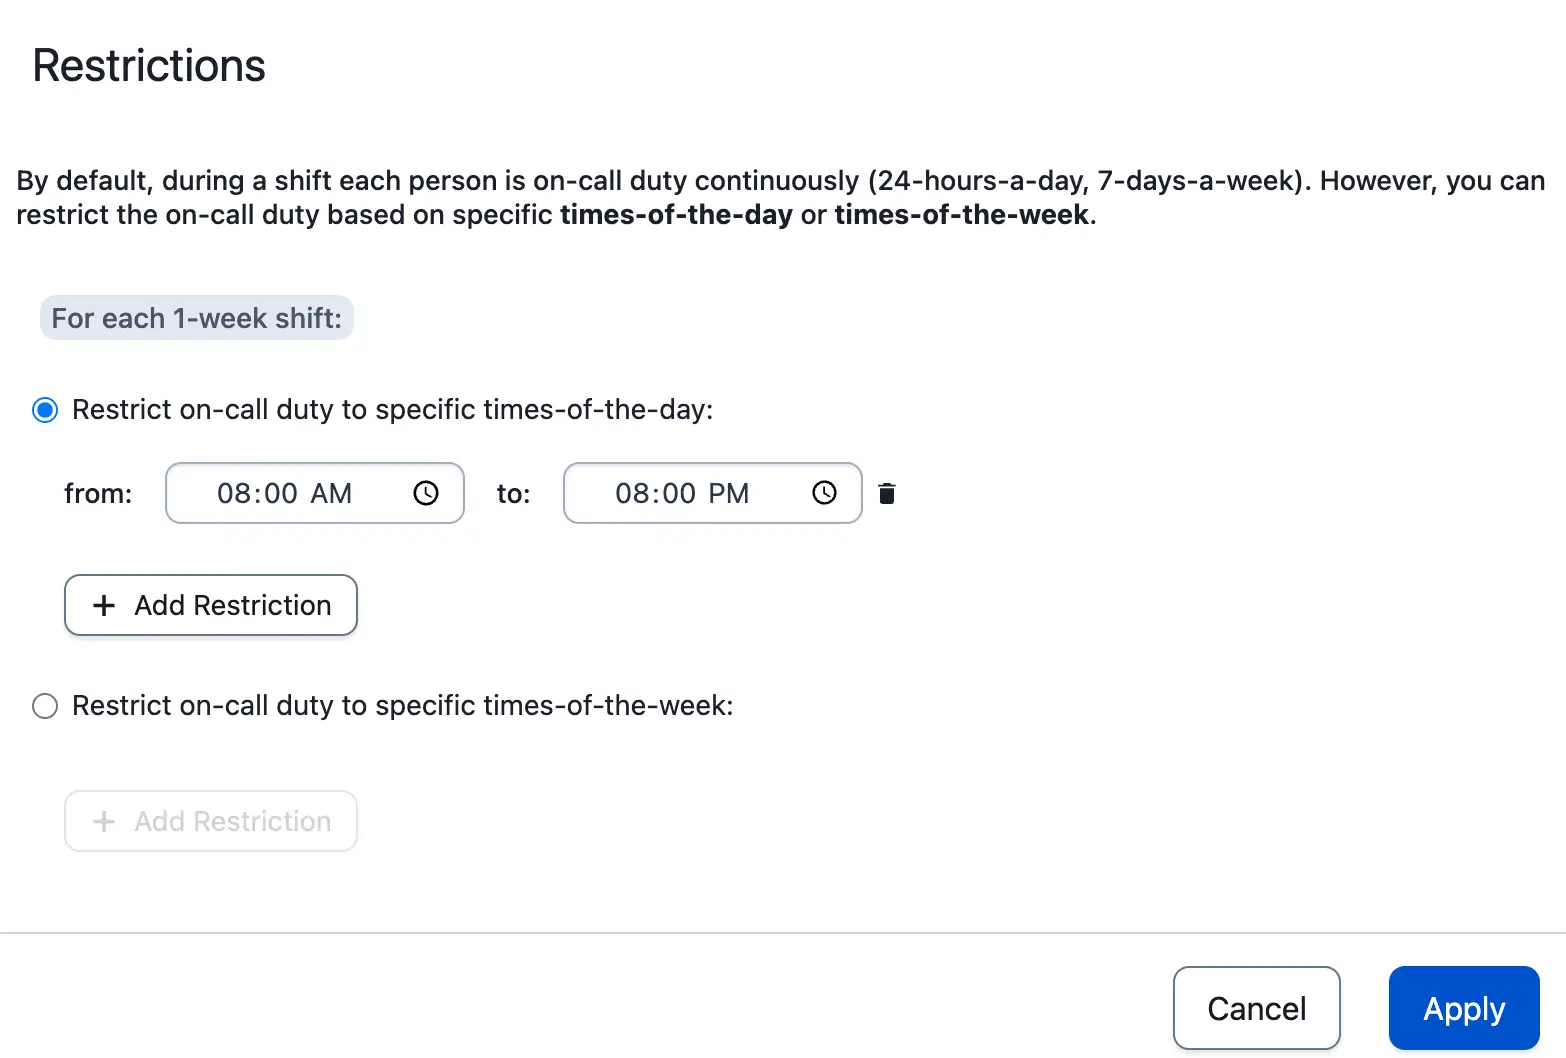
Example 8, layer 1 restrictions
- Click Apply.
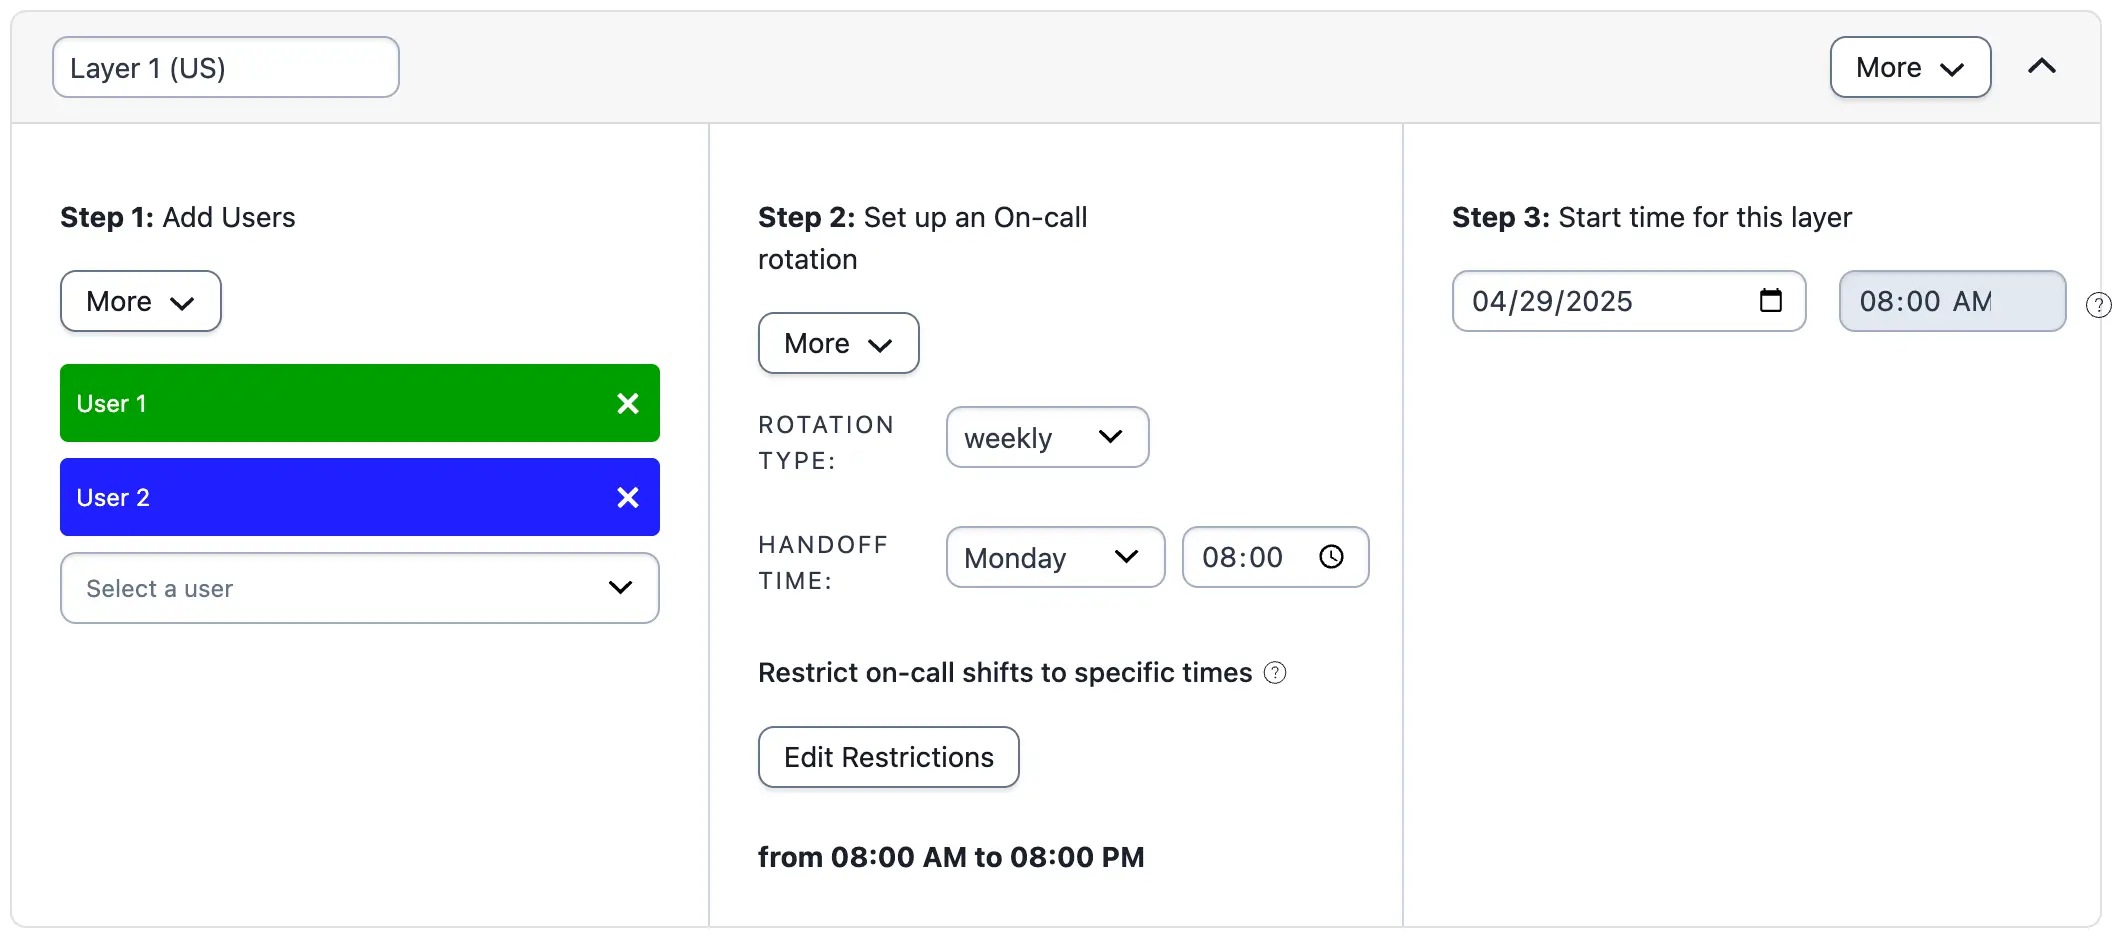
Example 8, layer 1 (US)
Layer PrecedenceYou do not need to restrict this layer to weekdays, since the weekend rotation in Layer 3 replaces weekend days on the final schedule. This follows the rule that the lowest layer takes precedence over any higher layers.
Team 2 (India)
- Click Add a new layer and add the India users (User 3 and User 4) to Layer 2.
- Select weekly as the rotation type and set the Handoff time to the beginning of this team's shift.
- Under Restrict on-call shifts to specific times, click Add Restrictions.
- With Restrict on-call duty to specific times-of-the-day selected, enter 8:00 PM to 8:00 AM.
- Click Apply.
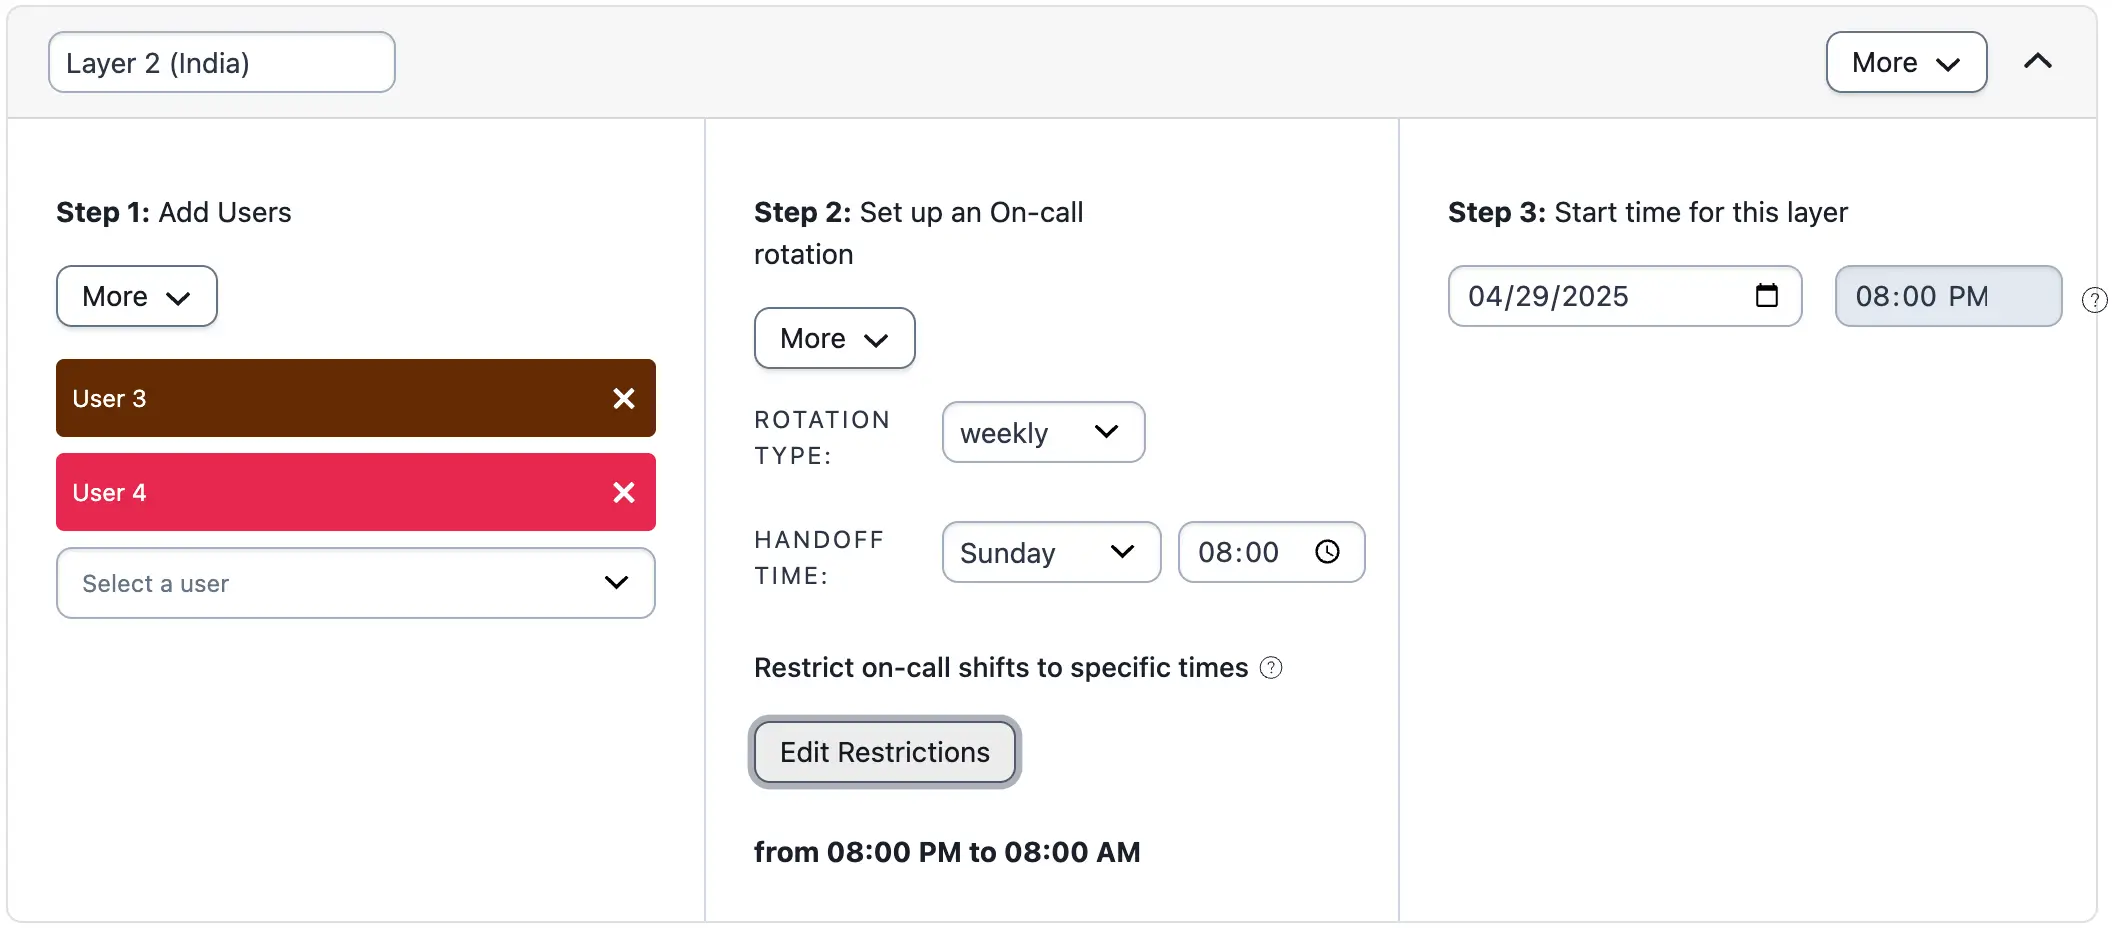
Example 8, layer 2 (India)
Team 3 (Weekend)
- Click Add a new layer and add all four users to Layer 3.
- Select weekly as the rotation type and set the Handoff time to the beginning of this team's shift.
- Under Restrict on-call shifts to specific times, click Add Restrictions.
- With Restrict on-call duty to specific times-of-the-week selected, enter Friday 8:00 PM to Sunday 8:00 PM.
- Click Apply.
Ex. 8 Final Schedule
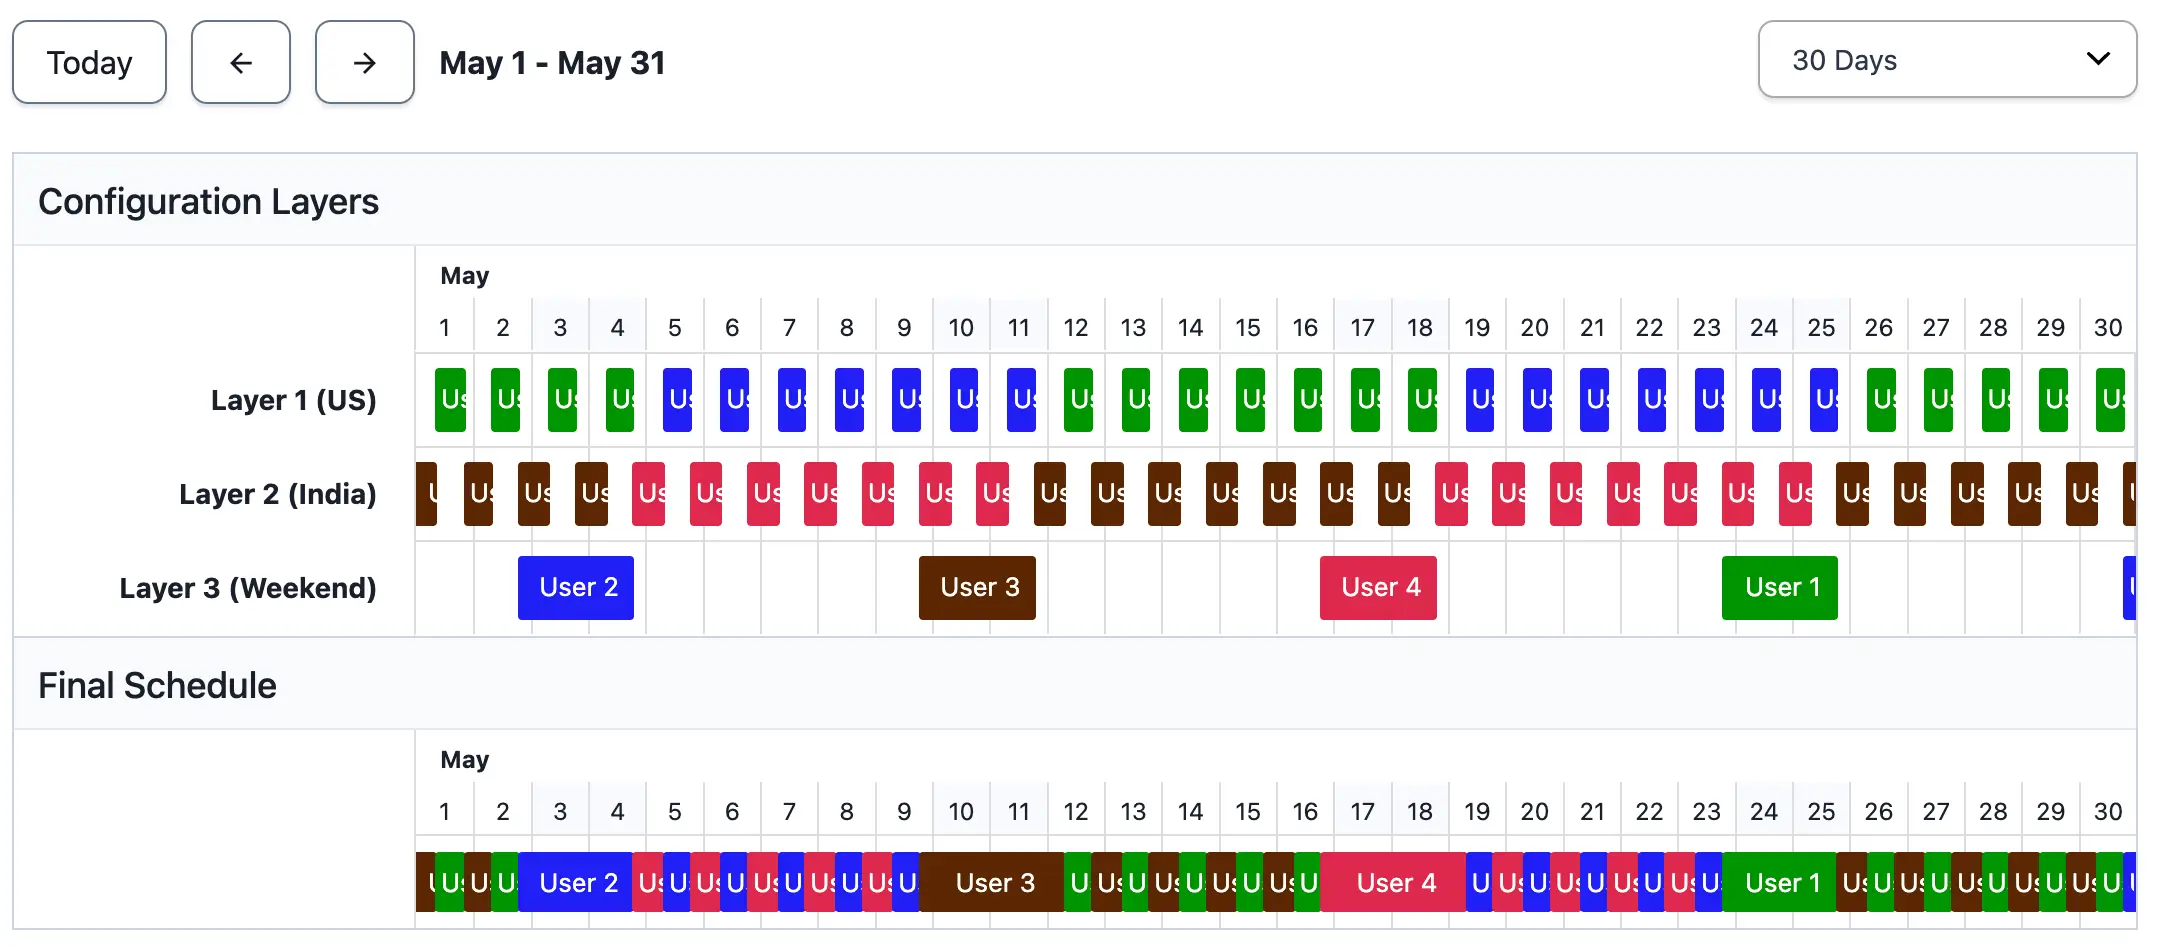
Example 8, final schedule
Example 9: Schedule Users Every Other Week
Ex. 9 Schedule Requirements
This schedule has four users. Two users are on call during the weekdays. The other two are on call during the weekend. They rotate every week.
Ex. 9 Configuration
Layer 1 handles the weekday rotation. User 1 and User 2 rotate on a weekly basis with a handoff time of Monday 12:00 AM.
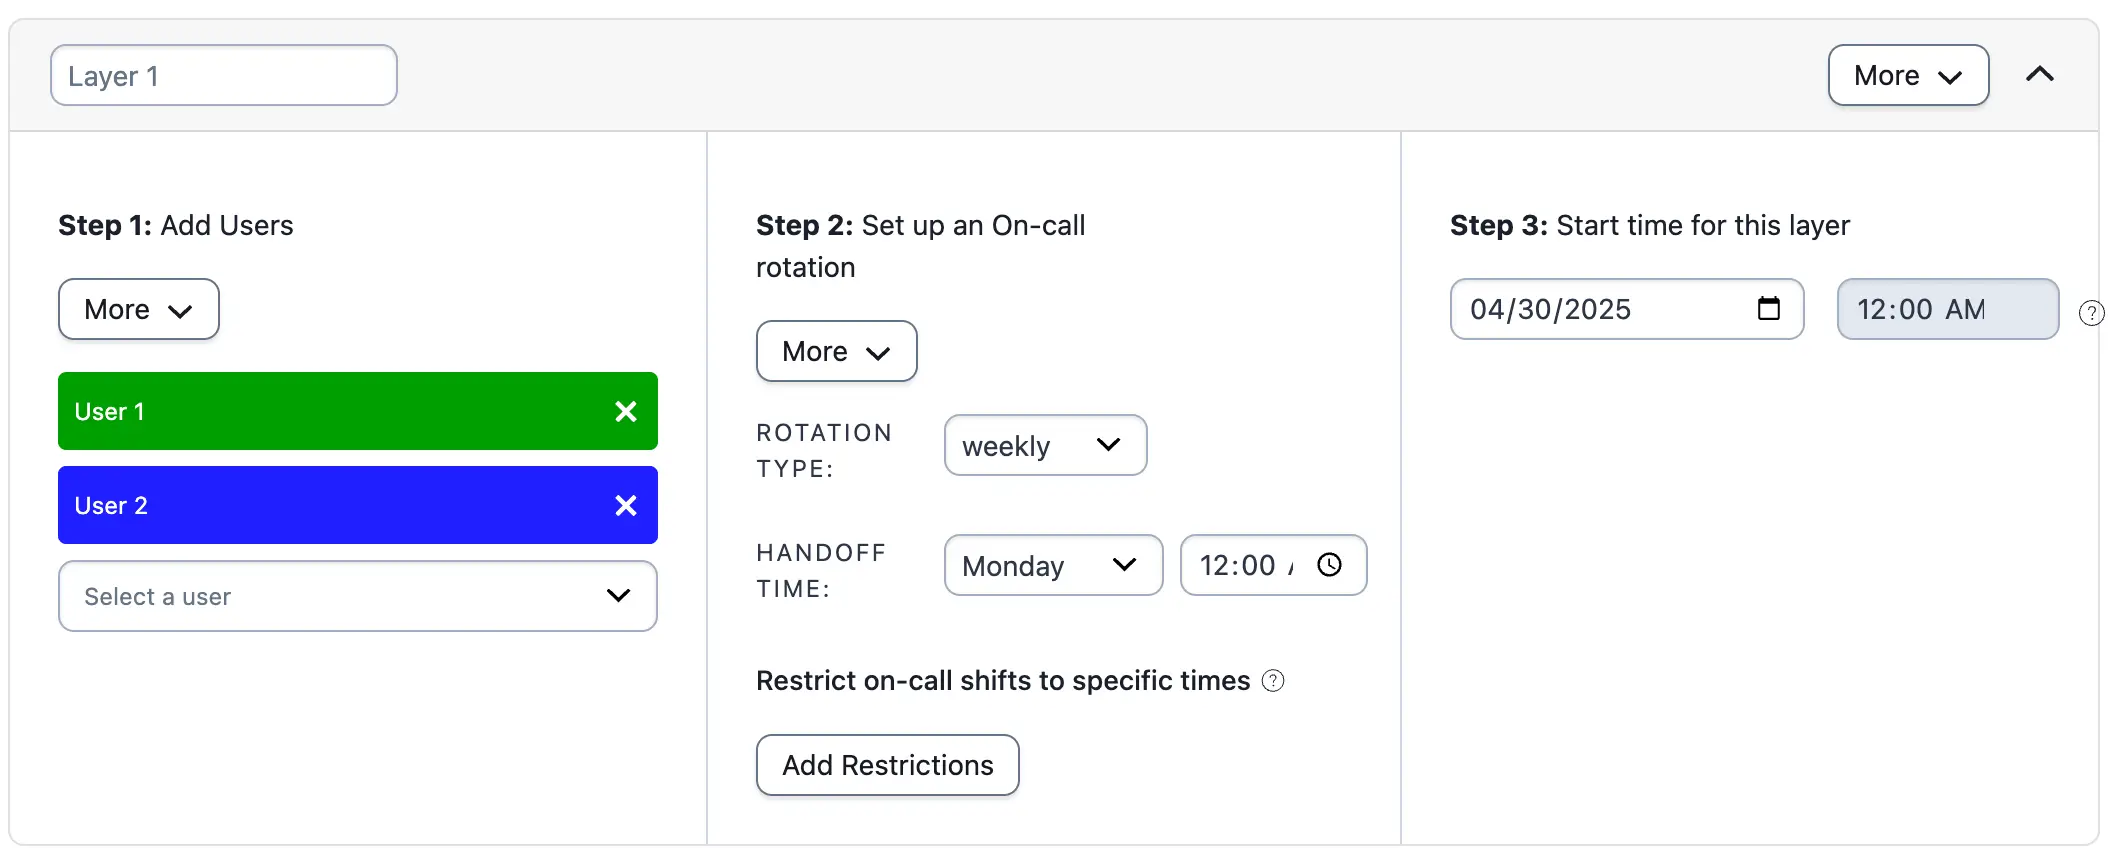
Example 9, layer 1
Click Add a new layer to create a second layer for the weekend. Layer 2 has Users 3 and 4 on a weekly rotation with a handoff time of Saturday 12:00 AM. Restrict this layer to the weekend.
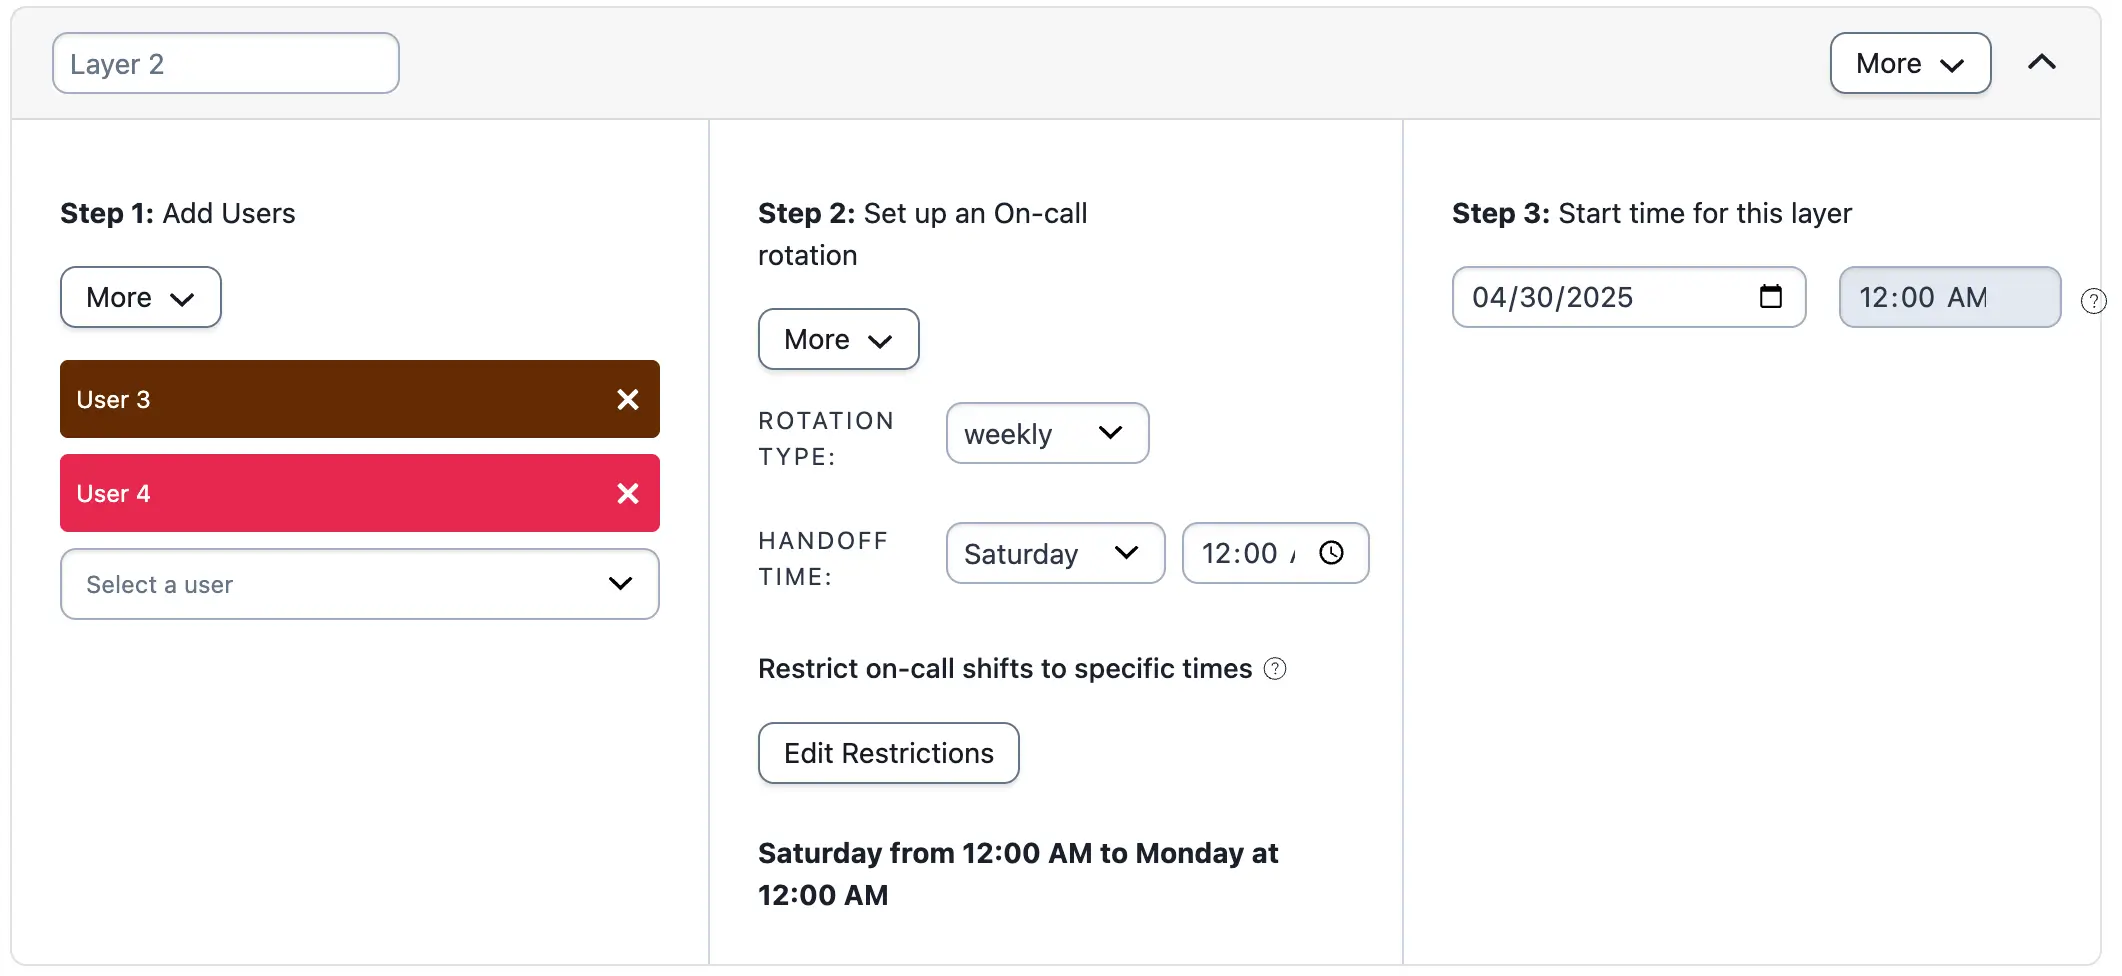
Example 9, layer 2
Ex. 9 Final Schedule
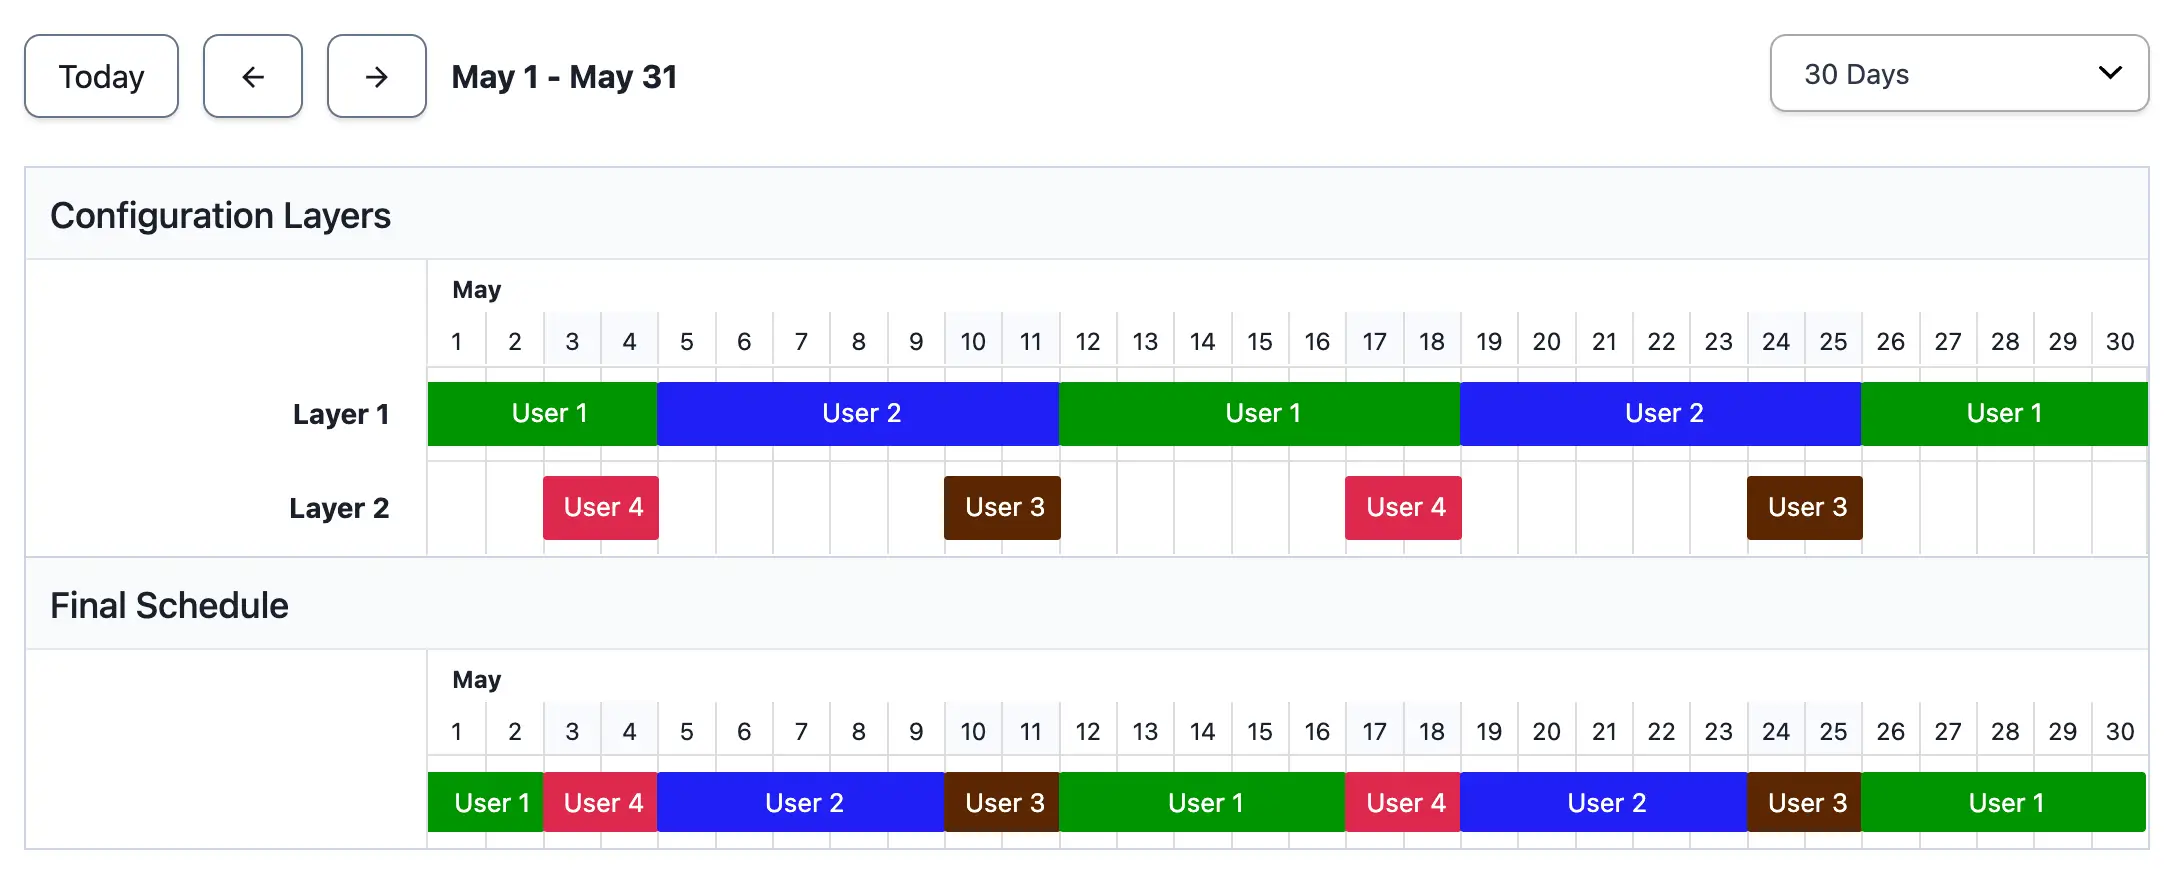
Example 9, final schedule
Example 10: Weekend/Weekday Schedule
A weekend/weekday schedule requires one rotation for the working week and another for the weekend. This example uses one layer for each group.
Navigate to People Schedules and click New Schedule. Enter a name for your schedule.
Layer 1: Weekday
The first layer is the weekday layer. Each member is on call for 24 hours in a daily rotation. Create a schedule with a daily rotation type and a handoff time at 12:00 AM.
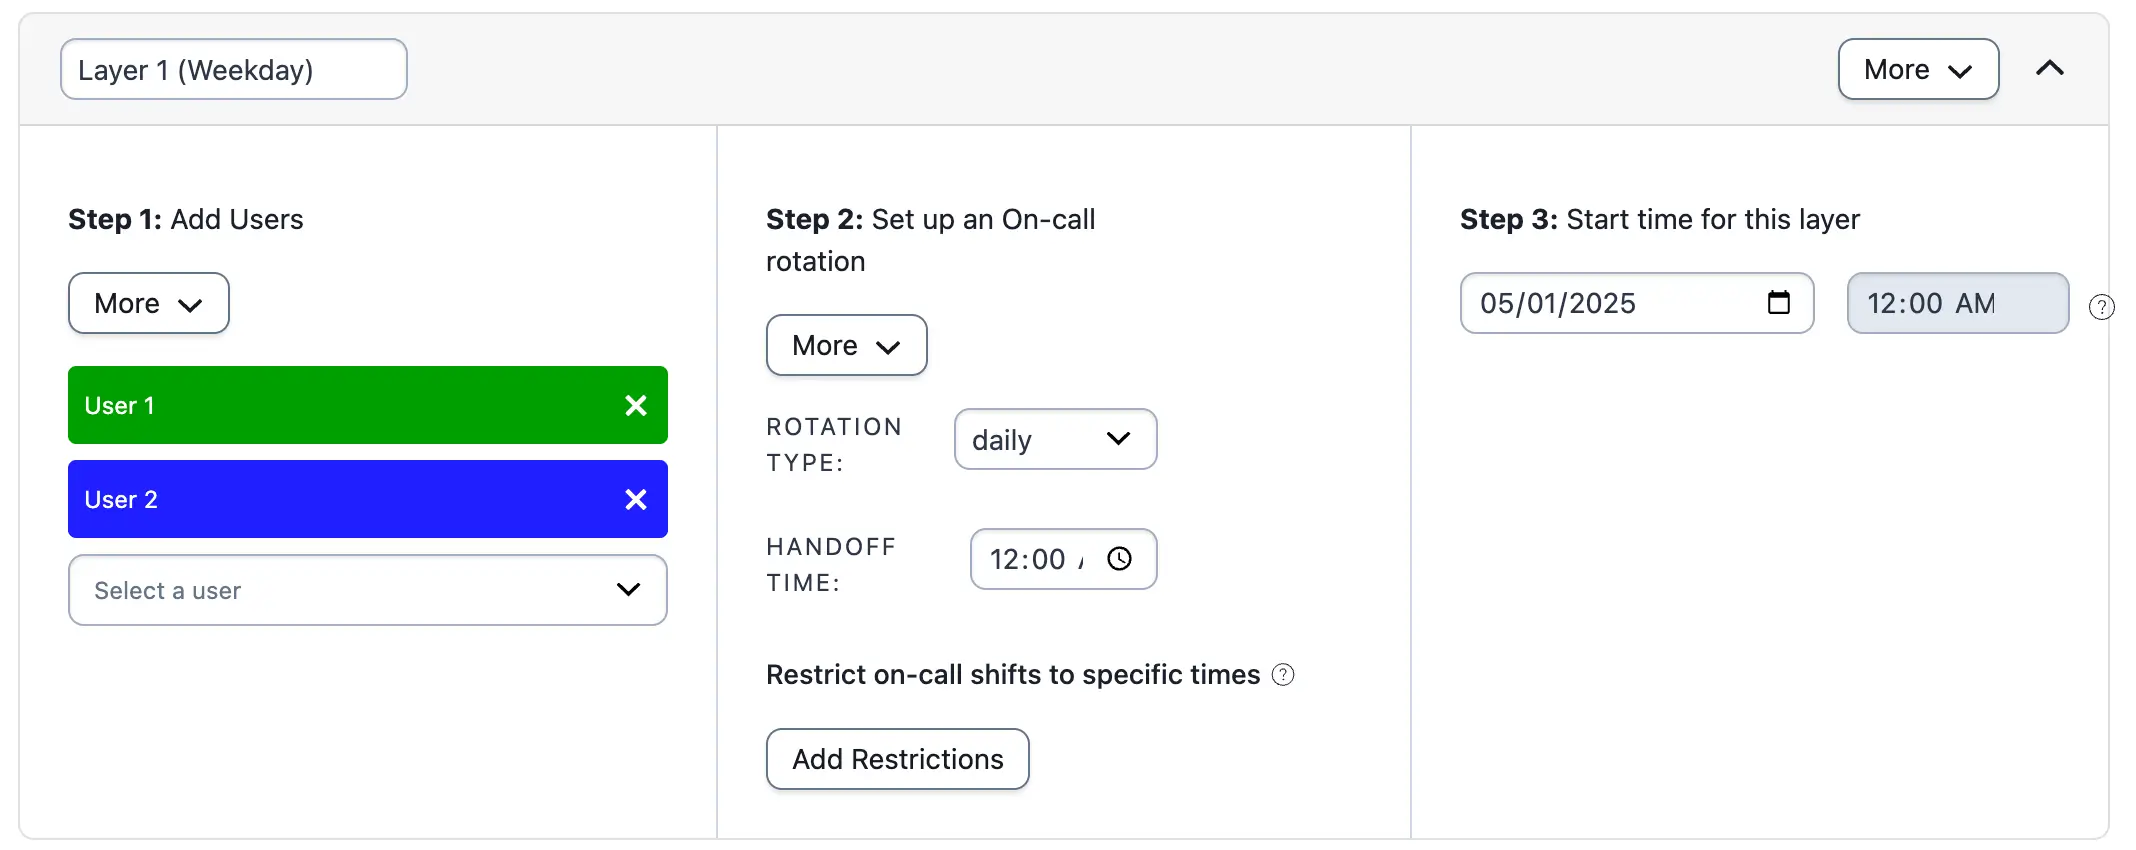
Example 10, layer 1
Layer 2: Weekend
This schedule layer represents the weekend rotation.
- Click Add a new layer.
- Add users to the layer and set the rotation type as daily with a handoff time of 00:00.
- Under Restrict on-call shifts to specific times, click Add Restrictions.
- With Restrict on-call duty to specific times-of-the-week selected, enter Saturday 12:00 AM to Monday 12:00 AM to represent the weekend rotation.
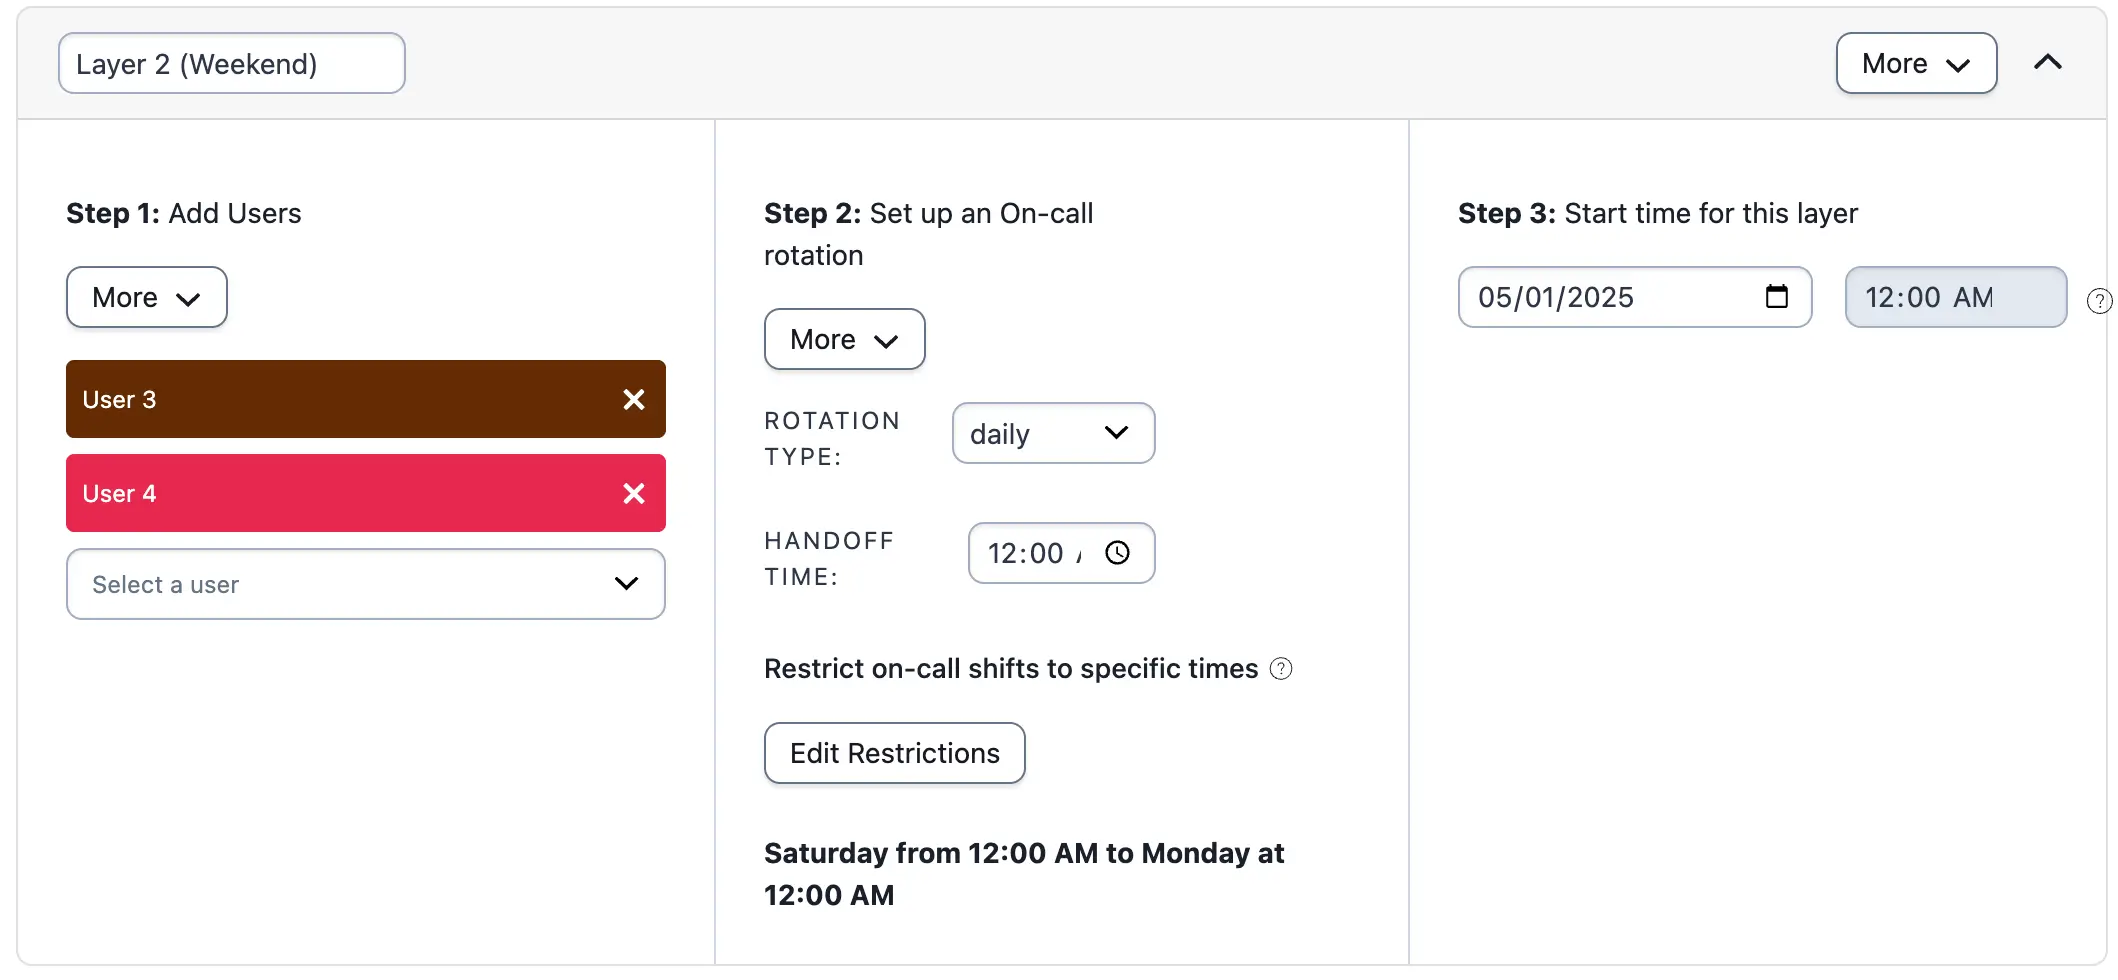
Example 10, layer 2
Since the bottom layer takes precedence over other layers, the Final Schedule shows that User 1 and User 2 take turns on call Monday to Friday on a daily basis. User 3 goes on call Saturday at 12:00 AM. User 4 goes on call Sunday at 12:00 AM.
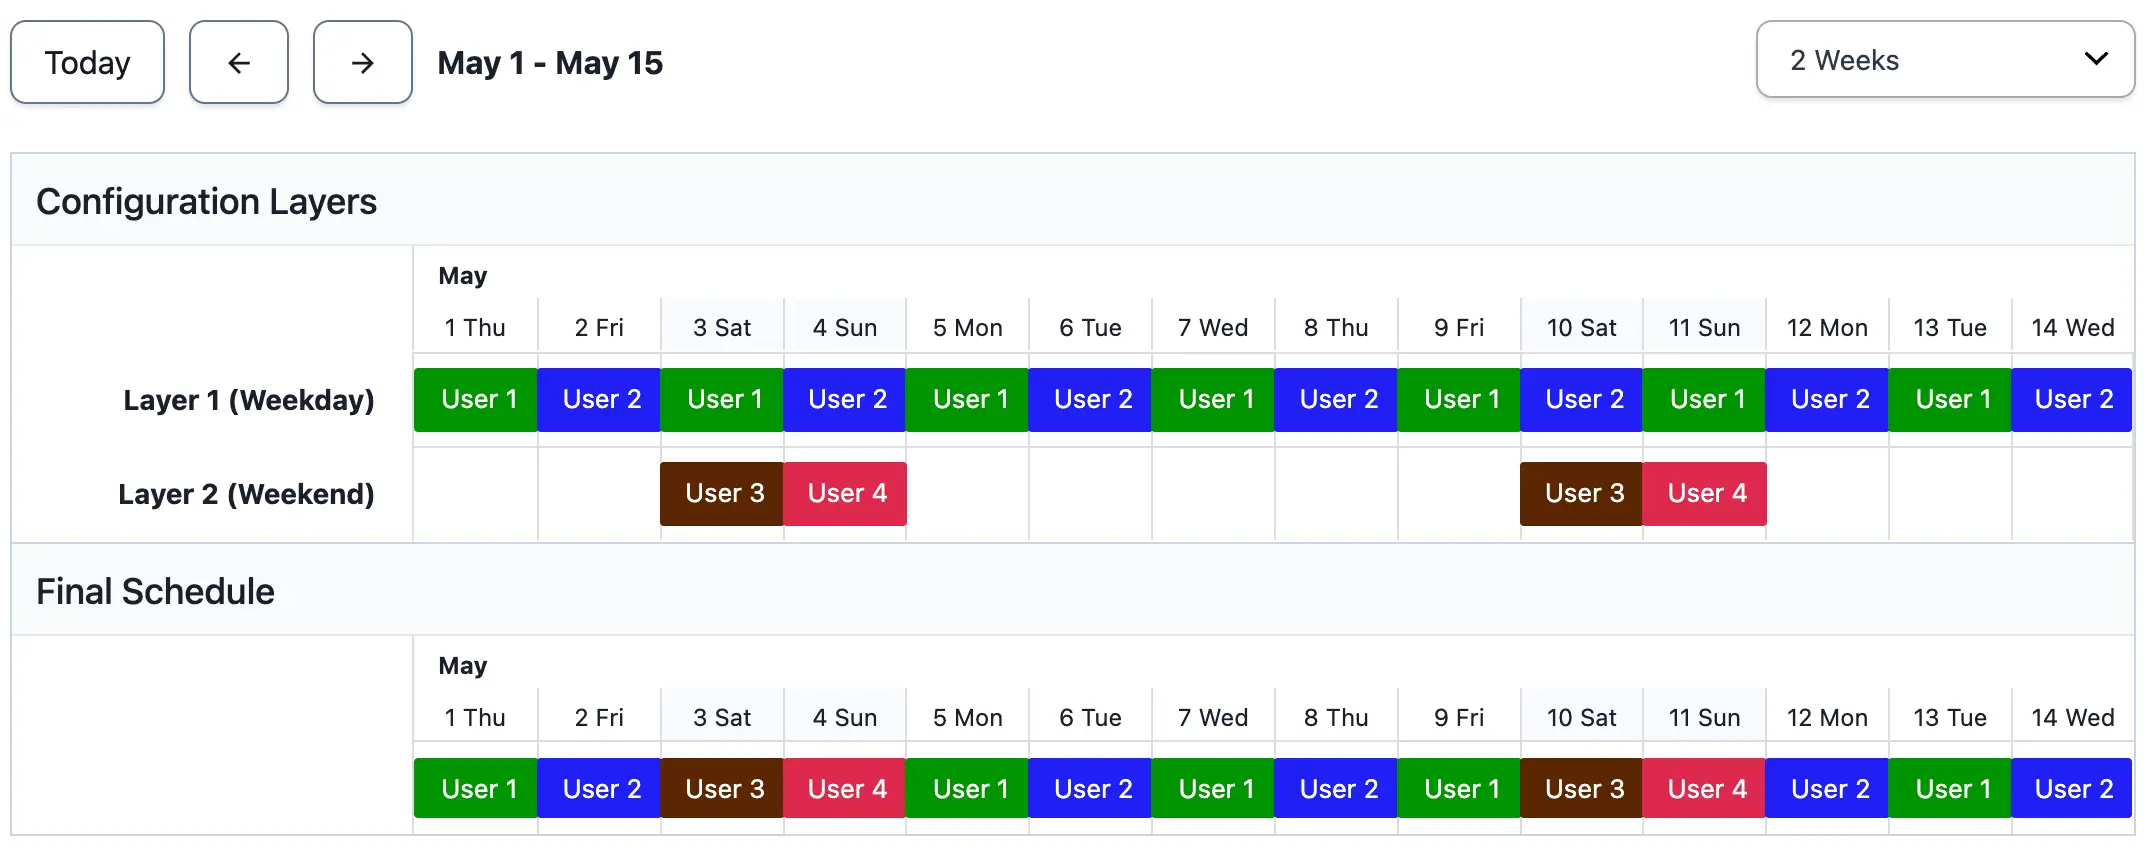
Example 10, final schedule
Updated 4 months ago