
Jeli Post-Incident Reviews
A Post-Incident Review is a structured evaluation process conducted after an incident or crisis to analyze what happened, why, and how to prevent it from happening again. Post-Incident Reviews are a valuable tool for organizations to learn from mistakes, improve incident response procedures, and enhance overall resilience in the face of future challenges. No matter how big or small an incident is, creating a Post-Incident Review has significant long-term benefits for your organization. When related, aggregated, or compared with other Jeli Post-Incident Reviews, incidents can reveal compelling organizational patterns and insights.
AvailabilityCustomers with the Enterprise for Incident Management pricing plan can create unlimited Jeli Post-Incident Reviews.
Customers on Professional and Business pricing plans can create up to 300 Post-Incident Reviews per year. This is a rolling 365-day window, and you can review the number of Post-Incident Reviews you have created in the past year by using the date filters on the Post-Incident Review list in the Jeli web app.
Please contact our Sales Team if you would like to upgrade to a plan featuring Jeli Post-Incident Reviews.
PrerequisiteBefore creating a Post-Incident Review in Jeli, please install the Slack | PagerDuty integration.
Select Post-Incident Reviews in the Jeli web app to see a list of Post-Incident Reviews. Click an Post-Incident Review's name to see its detailed overview.
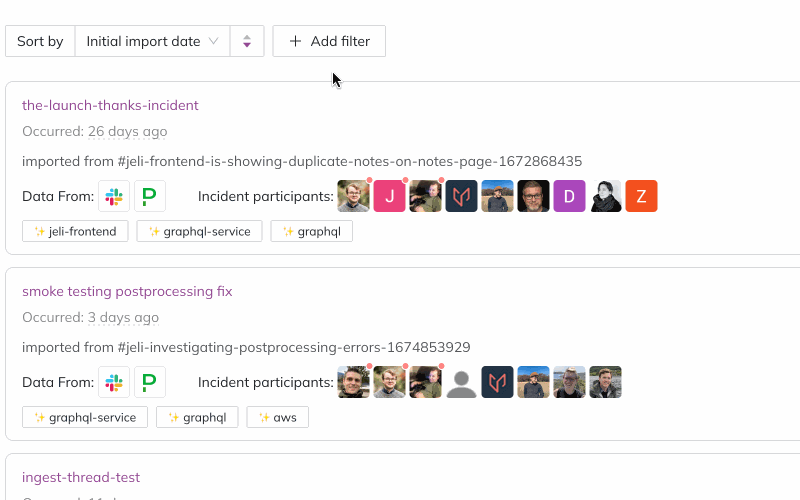
Search Post-Incident Reviews
Use the search bar above the Post-Incident Review list to search for Post-Incident Reviews by name or summary.
Filter the Post-Incident Review List
You can also add filters to your search, such as who participated in the Post-Incident Review and which teams or services were involved. Filtering the Post-Incident Review list can answer questions such as:
- How frequently was a particular service involved in incidents over the last quarter?
- Were key members of your front-end engineering team involved in incidents when they weren’t on call?
- Which Post-Incident Reviews should be analyzed further, based on the size and impact of the event?
You can filter and explore your incident data from the Post-Incident Review list :
- In the Jeli web app, select Post-Incident Reviews from the left menu.
- Click + Add filter .
- Choose the parameter you’d like to filter on, e.g., Tags or Key role.
- Choose the values you’d like to match against.
- Selecting multiple values will apply the filter using the
ORoperator. - You can bulk select and unselect tags from our filtering options by clicking the checkbox next to the desired tag type.
- Selecting multiple values will apply the filter using the
- Click to chain additional filters together using an
ANDoperator.
Post-Incident Review filters
Filter by Duration
You can filter by the following duration measurements. These are calculated based on a Post-Incident Review's event markers:
Total incident duration: The total time from incident start to end.
Diagnosis marker duration: The total time of all Diagnosis markers.
Repair marker duration: The total time of all Repair markers.
Detection marker duration: The total time of all Detection markers.
You can use these measurements to help you ask more detailed questions across your incident data, such as:
- Which incidents have taken the longest to diagnose, and which services were involved?
- How has your time spent diagnosing and repairing issues changed over time? Which services are trending up or down?
Share Post-Incident Reviews
Once you have applied your desired filters, you can share the results by copying the Post-Incident Review page URL. Other users who open the link will see the same filters applied to current Post-Incident Reviews in their view.
For example, below is a pre-set filter you can view in the Jeli web app. If prompted, please log in to your Jeli account first.
Which incidents do not have a primary investigator assigned?
Document Key Takeaways
During the course of an investigation, it is expected for themes to grow and change as you learn more and answer newly surfaced questions. Takeaways provide a place to record themes that surfaced throughout the investigation, distill them as you prepare for the learning review and capture them once they’ve been discussed in the meeting.
- In the Jeli web app, navigate to Post-Incident Reviews and select your desired Post-Incident Review.
- Select the Takeaways tab and click the text field to begin editing.
- When you're finished making updates, click Save.
The Takeaways field supports Markdown, and also supports templates, which can help ensure that information is recorded in a standardized way.
Topics of InterestConsider the following topics while conducting an investigation:
- What surprised you?
- What do you think others should know more about?
- What qualities does this incident share with other incidents?
Further ReadingPlease read Jeli's Howie: The Post-Incident Guide for a more detailed breakdown of incident analysis.
Import Slack Data
Importing Slack channel data into Jeli helps bring more context into your timelines and helps you prepare for your incident reviews. You can import data to create a new Post-Incident Review or add the data to an existing Post-Incident Review. You can also choose to import the entire channel or only data from a specific time span.
Post-Incident Review Access Roles
In Jeli, you have the ability to control who can view, edit, delete and manage access for every Post-Incident Review. You can assign this access in Slack before any data is imported into Jeli, and then manage it through the web app after import.
The following roles are available for individuals, or as a default level of access for an Post-Incident Review:
| No Access | Viewer | Editor | Owner | |
|---|---|---|---|---|
| View Post-Incident Review | ✓ | ✓ | ✓ | |
| Edit Post-Incident Review | ✓ | ✓ | ||
| Delete Post-Incident Review | ✓ | |||
| Edit access roles for Post-Incident Review | ✓ |
- Users that have No Access to an Post-Incident Review will not see the Post-Incident Review in the Jeli app homepage or in the Learning Center.
- You can assign multiple users the Owner role. Every Post-Incident Review in Jeli must have at least one Post-Incident Review Owner.
- Owners can change their own role, however, the user must grant another user ownership before changing their own access level.
Admin AccessAdmins for your organization automatically inherit Post-Incident Review Owner level access to every Post-Incident Review in Jeli. You can see your list of admins for your organization here within your settings page.
Manage Access Roles
Configure Access in Slack
When closing a Jeli incident with the /jeli close command, or creating a new Post-Incident Review via /jeli import, Jeli will prompt you to specify an Post-Incident Review Owner, and a default level of access.
Configure Access in the Jeli Web App
Required User Permissions
- Account admins or Post-Incident Review Owners can manage a Post-Incident Review's access roles in the web app.
You can manually set roles for existing Post-Incident Reviews in the web app. You can add or remove roles for specific users, as well as set the default access role for all other users.
To view an Post-Incident Review's current access roles:
- Navigate to your desired Post-Incident Review.
- Select Access from the left-hand sidebar.
This page shows the list of users granted specific roles for the Post-Incident Review. Below this list of users, you can see the default access role given to all remaining users. To change this, select the current role dropdown and choose the desired role.

Default access role assignment
To assign a user a specific access role:
- Search for the user you would like to add by entering their name in the search box. You can enter multiple users to give them the same role.
- Select the desired role for the user(s) from the dropdown.
- Click Add to add the user(s) to the Post-Incident Review.
To edit or remove a user's access role:
- Select the dropdown next to the desired user. Choose the new role or Remove Access to remove the user's current role.
Private Post-Incident Reviews
When closing a private incident and creating an Post-Incident Review for it, only the users who were members of the private channel can be added as Post-Incident Review Owners. After creating the Post-Incident Review, a Post-Incident Review Owner can give access to additional users via the web app.
Updated about 2 months ago