Event Orchestration allows users to route events to an endpoint and create nested rules, which define sets of actions to take based on event content. Event Orchestration is PagerDuty's modern solution to help tackle your existing and future automation goals.
⚠️
Required User Permissions
The following user roles can create/edit/delete Event Orchestrations:
User
Admin
Manager base roles and team roles. Manager team roles can create/edit/delete Event Orchestrations associated with their team.
When an incoming event stream has more than one service destination, you can use Global Orchestrations to apply common event actions and route events to different services.
Navigate to AIOpsEvent Orchestration and select + New Orchestration.
Enter an Orchestration Name and an optional Orchestration Description.
Click Save.
On the next screen, select Integrations to view the Integration Key, Email Address (for email integrations), and HTTP Endpoint for API that you can use to connect your alerting systems with PagerDuty. Follow your alerting system's integration guide for configuration instructions.
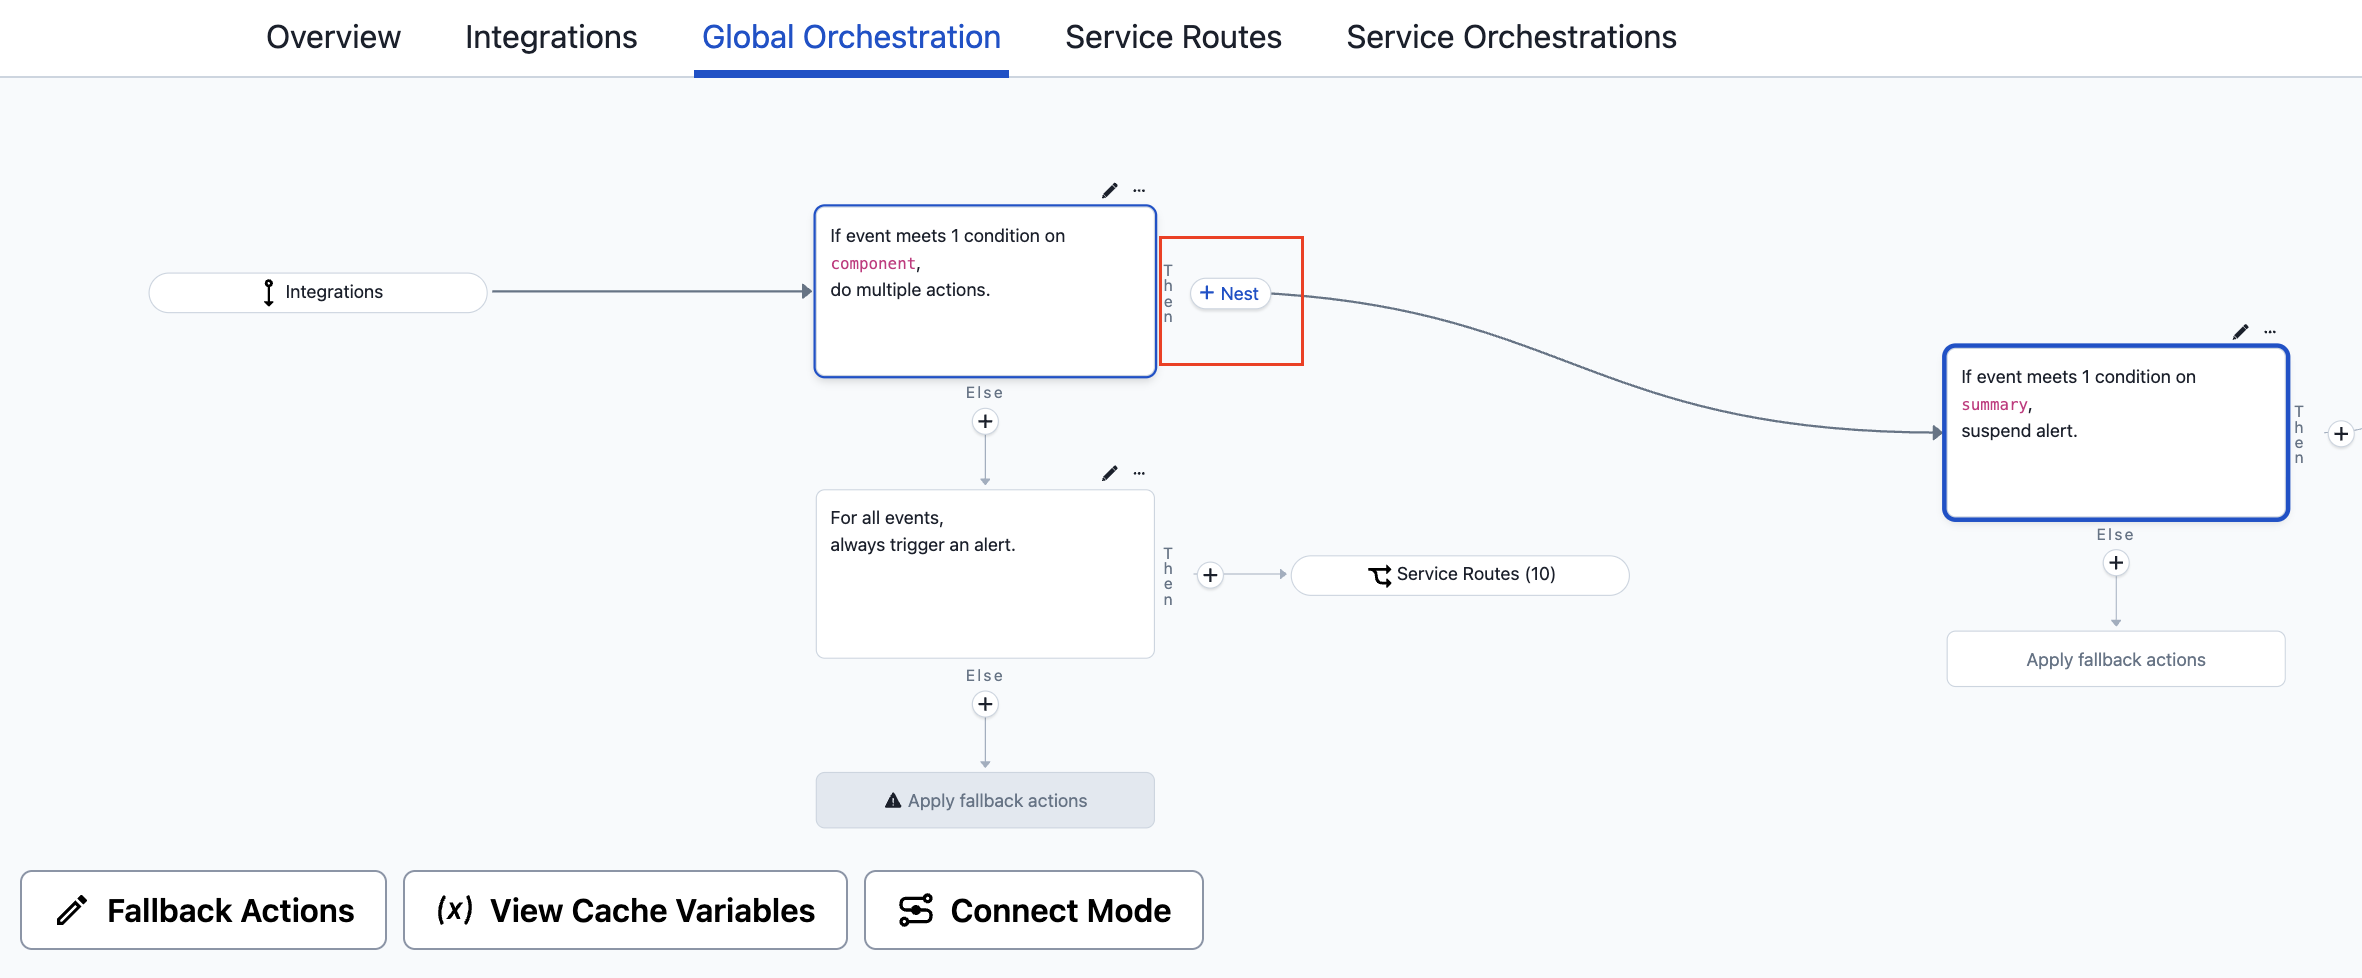
Select Global Orchestration to navigate to the Global Orchestration Rules graph.
When an incoming event stream has more than one service destination, you can use Global Integrations to route events to different services and apply Service Orchestration rule actions.
📘
Availability
Global Integrations are available on all packages.
Navigate to AIOpsEvent Orchestration and select New Orchestration.
Enter an Orchestration Name and an optional Orchestration Description.
Click Save.
On the next screen, select Integrations to view the Integration Key, Email Address (for email integrations), and HTTP Endpoint for API that you can use to connect your alerting systems with PagerDuty. Follow your alerting system's integration guide for configuration instructions.
Create a Service Orchestration from a Global Integration or Orchestration
A Service Orchestration can also be created after a Global Integration, or Global Orchestration is made. This method allows users to create the rules that define what happens after events are routed to a service.
To create a new Service Orchestration from a Global Integration or Orchestration:
Navigate to AIOpsEvent Orchestration select your desired Orchestration and then click Service Orchestrations.
Select a service from the Service Event Rules dropdown.
You are then taken to the Service Orchestration graph for the service you selected. Continue to Step 2: Create Rules.
Step 2: Create Rules
With Event Orchestration there are three distinct types of rules that a user can create:
Global Orchestration Rules (Available with PagerDuty AIOps only): Global Orchestration rules are optional rules that can be created before a routing rule. They determine which actions are applied to events during event processing as well as how events eventually turn into incidents. Actions applied at the Global Orchestration rule level apply to all events that match the rule's conditions, regardless of which service they are eventually routed to. Any actions applied can be overridden by Service Orchestration rules which also match against a given event. The last evaluated rule takes precedence where a single enrichment, alert, or incident action is taken multiple times.
Routing Rules (Available on all packages): Routing rules define how events are routed to services. They must be created for events to be routed from a Global Integration or Orchestration to a service.
Service Orchestration Rules (Available on all packages): Service Orchestration rules are optional rules that can be created after a routing rule. They determine which actions are applied to events during processing, and how events eventually turn into incidents. Service Orchestration rules have their own conditions and are linked to rules that precede and follow them.
AI Orchestrations
AI Orchestration rules are automatically generated recommendations that surface in a dedicated segment after all manual Global and Service Orchestration rules. See AI Orchestrations for more information.
Recommended Preparation
PagerDuty recommends sending events to your Orchestration integration key to inspect the incoming JSON key/value pairs and build rules from there.
To send events to Orchestrations:
Navigate to AIOps Event Orchestration, select your preferred Orchestration and click Integrations.
On the following screen, select the integration key set you want to work with and copy the appropriate Integration Key to use in your upstream event source, e.g., a monitoring tool or CI pipeline.
📘
Note
An Orchestration can have up to 10 integration keys associated with it. Using any of these integration keys directs events toward the Orchestration rules and routing rules specified for the Orchestration.
Routing Rules
For Event Orchestration to route events to the appropriate service, you need to create routing rules. Some things to keep in mind while working with your routing rules:
There can only be one routing rule per service per Event Orchestration. For example, if Orchestration A routes events to Service A, you cannot configure another rule within the same orchestration to route to the same service, however you could configure Orchestration B to route events to Service A.
Routing rule conditions can be based on either PD-CEF-transformed event data or raw event payloads.
You can also create Dynamic Routing Rules, which evaluate all events and do not have conditions. Dynamic Routing Rules are able to route events to services based on the Service name or Service ID in the payload. Dynamic Routing Rules are evaluated before any other routing rules on a service router.
Events that do not match any configured rules match to the catch all rule. The default catch all behavior does not send these events to a specific service & never creates an incident. You can edit the catch all rule to send these events to a specific service instead.
🚧
Routing Rules and Event Deduplication
All events—including acknowledge and resolve events—are evaluated against the conditions defined in your routing rules to determine which service they should be routed to. If you need event deduplication across all services because your trigger events have different payloads than acknowledge or resolve events, please refer to this example.
Create a Dynamic Routing Rule
To create a dynamic routing rule:
Navigate to AIOpsEvent Orchestration and select your preferred Orchestration.
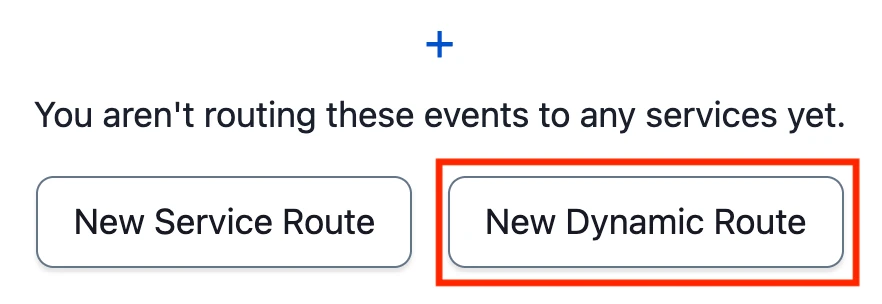
Click Service RoutesNew Dynamic Route.
Select New Dynamic Route
In the modal, select the Event Field where routing information (i.e., either service name or service ID) is located. You can select any single PD-CEF field. For example, event.summary refers to the Summary field. You may also select free text field formats: Raw Event (e.g., raw_event.foo.bar) or Custom Details (e.g., event.custom_details.foo.bar).
In the Format dropdown, select Service name (default) or Service ID. This setting specifies if the Dynamic Routing Rule should attempt to match events to services via its name or ID (e.g., PXXXXXX).
In the Extraction Regex field, enter an RE2 regex pattern that identifies where service information is located in the selected field. If you specify a capture group, the part matched by the capture group is used to set the variable. Otherwise, the entire match is used.
Click Save.
📘
Dynamic Routing Rules
Keep the following information in mind while configuring a dynamic routing rule:
If an event does not match to a service based on your dynamic routing rule configuration, it evaluates against the next routing rule in the service's router.
If an event contains malformed information in the field targeted for dynamic routing, Event Orchestration drops the event (e.g., if you have configured a dynamic routing rule based on service ID, but the specified field does not contain data shaped like a service ID).
Global Orchestrations execute before Dynamic Routing Rules. Manipulating a CEF field in a Global Orchestration may lead to unintended behavior if a downstream Dynamic Routing Rule reads from that field.
Service names are stored as cached data for routing purposes. It can take up to 10 minutes for the service name cache to update after a service's name has been changed. During this time events continue to match to services based on the previously configured service names.
Create a Routing Rule
To create a routing rule:
Navigate to AIOpsEvent Orchestration select your preferred OrchestrationService Routes click New Service Route.
Optional: next to , enter a description for your new rule.
From the dropdown What service should events route to?, select a service you would like to route events to.
Under When should events be routed here?, select one of the following options:
Depending on your selection in the previous step, configure the rule according to your needs.
Click Save.
Catch All Rule
If an event does not match any configured routing rules, it performs the action outlined by the catch all rule. There are two options available for this rule:
Events not matching a previous rule should not be sent to a specific service & should never create an incident (Default): If a trigger event reaches this rule, it creates a suppressed alert. If a resolve event reaches this rule, the rule attempts to resolve an open alert previously created through the orchestration with the same dedup_key, regardless of service. These events can also resolve suppressed alerts if a matching dedup_key exists.
Send all events not matching a previous rule to a service: If an event reaches this rule, it is routed to the chosen service and can be evaluated further by the service's Service Orchestration if one exists.
Global Orchestration rules are optional rules that can be created before a routing rule. These rules have their own conditions and are linked to rules that precede and follow them.
Global Orchestration rules can include any action except those that define how an event is routed to a service.
Service Orchestration rules are optional rules that can be created after a routing rule. These rules have their own conditions and are linked to rules that precede and follow them.
Service Orchestration rules determine which actions are applied to events during processing before an incident triggers.
When there is more than one potential global or service orchestration rule that an event could match against, that group of rules is called a set. Events match against whichever rule in a set has the highest ordinality (i.e., appears first, either in the UI or API).
When creating a Global or Service Orchestration rule, any conditions can be created and combined, similar to a routing rule, however, threshold-based conditions can only ever exist on their own. If a user wants to create a rule with a threshold-based condition they must make a specific service rule that only has that condition present.
📘
Ruleset Limits
A set of rules grouped vertically in the web app can be referred to as a "ruleset." Rulesets can have up to 25 rules. As needed, you can nest rules, which allows you to create more than 25 rules in an orchestration, however PagerDuty advises against making orchestrations too complex, as this can make it difficult to maintain, or for other teams to understand your orchestration's logic.
Recombining Rules
If your orchestration logic is complex, use Connect Mode to reduce redundant rules and improve user experience by enabling multiple rules to recombine back into a single rule. To learn more, see the guide on Recombining Rules.
Connect mode
Configure a Global or Service Orchestration Rule
Navigate to AIOpsEvent Orchestration select your preferred Orchestration select Global Orchestration or Service Orchestrations (and select a service), and click New Rule on an empty Orchestration rule page or on an Orchestration rule page with existing rules.
A modal appears on the page. Select the type of condition, then specify the appropriate conditions for this new rule.
Click Next.
Specify the actions that should be applied in the following menus:
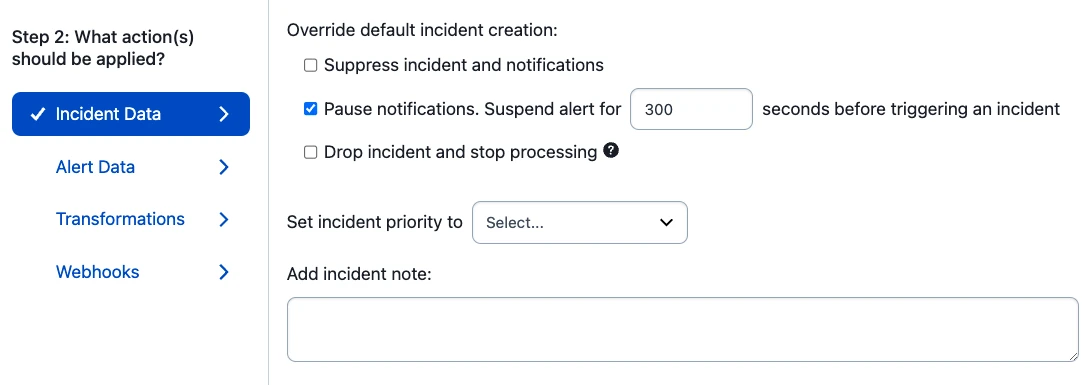
An incident can trigger after a predetermined amount of time. Enter the amount of time you would like to pass before an incident and notifications are created in the Suspend alert for _ second(s) before triggering incident field. See Pause Incident Notifications for more details.
Alerts that match the routing rule conditions suppress, meaning they do not create PagerDuty incidents or notify responders. You may want to suppress alerts if you do not want responders to be notified outside of support hours, or within any specific timeframe. Suppressed alerts are visible in the Alerts table.
Note: Only available for Global Orchestration rules. Events that match this rule are dropped out of PagerDuty's event ingestion pipeline. They generate no data within the PagerDuty platform, do not create Incidents, and are not turned into Alerts. It is not possible to audit PagerDuty for events that were dropped.
Set Priority
To set priority, check the Set Priority checkbox and select your desired priority level from the dropdown. Incident priority allows the classification of incidents based on a level of prioritization. Incident priority must be enabled on your account before it can be set with orchestrations.
To override a service's assigned Escalation Policy, select your preferred escalation policy from the dropdown. The on call responder associated with the selected escalation policy receives notifications when an incident triggers, instead of the responder associated with the service's configured escalation policy.
Add a note to the incident
To add a note when an incident is created, under Additional Context, enter the text of the note that you would like to be added to an incident that meets your rule's criteria. If multiple rules in an orchestration add a note, only the note from the most recently evaluated rule is added to the incident. Notes can be used to help responders resolve incidents quicker by including information or links related to the system that the event comes from.
⚠️
Adding a Note to a New Incident
Adding a note or overriding an Escalation Policy only applies when an event triggers a new incident. These actions are not applied to subsequent events and alerts that are grouped or deduplicated into an existing incident.
Event Fields
Event Fields allow you to copy important data from any combination of source event fields into any PagerDuty Common Event Format (CEF) field. Translate difficult machine terms and code into helpful context for responders so they can effectively respond to the problem. Event Fields can also be used to enhance PagerDuty AIOps capabilities by customizing alerts, influencing the Intelligent Alert Grouping and Intelligent Triage machine learning algorithms.
Enrich and update any CEF field or even create new key values within the Custom Details object using custom rule variables. When events are sent to PagerDuty, they are transformed into Common Event Format. You can replace any CEF field or even create new key values within the Custom Details object.
Select your preferred Common Event Field (CEF) from the Event field to set dropdown.
Right dropdown
Select whether you would like to use Regexor a Template from the Replace using dropdown.
Template option
If you chose a text template from the dropdown, you can reference a variable defined in the Create Custom Rule Variables section above using {{ }} brackets (e.g., {{class}}) in the Replace with value field.
Regex option
If you chose the Regex option from the dropdown, enter a Value and the origin Source.
Event Fields are available with both Global Orchestrations and Service Orchestrations.
Deduplication
The dedup_key field is used to merge events into a single alert. Events with the same dedup_key can update the status of the alert they are automatically merged into.
To set a deduplication key:
In the Event Fields section of your rule, under Define Custom Variable, create a rule variable from event fields by entering a Variable Name, Event Field and the Extraction Regex. You may use Sample Events on the right to create these rule variables.
Next, select Dedup Key from the Event field to set dropdown. Select whether you would like to use Regex or a Template from the right hand dropdown. If you use a Template, you can reference a rule variable defined in step 1 using {{variable name here}} brackets in Replace with value field. If you are using Regex, enter a Value and the Source.
⚠️
Using Event Fields on Email Events
Event Fields are only available for email events sent to Global Integrations. Users can extract data from the email event using regex matching into multiple rule variables. Currently, only Summary and Dedup_Key Common Event Fields can be replaced for email events.
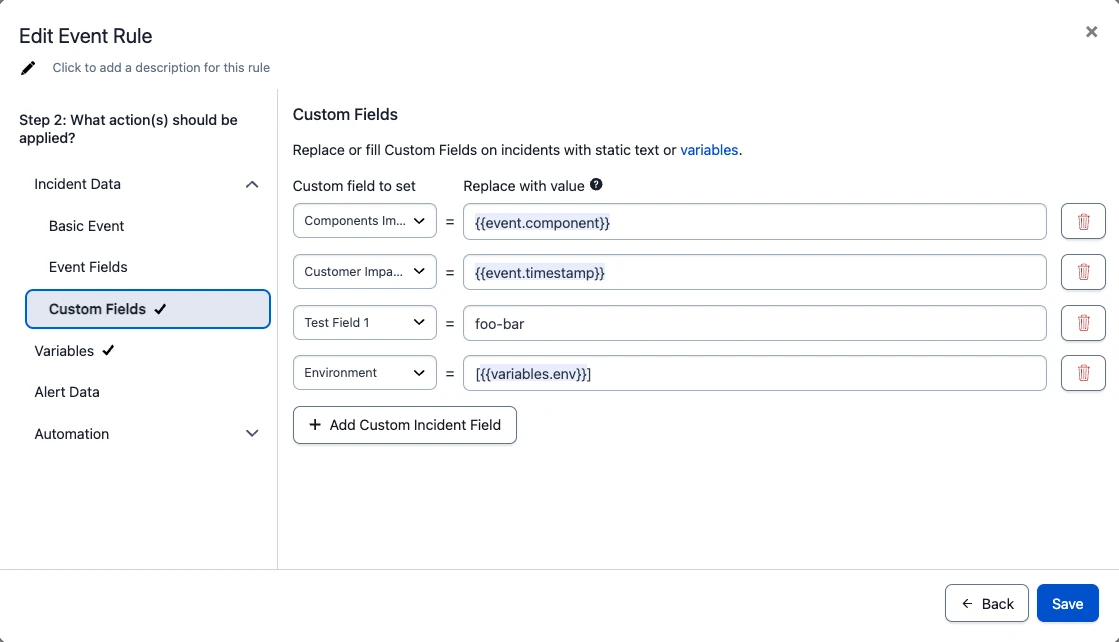
Custom Fields
Replace or fill incident Custom Fields with static text, event fields or rule variables. This allows you to bring event data into your incidents and use event-driven automation in your incident management. For example, you may wish to pass the component, class, or other custom details event fields into incident custom fields. Once a value is in a custom field, it can be used elsewhere in the product such as Status Update Templates or as part of the ServiceNow integration, which supports custom fields bi-directional syncing.
📘
Availability
Business Plans and above are able to set Custom Fields to static text values through Event Orchestration (#3 in table below)
Enterprise for Incident Management, Digital Operations (Legacy), Event Intelligence or AIOps plans are able to dynamically populate custom field values with Event Orchestration. This includes replacement with both event fields and variables (#1 and #2 in table below).
⚠️
Custom Fields Set on New Incidents
Custom fields are only set when the event triggers a new incident. Subsequent events and alerts that are grouped or deduplicated into the incident do not update Custom Fields at this time.
Custom fields in Event Orchestration
Click Add Custom Incident Field.
Perform the following:
Custom field to set
Replace with value
Select your preferred Custom Field
There are a few options for how to replace values: 1. Replace with event field: Use double curly brackets to reference event fields. E.g.: {{event.component}}. 2. Replace with variable: Use double curly brackets to reference both cache variables and rule variables. Note: variables must first exist before they can be referenced. E.g.: {{variables.env}} {{cache_var.foo_bar}} 3. Replace with static text: Simply use static text, such as foo-bar in the above image.
See the Event Fields section for more information.
Field Types Supported
Custom Field Type
Expected Event Orchestration Format
Example
Text
As is
Hello World
Single Select
As-is
OptionA
Multiple Select
Array with quoted strings
[“OptionA”, “OptionB”]
Tag
Array with quoted strings
[“TagA”, “TagB”]
Date-Time
ISO-8601 formatted date-time with timezone. Microseconds are accepted but not required. - yyyy-mm-ddThh:mm:ss.sss±hh:mm - yyyy-mm-ddThh:mm:ss±hh:mm - yyyy-mm-ddThh:mm:ss.sssZ - yyyy-mm-ddThh:mm:ssZ
2024-01-25T16:17:18.315+0500 or - 2024-01-25T16:17:18+0500 or - 2024-01-25T16:17:18.315Z or - 2024-01-25T16:17:18Z
Decimal
As-is
101.234
Integer
As-is
1234
Boolean
True or False Note: If left empty, defaults to False
True
Create Custom Rule Variables
You can define custom rule variables to capture snippets from a source event using regex matching for use with Event Fields.
Field
Instructions and Details
Variable Name
Enter a name for the rule variable.
Event Field
Enter the full path of a CEF or non-CEF field to read the rule variable from. For example, use event.summary for the Summary CEF field, or raw_event.fieldname to read from the original event's fieldname data.
Extraction Regex
Enter an RE2 regular expression, which matches the part of the field you want to extract. If you specify a capture group, the part matched by the capture group is used to set the rule variable. Otherwise, the entire match is used.
You may use Sample Events on the right as a reference for rule variables by clicking Show Details. You may add multiple rule variables by clicking Add Variable in the upper right of the Customize Event Fields panel, or delete rule variables by clicking the icon directly to the right of the rule variable.
Alert Data
Alert Action
Instructions and Details
Set Severity
To set severity, check the Set Severity checkbox and select info, error, warning or critical from the dropdown. Severity can be used for Dynamic Notifications, which are defined by the service settings. To use Dynamic Notifications, the events must be routed to a service that sets Dynamic Notifications based on severity levels. With severity controlled via Event Orchestrations and the service configured to use dynamic notifications, you can control the incident urgency.
Set a custom trigger/resolve action
If you would like to automatically trigger or resolve an alert based on your event rule's conditions, in the section Override the given event_action behavior, check the box for either Always trigger an alert or Always resolve an alert.
Automation
Event Orchestration enables you to trigger automations at machine speed. You can leverage webhooks with Global Orchestration and Service Orchestration rules to trigger automations in external systems. Automation Actions within Service Orchestration rules allow you to run automations already created in the PagerDuty platform. Through an Event Orchestration rule, run the Automation on Incidents or Automation on Alerts so that the automation is completed before a human is notified.
Only one automation can be specified per rule, however multiple automations can be triggered during incident creation by nesting rules one after another. To help you get started, see the example on how to Automate Remediation for Specific Incidents.
⚠️
Configuration Note
Ensure that any configuration in the Event Orchestration aligns with the defined Trigger condition as it is possible to create a scenario where an automation would never run. This conflict could occur in a single rule or with nested rules. For example:
Suppression Conflicts: If you set rule #1 to suppress all alerts and rule #2 to "Run Automation Action" when an alert is added, the automation never runs because the alert was never created.
Deduplication vs. Grouping: If your rule is set to trigger "Automatically when Alert is added to an Incident," it fires for the initial alert and any subsequent grouped alerts. However, it does not fire for deduplicated events that update the initial alert, as no new alert is being added to the incident.
These rules would never trigger an automation as every alert would be suppressed, therefore an automation that is configured to run when an alert is added to an incident is impossible.
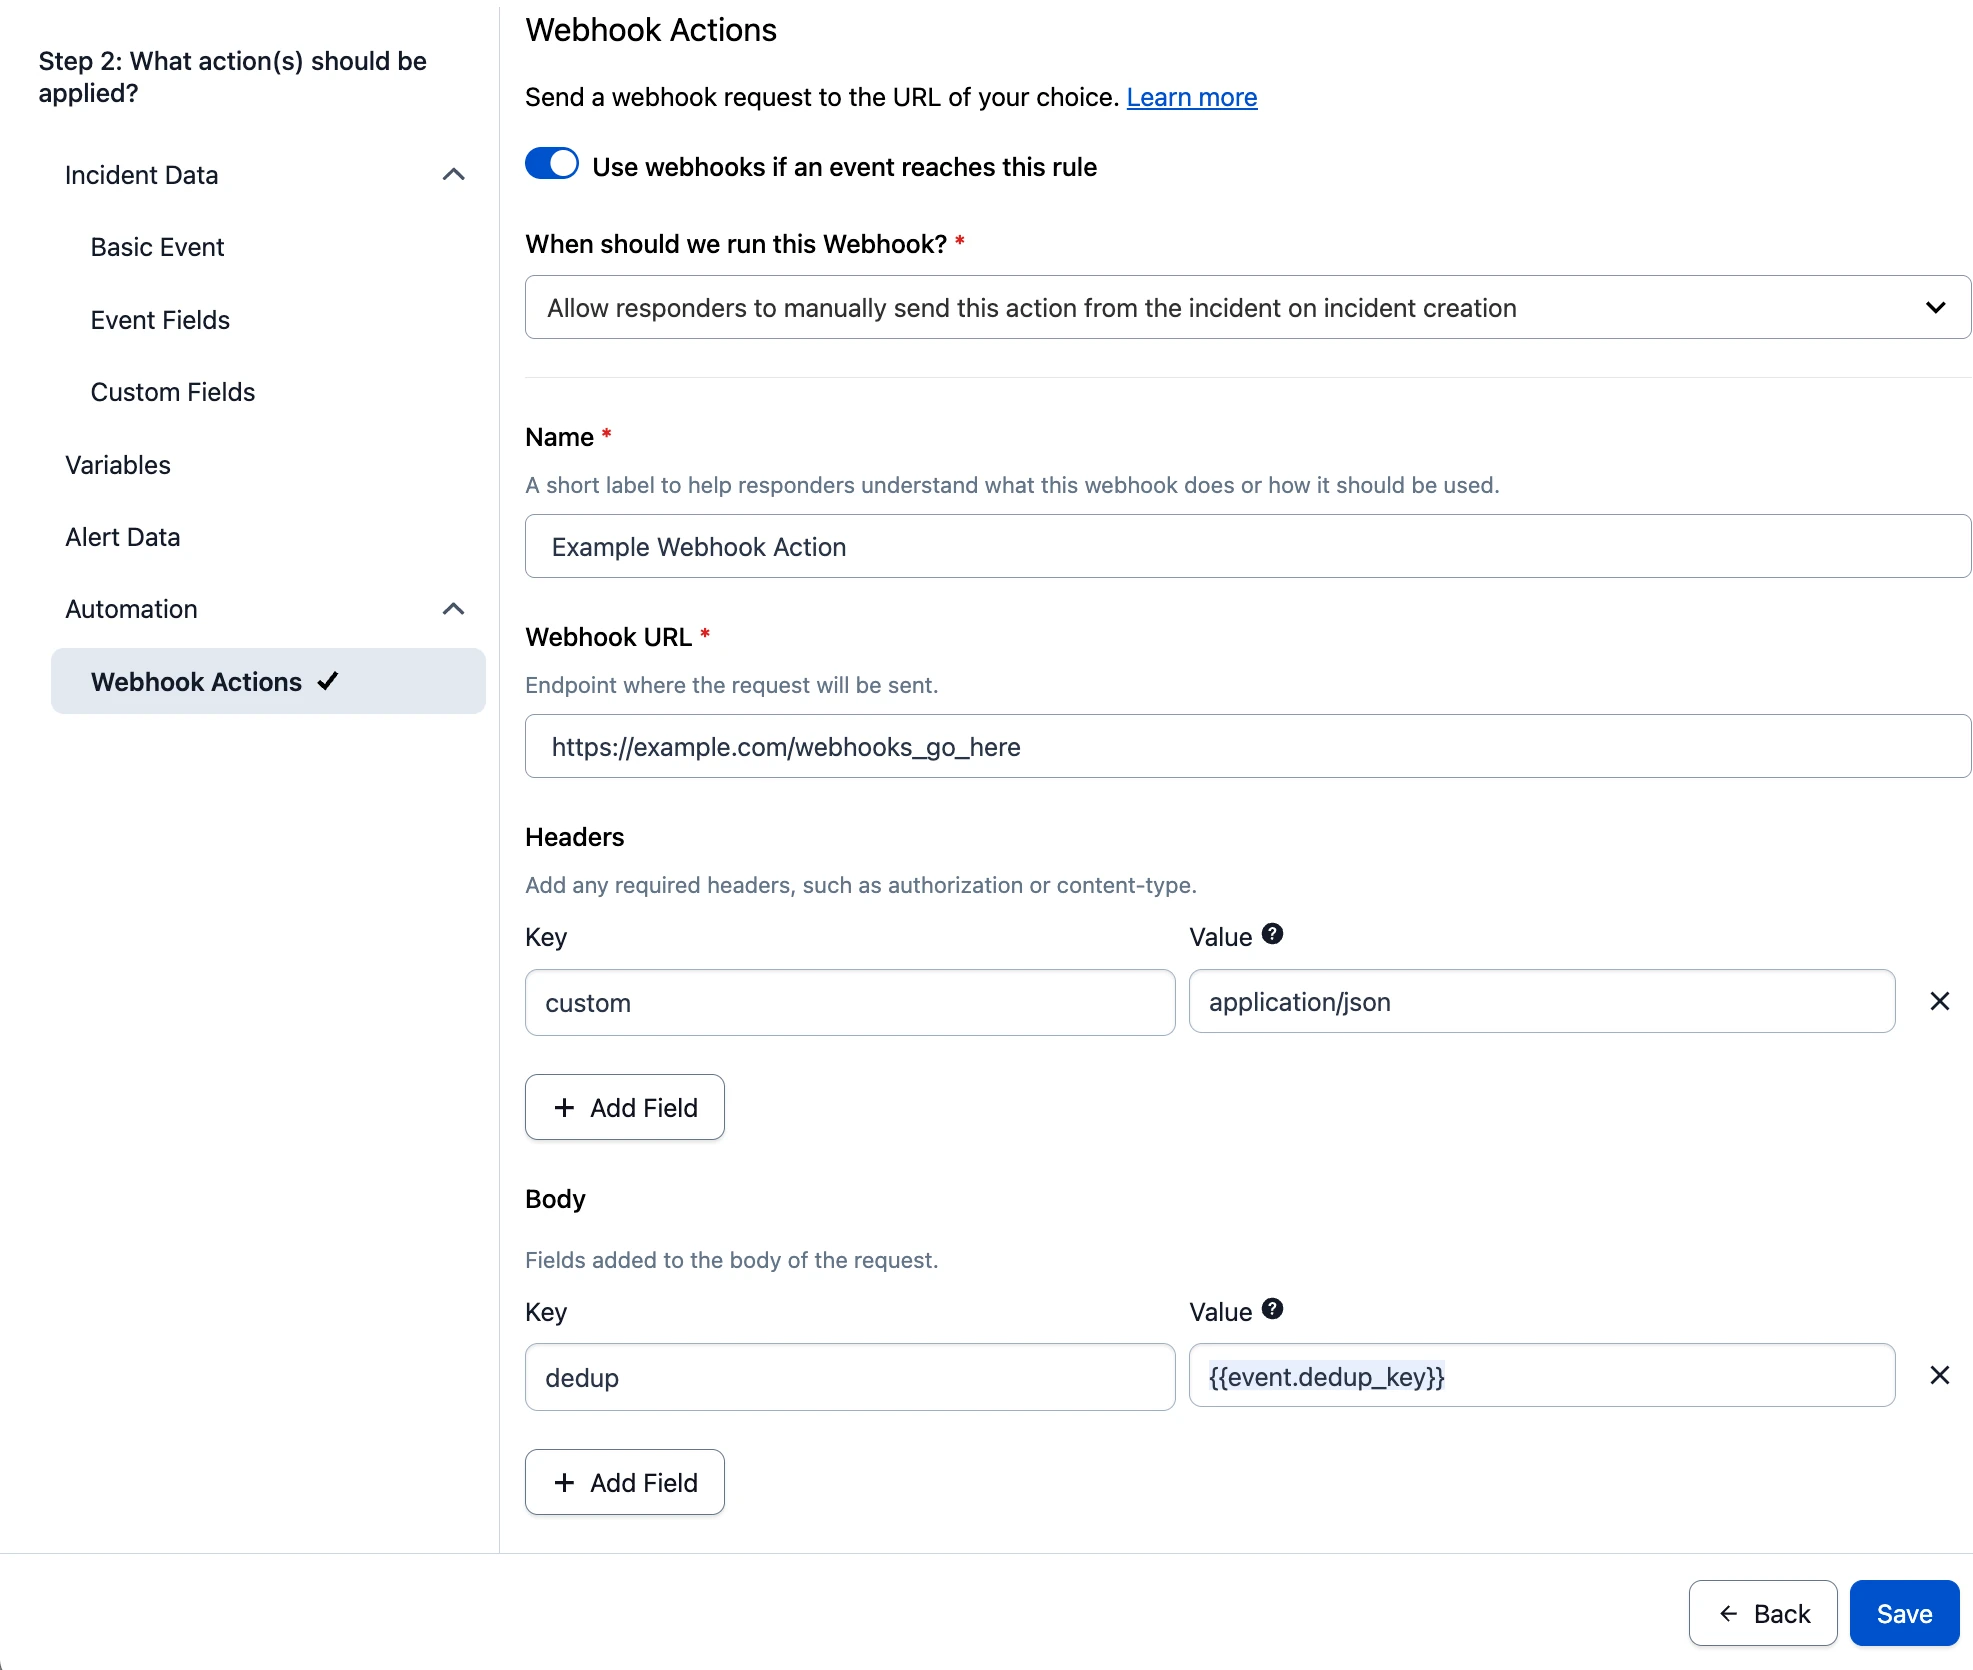
Webhooks
Webhook Actions allow response teams to easily define a dynamic webhook through an Orchestration and send a custom payload to a specified endpoint. This enables responders to automate actions like restarting a server, clearing logs, and reverting bad deploys.
The payload can be set using a combination of several predefined variables. To configure a webhook action within an event rule:
Option
Instructions and Details
Use webhooks if an event reaches this rule (Enable webhook)
Click the toggle to enable the webhook.
When should we run this Webhook? (Trigger condition)
Select the scenario from the dropdown for when the webhook should run: - Allow responders to manually send this action from the incident on incident creation - Automatically when Alert is added to an Incident - Automatically when Alert is suppressed - Automatically when Alert is paused/suspended
Name
Enter a webhook name to be displayed on the alert or incident.
Webhook URL
Enter the API endpoint for the payload.
Headers
Select the + Header Field button and enter the Name and Value for the webhook header.
Runbook Automation Self-Hosted allows users to specify which PagerDuty Automation Action should be run based on an incoming event's payload. Responders can initiate automated diagnostics or remediation as soon as an incident is created, saving critical time during major incidents, or preventing major incidents altogether.
Event Orchestration is able to automatically trigger any Automation Action that has already been created and is allowed for use on the service Event Orchestration is being used on. Read the Automation Actions article to learn more about how to configure actions and their permissions.
This feature is available for Business, Enterprise for Incident Management and Digital Operations (Legacy) plans that meet the following criteria:
Business Plans: Accounts must have the PagerDuty AIOps and PagerDuty Automation Actions add-ons, as well as Advanced Event Orchestration.
Enterprise for Incident Management and Digital Operations (Legacy) Plans: Accounts must have the PagerDuty Automation Actions add-on and Advanced Event Orchestration.
To configure an Automation Action within your Service Orchestration rule:
Option
Instructions and Details
Use Automation Actions if an event reaches this rule (Enable Automation Action)
Click the toggle to enable the Automation Action.
When should we run this Action? (Trigger condition)
Select the scenario from the dropdown for when the Automation Action should run: - Automatically when Alert is added to an Incident - Automatically when Alert is suppressed - Automatically when Alert is paused/suspended
Automated Action
Select an existing Automation Action from the dropdown.
⚠️
Removed Automation Action
If an Event Orchestration rule has an Automation Action specified that is no longer valid due to it being deleted or not available, the rule with the Automation Action persists and still functions, however the Automation Action no longer triggers. Rules where this occurs have a yellow icon on the Automation tab when you edit the rule, to indicate that the Automation Action is no longer available.
Copy Service Rules
📘
Copied Service Rule Limitations
Copied service orchestration rules persist for 5 minutes after being copied or until they are manually deleted via the successful rule copy icon located in the top right of the service orchestration canvas.
Copying Event Orchestration Routing Rules is not currently supported.
To copy an existing service orchestration rule:
Click the menu shown and select Copy Rule.
An icon appears in the top right of the service orchestration canvas indicating that a rule has been copied when this is successful. Copying a rule copies all of its conditions, actions, and action configurations.
Copied rules can be pasted after, before, or between any existing service orchestration rules. To paste a rule, you may either click the button shown on the service orchestration canvas between existing rules, or click the menu for an existing rule and select Paste Rule.
A rule creation modal appears and it contains all the conditions, actions, and action configurations for the rule that was copied. These conditions, actions, and action configurations can be edited, or they can be left as they are. Click Save.
Manage AIOps
PagerDuty's AIOps Service Configuration provides you with flexibility and control over how and where AIOps features apply. This feature allows you to enable or disable AIOps on Event Orchestrations. See the PagerDuty AIOps article for more information.
For AIOps customers, all newly-created Event Orchestrations have AIOps enabled by default.
Changes to AIOps configurations may take up to 5 minutes to fully apply.
📘
Availability
This feature is in Limited General Availability with the PagerDuty AIOps add-on. Contact your account team or Support to request access. To sign up for a trial of PagerDuty AIOps features, read PagerDuty AIOps Trials.
⚠️
Required User Permissions
Account Owners
Admin and Global Admins
Manager base role and team roles
Manager team roles can only manage Event Orchestrations associated with their team
⚠️
Disable Behavior
When you disable AIOps on an Event Orchestration, you can expect the following to occur:
Event Throughput: If an AIOps integration key requests an increased throughput and you subsequently disable AIOps, it defaults back to a maximum of 120 events/min.
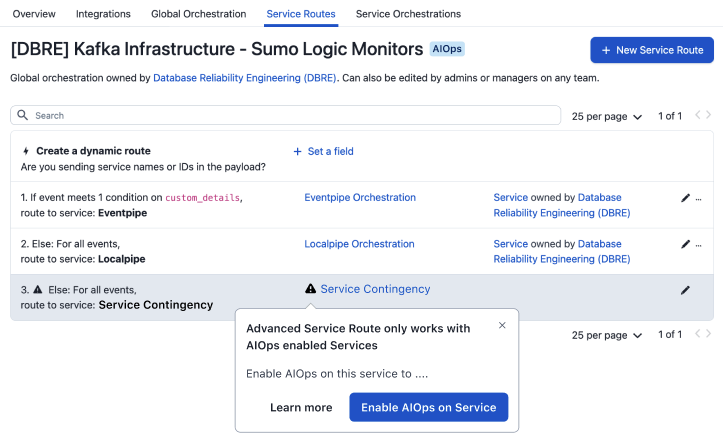
Global Orchestration: Only AIOps-enabled Event Orchestrations have access. The system skips any existing Global Orchestration rules on a non-AIOps Event Orchestration during event ingestion.
Dynamic Service Routing Rule: Only AIOps-enabled Event Orchestrations have access. The system skips any existing Dynamic Service Routing Rules on a non-AIOps Event Orchestration during event ingestion.
Routing to AIOps-Enabled Services: Only AIOps-enabled Event Orchestrations can route to AIOps-enabled services. If a non-AIOps Event Orchestration has an invalid routing rule that routes to an AIOps service, the event still routes to the service to ensure it does not miss an incident. However, this event does not count against your AIOps event volume tier but the incident has all AIOps features disabled, including skipped Orchestration rules. This may result in unintended consequences such as increased noise.
Routing to AIOps-Disabled Services from AIOps-Enabled Event Orchestration: Since AIOps features such as Global Orchestrations and Dynamic Service Routes can still be applied, all events sent to an AIOps-enabled Event Orchestration count against the AIOps event volume tier, even if the Service has AIOps disabled.
Error message from an Orchestration routing to a non-AIOps service
To enable or disable AIOps on an Event Orchestration:
Navigate to AIAIOpsEvent Orchestration.
To the right of your preferred orchestration, click the kabob menu and perform the following based on your use case:
Click Enable AIOps. In the confirmation modal that appears, click Enable to complete the process.
Click Disable AIOps. In the confirmation modal that appears, click Disable to complete the process.
If you delete or migrate all integration keys associated with an orchestration, the orchestration's rules persist, however they are not able to receive or evaluate events.
Create an Integration
In the web app, navigate to AIOpsEvent Orchestration.
Select your desired Orchestration from the list.
Select Integrations, click New Integration and select Create new integration.
Enter a name for the integration and click Save.
📘
Integration Limit
One orchestration can have up to 10 integrations.
Rename an Integration
In the web app, navigate to AIOpsEvent Orchestration.
Select the Orchestration with the integration you would like to rename from the list.
Select Integrations.
On the top-right of the integration you would like to rename, click .
Enter a new name for the integration and click Save.
Delete an Integration
In the web app, navigate to AIOpsEvent Orchestration.
Select the Orchestration with the integration you would like to delete from the list.
Select Integrations.
On the top-right of the integration you would like to delete, click .
In the confirmation modal, click Delete.
Note: This action cannot be undone.
Migrate an Integration from an Existing Ruleset or Orchestration
Edit, Disable or Reorder a Global Orchestration Rule
Navigate to AIOpsEvent Orchestration.
Select the Orchestration from the list that contains the Global Orchestration rule you wish to edit or disable.
Select Global Orchestration.
On the following page:
To edit: Click in the top-right of your desired rule. In the modal, make any changes to conditions or rule information and click Save.
To disable: Click in the top-right of your desired rule and select Disable. The rule is immediately disabled, and appears in the rule's description. To enable the rule again, click and select Enable.
To reorder: Click in the top-right of your desired rule and select an action, as appropriate (e.g., Move to Top, Move Up, Move Down, Move to Bottom).
Delete a Global Orchestration Rule
Navigate to AIOpsEvent Orchestration.
Select the Orchestration from the list that contains the Global Orchestration rule you wish to delete.
Select Global Orchestration.
On the following page, click in the top-right of your desired rule and select Delete.
In the confirmation modal, click Delete.
Note: This action cannot be undone.
Manage Routing Rules
Edit or Disable a Routing Rule
Navigate to AIOpsEvent Orchestration.
Select the Orchestration from the list that contains the routing rule you wish to edit or disable.
Select Service Routes.
On the following page:
To edit: Click to the right of your desired routing rule. In the modal, make any changes to conditions or rule information and click Save.
To disable: Click to the right of your desired routing rule and select Disable. The rule is immediately disabled, and appears in the rule's description. To enable the rule again, click and select Enable.
To reorder: Click in the top-right of your desired rule and select an action, as appropriate (e.g., Move to Top of All Routes, Move Up, Move Down, Move to Bottom of All Routes).
Delete a Routing Rule
Navigate to AIOpsEvent Orchestration.
Select the Orchestration from the list that contains the routing rule you wish to delete.
Select Service Routes.
On the following page, click to the right of your desired routing rule and select Delete Rule.
In the confirmation modal, click Delete.
Note: This action cannot be undone.
Manage Service Orchestration Rules
There are two places where you can manage Service Orchestration rules:
Manage a Service Orchestration Rule in Event Orchestration
Edit, Disable or Reorder a Service Rule
Navigate to AIOpsEvent Orchestration.
Select the Orchestration from the list that contains the service rule you wish to edit or disable.
Select Service Orchestrations and select your desired service from the dropdown.
On the following page:
To edit: Click to the right of your desired routing rule. In the modal, make any changes to conditions or rule information and click Save.
To disable: Click to the right of your desired routing rule and select Disable. The rule is immediately disabled, and appears in the rule's description. To enable the rule again, click and select Enable.
To reorder: Click in the top-right of your desired rule and select an action, as appropriate (e.g., Move to Top, Move Up, Move Down, Move to Bottom)
Delete a Service Rule
Navigate to AIOpsEvent Orchestration.
Select the Orchestration from the list that contains the service rule you wish to delete.
Select Service Orchestrations and select your desired service from the dropdown.
On the following page, click in the top-right of your desired rule and select Delete.
In the confirmation modal, click Delete.
Note: This action cannot be undone.
Manage a Service Orchestration Rule on a Service's Settings Tab
Edit, Disable or Reorder a Service Rule
Navigate to ServicesService Directory and select your desired service.
Select the Settings tab, scroll to the Event Management section and click Service Orchestration Rules.
On the following page:
To edit: Click to the right of your desired routing rule. In the modal, make any changes to conditions or rule information and click Save.
To disable: Click to the right of your desired routing rule and select Disable. The rule is immediately disabled, and appears in the rule's description. To enable the rule again, click and select Enable.
To reorder: Click in the top-right of your desired rule and select an action, as appropriate (e.g., Move to Top, Move Up, Move Down, Move to Bottom)
Delete a Service Rule
Navigate to ServicesService Directory and select your desired service.
Select the Settings tab, scroll to the Event Management section and click Service Orchestration Rules.
On the following page, click in the top-right of your desired rule and select Delete.
Click Integrations to navigate to the Integrations section of the Event Orchestration. Each Event Orchestration has the following routing options for each integration key set:
Integration Key: You may use the integration key with many of the tool integrations. You may also use it to send events via API (see below).
Email Address: You may use the email address with the Email Integration.
HTTP Endpoint for API: You may use the integration key and the Events API V2 to send events to this endpoint.
Once you have added the integration to your service, you are directed to the Integrations tab. Find the integration that was just added in the list, click to the right and then copy its Integration Key.
Use this integration key to complete your integration according to its guide, and then send test events to your service.
Switch to Service Orchestrations
If your account has services that are currently using Service Event Rules, you may choose to switch to Service Orchestrations, which is a more robust feature. When you switch to Service Orchestrations, events that land on the service, regardless of source, are evaluated by Event Orchestration instead of Event Rules.
📘
Note
Email events are an exception. If an email event comes in via a service-level email integration, the Service Orchestration is ignored, and only the email filters and rules are applied. In contrast, if an email comes in on a Global Orchestration, then the Global Orchestration rules are applied, followed by Service Orchestration rules, if present.
To switch to Service Orchestrations:
Navigate to ServicesService Directory and select your desired service.
Select the Settings tab, scroll to Event Management and then click Switch to Service Orchestrations.
The service can be switched back to processing events using Event Rules using the same process.
Pause Incident Notifications
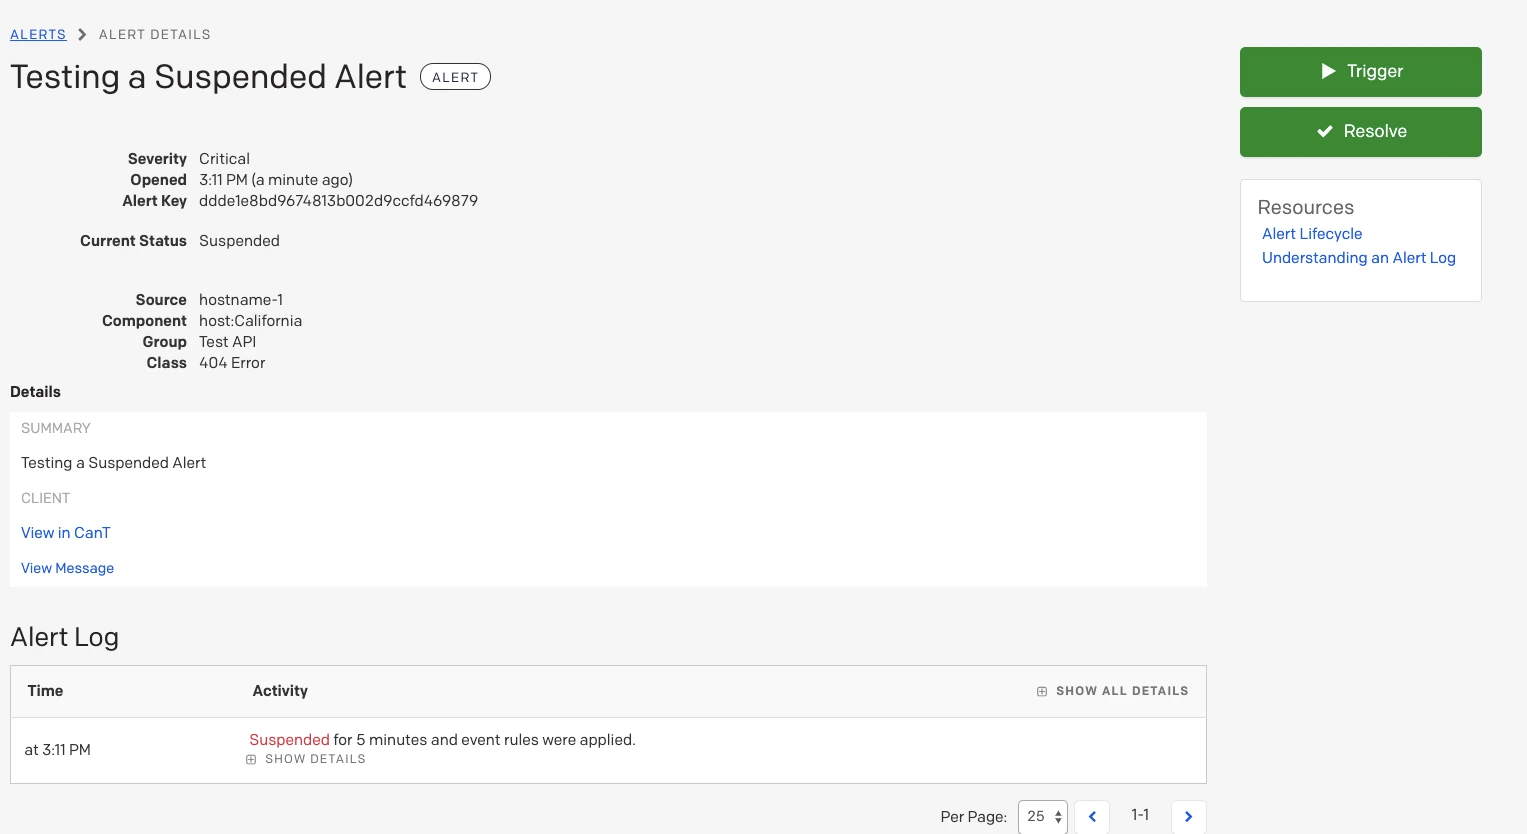
As a feature of Event Orchestration, you can configure rules to create alerts in a Suspended state, which pauses incident creation and notifications for a predefined amount of time. During the pause period, new alerts are viewable in the Alerts Table with a Suspended status. You can take one of two actions on a Suspended alert: either Trigger it, which immediately creates an incident and sends out responder notifications, or Resolve it, which prevents the incident and notifications from being created altogether.
Enter a value (in seconds) for Suspend alert for ___ seconds before triggering an incident.
Select pause notifications
Click Save.
View and Take Action on Paused Alerts
To view alerts in a paused state, navigate to the Alerts table in the upper menu of the web app. Alerts with paused incident notifications have a Suspended status:
Suspended alert
To take action on a paused alert:
Click the incident title to view its details page.
On the right hand side, click Trigger to trigger an incident and send notifications, or Resolve if you would like to resolve the alert without triggering an incident/notifications. You see a green modal that confirms that the alert has been triggered or resolved.
Alert details
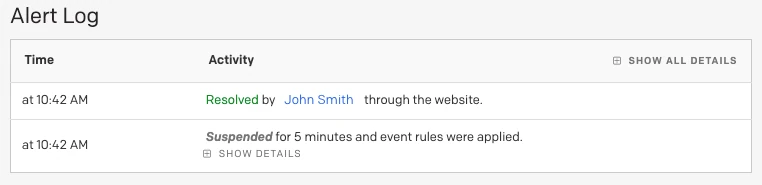
The pause period and action taken also appear in the Alert Log timeline, accessible by clicking an alert's title to view the detail page:
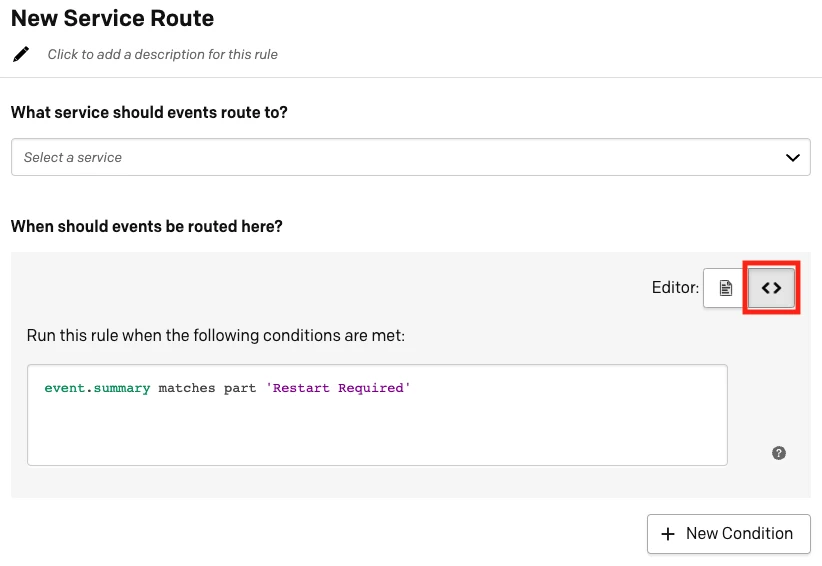
Edit a routing rule using PagerDuty Condition Language (PCL)
For more information and examples, see the developer documentation PCL Overview.
FAQ
How should I troubleshoot a rule that did not work as expected?
Ensure the expected action is supported
Confirm your subscription plan supports the action you expected. Some Event Orchestration features are only available with AIOps. If relevant, ensure both your Event Orchestration and Service have AIOps enabled.
If you were on an AIOps Trial, verify the trial was active when the event was ingested or the incident was created.
Review the incident timeline
Check the incident timeline for any errors or unexpected behavior when the event was processed. Look for skipped actions, error messages, or anything unusual.
Check the alert timeline
Next, review the alert timeline for more details. The alert timeline can show errors or skipped actions, and provides direct links to the specific Event Orchestration rule that applied (or attempted to apply) an action, so you can jump straight to the rule for further review.
Verify the rule condition
Carefully review the condition in your orchestration rule. Ensure it is accurate and free of typos or special characters (like extra spaces, quotes, or symbols) that could interfere with matching.
Use the Recent Events pane
Open the Recent Events panel and find the event in question. Note: Only the last 10 accepted events are displayed so you may need to send a test event with the relevant payload.
Compare the event fields and values to your rule's condition. Make sure the field names and values match exactly—any mismatch can prevent the rule from triggering.
Ensure another rule or orchestration has not overwritten your action
All rules are applied with a "last rule wins" methodology. Any rule in a Service Orchestration can overwrite any discrete actions (all actions other than triggering webhooks or Automation Actions) that were applied in a Global Orchestration. This same behavior applies to child rules within the same orchestration.
What is the difference between Event Rules and Event Orchestration?
Many of the new features in Event Orchestration are enhancements on Event Rules, however, there are also some substantial departures from existing event rule functionality:
With Event Orchestration, rules are now evaluated iteratively. They start with Global Orchestration rules, which define actions to be performed before routing and end with the definition of Service Orchestration rules, allowing individual teams to define their own incident creation behavior at the service level. This is substantially different from the earlier approach, which evaluated Global Event Rules (GERs) and Service Event Rules (SERs) at the same time. This change has allowed PagerDuty to remove both GERs and SERs from Event Orchestration.
As an intentional part of this change, Event Orchestration now also supports evaluation of conditions against either raw or PD-CEF-formatted event payloads.
Another substantial change with Event Orchestration is the introduction of different rule types, as well as a rigid rule structuring. This improves observability, ensures context is established when actions are taken, and streamlines rule creation.
Event Orchestration has made improvements to integration key management by adding the ability to migrate integration keys between rulesets and orchestrations as well as the ability to combine multiple integration keys together into a single Event Orchestration, reducing the number of Global Orchestrations and Routers required to ensure events are properly normalized and directed to the right teams.
How many services can an Event Orchestration route to?
You can route events to as many as 1,000 services in one orchestration. However, each service can only have one routing rule.
Can a service have more than one set of Service Orchestration rules?
No, each service can only have one set of Service Orchestration rules (orchestration rule canvas). Here, the same set of orchestration rules is applied to all events that land on the service, which streamlines the Event Management process.
Can events be routed to a service from the Unrouted rule with Event Orchestration?
Yes, selecting a service to route events that do not match with any of the routing rules in an orchestration is possible with Event Orchestration.
Does Event Orchestration support email events?
Yes, Event Orchestration supports email events. Rules may be based on the content of an email by entering the email field as custom details in the event field event.custom_details.subject. Having email events as custom fields means email events are treated as CEF events that you can apply Event Fields to.
Does Event Orchestration support the "contains/does not contain" filter?
Yes, Event Orchestration supports the "contains/does not contain" filter. It has, however, been reworded and replaced with the "matches part/does not match part" filter.
Are condition values case sensitive with Event Orchestration?
No, condition values with Event Orchestration are case insensitive.
Does Event Orchestration support time-based conditions?
Yes, you can set time-based conditions with Event Orchestrations that avoid trapping events that do not match condition pairs. With Event Orchestration, events outside the set schedule are evaluated by the next rule.
Is there a payload size limit for an Event Orchestration?
Yes, the maximum payload size for an Event Orchestration is 4 MB. Orchestrations greater than 4 MB return 413 Payload Too Large errors and do not save. This limit is most relevant to users who manage Event Orchestration via the REST API or with infrastructure-as-code tools, such as Terraform.
How many integrations can be added to an Event Orchestration?
Users can associate up to 10 integrations with one Event Orchestration.