
Jira Server v3 Integration Guide | PagerDuty
Integration Guide for Jira Server
This integration is for Jira Server (self-hosted) for Jira Server 7.2.0 - 8.x.x, which can be downloaded from the Atlassian Marketplace. If you use Jira Cloud, see the Jira Cloud integration guide.
PagerDuty's integration with Jira Server enables customers to have bi-directional sync between Atlassian Jira Software. Incidents triggered in PagerDuty can automatically open an issue in Jira and includes the ability to populate issue fields, whether they are out-of-box or custom. Issues in Jira can also trigger a PagerDuty incident, helping you notify your team of time-sensitive issues.
Additional capabilities include: Incident priority synchronization, notes synchronization, and state mapping.
This integration also supports Jira Service Management.
Looking For a Different Version?This guide is for the Jira Server v3 integration. If you would like to use the latest version, go to our Jira Server v4 integration guide.
Create PagerDuty Authentication Token
Required User PermissionsYou need an Admin or Account Owner user permission in PagerDuty to create the Jira authentication token.
In PagerDuty, you need to add the Jira Server extension. A unique authentication token is created. The token is used in Jira for the next step.
- In the top right corner of your screen, click Apps & Add-Ons Extensions.
- Click + New Extension and select Jira Server. A screen appears prompting you to open the Jira Server Extension page; click Open Jira Server Page.
- From the Jira Server configuration page, copy the Authentication Token to be used later on in this guide.
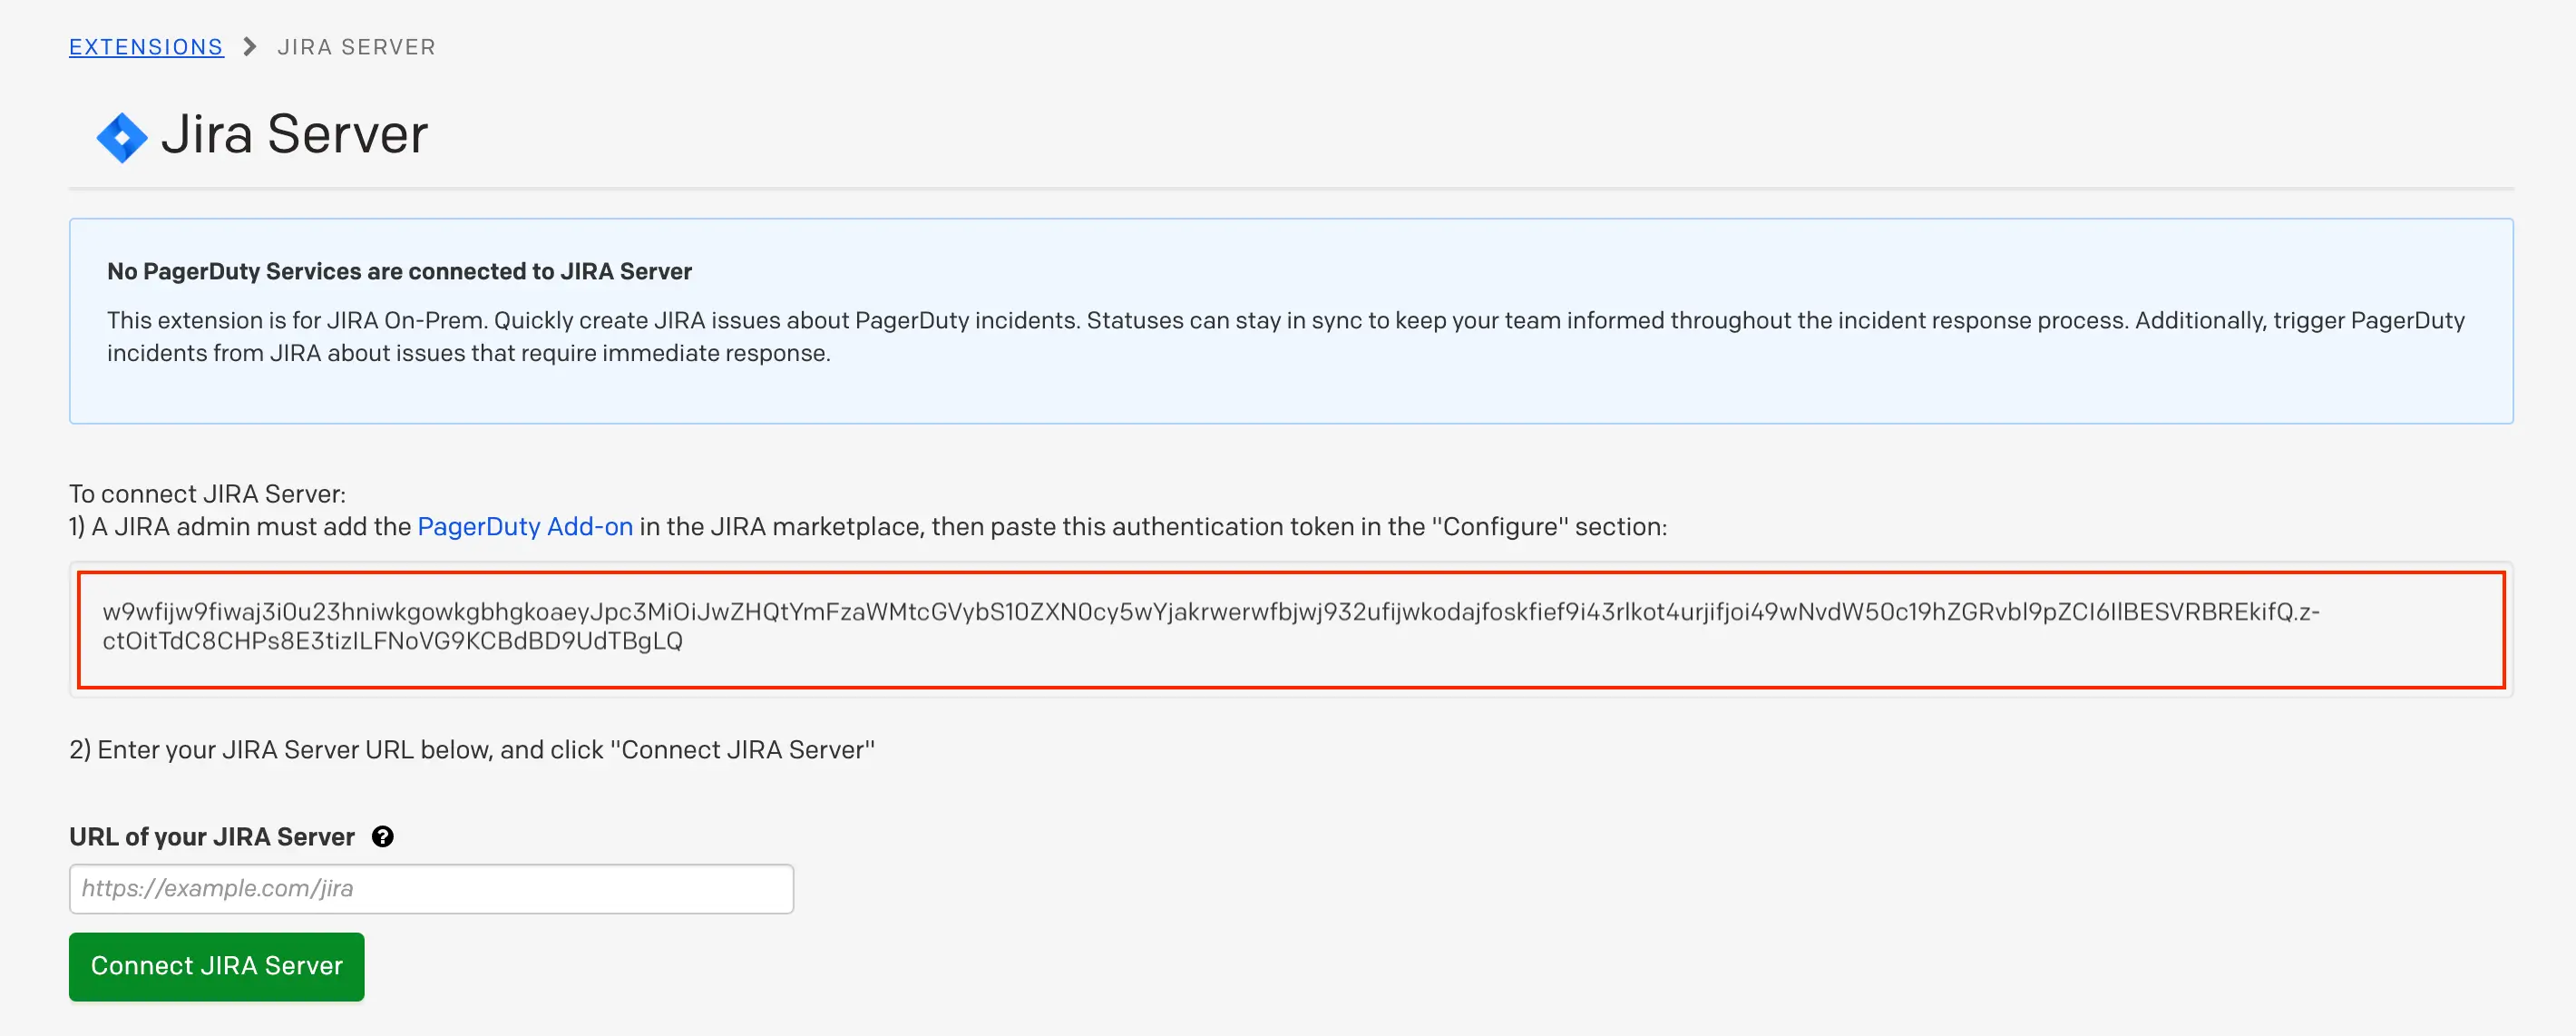
Copy authentication token
- Log in to your Jira Server application. Note: You cannot connect PagerDuty to Jira Server until you paste the authentication token into the PagerDuty add-on in Jira.
Add PagerDuty Plugin in Jira
In Jira, you need to download the PagerDuty for Jira Server plugin and add your PagerDuty authentication token.
Required User PermissionsAt minimum, you must have permission to perform the following actions in Jira:
- Create, update, and comment on issues
- Run JQL searches
- Read Projects
- Read Settings (for example, globally configured Priorities)
- From the Jira Administration menu in the top right corner, click Add Ons.

Select "Add Ons"
- Click the Add-ons tab, then click Find new add-ons in the Atlassian Marketplace. Search for PagerDuty for Jira Server and click the Install button.
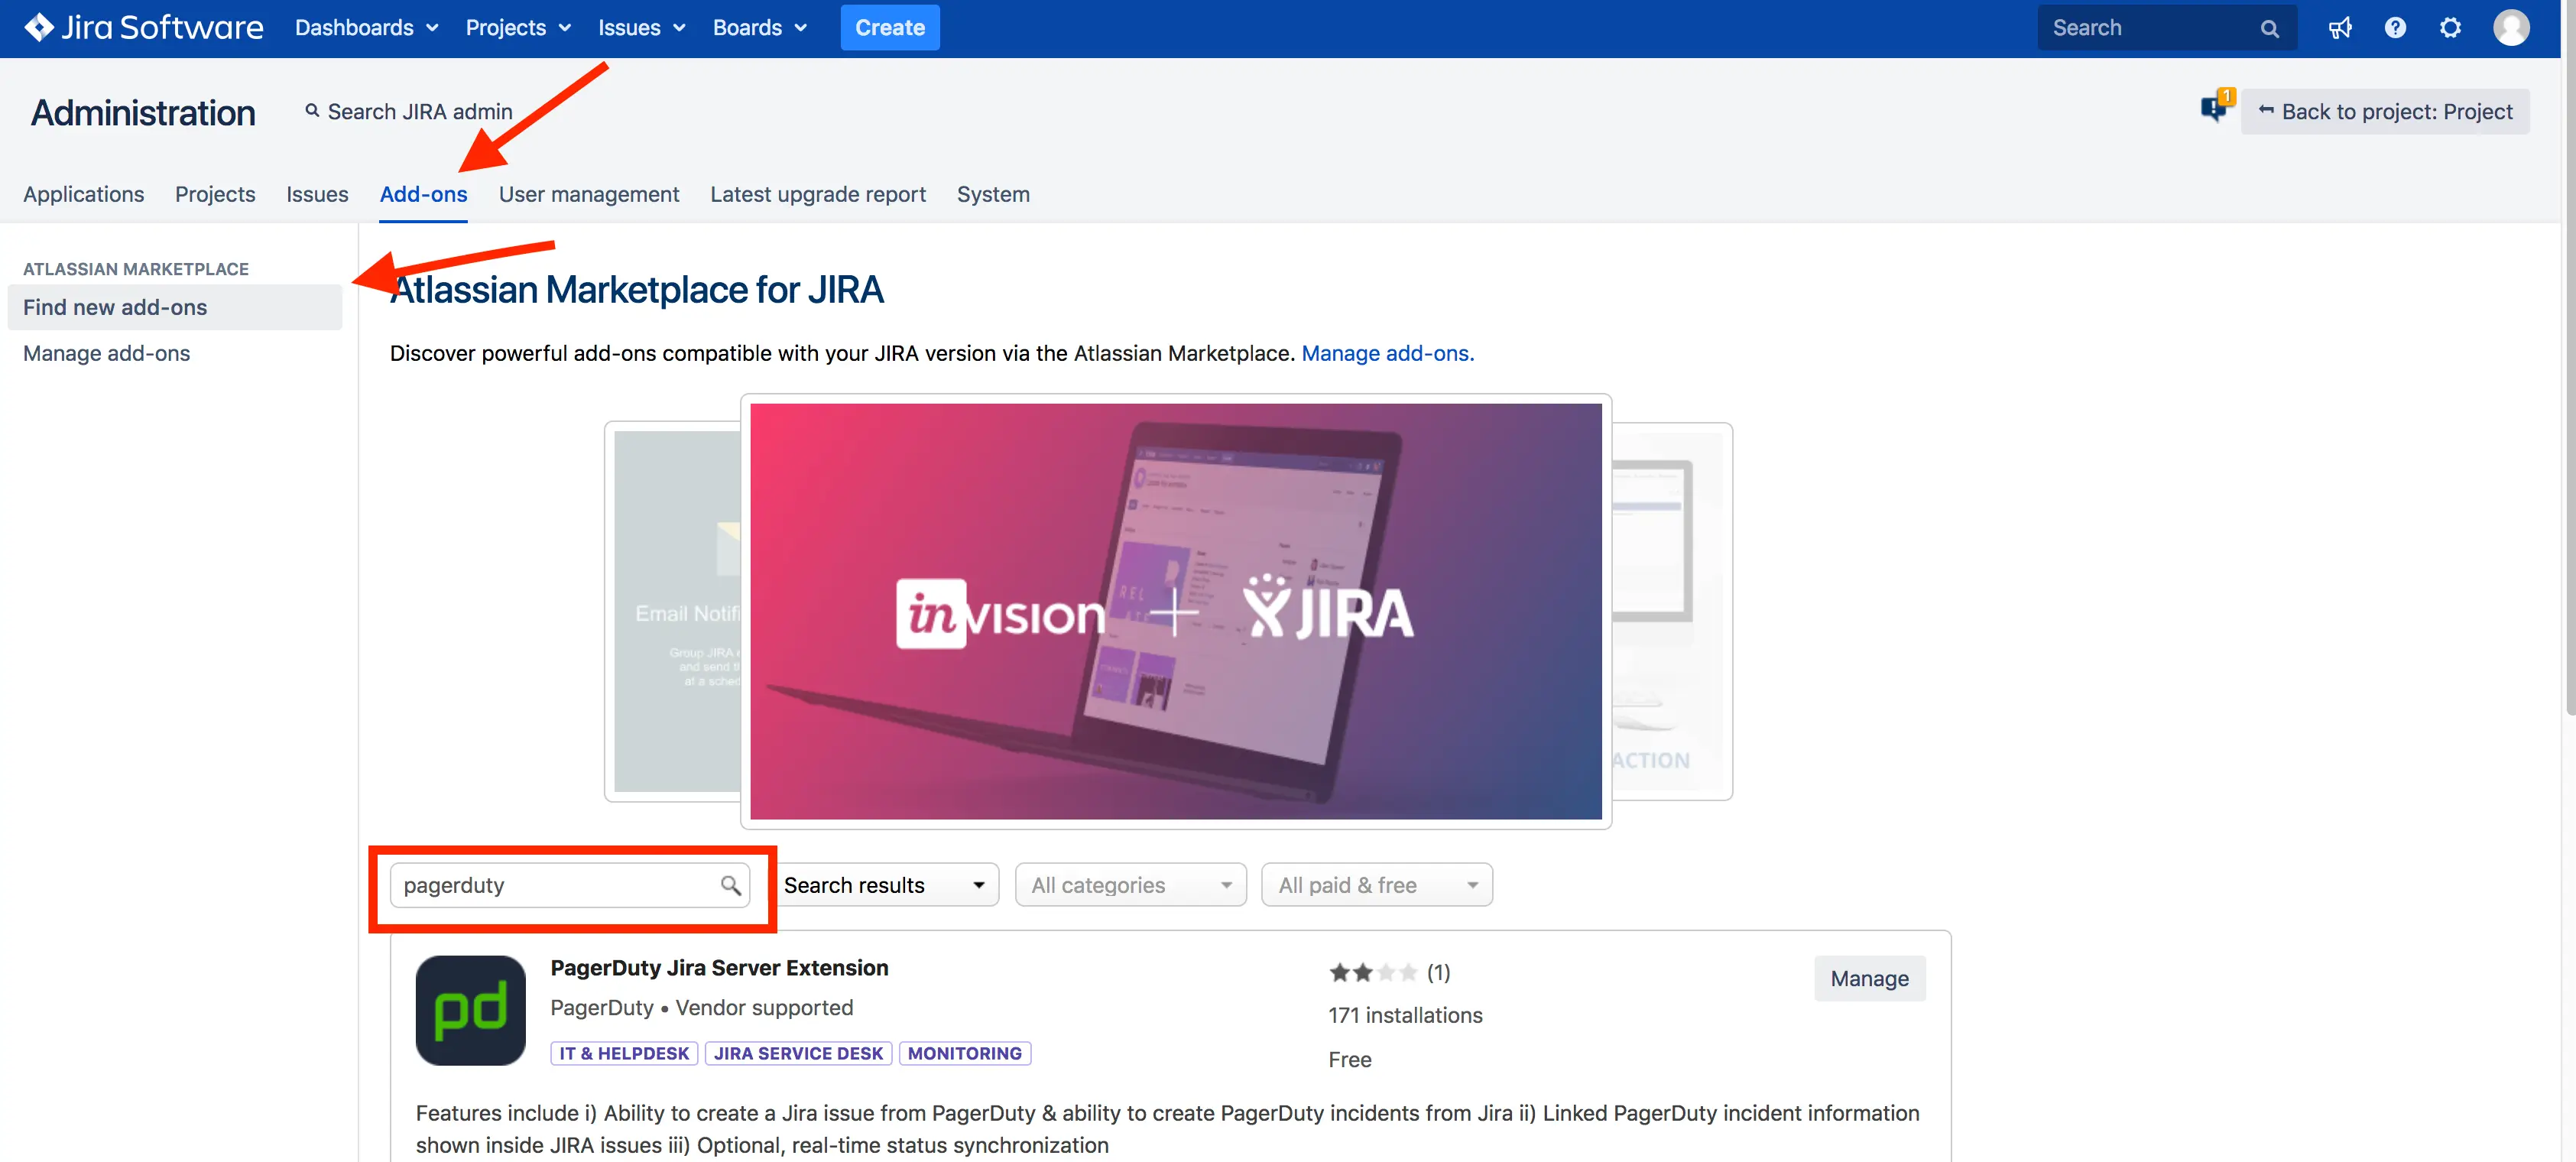
Search for "PagerDuty for Jira Server"
- After returning to the Manage Add On page, select the PagerDuty Add On, and click Configure.
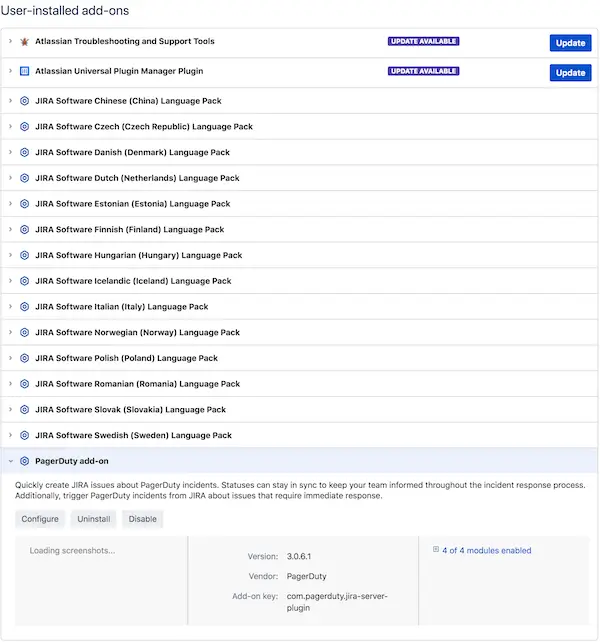
Configure "PagerDuty add-on"
-
Add the Authentication Token you copied from the PagerDuty extension configuration and click Save.
-
Ensure a user account with the name PagerDuty was created in Jira, with write access to applicable issues and projects. You can check out the minimum required project roles in our FAQ.
Connect PagerDuty to Jira Server
The last step is to connect PagerDuty to Jira and configure the mapping between a PagerDuty Service and a Jira project.
- Add the URL of your Jira server and click Connect JIRA Server.
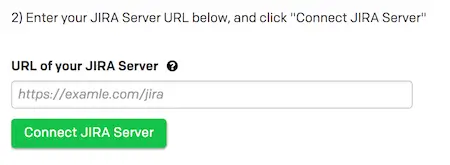
Enter Jira Server URL
- If the connection was successful, you should be able to select a PagerDuty service and corresponding Jira project. After selecting both, click Connect JIRA Project.

Connect Jira project
- After connecting, you are taken to a configuration page where you can:
- Select a Configuration Name. We recommend using the name of the Jira project. For example: "Create Bug (Project Name)".
- Choose a Jira Issue Type.
- Choose an option for Create Issues Mode:
- Manually: Must click the Configuration Name under the More Actions button on an incident details page.
- Automatically: PagerDuty automatically creates Issues in Jira.
- Create a Jira Query Language (JQL) statement which can automatically create PagerDuty incidents if a Jira issue matches the JQL. Note: The issue must be in the same Jira project and be the same Jira Issue type. If you are using Jira Service Management, incidents are created from JQL before automation rules are applied.
- Map the status of PagerDuty incidents to the status of Jira Issues.
- Optionally, sync notes between PagerDuty and Jira. Note: This option requires you to select a user, and each note appears as coming from this user.
- Optionally, sync PagerDuty incident priority levels with Jira priority levels.
- Optionally, sync custom fields between a PagerDuty Attribute and Jira Issue Field Name.
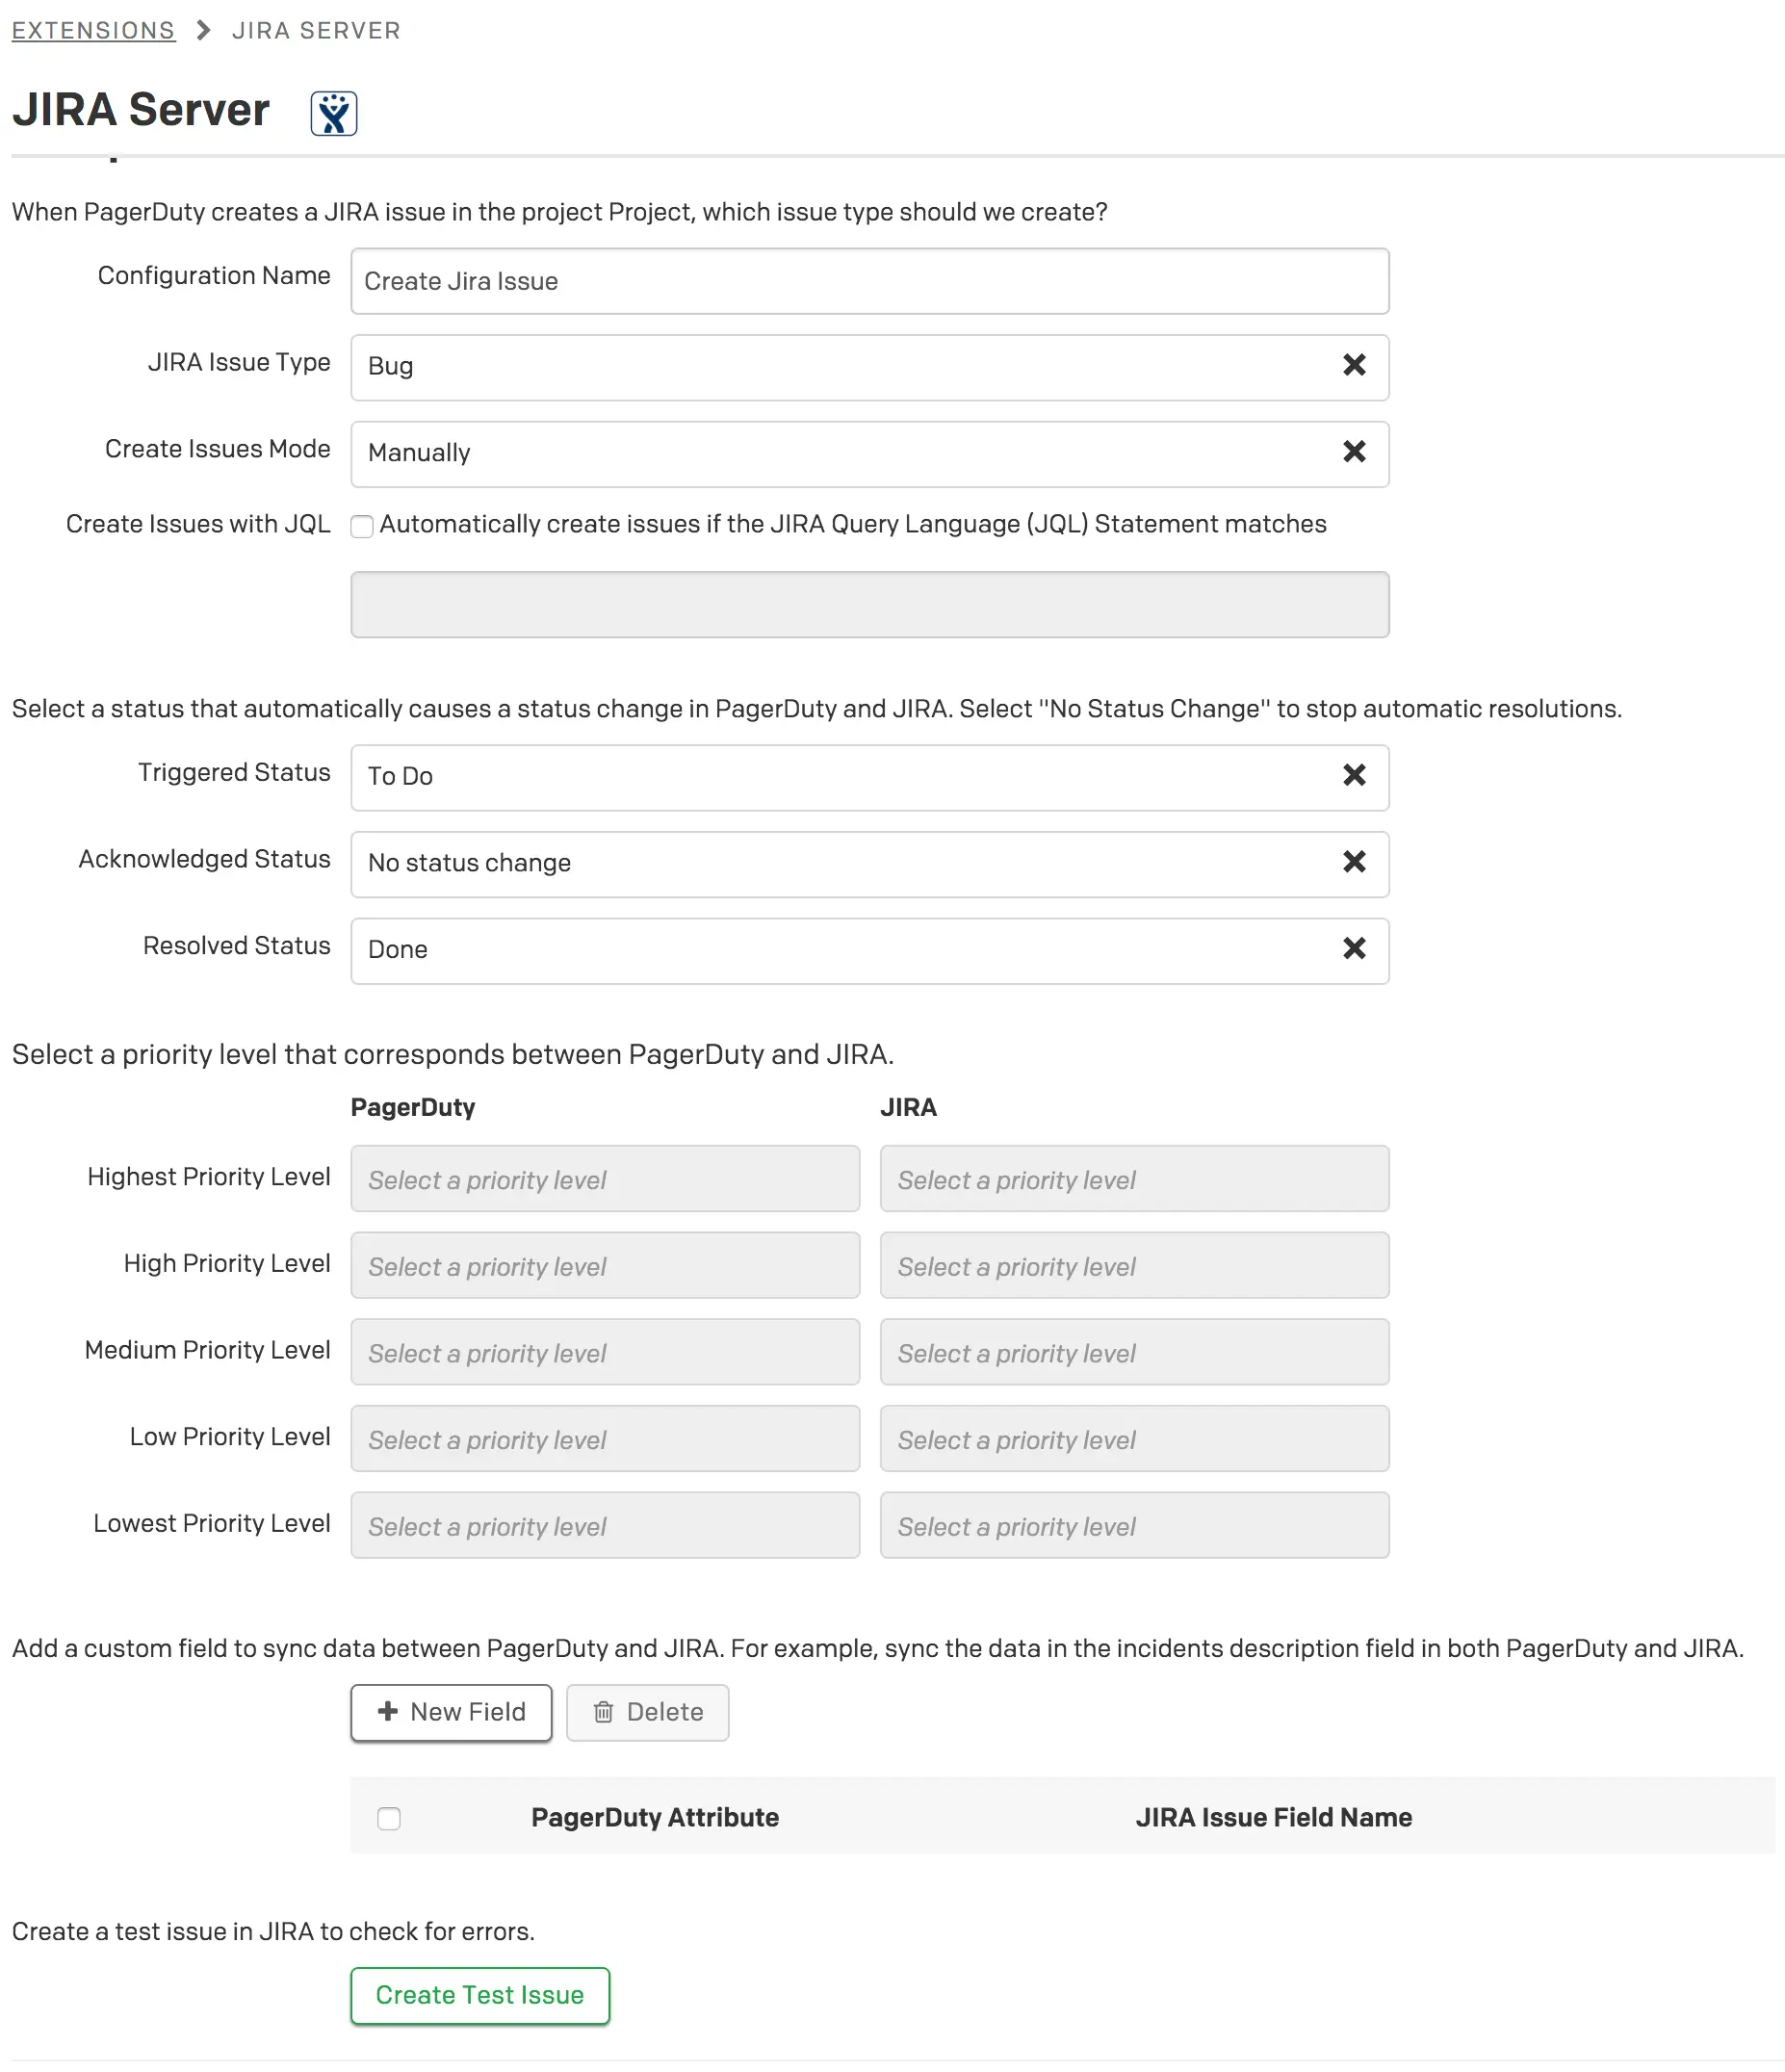
Jira Server configuration
- Click Create Test Issue to test the connection between PagerDuty and your Jira Server. You should see a success message at the top of the modal and the new ticket is visible in Jira.
- Click Save, and you are done 🎉.
Jira Service Management Required Steps
If you are integrating PagerDuty with Jira Service Management, you need to ensure that the PagerDuty user account in Jira has the necessary permissions.
- Add the jira-servicedesk-users group to the PagerDuty user account.
- For each of your Service Desk projects, ensure that the PagerDuty user account has Service Desk Team access.
a. From the Jira Administration menu in the top right corner, click Projects.
b. Select your Jira Service Management project.
c. Click the Users and roles tab under the Project settings navigation bar.
d. Select the Add users to a role button.
e. Add the jira-servicedesk-users group or PagerDuty user to the Service Desk Team role.
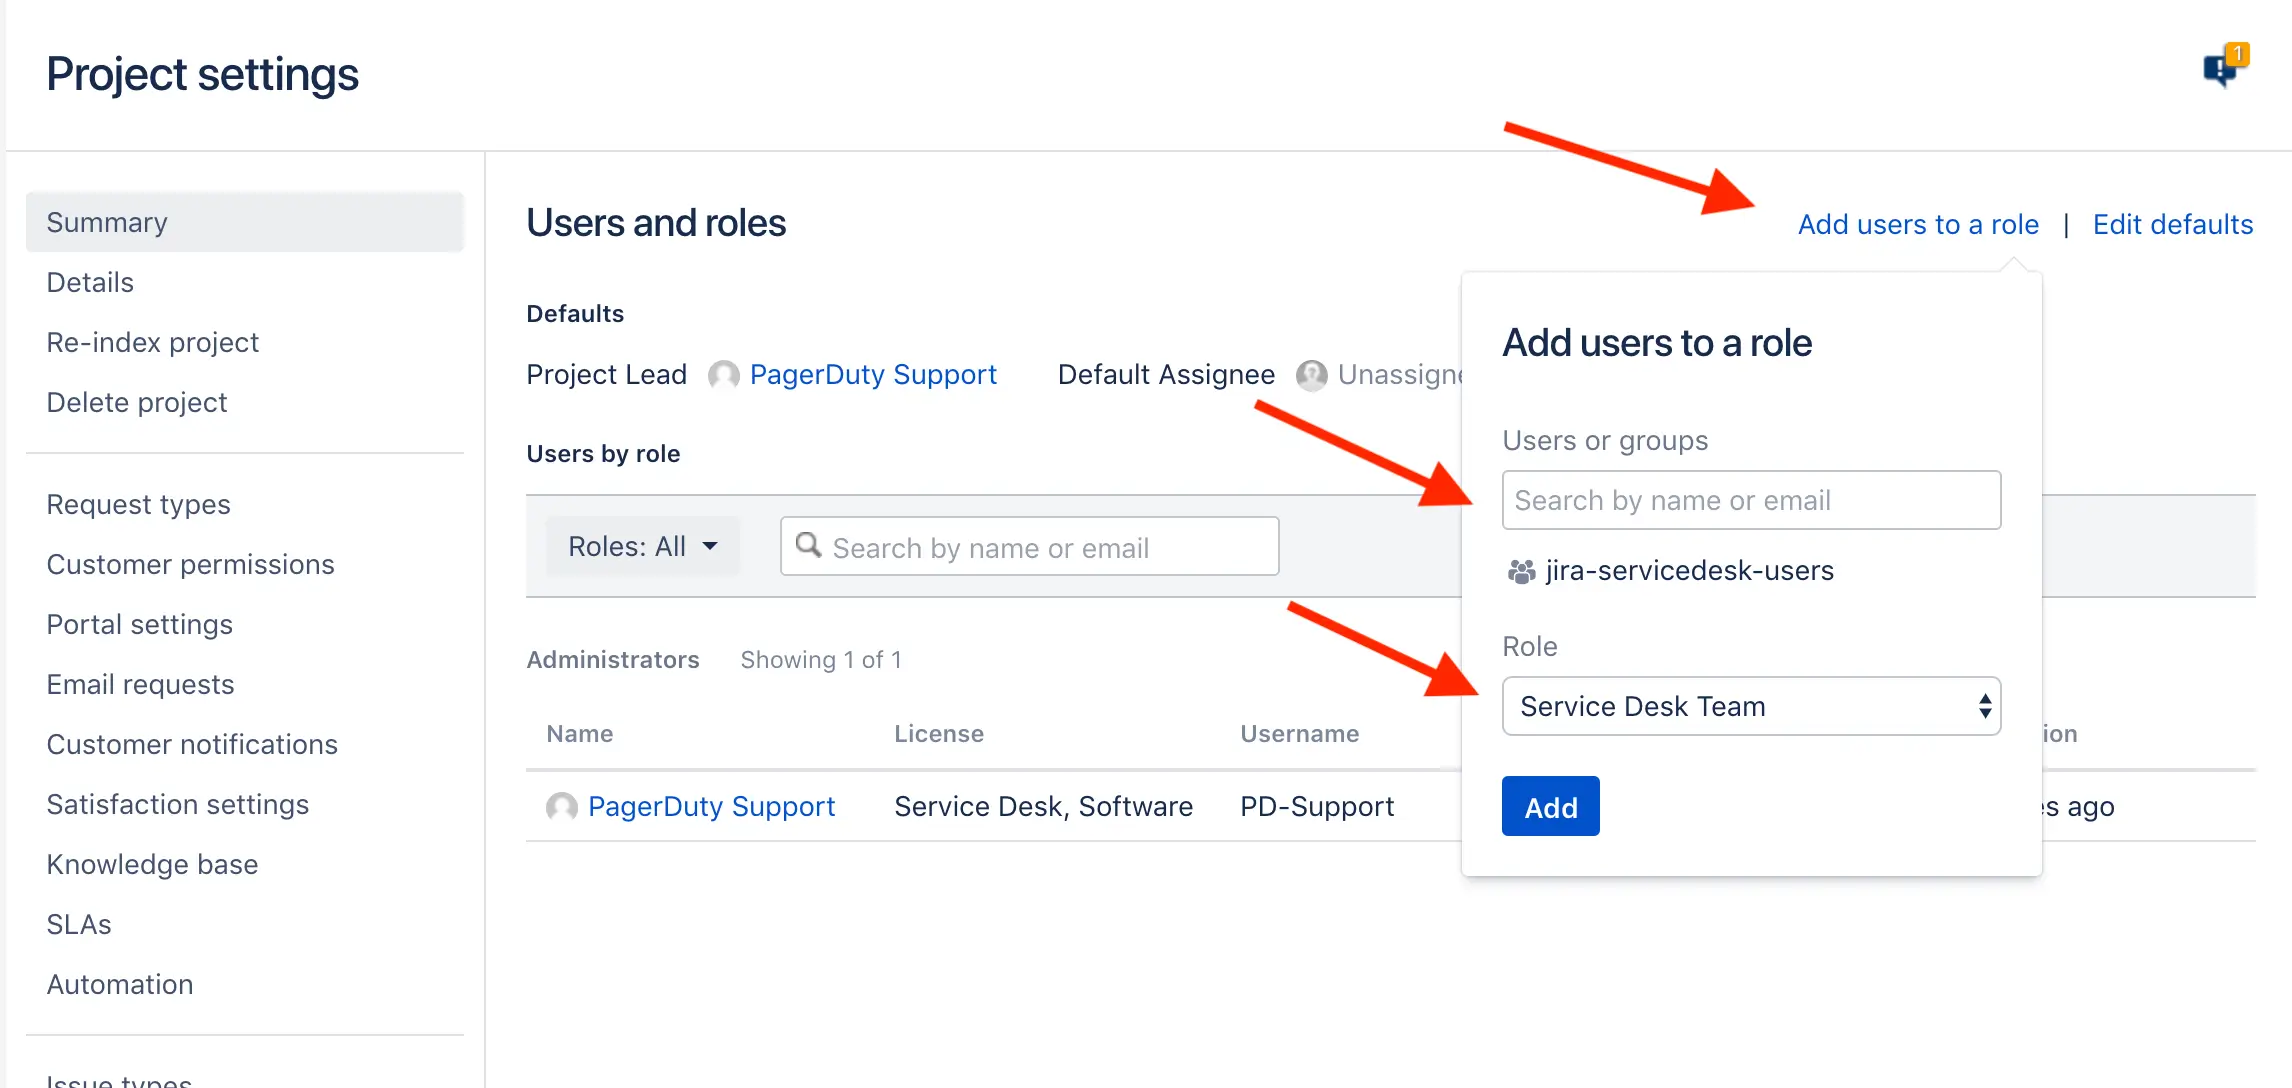
Add Jira users
Jira Server v3 + PagerDuty Benefits
- Bidirectionally sync issues between Atlassian Jira Software and PagerDuty.
- Incidents triggered in PagerDuty can automatically open an issue in Jira and populate both custom and out-of-box issue fields.
- Issues in Jira can also trigger a PagerDuty incident, helping your team stay on top of time-sensitive issues.
- Sync incident priority, incident notes, and state mapping.
- This integration also supports Jira Service Management.
Requirements
In PagerDuty: You need a Global Admin or Account Owner user role to create the Jira authentication token.
In Jira: You need to be able to perform the following actions:
- Create, update, and comment on issues
- Run JQL searches
- Read Projects
- Read Settings (for example, globally configured Priorities)
How it Works
- Based on predefined rules set in Jira, when a PagerDuty incident performs a condition's action, it sends a webhook to Jira where it can create or update an issue.
- When a Jira issue performs a predefined condition's action, it sends a webhook to PagerDuty where it can create or update an incident.
Version
This integration is for the self-hosted Jira Server 7.2.0–8.x.x, which can be downloaded from the Atlassian Marketplace. If you use Jira Cloud, see the Jira Cloud integration guide.
Looking For a Different Version?To upgrade to the latest version of the integration (v4), see our Jira Server integration guide.
Integration Walkthrough
In PagerDuty
In PagerDuty, you add the Jira Server extension and create a unique authentication token for use in the next section.
- In the web app, navigate to Integrations Extensions and click New Extension.
- From the dropdown select Jira Server. A screen appears prompting you to open the Jira Server Extension page; click Open.
- Under Please ensure you use Jira add-on version at least 4.2.0, click here to expand the configuration options.

Expand configurations options
- Copy the authentication token to your clipboard, which you use later in this guide.

Jira Server authentication token
- Log in to your Jira Server application.
- Note: You need to paste the authentication token into the PagerDuty add-on in Jira before you can connect PagerDuty to Jira Server.
In Jira
In Jira, you download the PagerDuty for Jira Server & Data Center plugin and add the PagerDuty authentication token you copied in the previous section.
- From the Jira Administration menu in the top right corner, click Add-ons.
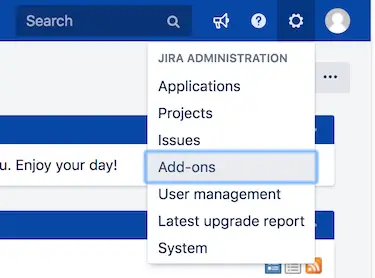
Select Add-ons
- Click the Add-ons tab, then click Find new add-ons in the Atlassian Marketplace. Search for PagerDuty for Jira Server and click the Install button.

PagerDuty add-on in Jira
- After returning to the Manage Add On page, select PagerDuty add-on, and click Configure.

Install PagerDuty add-on
- Add the Authentication Token you copied from the PagerDuty extension configuration and click Save.
- Ensure a user account with the name
PagerDutywas created in Jira, with write access to applicable issues and projects. You can check out the minimum required project roles in our FAQ.
In PagerDuty
The last step is to connect PagerDuty to Jira and configure the mapping between a PagerDuty Service and a Jira project.
- Enter your Jira Server URL and click Connect Jira Server.
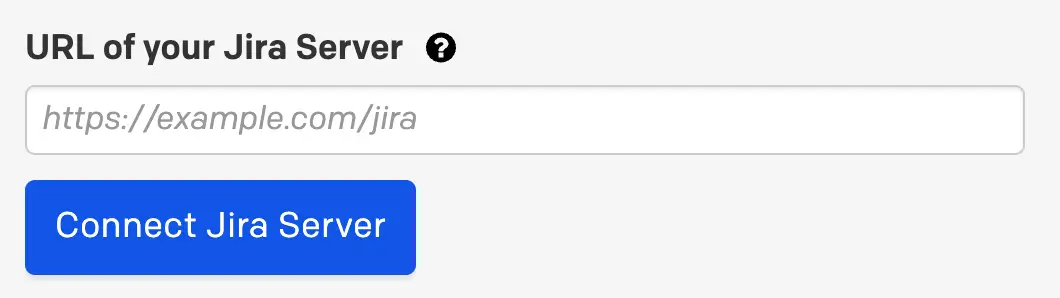
Enter Jira Server URL
- If the connection was successful, you should be able to select a PagerDuty service and corresponding Jira project. After selecting both, click Connect Jira Project.
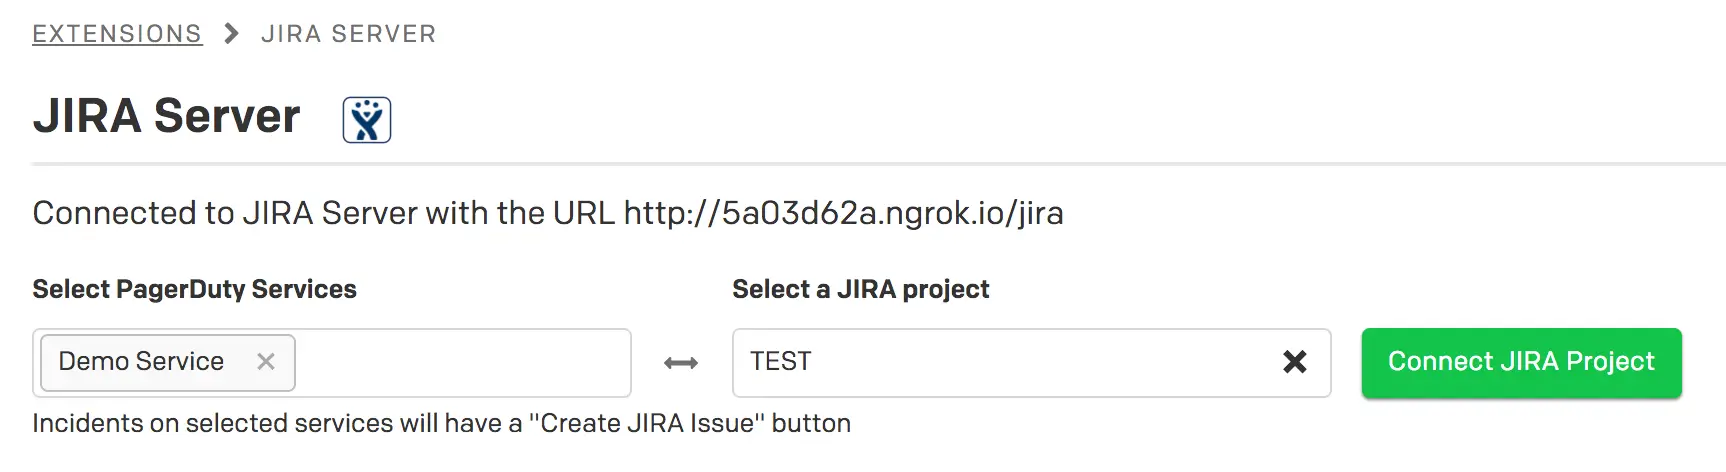
Connect Jira project
- After connecting, you are taken to a configuration page where you can:
- Select a Configuration Name. We recommend using the name of the Jira project. For example: "Create Bug (Project Name)".
- Choose a Jira Issue Type.
- Choose an option for Create Issues Mode:
- Manually: Must click the Configuration Name under the More Actions button on an incident details page.
- Automatically: PagerDuty automatically creates Issues in Jira.
- Create a Jira Query Language (JQL) statement which can automatically create PagerDuty incidents if a Jira issue matches the JQL. Note: The issue must be in the same Jira project and be the same Jira Issue type. If you are using Jira Service Management, incidents are created from JQL before automation rules are applied.
- Map the status of PagerDuty incidents to the status of Jira Issues.
- Optionally, sync notes between PagerDuty and Jira. Note: This option requires you to select a user, and each note appears as coming from this user.
- Optionally, sync PagerDuty incident priority levels with Jira priority levels.
- Optionally, sync custom fields between a PagerDuty Attribute and Jira Issue Field Name.

Configure the integration
- Click Create Test Issue to test the connection between PagerDuty and your Jira Server. You should see a success message at the top of the modal and the new ticket is visible in Jira.
- Click Save, and you are done 🎉.
Jira Service Management Required Steps
If you are integrating PagerDuty with Jira Service Management, the PagerDuty user account needs the necessary permissions in Jira.
- Add the jira-servicedesk-users group to the PagerDuty user account.
- For each of your Service Desk projects, ensure that the PagerDuty user account has Service Desk Team access.
a. From the Jira Administration menu in the top right corner, click Projects.
b. Select your Jira Service Management project.
c. Click the Users and roles tab under the Project settings navigation bar.
d. Select the Add users to a role button.
e. Add the jira-servicedesk-users group or PagerDuty user to the Service Desk Team role.

Configure Jira Service Management
You can learn more about managing users and roles on the Atlassian website.
FAQ
Is this integration bidirectional?
Yes! You can create Jira issues from PagerDuty incidents and PagerDuty incidents from Jira issues.
Note: As users are not mapped from PagerDuty to Jira, a Jira status is not able to move the PagerDuty status to Acknowledged.
What items does this integration create in Jira?
When you install the add-on from the Atlassian Marketplace, a user is created in Jira called PagerDuty. Ensure this user has write access to applicable issues and projects.
What if my Jira Server is behind a firewall?
To allow bidirectional integration between PagerDuty and your Jira Server, it may be necessary for you to configure your firewall to allow for incoming traffic from PagerDuty. See Safelist IPs for more information. You specifically need to safelist IPs for our REST API, webhooks, and specific IPs for Jira Server.
Does the Jira Server integration support mandatory custom fields?
Yes. You can set up PagerDuty to populate Jira fields while configuring the integration in PagerDuty.
When triggering a test incident, how can I fix the error "Sorry, you can't create any issues right now, as you need to have access to a Jira application to be able to create issues"?
When the extension is created, it creates a user called PagerDuty in Jira. This user requires write access to applicable issues and projects in order for the integration to work.
To make sure this is set up correctly, follow these steps in Jira:
- In your Jira account, click near the top-right User Management.
- You are prompted to enter a Jira Administrator username and password.
- Select the
PagerDutyuser. - Select the
PagerDutyuser, then View Project Roles in the top-right. You are then brought to the permissions for the specific Jira projects.- Note: The user's name in Jira must be
PagerDuty. Any other name, evenPagerDuty1, will not work.
- Note: The user's name in Jira must be
Once you have set this user's permissions, try creating a test incident again.
How do I map priorities from Jira to PagerDuty?
It is possible to map priorities while connecting the Jira project in PagerDuty. To add or change priority mapping for existing Jira projects, go to your Jira Server extension page in PagerDuty and select Edit for the applicable Jira project.
What if I only want specific Jira issues to trigger PagerDuty incidents?
You can use JQL in PagerDuty to fine tune the conditions that trigger a PagerDuty incident. You can find this by navigating to Extensions in your PagerDuty account. Once you select your Jira Server Extension, you can edit preexisting Service to Project mappings by selecting ; you can also add new mappings. It is very important that you test the JQL in Jira first to ensure it matches the issues you would like to trigger incidents in PagerDuty. For example, if you only want to trigger a PagerDuty incident if a high-priority ticket is opened in my SRE Project, the JQL may look like this:
(status = Open AND project = SRE ) AND priority = High OR priority = Highest
You can use different JQL for each Project you add, so there is no need to craft a catch-all JQL statement for all of your Jira Projects.
Note: Automatic PagerDuty incident creation via JQL is possible for new and existing Jira Issues.
How do I fix an error if I see an error when I try to save the authentication token in Jira?
The most common cause of this issue is that app.pagerduty.com/app.eu.pagerduty.com is not accessible from your Jira Server. In this case, you need to check your network and firewall settings to ensure our IP addresses are safelisted. Read more about this in the Safelisting IPs article.
It may also be possible that your authentication token has expired. The authentication token generated in PagerDuty expires after 15 minutes of inactivity. If more than 15 minutes have passed since you generated the token in PagerDuty, refresh the PagerDuty page to generate a new token.
While linking my Jira Project in PagerDuty, I get an error and am unable to add my Project.
If you have already made sure that you have safelisted PagerDuty IP addresses, check your SSL certificate. While we do support HTTP, you may run into this issue if your Jira instance uses an expired or invalid SSL certificate.
When I click 'Create a Test Issue' in PagerDuty, I get an error or nothing is created in my Jira Instance.
Check the following:
- In Jira, check that the
PagerDutyuser exists and has administrative rights to the Project you would like to open a ticket in. - Are there any required, mandatory fields in Jira? If so, you should sync PagerDuty fields with the mandatory Jira fields while configuring the integration in PagerDuty.
- In PagerDuty, ensure there is a v2 REST API key with the description "API Key for add-on Jira Server".
What types of Jira fields can I populate from PagerDuty?
You can populate the following types of fields with this integration:
- Any field that takes a string
- Labels
- Number Fields
- Select Lists (single and multi-choice)
- Text fields (single and multi-line)
- URLs
- User Pickers (single user)
How can I populate the label fields from PagerDuty?
You can populate this field while configuring the Jira Project in PagerDuty:
- Click the New Field button to create a custom field to sync data.
- Choose Constant value as the PagerDuty Attribute.
- A text box input appears. Enter the value you would like to use for the label field.
- You can add multiple values by using a comma as a delimiter (for example,
blue,red).
- You can add multiple values by using a comma as a delimiter (for example,
Note: When you create a test issue, the integration does not respect the comma delimiter, and creates a Jira Issue with one label. The comma delimiter works as expected for Jira Issues created from a PagerDuty incident.
How can I populate the Reporter or Assignee fields from PagerDuty?
You can populate this field while configuring the Jira Project in PagerDuty:
- Click New Field to create a custom field to sync data.
- Choose Constant value as the PagerDuty Attribute.
- In the text box, input the Jira username.
- Note: The usernames must match on both platforms.
When I update the PagerDuty incident's status, the Jira ticket is not updated. What is happening?
This can happen for the following reasons:
- The Jira project's workflow requires some fields be populated when setting it to that given state, and those fields are not populated. You can configure the Jira extension to populate them when creating Jira incidents using the above method.
- The Jira project's workflow does not permit the transition between the issue states corresponding to the previous and current PagerDuty incident states. For instance, if your Jira workflow does not permit setting a To-Do status Jira ticket directly to Done, and the Triggered status in PagerDuty maps to To-Do while the Resolved status maps to Done, then if a triggered incident is resolved (without acknowledging it first) then the ticket does not move to the Done state because this modification is not permitted in your Jira project's workflow configuration.
One way that you can ensure the workflow configuration does not interfere is by editing the statuses corresponding to acknowledged and/or resolved, and enabling transitions from all other statuses to it.
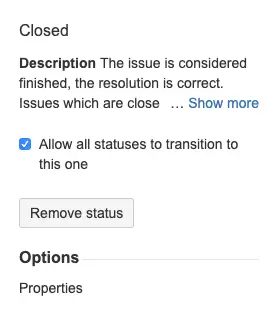
Edit the Closed status
I just updated a PagerDuty incident's priority. Why did the priority not update in the Jira issue?
The Jira Issue is only updated when the PagerDuty incident triggers an action that triggers a v2 webhook (a full list of actions can be viewed in our webhook documentation). If you would like PagerDuty to trigger an action for PagerDuty incident priority changes, make a feature request to [email protected].
How does PagerDuty authenticate when connecting to Jira Server?
The HTTP request to Jira includes an Authorization header containing a JSON Web Token (JWT) as a Bearer token.
Why do I receive a "Jira test failed: cannot change status to requested state" error when trying to create a test issue?
The "Create Test Issue" feature in PagerDuty tries to create a Jira issue and automatically maps it to Resolved in Jira. You see this error if the workflow for your Jira project does not allow the Jira issue to transition directly from the Triggered status mapping to the Resolved status mapping.
Create a Jira Issue from a normal PagerDuty incident to determine if the integration works as expected.
What are the minimum required permissions for the PagerDuty user in Jira?
Below is a list of the minimum required project roles for the PagerDuty user in Jira:
- Create Issues
- Edit Issues
- Transition Issues
- Resolve Issues
I have renamed the Jira base URL on my Jira Server. How can I update this in PagerDuty?
Reach out to [email protected] if you have changed (or plan to change) your Jira Server base URL.

Example: Editing the Closed status
I just updated the priority of a PagerDuty incident. Why did the priority not update in the Jira issue?
The Jira Issue is only updated when the PagerDuty incident triggers an action that triggers a v2 webhook — a full list of actions can be viewed in our webhook documentation. If you would like PagerDuty to trigger an action for PagerDuty incident priority changes, make a feature request to [email protected].
How does PagerDuty authenticate when connecting to Jira Server?
The HTTP request to Jira includes an Authorization header containing a JSON Web Token (JWT) as a Bearer token.
Why do I receive a "JIRA test failed: cannot change status to requested state" error when trying to create a test issue?
The "Create Test Issue" in PagerDuty tries to create a Jira issue and automatically maps it to the Resolved mapping in Jira. You see this error if the workflow for your Jira project does not allow the Jira issue to transition directly from the Triggered status mapping to the Resolved status mapping.
Create a Jira Issue from a normal PagerDuty incident to determine if the integration works as expected.
What are the minimum required permissions for the PagerDuty user in Jira?
Below is a list of the minimum required project roles for the PagerDuty user in Jira:
- Create Issues
- Edit Issues
- Transition Issues
- Resolve Issues
I have renamed the Jira base URL on my Jira Server. How can I update this in PagerDuty?
If such a rename has taken place or there is a plan to do this, reach out to [email protected] and we can assist with the rename.
Updated about 2 months ago