
Reassign Incidents
Reassign incidents to escalation levels, escalation policies, or specific users.
If the assigned responder cannot respond to a PagerDuty incident, you can reassign the incident to the next user on the current escalation level, to a different escalation policy, or to a specific user.
Reassign an Incident
There are three methods of reassigning an incident:
- Reassign to an Escalation Level (Recommended): Reassigning an incident to an escalation level escalates it to the next user in its current escalation policy. This method is preferred because the escalation policy continues to cycle through escalation rules until a user acknowledges the incident.
- Reassign to an Escalation Policy (Recommended): Reassigning the incident to a different escalation policy continues cycling through escalation rules until a user acknowledges the incident.
- Reassign to a User: Reassigning the incident to an individual user only notifies that user. The incident's escalation policy is no longer used, and other users are not notified if the selected user does not acknowledge the incident.
Low-Urgency IncidentsYou cannot reassign low-urgency incidents to a specific escalation level. You can reassign them to an escalation policy or a user.
Reassign an Incident in the Web App
1. Click an incident's title to go to its details page and click Reassign.
2. Select the desired Escalation Policy, User, or Escalation Level from their respective tabs in the dropdown.
3. Click Reassign.
Reassign Multiple Incidents
- Navigate to the Incidents page.
- Select the checkbox to the left of each incident and click Reassign.

Reassign multiple incidents
- Select the desired Escalation Policy, User, or Escalation Level from their respective tabs in the dropdown.
- Click Reassign.
Reassign an Incident in the Mobile App
1. Tap the incident you want to reassign.
2. Tap More in the bottom right and tap Reassign, or scroll through the incident actions in the Triage tab and tap Reassign.
3. Select one of the following based on your preference:
- To reassign to a different escalation policy: In the Escalation Policies tab, select your preferred escalation policy.
- To reassign to the next user on the escalation level: In the Users tab, select a user under This Policy.
- To reassign to a different user: In the Users tab, select a user under All Users.
- Tap Reassign to confirm.
Reassign Multiple Incidents
- On the Open Incidents screen, tap in the top right and select Select Incidents.
- Select the radio buttons to the left of each incident you want to reassign, tap again, and select Reassign.
- Select one of the following based on your preference:
- To reassign to a different escalation policy: In the Escalation Policies tab, select your preferred escalation policy.
- To reassign to the next user on the escalation level: In the Users tab, select a user under This Policy.
- To reassign to a different user: In the Users tab, select a user under All Users.
- Tap Reassign to confirm.
Reassign an Incident via API
Refer to the Manage Incidents API Documentation for more information.
Escalate an Incident
Escalation assigns the incident to another user on the incident's current escalation policy. You may select the next user from the escalation level you are on, or from a different escalation level. Escalating is the same as reassigning to an escalation level, but is also available under the Escalate button on PagerDuty incidents for quick access.
Low-Urgency IncidentsYou cannot escalate low-urgency incidents.
Escalate an Incident in the Web App
1. Click an incident's Title to go to its details page.
2. Click Escalate.
3. Select the desired user from the dropdown. The incident automatically escalates to that user.
Escalate an Incident in the Mobile App
1. Tap the incident you want to escalate.
2. Tap More in the bottom right and tap Escalate, or scroll through the incident actions in the Triage tab and tap Escalate.
3. Select the desired user from the list and tap Escalate in the confirmation dialog.
Escalate an Incident via SMS
To escalate an incident via SMS, use the code in your SMS notification.
Escalating via SMS assigns the incident to the next user on call in the escalation policy. You can only escalate to the next on-call user in the escalation policy. To escalate to another user, reassign the incident in the PagerDuty web app or mobile app.
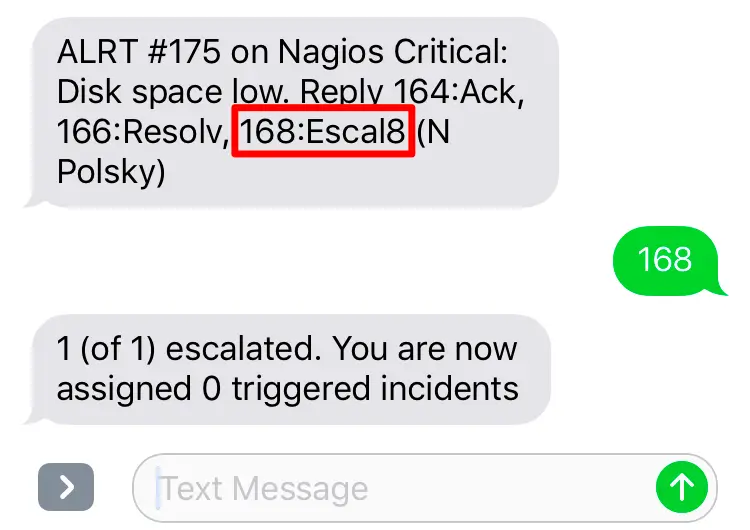
Escalate an incident via SMS
Response NumbersThe response numbers to acknowledge, resolve, and escalate incidents via SMS may change depending on the number of incidents in your account and notifications already received. Check the SMS carefully for the correct response numbers — the numbers shown in the example screenshot may not be valid for your incidents.
Escalate an Incident via API
Refer to the Manage Incidents API Documentation for more information.
Updated about 1 month ago