
ServiceNow v5 Integration Guide
Configuring and installing the core ServiceNow v5 integration
ServiceNow Enterprise is a platform-as-a-service that offers advanced automation and process workflow for the enterprise environment. This integration allows you to leverage ServiceNow's workflow and ticketing capabilities with PagerDuty's on-call scheduling, notifications, and escalations.
This article covers installing version 5 of the ServiceNow integration, certified for ServiceNow Kingston, London, and Madrid.
Looking for Another Version?Versions v7.6 (current), v6, and v4 of the ServiceNow Enterprise integration are also available.
Quick Links
- How the Integration Works and Advanced Configuration
- Troubleshooting the ServiceNow Integration
- Frequently Asked Questions
Communication between ServiceNow Enterprise and PagerDuty is supported in both directions, allowing incidents to be acknowledged, delegated, and resolved in either system. The following workflows are supported:
- A third-party monitoring tool detects an issue and triggers an incident in PagerDuty. You receive a notification and can acknowledge or resolve via PagerDuty. A ServiceNow ticket opens when a PagerDuty incident is triggered and remains in sync for the lifecycle of the incident.
- A ticket is filed in ServiceNow. An incident automatically opens in PagerDuty and notifies you. You take ownership via PagerDuty, and information from PagerDuty stays in sync with ServiceNow.
ServiceNow Requirements Prior to Install
The following changes are required in ServiceNow before installation and must be performed by a ServiceNow administrator.
Application Access Controls
- Navigate to System Definition Tables and open the record for the User (
sys_user) table. - Click the Application Access tab, enable the Allow configuration option to support provisioning PagerDuty users from a user form, and click Update.
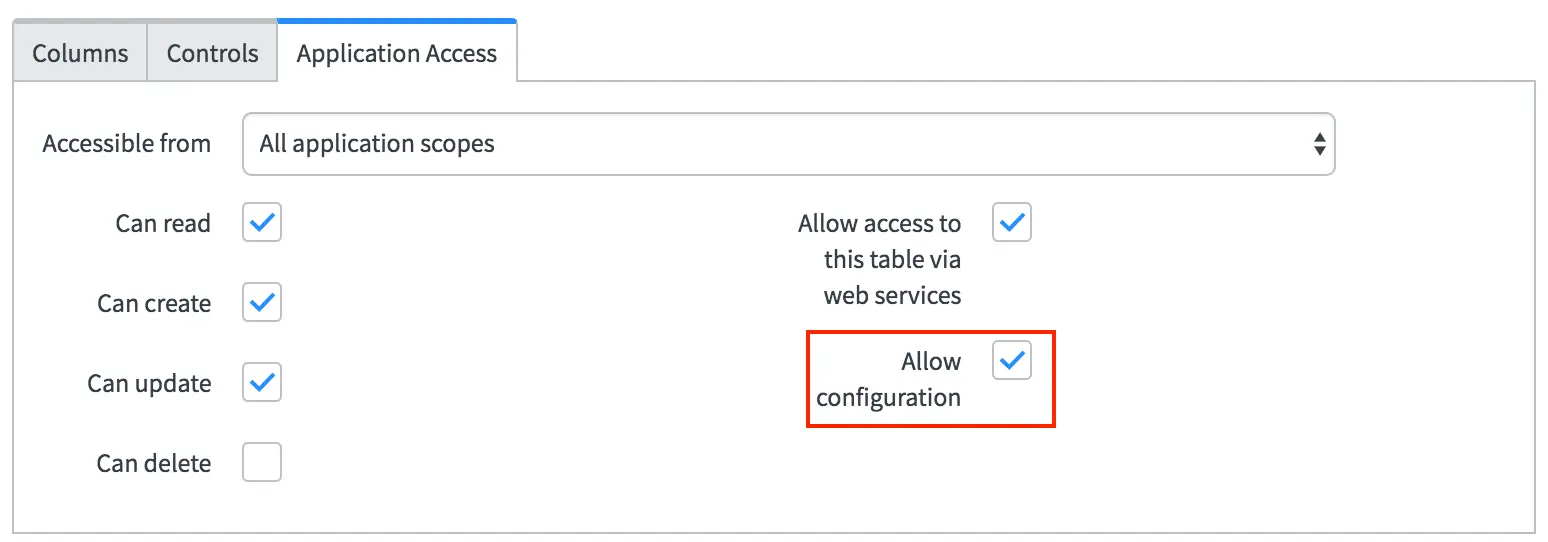
Application Access
- Back in System Definition Tables, open the record for the Group (
sys_user_group) table. - In the Application Access tab, enable the Allow configuration option to support provisioning PagerDuty services and policies from a group form.
- Enable the Can create and Can update options to allow PagerDuty to write the group's service and policy IDs to the group record, then click Update.
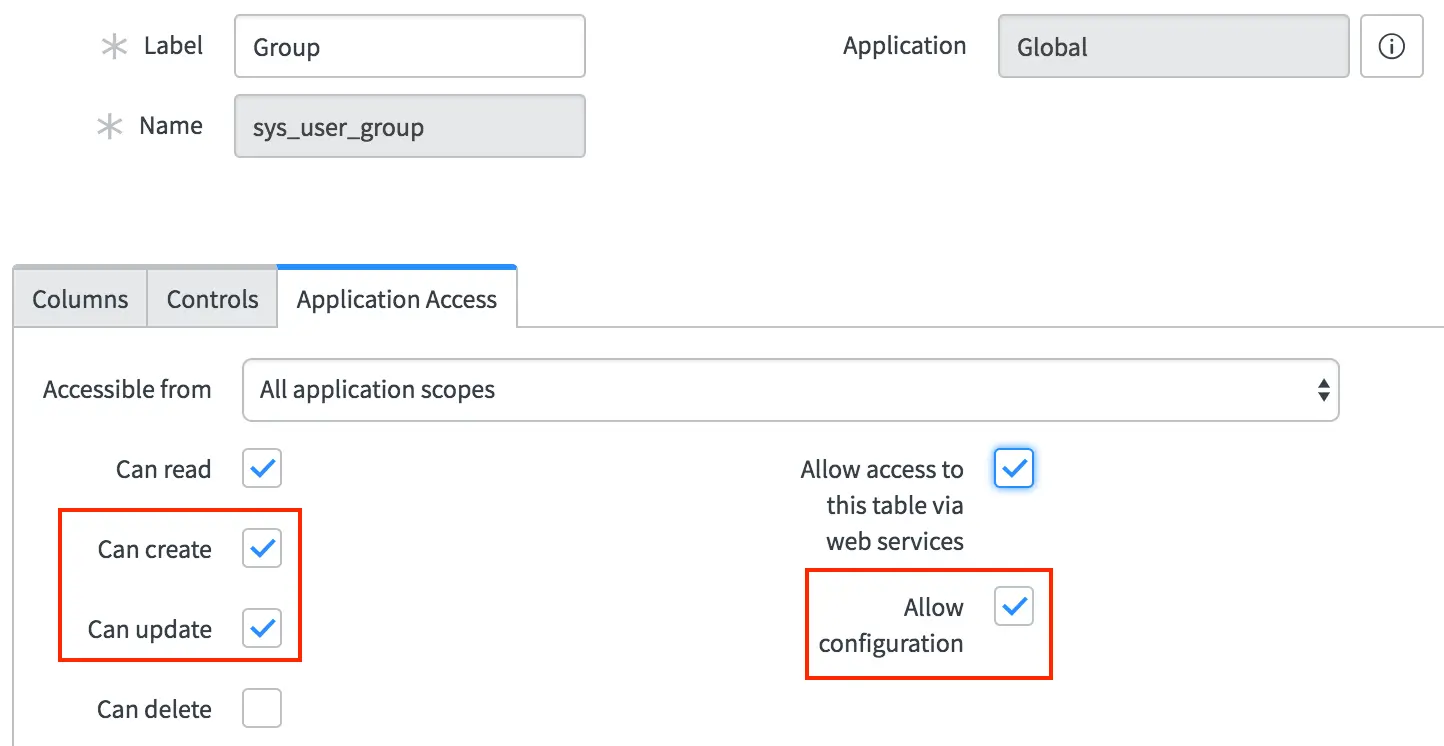
Application Access configuration options
- Back in System Definition Tables, open the record for the Group Member (
sys_user_grmember) table, enable the Allow configuration option, and click Update.
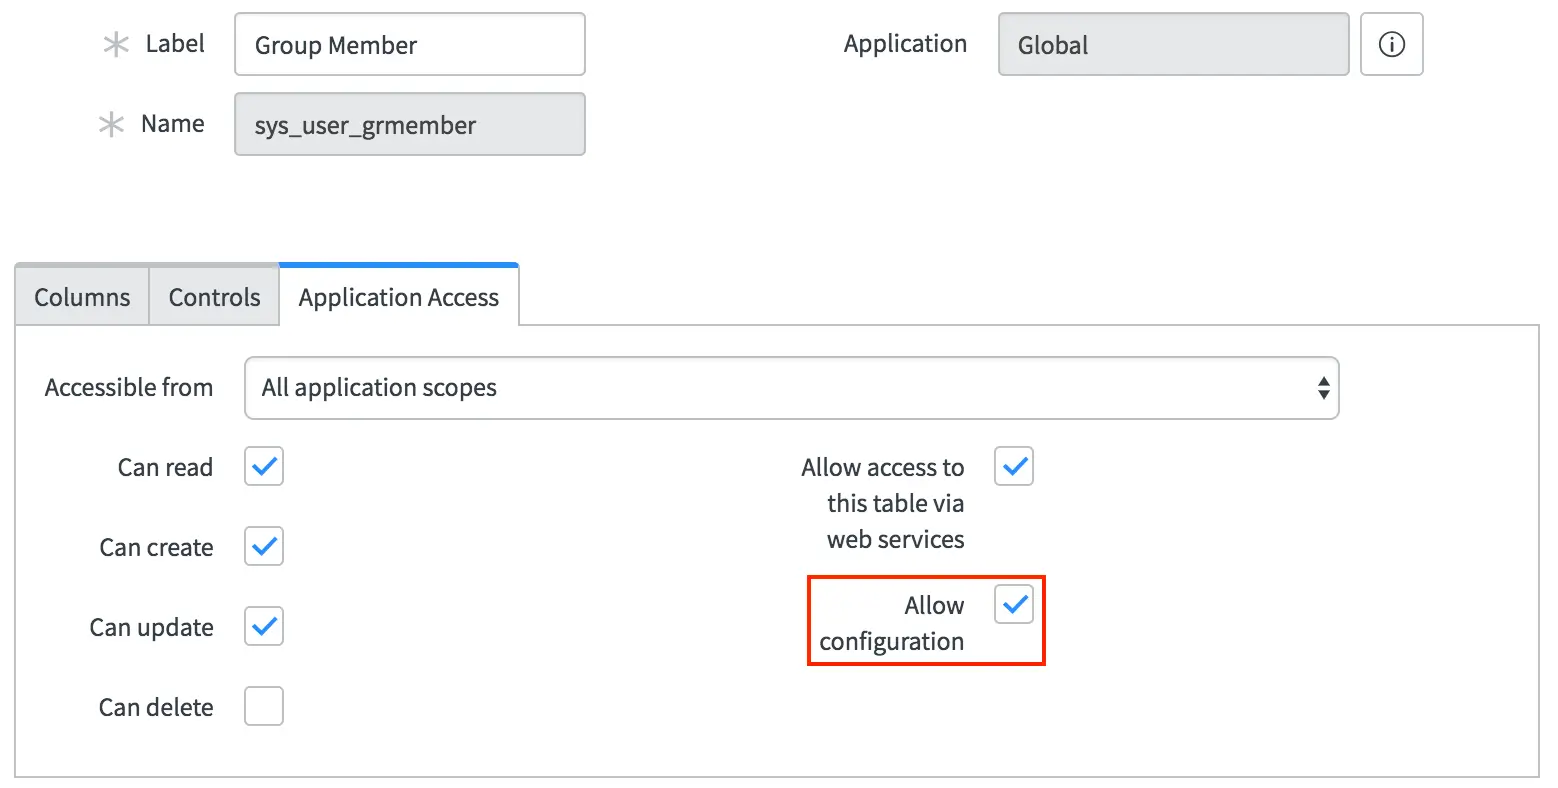
Select "Allow configuration"
Installation from the ServiceNow Store
- Click here to find the application in the ServiceNow Store.
- Select the option to purchase the application. There is no charge. Select the most recent version available for your version of ServiceNow.
- Log in to your ServiceNow Enterprise account as an admin.
- Navigate to System Applications Applications and click the Downloads tab to find the PagerDuty Incident Resolution Platform application.
- Click Install on the PagerDuty application.
Add PagerDuty Fields to Views
If you want to view PagerDuty ID fields within ServiceNow, you must manually add them to views. See Show or hide fields on a form in the ServiceNow documentation for instructions.
It is also recommended that you add fields to the list view by clicking the gear icon in the upper left corner of the grid to customize the display of columns. For example, in the Groups view:
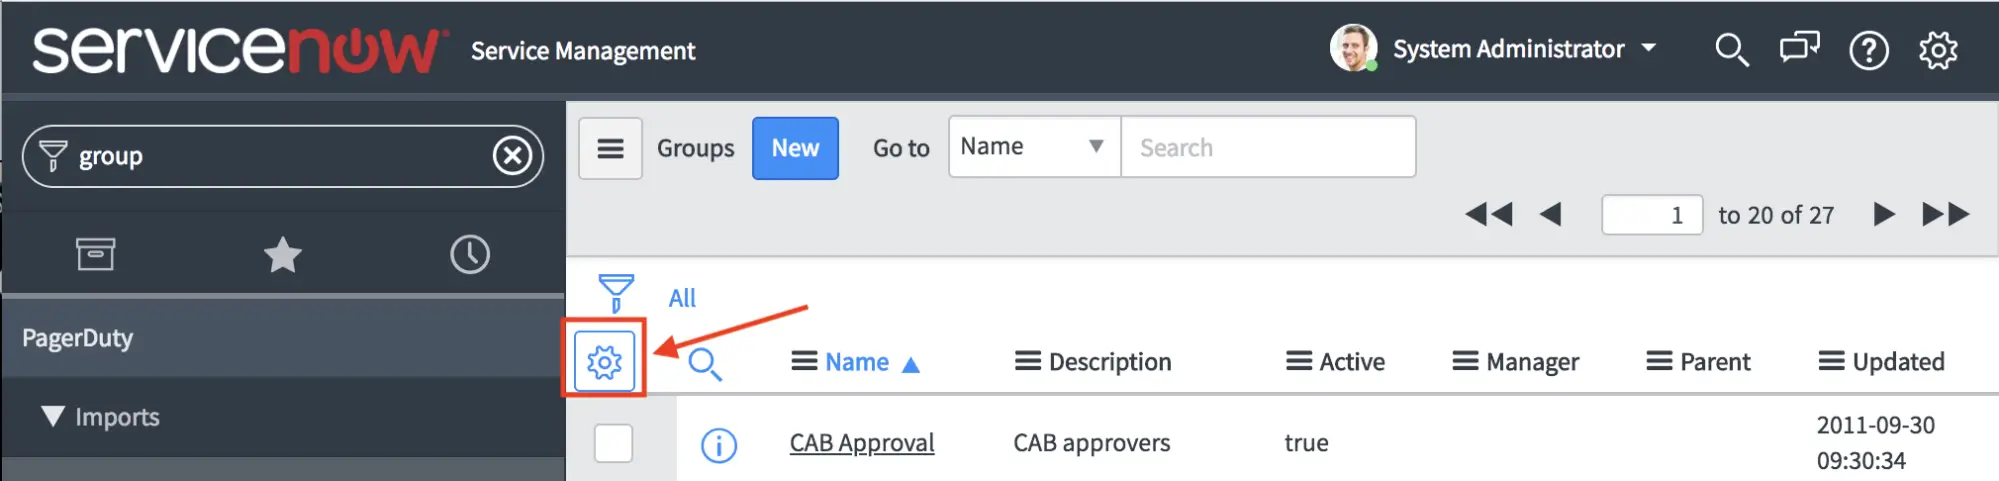
Customize Groups view
The following fields are available. Adding them to form views also enables quick links to the related PagerDuty record.
- User (list and individual user form)
- PagerDuty ID
- Group (list and individual group form)
- PagerDuty service
- PagerDuty escalation
- PagerDuty webhook
- PagerDuty team
- PagerDuty schedule
- CMDB CI Application (list and individual CI form)
- PagerDuty service
- PagerDuty webhook
- Incident
- PagerDuty ID
Configuration in PagerDuty
Create a REST API Key
This API key is used by ServiceNow to communicate with PagerDuty. These steps only need to be performed once during initial installation.
- Navigate to Integrations API Access Keys.
- Click Create New API Key.
- Enter a Description for your key and choose an API version. Leave the Read-only option unchecked — a full API key is required.
- Click Create Key.
- Copy the key and save it in a secure location.
Save Your API Key NowYou will not have access to this key after closing this dialog. If you lose a previously created key, remove it and create a new one.
- Click Close.
Configuration in ServiceNow
Most application-wide settings are configured on the PagerDuty Configuration PagerDuty Settings page in the system menu.
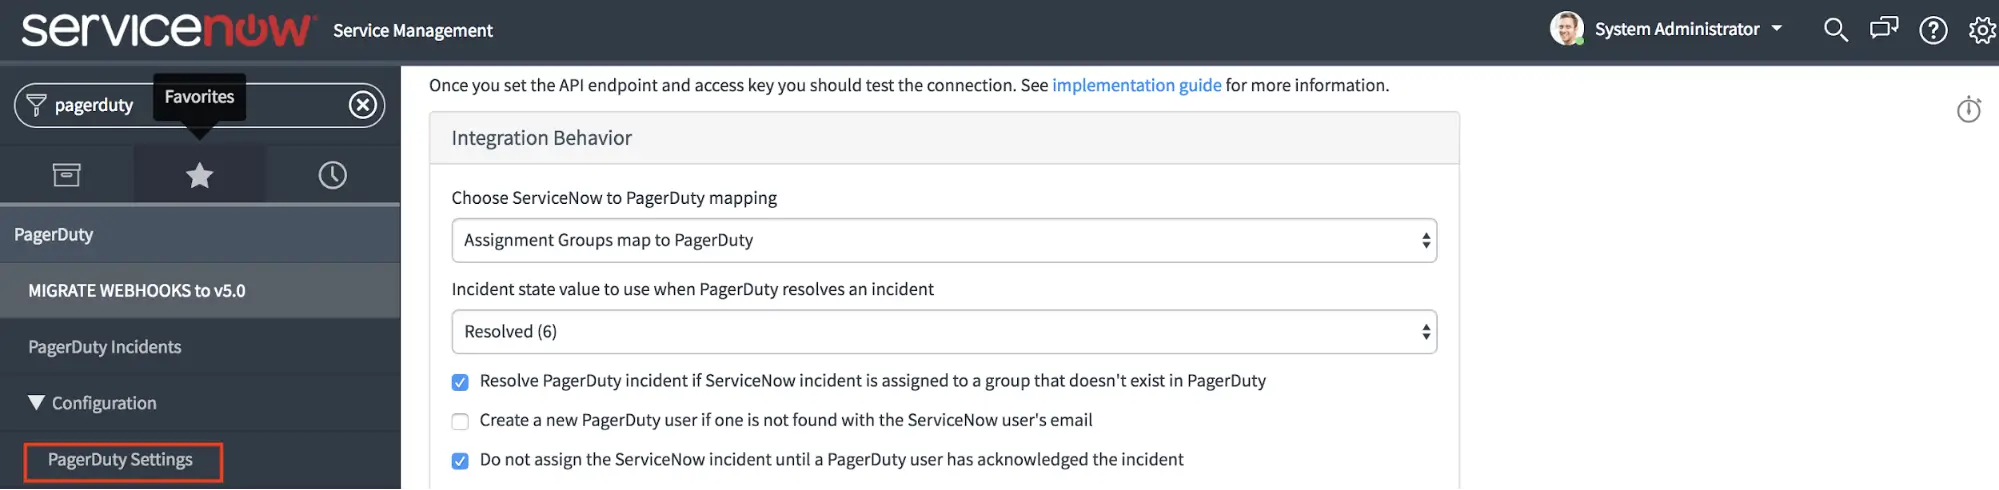
PagerDuty Settings
Create an Integration User Account for Webhook Authentication
The integration requires a dedicated ServiceNow user account to perform actions initiated by webhooks from PagerDuty. This allows you to control the permissions and roles the integration has.
- Navigate to Organization Users and click New to create a service account for the PagerDuty application. You will need to provide the username and password in the PagerDuty Settings UI when configuring the application.
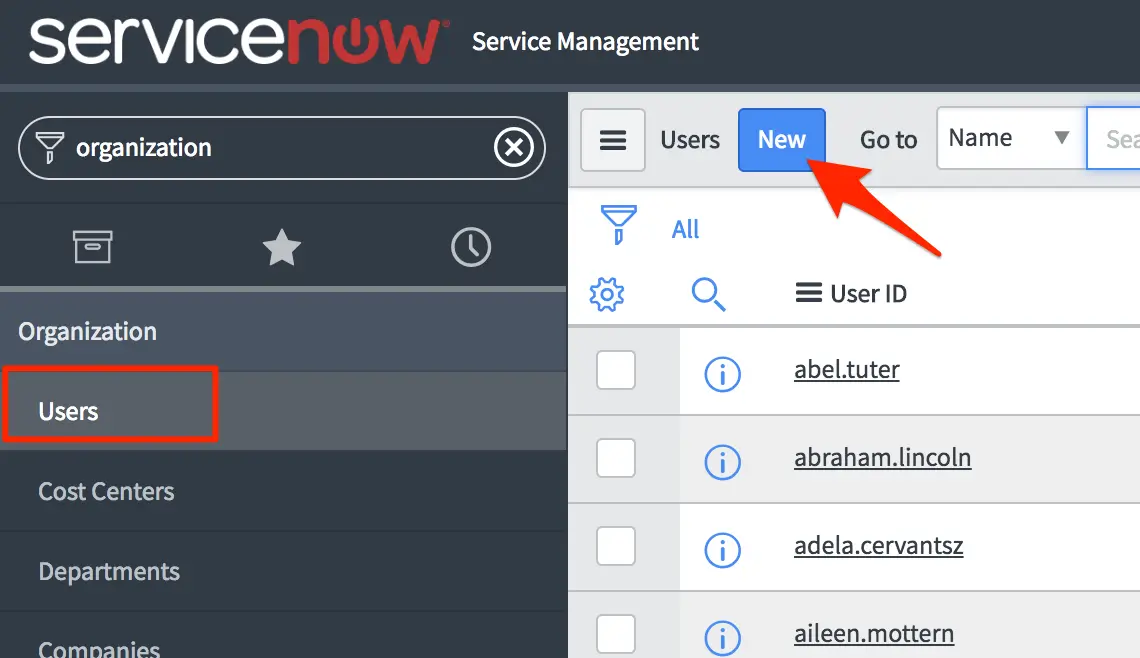
Create a new service account
- Set a User ID, First name, Last name, and Password for the user. If the Web service access only and Internal Integration User options are available, enable them.
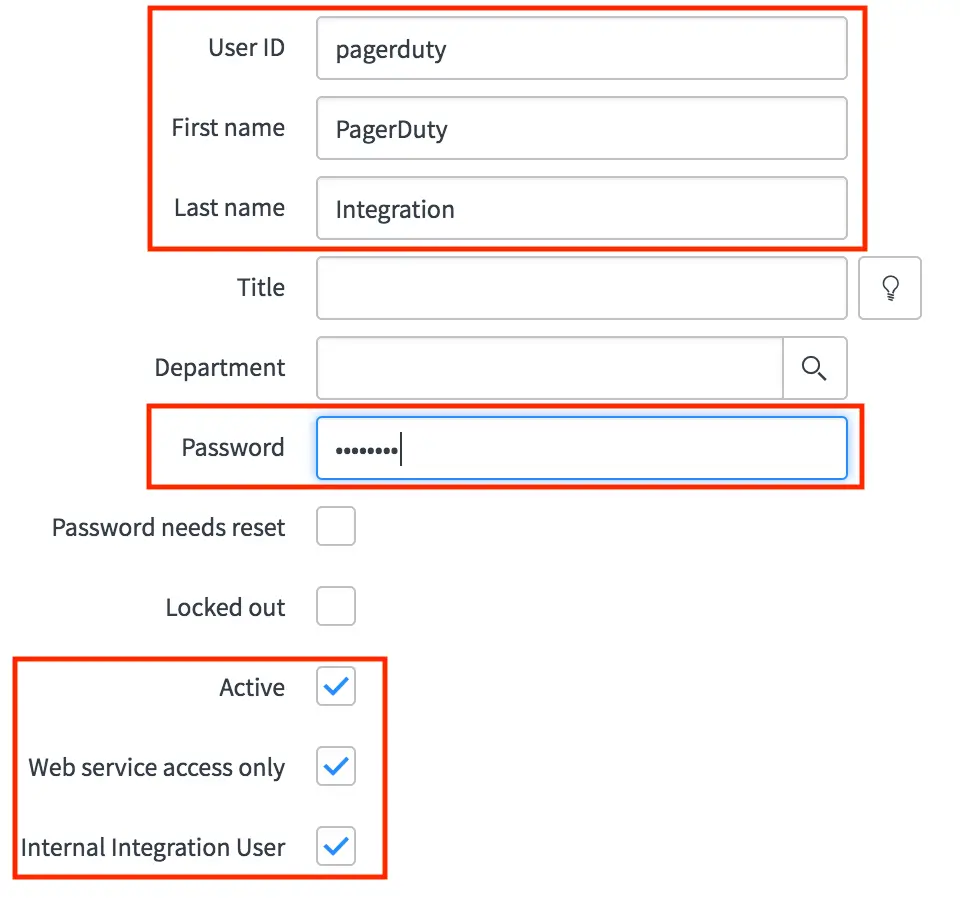
PagerDuty user information
- Populate the Email field on the integration user with the email address of a valid PagerDuty user. This ensures requests are properly formatted with a
PagerDuty-Fromheader. - Under the Roles tab, click Edit and assign the following three roles to the user:
itil,rest_service, andx_pd_integration.admin.
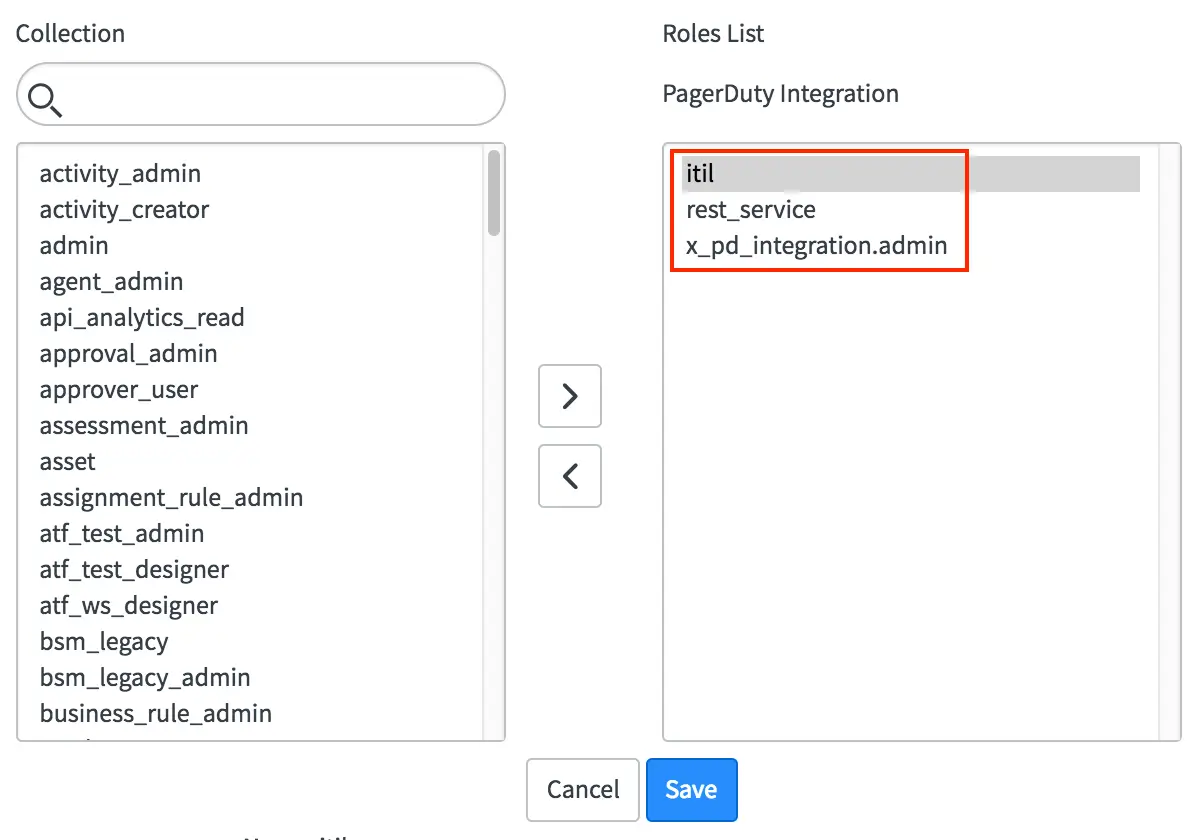
Select roles
Madrid and Later ServiceNow VersionsIf you are installing the PagerDuty integration for the first time on the Madrid platform version, add the role
snc_platform_rest_api_accessin place ofrest_service. If you installed the integration on a version earlier than Madrid, no changes are needed.
- Navigate to PagerDuty Configuration PagerDuty Settings and enter the user ID and password of the new user into the ServiceNow user for authentication and ServiceNow user password for authentication fields.
- Click Test ServiceNow User Authentication to validate basic authentication. A
ServiceNow user authentication test successful (200)response confirms everything is working.
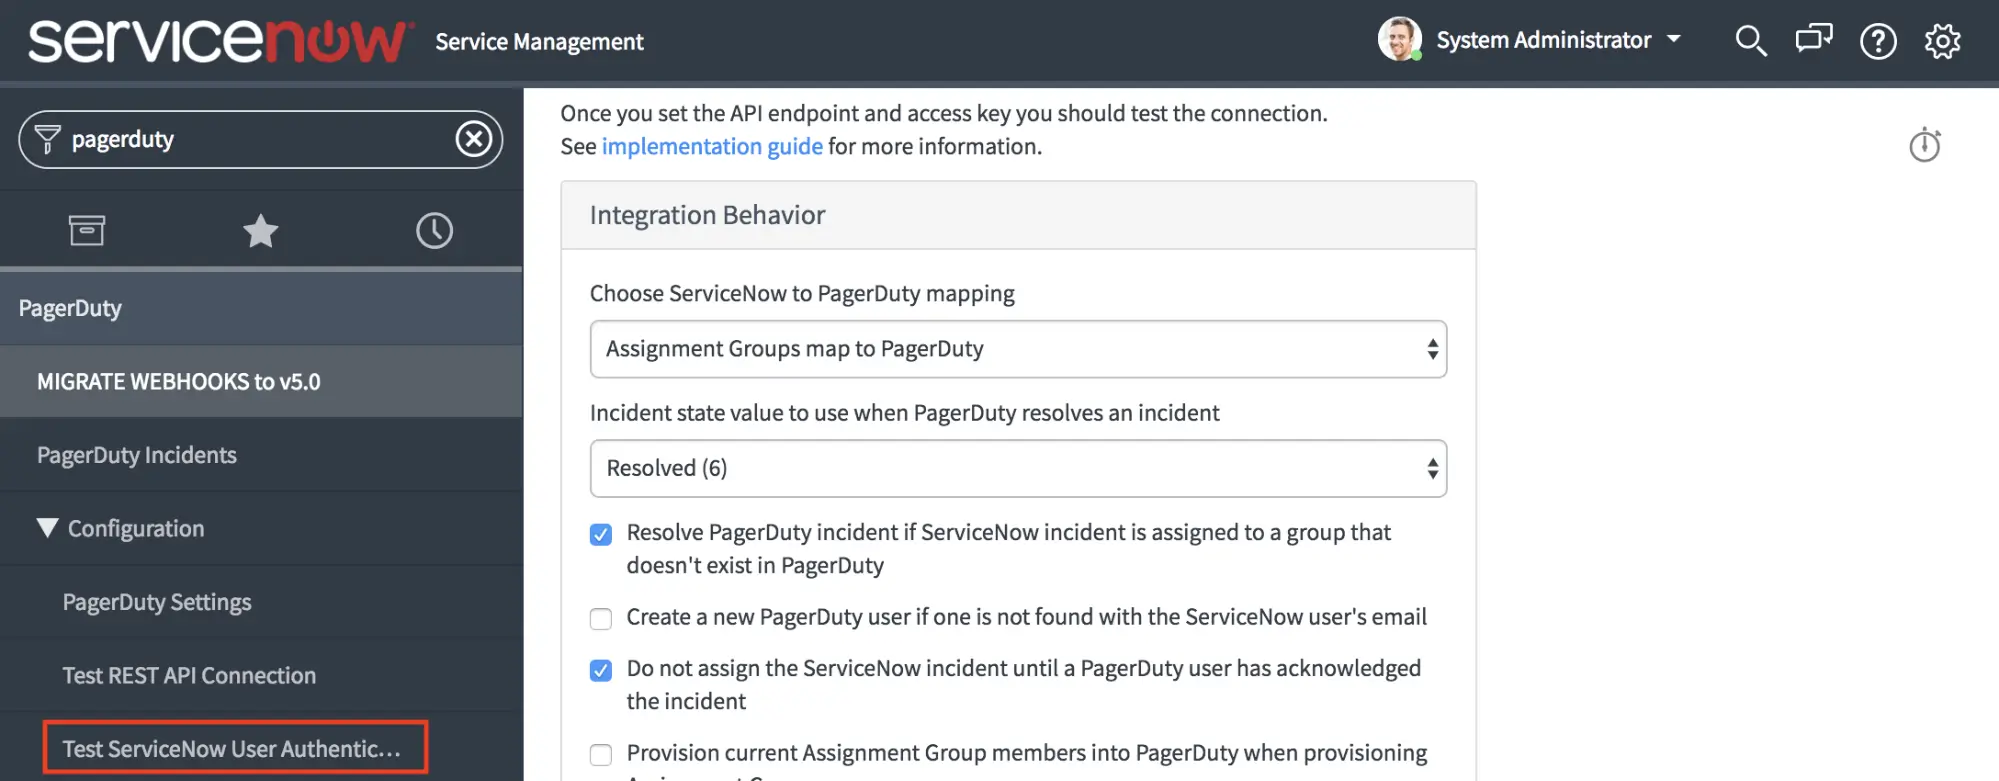
Test ServiceNow User Authentication
Configure the PagerDuty API Connection
Navigate to PagerDuty Configuration PagerDuty Settings and configure the following fields:
| Field | Value |
|---|---|
| Default PagerDuty User ID to use if auto-provisioning is disabled | Enter the ID of a valid PagerDuty user. This is used when the integration cannot identify a PagerDuty account for the ServiceNow user performing the action. The value is the alphanumeric code beginning with P at the end of the user's PagerDuty profile URL. |
| REST API endpoint URL | Leave as the default: https://api.pagerduty.com. |
| PagerDuty API access key | Enter the API key generated in the previous section. |
Setting the Default User CorrectlyIf auto-provisioning is disabled, a default PagerDuty user ID is required. If a valid user ID is not set, many aspects of the integration will not work.
The default PagerDuty ID must be a PagerDuty user ID — not a ServiceNow user ID or email address. A PagerDuty user ID is the alphanumeric code beginning with
Pat the end of the user's PagerDuty profile URL (for example,PXXXXXX).The PagerDuty user's default role must be at least Responder.
If a user in ServiceNow has that PagerDuty user ID in their PagerDuty ID field, that user's email address must exactly match the login email of the user in PagerDuty.
If these conditions are not met, the integration will be unable to reassign or resolve incidents in PagerDuty when they are reassigned or resolved by a ServiceNow user who does not have a corresponding PagerDuty account.
Click Test REST API Connection to validate the integration. A Connection test successful (200) response confirms everything is working.
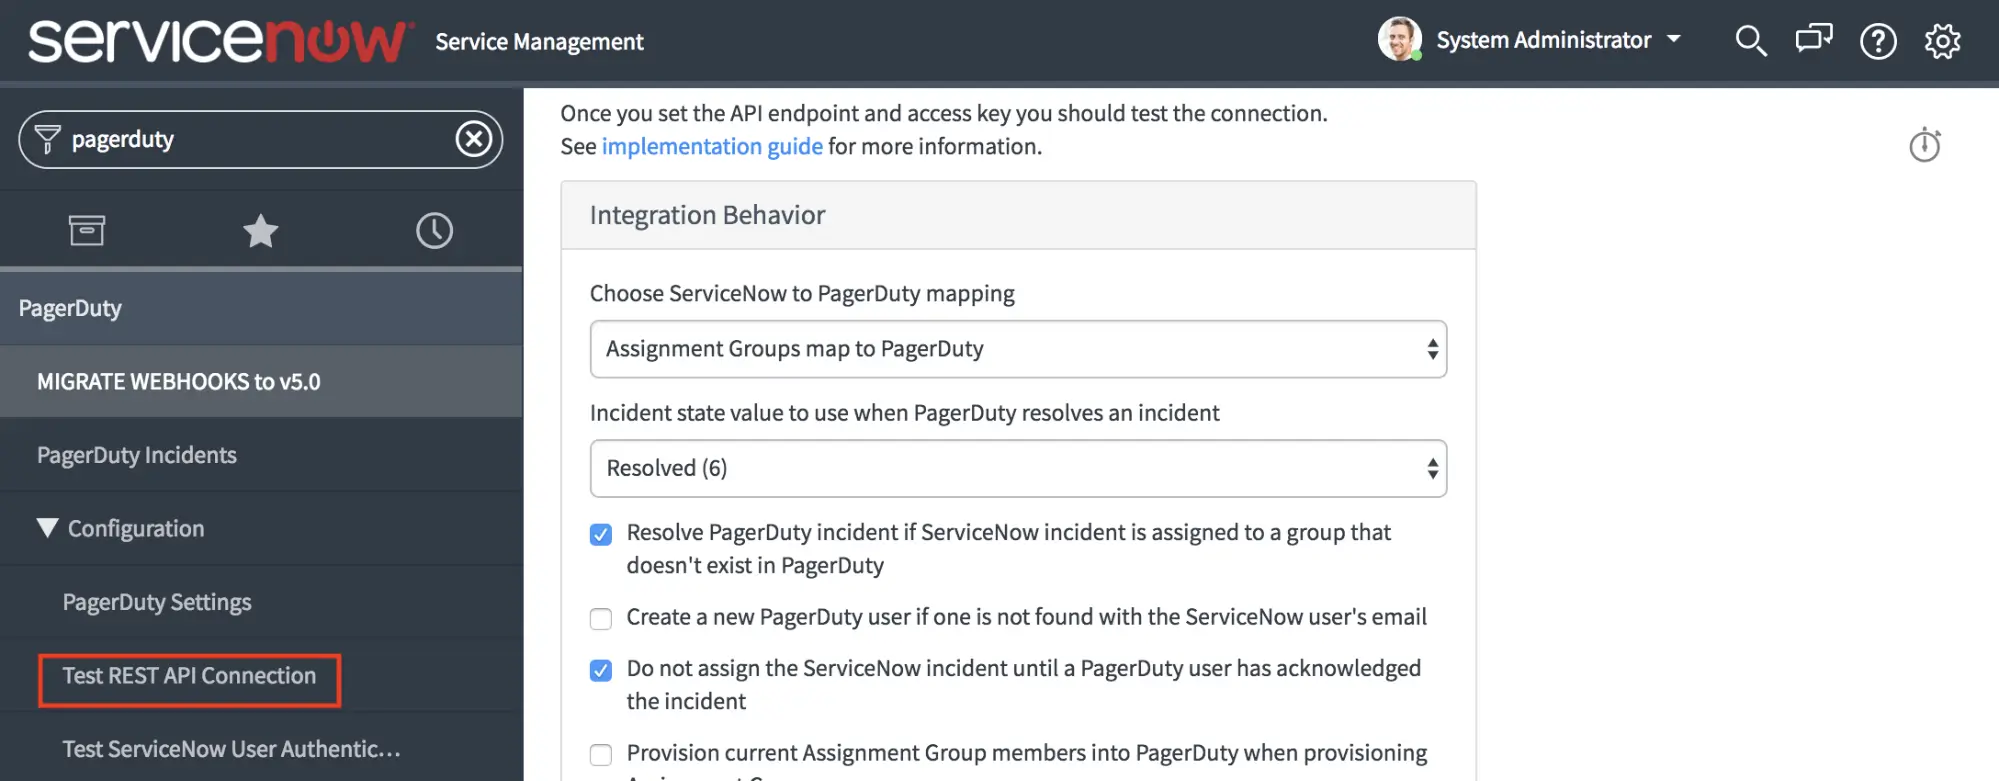
Test REST API Connection
Additional Properties to Review
Once you have configured the integration, see the Advanced Configuration article for information on Priority Sync, Inbound Field Rules, and other optional configurations.
Additional global settings are available on the same PagerDuty Configuration PagerDuty Settings page:
Integration Behavior
- Choose ServiceNow to PagerDuty mapping: Select whether Assignment Groups map to PagerDuty, or whether Configuration Items and Assignment Groups map to PagerDuty.
- Incident state value to use when PagerDuty resolves an incident: Select the integer value associated with the Resolved state in your ServiceNow instance. If this value is customized, select the appropriate value here.
- Resolve PagerDuty incident if ServiceNow incident is assigned to a group that does not exist in PagerDuty: Choose whether an incident in PagerDuty should be resolved if it is assigned to a group that has not been mapped to PagerDuty. This is useful when not all ServiceNow groups are mapped to PagerDuty escalation policies.
- Create a new PagerDuty user if one is not found with the ServiceNow user's email: Optionally auto-provision ServiceNow users into PagerDuty when they are assigned to or manage an incident. This may impact billing on your account.
- Do not assign the ServiceNow incident until a PagerDuty user has acknowledged the incident
- Provision current Assignment Group members into PagerDuty when provisioning Assignment Groups: Optionally auto-provision all users in an Assignment Group when that group is provisioned into PagerDuty.
- Create PagerDuty Schedule when provisioning Assignment Groups: Automatically create a new schedule for Assignment Groups provisioned from ServiceNow. When a schedule is created, the manager of the Assignment Group is added to it. The schedule must then be populated with other users in PagerDuty.
- Use PagerDuty teams: Enable PagerDuty teams functionality alongside assignment groups in ServiceNow.
- Create PagerDuty Team when provisioning Assignment Groups: When enabled, a PagerDuty team is created when you provision an Assignment Group from ServiceNow.
PagerDuty Settings
- PagerDuty instance URL: The URL of your PagerDuty instance.
- PagerDuty API access key: The API key generated during configuration, used to authenticate with the PagerDuty REST API.
- Default User ID: The PagerDuty account used to make API requests from ServiceNow when the acting user does not exist in PagerDuty. Omitting this field may result in incidents not being created in PagerDuty when triggered by a ServiceNow user who is not provisioned in PagerDuty.
- REST API Endpoint: This field does not need to be changed.
ServiceNow Settings
- ServiceNow user for authentication: The username PagerDuty uses to authenticate with ServiceNow for webhook delivery.
- ServiceNow user password for authentication: The password for the authentication user above.
- ServiceNow REST endpoint for webhook callback: Optionally modify the path PagerDuty uses to send webhooks to. It is recommended that you leave this value as is.
Legacy Settings
- Logging verbosity level: Controls the amount of information in the integration logs. The default value is
info. Change todebugfor troubleshooting.
Choose How ServiceNow Objects Map to PagerDuty Objects
The Choose ServiceNow to PagerDuty mapping option on the PagerDuty Configuration Settings page provides two options:
- ServiceNow Configuration Items and Assignment Groups map to PagerDuty
- Configuration Items map to PagerDuty services.
- Assignment Groups map to PagerDuty escalation policies.
- ServiceNow Assignment Groups map to PagerDuty
- Assignment Groups map to both a PagerDuty service and a PagerDuty escalation policy.
The following diagram represents the object mapping between systems when Configuration Items and Assignment Groups map to PagerDuty:
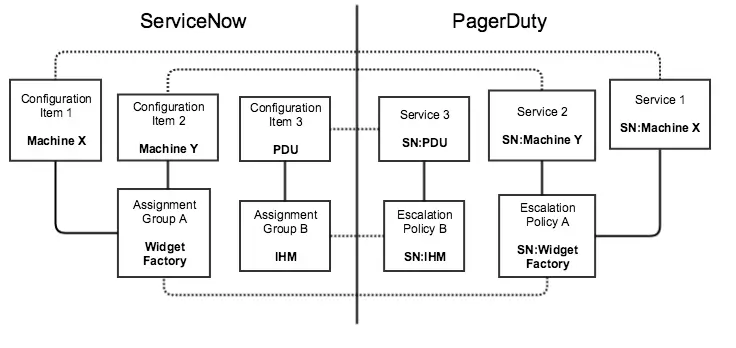
Object mapping
Provision Configuration Items to PagerDuty
Assignment Groups Mapping OnlyIf you selected Assignment Groups map to PagerDuty in the PagerDuty Settings, skip this section. Configuration Items do not need to be provisioned.
Before provisioning Configuration Items, set the corresponding assignment group for each item you plan to provision. When you provision a Configuration Item, the integration verifies that its assignment group exists in PagerDuty as an escalation policy and provisions it if not.
Any configuration item that extends the base cmdb_ci table can be mapped to PagerDuty. Provisioning business services, technical services, and applications is recommended. For each Configuration Item type, the form view must be modified to show the PagerDuty object ID.
- In the Applications list in ServiceNow, the PagerDuty service and PagerDuty webhook fields are empty for any CI not yet mapped to PagerDuty.

"PagerDuty service" and "PagerDuty webhook"
- Select the application or CI you want to provision, then click Provision CI Into PagerDuty under Related Links.
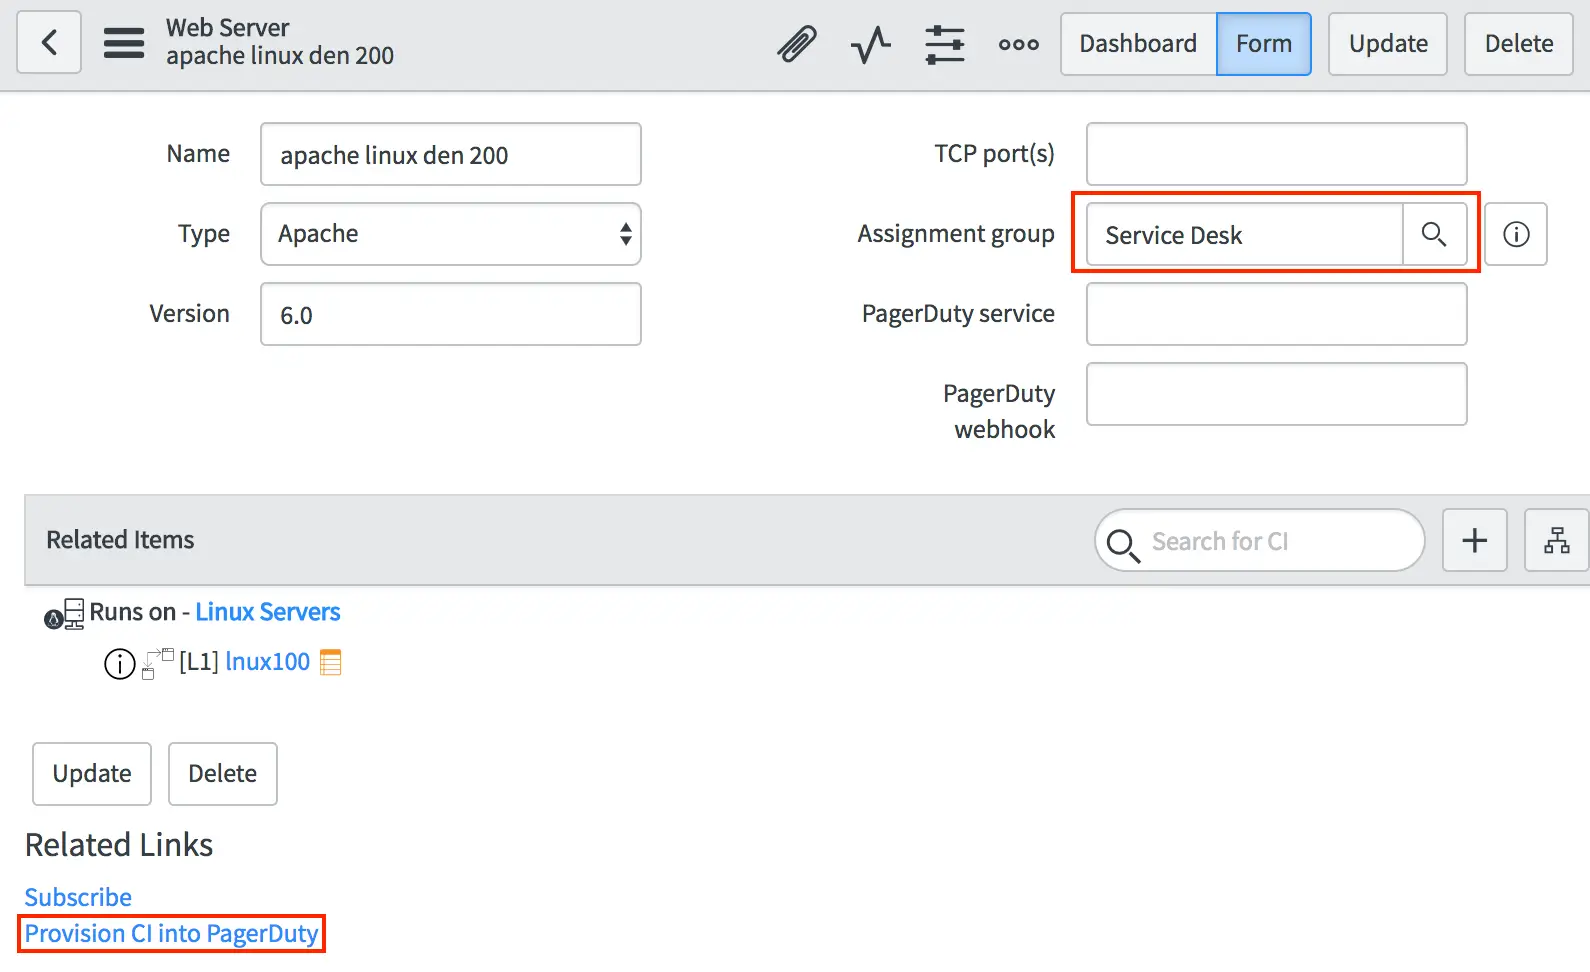
Provision CI into PagerDuty
- A notification confirms the configuration item is being created. Once complete, the PagerDuty service and PagerDuty webhook fields are populated with the PagerDuty IDs.
- The corresponding service and escalation policy are created in PagerDuty. The service includes an automatically created webhook that powers the bi-directional sync between PagerDuty and ServiceNow.
Provision Assignment Groups to PagerDuty
Each assignment group corresponds to a PagerDuty escalation policy. You can optionally enable settings to automatically create a PagerDuty schedule and team when a group is provisioned from ServiceNow.
The PagerDuty attributes set on assignment groups depend on the mapping selected in the Settings page:
- Assignment Groups map to PagerDuty: Each assignment group has a corresponding PagerDuty escalation policy, service, and webhook ID. Optionally, each group also has a PagerDuty schedule and team ID.
- Configuration Items and Assignment Groups map to PagerDuty: Each assignment group has only a PagerDuty escalation ID (and optionally a PagerDuty schedule and team ID). The PagerDuty service and webhook ID are mapped to Configuration Items.
User RequirementThe user provisioning assignment groups from ServiceNow to PagerDuty must have a PagerDuty user ID attached to their ServiceNow account.
- Select an assignment group you want to provision, then click Provision Group into PagerDuty.
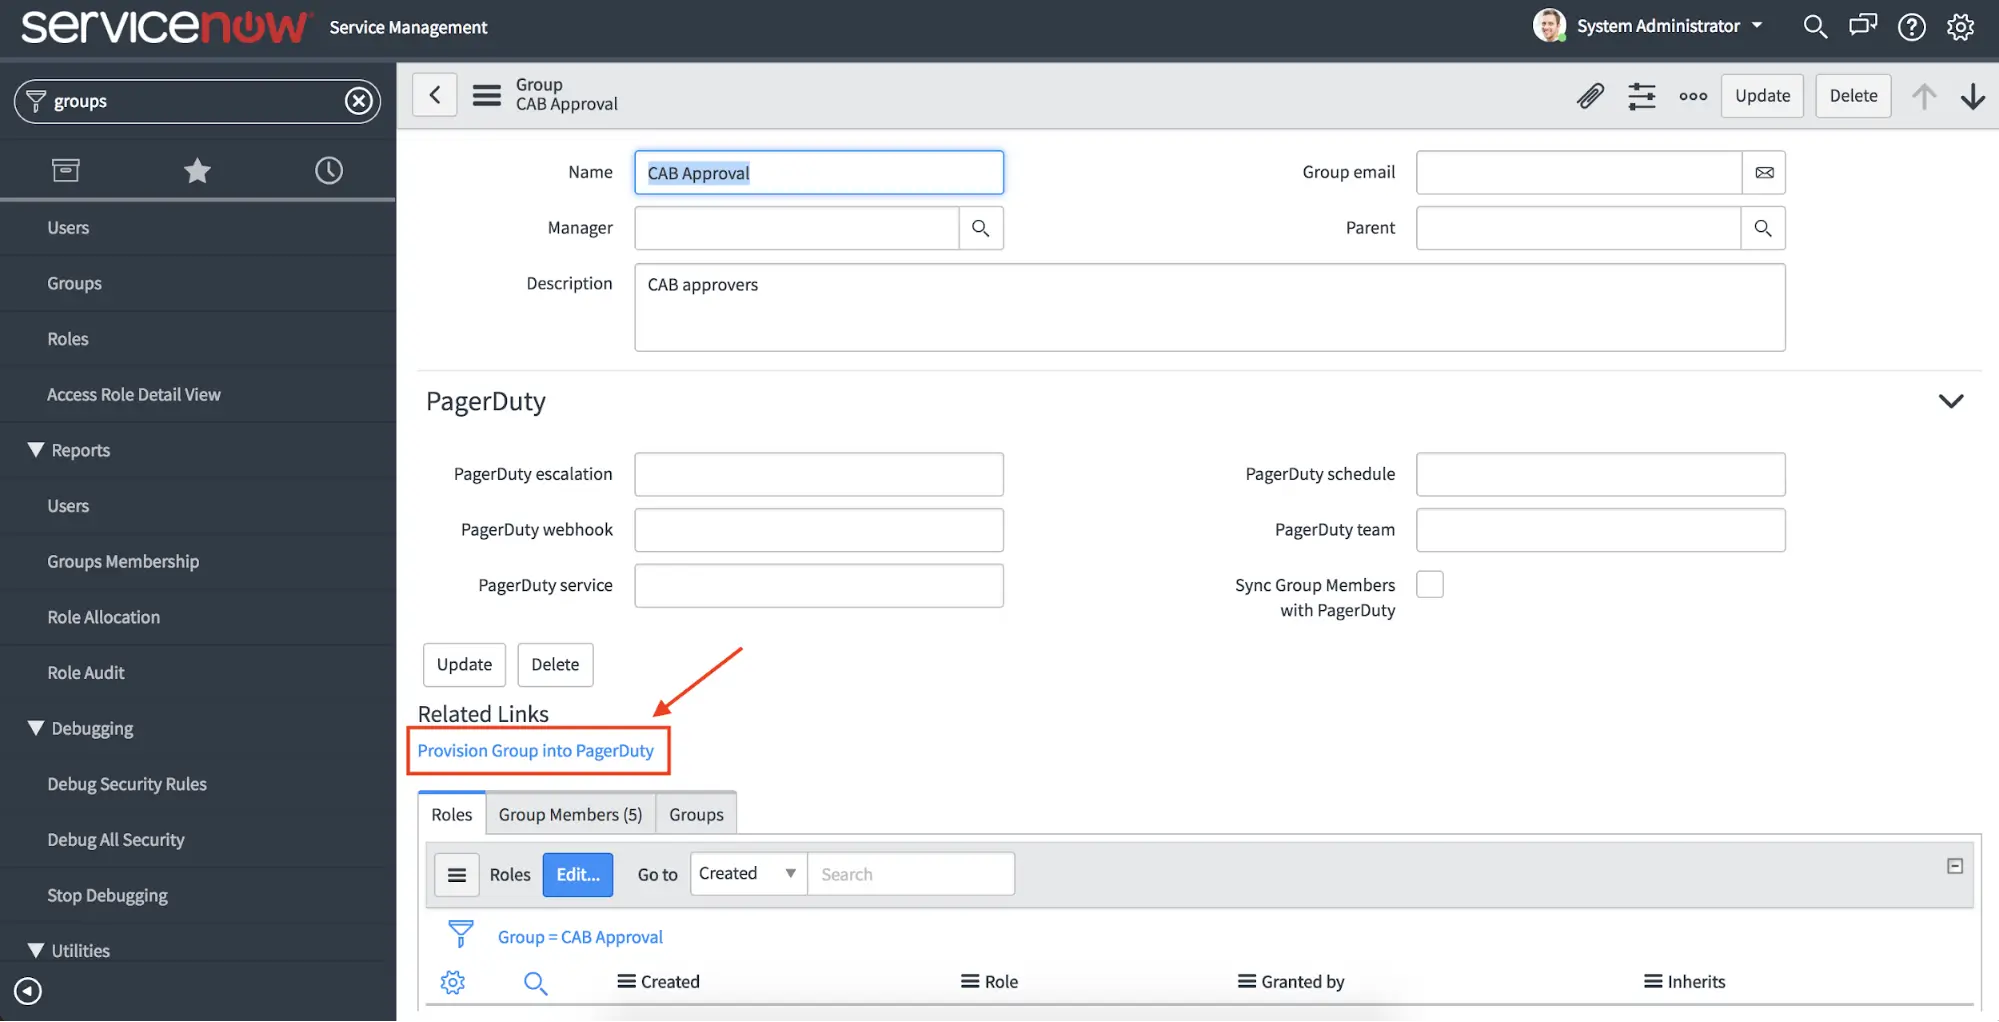
Provision Group into PagerDuty
- A notification confirms the assignment group is being created. Once complete, the PagerDuty service, PagerDuty escalation, and PagerDuty webhook fields are populated. If a schedule and team were enabled in PagerDuty Settings, those IDs are also populated.
- The corresponding service and escalation policy are created in PagerDuty. The service includes an automatically created webhook — with a shared secret in the URL — that powers the bi-directional sync.
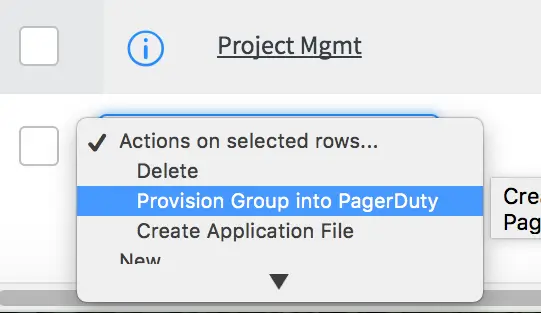
- To provision multiple groups at once, select them from the Groups list view and click Provision Group into PagerDuty from the dropdown.
Select Provision Group into PagerDuty
Provision Users to PagerDuty
- Navigate to the ServiceNow users list. Users with a populated PagerDuty ID field have already been provisioned to PagerDuty.
- Select a user who has not yet been provisioned and click Provision PagerDuty User.

Provision PagerDuty User
- A notice confirms the user is being provisioned. Upon completion, the PagerDuty ID field is automatically populated and the user appears in PagerDuty with the same name and email address.
- If the user has Business phone or Mobile phone fields populated in ServiceNow, these are automatically provisioned as Contact Methods and Notification Rules in PagerDuty.
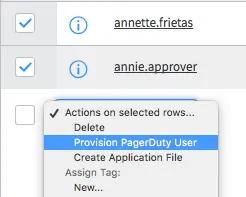
- To provision multiple users at once, select them from the Users list and click Provision PagerDuty User from the dropdown.
Select Provision PagerDuty User
Verify that ServiceNow and PagerDuty Are Communicating
Assign an incident to a group in ServiceNow that is tied to a PagerDuty service to verify communication between the two systems.
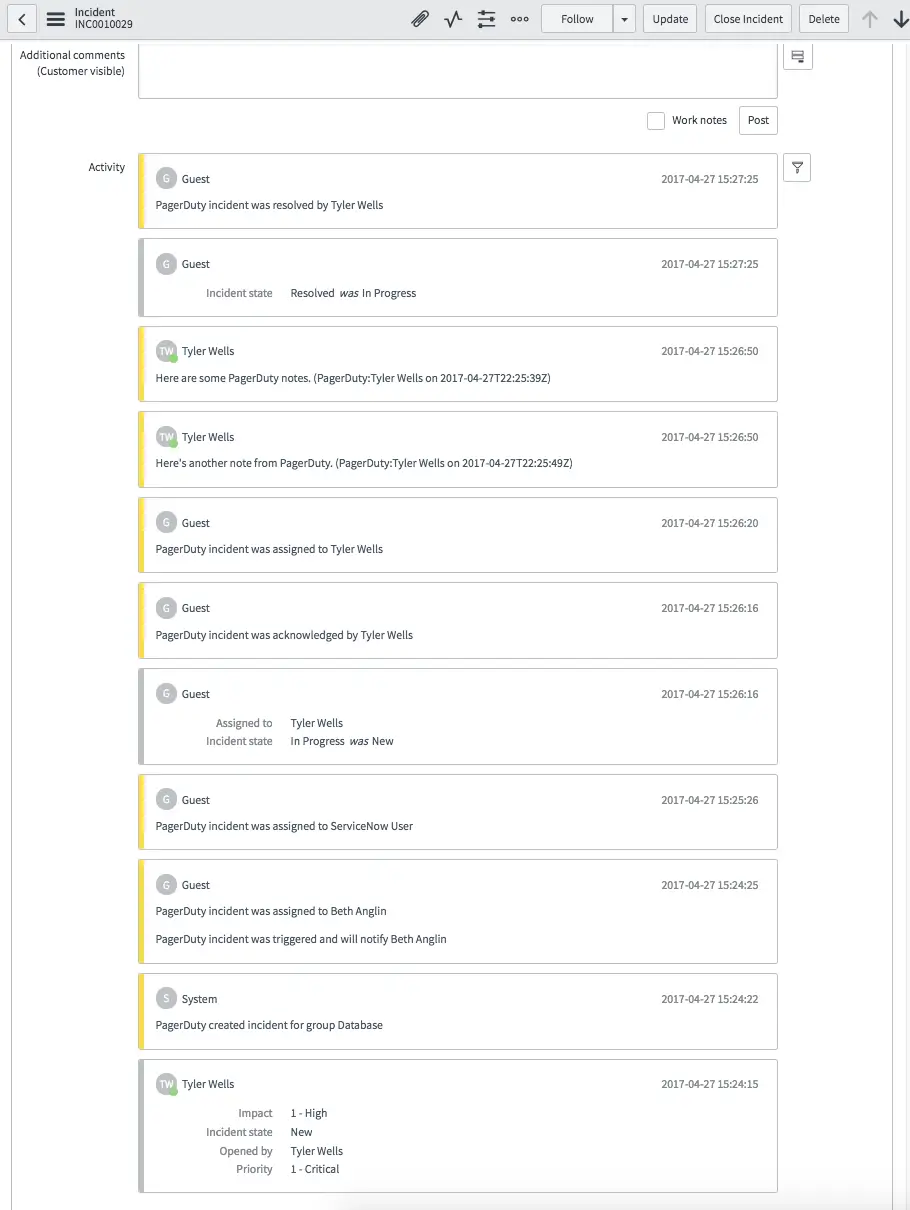
Example ServiceNow incident
Once an incident is resolved in PagerDuty, it is resolved in ServiceNow, and vice versa. ServiceNow also maintains a log of activities that have taken place within PagerDuty.
Index RecommendationAfter successfully installing and configuring the PagerDuty application, index the
incident.x_pd_integration_incidentcolumn on your incident table. This ensures optimal performance when the PagerDuty application queries the incidents table.
Upgrade Your PagerDuty Integration
Before starting the upgrade process, address the following:
- Revert any customizations prior to upgrading from the store. The upgrade path does not patch customized or modified files.
- Before running the MIGRATE WEBHOOKS TO v5.0 script, update the PagerDuty Settings page and run both the Test REST API Connection and Test ServiceNow User Authentication scripts to confirm a
success (200)status code.
Updated about 1 month ago