
Jira Cloud Integration Guide | PagerDuty
Configure the Jira Cloud integration
Jira Cloud + PagerDuty Benefits
- Tackle critical service requests and accelerate incident resolution with bidirectional sync between Jira Cloud issues and PagerDuty incidents.
- Populate out-of-the-box or custom issue fields, sync incident priority and notes, and configure state mapping between Jira and PagerDuty.
- Jira Cloud users can leverage PagerDuty's integrations and PagerDuty AIOps functionality.
- This integration is compatible with both Jira Software and Jira Service Management products.
Jira On-Prem IntegrationIf you are using Jira on-premises (Jira Server/Jira Data Center), refer to the Jira Server Integration Guide.
Requirements
AvailabilityThe Jira Cloud Integration is available on the following pricing plans: Professional, Business, Digital Operations (legacy), and Enterprise Incident Management.
Contact the Sales team to upgrade your account to include the Jira Cloud Integration.
To Configure the Integration
In PagerDuty
- You must have an Account Owner, Global Admin, or Manager base role to configure the integration. Responder and Observer base roles will have read-only access to the Jira Cloud configuration page.
In Jira
- You must have an Admin role to install and manage the PagerDuty app.
To Use the Integration
In PagerDuty
- You must have a PagerDuty user license to use the integration.
In Jira
- Users in Jira do not need a PagerDuty account to use the PagerDuty app.
How It Works
If you configure the integration to create incidents and issues manually:
- When a user clicks Create Jira Issue on a PagerDuty incident, the action sends an
Issue Createdevent to Jira Cloud, creating an issue. - When a user clicks Create New Incident on a Jira Cloud issue, the action sends a trigger event to PagerDuty, creating an incident.
- PagerDuty incident and Jira issue statuses are mapped during integration configuration and are bidirectionally synced throughout the lifecycle of the incident and issue.
If you configure the integration to create incidents and issues automatically:
- When a user creates a PagerDuty incident, it will automatically create a Jira issue.
- When a user creates or updates a Jira issue matching a predefined JQL statement, it will automatically trigger a PagerDuty incident.
- PagerDuty incident and Jira issue statuses are mapped during integration configuration and are bidirectionally synced throughout the lifecycle of the incident and issue.
Integration Walkthrough
In Jira Cloud
- Depending on your service region, navigate to one of the following apps in the Atlassian Marketplace:
- US Service Region: PagerDuty for Jira Cloud. Click Get it Now to download.
- EU Service Region: PagerDuty for Jira Cloud (EU only version). Click Get it Now to download.
- Once the app installs, click Manage app in the confirmation dialog that appears. On the following screen, click Configure.
- A Jira connection code will appear in the instructions. Copy this key and keep it in a safe place for later use.
Connection Code ExpiryFor security reasons, the key in this step must be used within 48 hours.
- (Optional): To activate PagerDuty in a Jira project's sidebar, navigate to your project Project settings Apps PagerDuty Sidebar and enable the Enable Sidebar toggle.
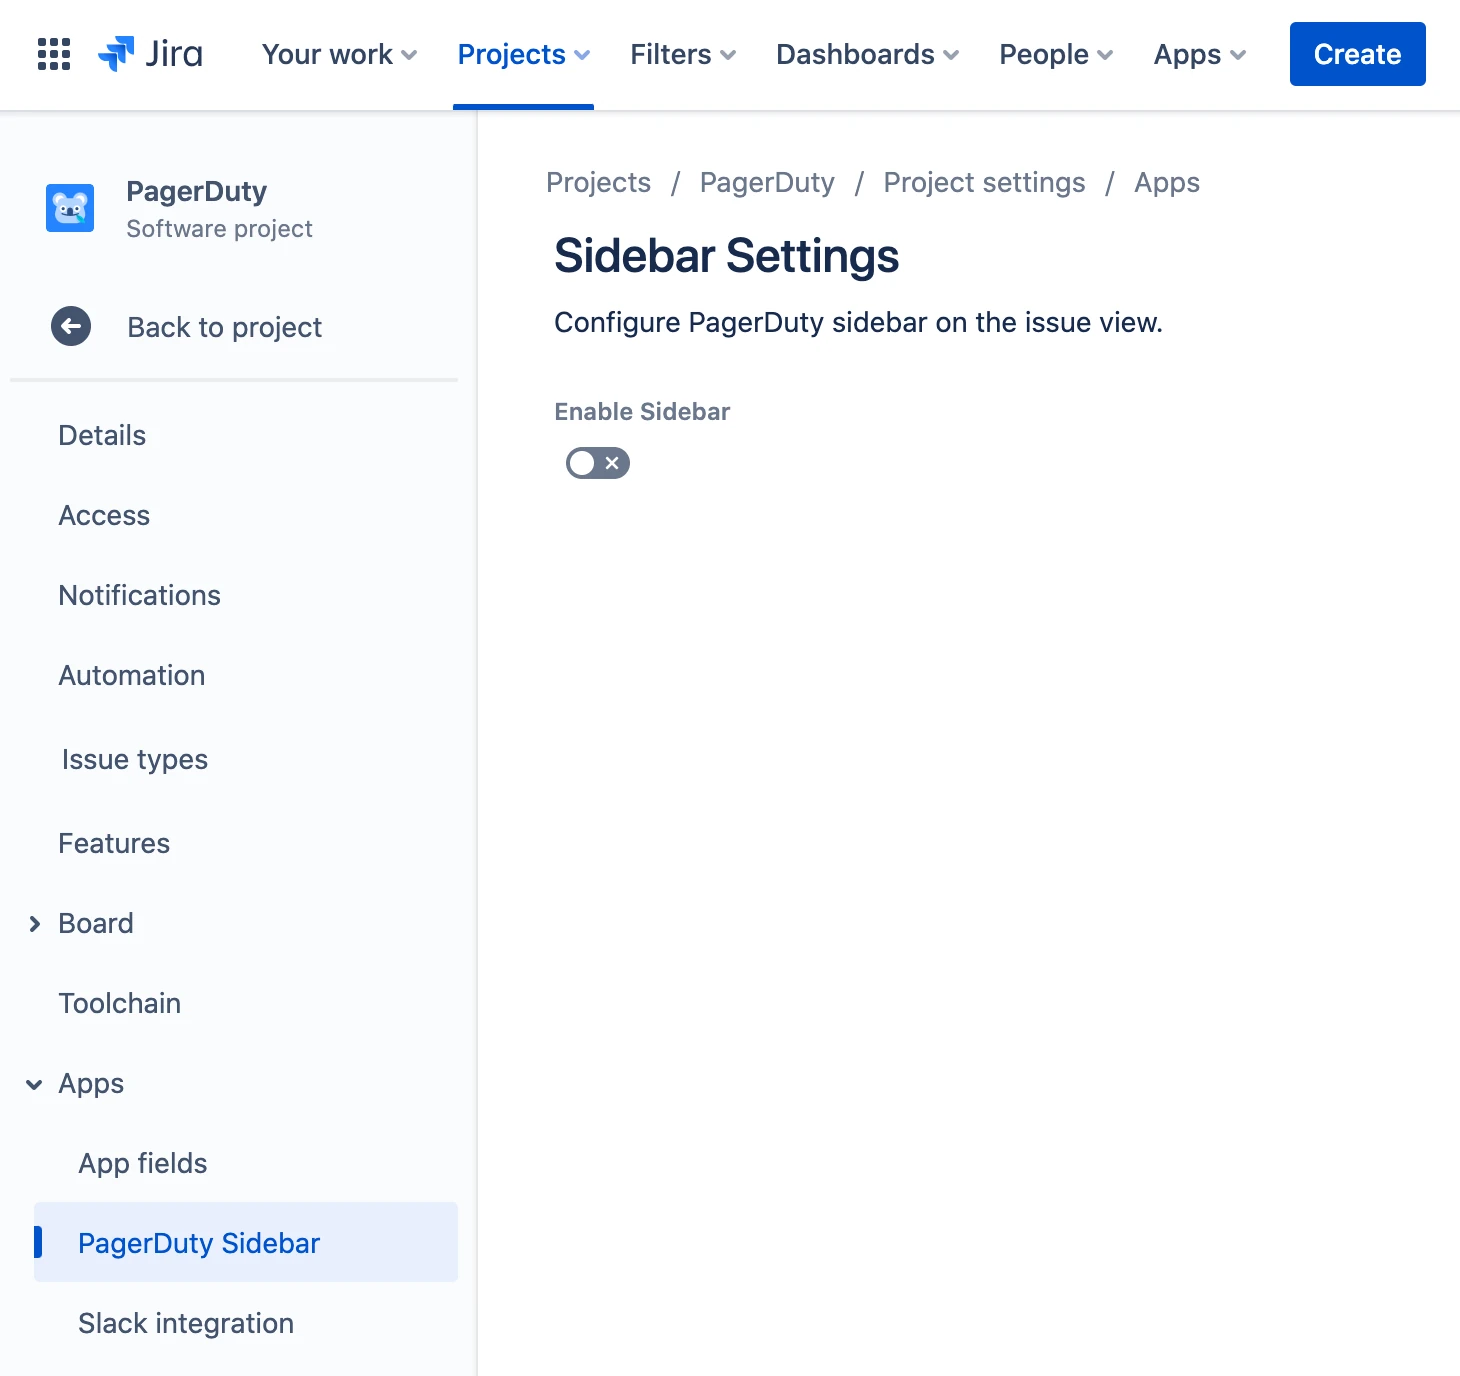
Configure PagerDuty Sidebar
In PagerDuty
Create Jira Extension
- Navigate to Integrations Extensions.
- On the Extensions page, click New Extension, then search for and select Jira Cloud. The Add on the JIRA Extension Page modal will appear — click Open.
- Click Add Account.
- Enter the Jira connection code you generated in Jira and click Connect Jira Account.
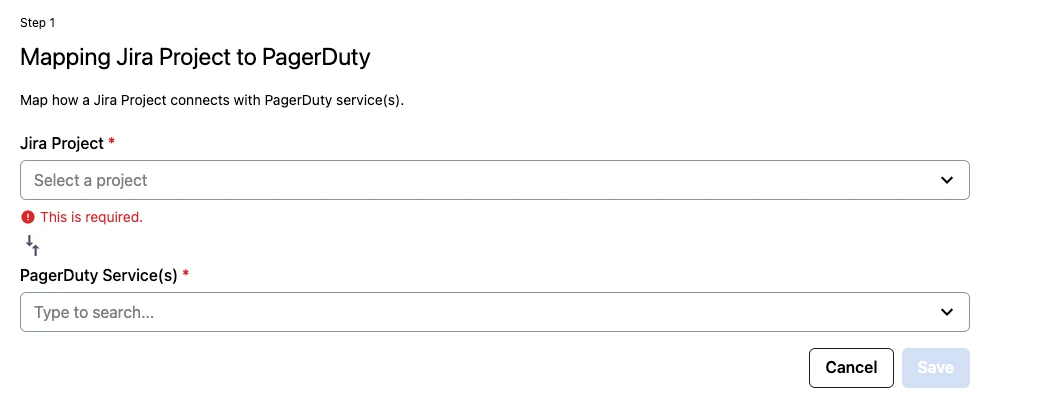
Map Jira Project to PagerDuty Service
- Navigate to Integrations Extensions Jira Cloud.
- Select the Jira account to view the configuration settings.
- Click New Configuration.
- Select the desired Jira project and PagerDuty service(s) from the dropdown menus. If you select multiple PagerDuty services, a separate mapping will be created for each service.
Mapping RestrictionsOnce you save a mapping, you cannot edit the selected project or service(s). You will need to create a new mapping to map a different project or service.
Create Mapping
- Enter the Configuration Details:
- Configuration name: Enter a name for your mapping.
- Issue Type: Select which issue type this mapping applies to.
Create Jira Issues from PagerDuty Incidents
- Configure your Jira Issue Creation settings:
- Creation Type: Choose either Automatically create issues when an incident triggers or Manually create issues using a Jira Action button on the incident details page.
- Jira Field Mapping: Choose which Jira fields will map to PagerDuty fields. To create a new mapping, click New Mapping and select your desired fields from the dropdown menus.
- Jira Test Issue: Click Create a Test Issue to test your configuration. This test will only create a Jira issue using placeholder information — it will not create a PagerDuty incident. If the test is successful, a message will appear with a link to the test issue.
Create PagerDuty Incidents from Jira Issues
- Configure your PagerDuty Incident Creation with JQL settings:
- To create PagerDuty incidents from Jira, check the box next to Create an incident if the issue matches the JQL statement.
- Enter your desired JQL statement. For example,
status = "To Do" AND summary ~ "PagerDuty Test"will create a PagerDuty incident when a Jira issue's status is set to To Do and the issue summary contains the words "PagerDuty" and "Test". Refer to Atlassian's JQL documentation for more information on using JQL.
JQL Statement RestrictionsDo not include the Jira Project and Issue type in your JQL statement. These will be inferred based on what you selected in the Configuration Details section. You may see an error if you attempt to include these fields in the statement.
Sync Notes
- To sync notes between PagerDuty incidents and Jira issues, click the checkbox next to Sync notes to issues:
- Choose the PagerDuty user that will be used for posting in the Account for note syncing dropdown. This user will be the author for any notes created by the integration.
Status Mapping
- Select the appropriate Jira Status for each PagerDuty Status: Triggered, Acknowledged, and Resolved.
Incident AcknowledgementJira cannot change the state of an incident in PagerDuty to Acknowledged. This ensures only PagerDuty users can acknowledge an incident is being worked on.
Priority Mapping
- If you have configured incident priorities in PagerDuty, you can map these to your Jira priorities. For each priority you want to map, click New Mapping and select your desired PagerDuty priority and Jira priority values.
Once you have completed your configuration, click Save.
The integration is now complete. See the Jira Cloud User Guide for instructions on using the integration.
FAQ
Read Jira Cloud Integration FAQ for answers to common questions.
Updated about 2 months ago