
Billing, Invoices and Payments
View and administer your PagerDuty account's billing information
Manage your PagerDuty account's subscription, billing, and user licensing. Learn more about updating subscription plans, accessing invoices, managing user charges, and keeping payment methods current. Whether you're adjusting your license count, updating billing contacts, or exploring flexible licensing options, this article walks you through each step to ensure accurate billing and streamlined account administration.
Required User Permissions
- The Account Owner is the only user that has access to billing-related information in PagerDuty.
- For accounts created from 2023 onwards, both the Account Owner and Global Admins can add user licenses. If your account was created prior to 2023, only Account Owners can add user licenses by default. To grant Global Admins access to add user licenses, have your Account Owner contact the Support team.
- If you need access to view or change billing, invoice, or payment information for your account, you can find the Account Owner by going to People Users and looking for Account Owner in the Role column.
Pricing Plan Subscription
All PagerDuty accounts are subscribed to a pricing plan. Your pricing plan determines which features are available and affects your invoice amount. You can manage your pricing plan, along with user licenses, add-ons, and billing in the web app by navigating to User Icon Subscriptions.
Upgrade Your Pricing Plan Subscription
- Navigate to User Icon Subscriptions.
- In the Subscription Details card, click Upgrade Plan.
- Select one of the available plans, review and update the purchase details as needed, and click Complete Your Purchase.
Downgrade Your Pricing Plan Subscription
To downgrade your pricing plan, reach out to the Sales team for assistance.
Operations Cloud Consumption & Platform Usage
The Operations Cloud Consumption & Platform Usage view on the Your Subscription page provides a single, at-a-glance view of how much of your plan and purchased credits have been consumed across three dimensions: Operations Cloud Seats, Events, and AI Actions.
The panel displays both your seeded allotment (Included in Plan) and your overage consumption (From Credits purchased). This allows you to monitor capacity and track credit burn-down, ensuring you always know whether you are approaching your included limits and how many purchased credits remain.
Pricing Plan InformationThis view is available only to accounts on an Operations Cloud plan. It is not present on legacy Incident Management, AIOps-only, or other non-OpsCloud plans.
PermissionsThe Account Owner is the only user with access to view the Operations Cloud Consumption & Platform Usage panel.
View Platform Usage
This feature requires no configuration and appears automatically for Account Owners on Operations Cloud plans.
- Navigate to User Icon Subscriptions.
- Select the Your Subscription tab.
- Scroll below Subscription Details to the Your Platform usage heading.
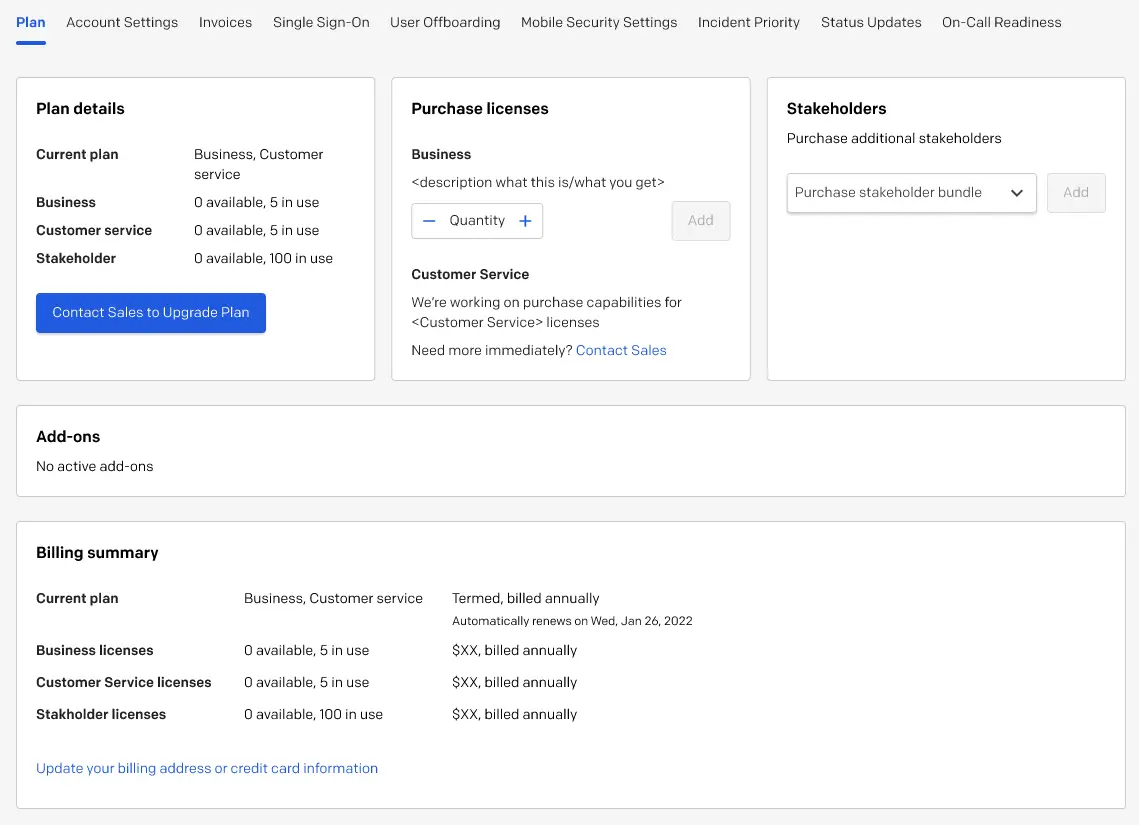
Subscription Details
The Subscription Details card sits directly above the usage section and provides context for your current billing cycle. It displays your Current Plan, Stakeholder Seats included, the Plan Period, and your Renewal date.
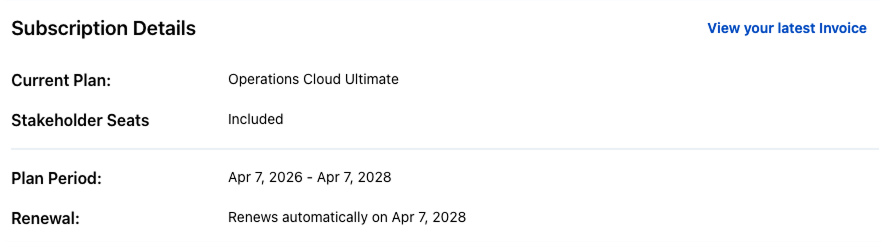
Subscription details
Operations Cloud Consumption Summary
At the top of the Your Platform usage area, the summary bar shows your Total Platform capacity used as a single percentage. A stacked bar underneath visually breaks down consumption by dimension:
- Operations Cloud Seats (Purple)
- Events (Blue)
- AI Actions (Green)
Below the stacked bar, Total Credits Purchased displays the number of credits used against your total purchased pool.
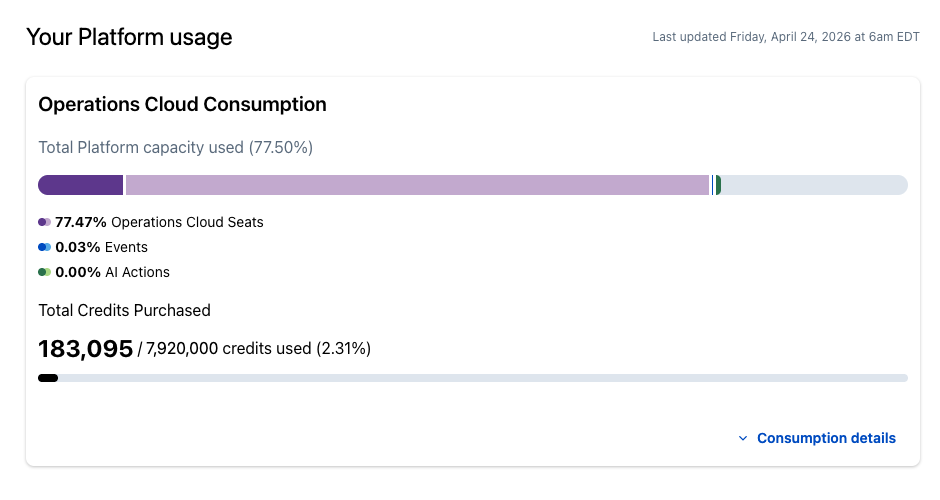
Consumption summary
Usage Breakdown
Click the Consumption details button at the bottom-right of the summary panel to view a detailed breakdown. Three cards will expand — one for each dimension — displaying a two-segment progress bar. The darker segment represents what is Included in Plan, and the lighter segment represents what is drawn From Credits purchased.
- Operations Cloud Seats: Displays your seeded seat allotment vs. overage seats.
- Events: Displays your event allotment vs. overage events. Includes a View historical Events link.
- AI Actions: Displays your AI Action allotment vs. overage actions. Includes a View historical Usage link and a Learn more about AI Actions Consumption link.
Card TotalsEach card summarizes the total units used at the bottom.
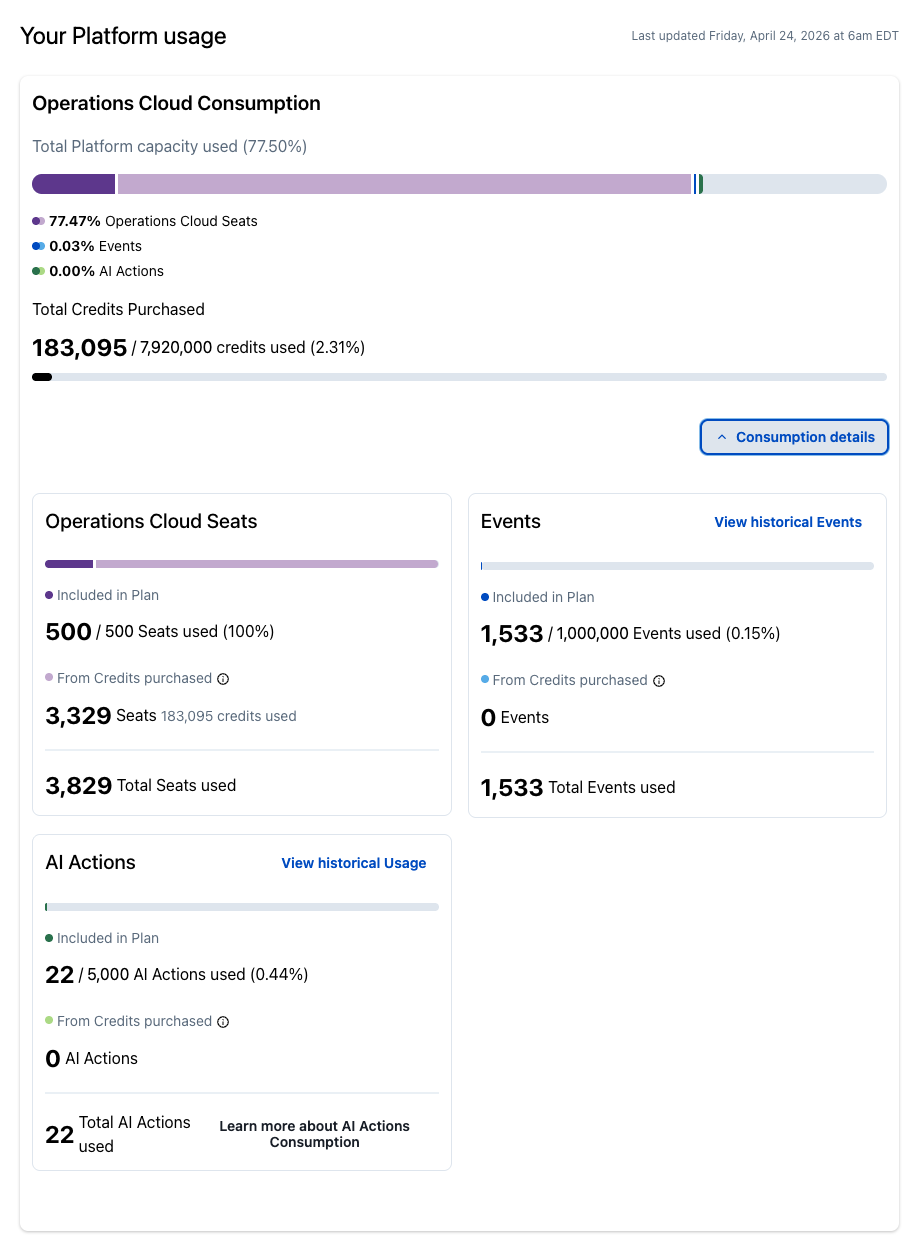
Usage breakdown
Included in Plan vs. From Credits Purchased
When monitoring your consumption, it is important to understand the difference between seeded and overage usage:
- Included in Plan: The seeded allotment that comes directly with your Operations Cloud subscription, for example 20 seats, 20,000 events, or 1,000 AI actions per plan period.
- From Credits purchased: Consumption that exceeds your seeded allotment. Once your Included in Plan allotment hits 100%, any additional usage automatically begins drawing down from your purchased credits.
Monitor Your Usage
Typical workflows for managing your consumption include:
- Check overall capacity: Review the Total Platform capacity used percentage for a quick headline number.
- Identify the highest dimension: Use the color-coded stacked bar to instantly see whether Seats, Events, or AI Actions are driving your consumption.
- Monitor credit burn-down: Check the Total Credits Purchased line to see how much of your credit pool remains for the current plan period.
View Invoices
Invoices automatically send to the Account Owner's login email address every month. The Account Owner can also view them at any time in the web app:
- Go to User Icon Subscriptions.
- In the Invoice section, click View your Invoice.
A list of invoices will display, with the most recent at the bottom. You can view and download a specific invoice by clicking the invoice title.
For questions regarding your invoice amount, contact the Billing Team.
Invoice Address
If you need to display a separate address on your invoices:
- As the Account Owner, navigate to User Icon Account Settings and select the Account Settings tab.
- In the Update Payment Information section, click Update Billing Information.
- With the Billing Contact Information tab selected, enter the new contact information you would like shown on invoices.
- Click Update.
Invoice Emails
If another user or a member of your company's finance team would like to receive copies of invoices each month, the Account Owner can CC them on invoice and payment-related emails:
- Go to User Icon Account Settings and select the Account Settings tab.
- Under the Billing Notifications section, enter a comma-separated list of email addresses in the Invoice Email Notifications field.
- Click Save Changes.
Additional Notification Emails
If other users would like to receive usage notifications for AIOps and PagerDuty Advance, the Account Owner can add up to five additional emails.
- Go to User Icon Account Settings and select the Account Settings tab.
- Under the Billing Notifications section, enter a comma-separated list of email addresses in the Additional Notifications field.
- Click Save Changes.
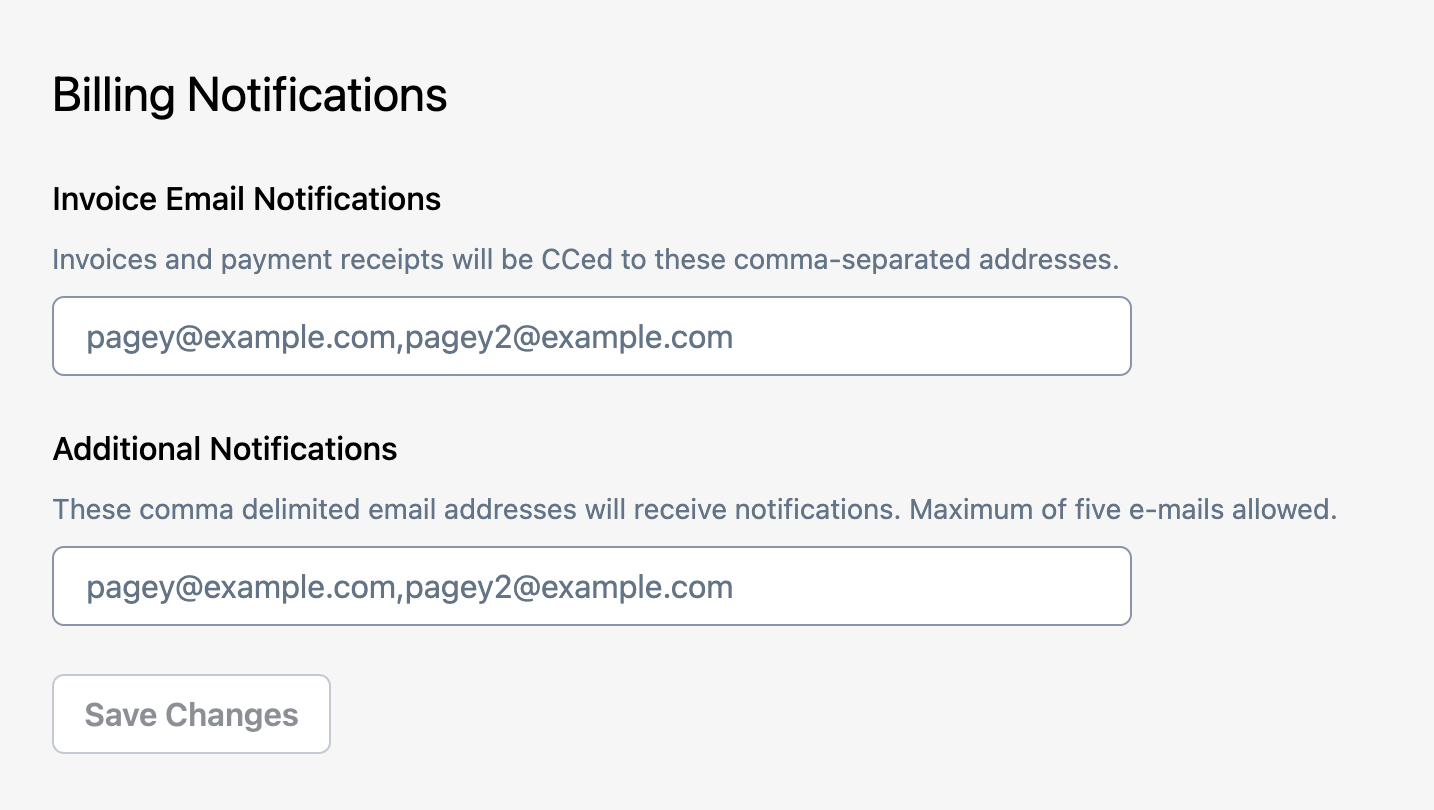
Billing Notifications
User Charges
For accounts with month-to-month pricing plans, your monthly user charge is determined based on the highest number of full users — all user roles other than Stakeholder or Limited Stakeholder — in your account at any time during the current month or in prior months. To reduce your billable license count for any subsequent months, you must reduce your license count. Account Owners can also set a Full User Limit which defines the maximum number of users allowed on the account.
Annual PlansIf you anticipate consistent usage, an annual plan may offer cost savings over monthly plans. Contact the Sales Team or see the pricing page for more information.
Reduce Your PagerDuty License Count
Account Owners can decrease the number of purchased licenses by submitting an email request to [email protected] with the desired number of user licenses.
Important
- Changes will reflect on the following month's invoice.
- To ensure accurate billing, the number of active users in your account must match the requested seat count. Removing or deleting user accounts will not automatically adjust your monthly charge.
The following resources offer more information about removing users:
- Delete Users
- User Offboarding
- PagerDuty University User Deprovisioning Course
Flexible Licensing
Flexible Licensing allows account administrators to quickly understand which licenses are assigned to each user and how many license types have been deployed. Flexible Licensing makes no changes to your existing license assignments, provides a graphical update to your Users page, and offers the following beneficial changes:
- Manage user licenses on the Users page.
- Removes role assignment from the individual user details page.
- Manage licenses on the Your Subscription page. The plan details and billing summary will show multiple base licenses where applicable.
Manage Licenses on the Users Page
Manage user licenses from the Users page by navigating to People Users. For more information, read Manage Users.
Manage licenses on the Users page
Manage Licenses on Your Subscription Page
Customers with multiple flexible license products, for example Incident Response and Customer Service Ops, can manage and view license data by navigating to User Profile Subscriptions.
Manage licenses on your Subscriptions page
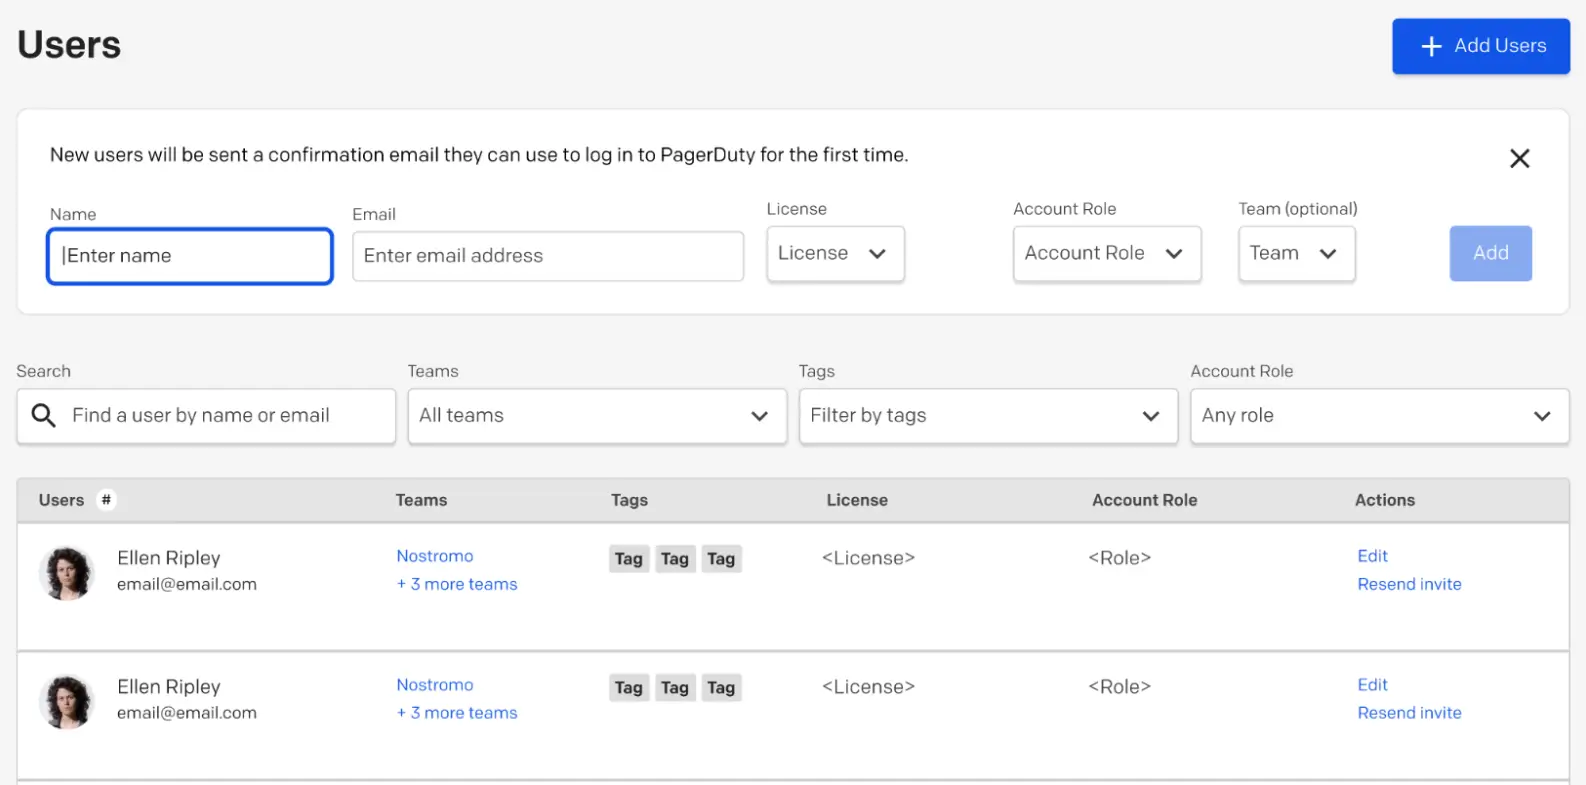
Purchase Licenses
Account Owners:
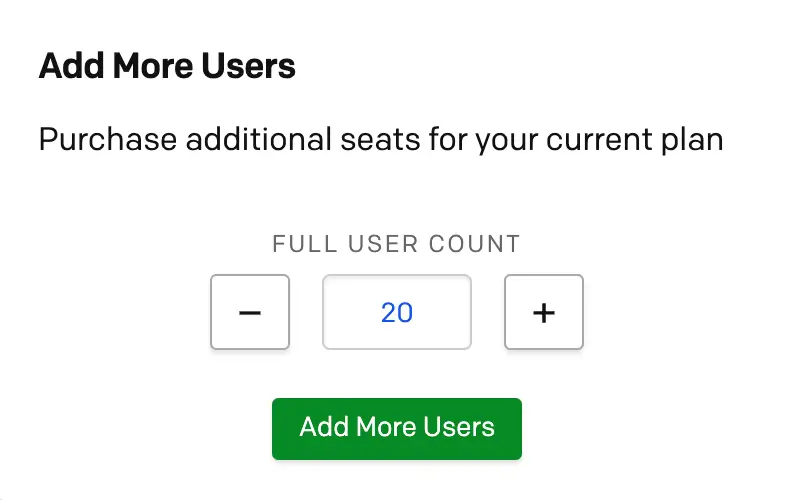
- Navigate to User Icon Subscriptions Add More Users.
- Click to increase the number of licenses and then click Add More Users.
Admins or Global Admins:
- Navigate to People Users.
- Click Add Users in the top right corner of the page.
- Enter the user's Name (first and last) and Email Address.
- Select the type of License you would like the user to have.
- Select the desired Role for the user.
- (Optional): If your account has access to the Teams feature, select a Team from the dropdown.
- Click Add. If you are adding more than one user, repeat steps 2–7.
This will co-term more users for your annual plan with a prorated amount based on when your annual subscription completes.
Other objects in your PagerDuty account, such as schedules, services, integrations, extensions, add-ons, and Teams, do not have an effect on billing. You can add users to any number of schedules, escalation policies, or Teams at no additional cost.
Stakeholder Users
Stakeholder users are billed at a different rate than other users and are typically purchased in tiered bundles. For pricing details, contact the Sales team.
You can also read more about Stakeholders' capabilities in Advanced Permissions.
Add Stakeholder Users
To purchase a Stakeholder bundle in the web app:
- Navigate to User Icon Subscriptions.
- In the Include Your Stakeholders section, make a selection from the Stakeholders dropdown and click Add Stakeholders.
- Select whether you require a purchase order and click Complete Purchase.
PagerDuty AIOps Consumption Based Pricing
PagerDuty AIOps is licensed per accepted event. Accepted events are any valid events that are sent to and processed by PagerDuty via email integration or API with a successful 2xx response. The number of events correlates with the number of 2xx responses received back from the Events API.
This means that all events accepted are counted, including:
- Events sent to Events API v1, Events API v2,
x-ere, and others - API events sent to a service key or a Global Orchestration
- Email events
- Trigger, resolve, and acknowledge event actions
- Deduplicated or suppressed events
- Events sent to a service in maintenance mode
- Events sent to a disabled service
- Redundant resolves where a service continues to send resolves on the same incident
- Events that are later dropped due to rules or customer event transformations
Events that are not counted include:
- Events rejected at the API due to rate limiting, throttling, or an error
- Events sent to deleted routing keys (integrations or orchestrations) — these do receive a
2xxresponse for security reasons - Change events
- REST API calls
- Incidents created through the REST API
Purchase Orders
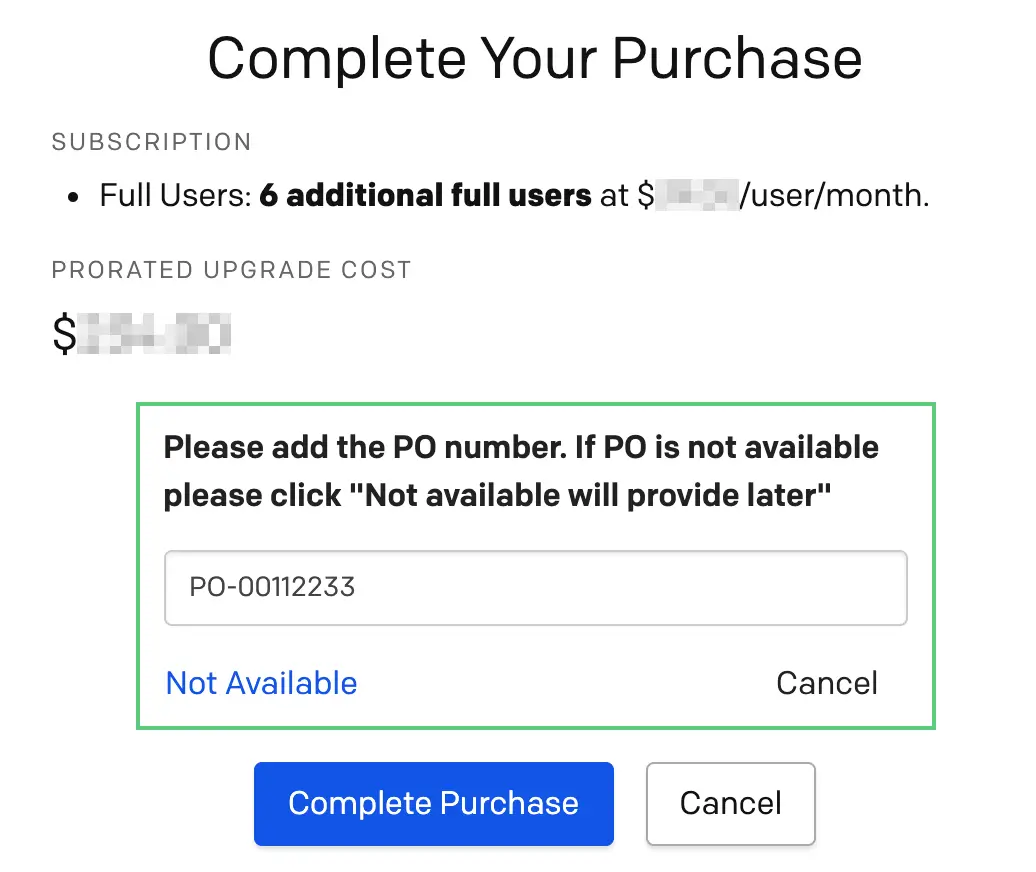
The Account Owner can add a purchase order number to invoices during the checkout process:
- Go to User Icon Subscriptions.
- In the Add More Users section, update the new number of full users.
Add more users
- Click Add More Users.
- Under Do you require a purchase order for this order?, select YES.
- Enter your purchase order number.
- (Optional): If you do not have a purchase order on hand, you may select Not Available to complete the purchase now and provide a purchase order number later.
- Click Complete Purchase.
Complete your purchase
Notifications
Customers on all modern pricing plans have access to unlimited worldwide push and email notifications, and incident notifications do not affect your billing amount. Customers on Professional, Business, Enterprise for Incident Management, and Digital Operations (Legacy) plans also have an unlimited number of international SMS and phone notifications, while Free accounts can use 100 SMS and phone notifications per month.
Update Credit Card Information
The Account Owner can update credit card information in the web app:
- Navigate to User Icon Subscriptions.
- In the Billing Summary section, select Update your Billing Address or Credit Card Information.
- Select the Credit Card Details tab and enter the new credit card information.
- Click Update.
If you have a past-due invoice, PagerDuty will automatically attempt to use the newly added card to pay its balance within 24 hours.
Security NotePagerDuty Support will never call you asking for credit card information over the phone.
Support is not authorized to update credit card details over the phone or via other channels. Follow the steps above to update your credit card information.
Credit Card Authorization Errors
If you receive a credit card authorization error, your new billing information will not save until you correct the problem. In most cases, authorization errors are due to issues verifying the address. PagerDuty verifies all billing information with your card issuer, so you may receive an authorization error even if the card has been accepted by other merchants who do not use address verification. Make sure you are using a current address and that the postal code is correct.
If you recently updated your address with your card issuer and the card information you enter is not accepted by PagerDuty, try again at a later time. Some card issuers take up to 72 hours to update your address, meaning address verification attempts will fail until your card issuer completes the address update.
Authorization attempts may also fail if you:
- Enter an unsupported card. PagerDuty accepts Visa, MasterCard, American Express, Discover, and JCB.
- Enter an invalid security code.
- This is the 3-digit code on the back of the card for Visa, MasterCard, Discover, or JCB; or the 4-digit code above the 15-digit card number on the front of the card for American Express.
- Enter an expired card.
- Enter a card that has not yet been activated with the issuer.
Annual Billing via Invoice
Payment via invoice (as opposed to credit card) is available for yearly prepayment plans.
Contact the Sales team for a quote if you are interested in paying yearly instead of monthly.
Updated 28 days ago