
Advanced ServiceNow Configuration
How to leverage the full power and versatility of the ServiceNow integration
ServiceNow v8 is a robust, highly-customizable enterprise integration that you can configure to meet your business’s needs. Below are some guidelines to configure advanced features, or create customizations.
Please note:
- Advanced Configurations: This section covers concepts and instructions to configure advanced, PagerDuty-supported features that are available out of the box.
- Advanced Customizations: This section covers concepts and instructions for unsupported customizations that may alter the integration’s out-of-the-box behavior.
Looking for a Different Version?Advanced ServiceNow Configuration for the v7 integration is also available.
Advanced Configurations
Support Notes
- The Advanced Configurations section covers PagerDuty-supported features that are available out of the box.
- For assistance with advanced ServiceNow configurations, please contact your account manager/sales representative, or reach out to PagerDuty Services.
Configure Escalation Policy Priority Mapping
The ServiceNow v8 integration allows Assignment Groups to assign more than one escalation policy to incidents based on incident priority in ServiceNow. For example, if you would like one escalation policy assigned to incidents with a priority of Moderate or below and another for priorities above Moderate, you can map escalation policies to this scheme.
To configure escalation policy priority mapping via the PagerDuty menu
- Navigate to PagerDuty in the application navigator and select Map Priority to Escalation Policy.
- Click New and select the Assignment Group, Escalation Policy and Priority you wish to map and check the Active checkbox.
- Click Submit to save. If you would like to deactivate this mapping, return to the Map Priority to Escalation Policy screen, click the status in the Active column, uncheck the Active checkbox and click Update. You may repeat this process to map multiple escalation policies to different priorities.
To configure escalation policy priority mapping on an individual Assignment Group
- Search and click into your preferred Assignment Group. Select the PagerDuty Escalation Policies tab and click New.
- In the Escalation Policy field, search and select your preferred escalation policy. In the Priority field, search and select which priority should be mapped to that escalation policy. Check the Active checkbox to activate this setting and click Submit. You may repeat this process to map multiple escalation policies to different priorities.
Once configured, when an incident is assigned to that assignment group and the mapped priority, the mapped escalation policy will be assigned to that incident.
Incident Types and Custom Field Mappings
Please see our Sync Incident Types with ServiceNow and ServiceNow Custom Field Mappings articles for more information.
Service Reassignment Sync
Please see our Sync Service Reassignment with ServiceNow article for more information.
v3 Webhooks
Supported Event Types
Supported Event Types
- incident.triggered
-
incident.acknowledged -
incident.unacknowledged -
incident.annotated -
incident.delegated -
incident.escalated -
incident.reassigned -
incident.resolved
The introduction of v3 webhooks adds support for the following event types:
-
incident.priority_updated -
incident.responder.added -
incident.responder.replied -
incident.conference_bridge.updated -
incident.workflow.completed -
incident.workflow.started
Event Types in v8
Event Types in v8
Responder Events
incident.responder.addedincident.responder.replied
The above PagerDuty responder updates sync to the ServiceNow Incident Work Notes and in the PagerDuty Response table in ServiceNow.
Priority Events
incident.priority_updated
Responders no longer need to publish PagerDuty notes to force-sync priority changes to ServiceNow. When you update the PagerDuty incident’s priority, the ServiceNow incident record is also updated to reflect the corresponding priority (as defined in the priority mappings).
Conference Bridge Events
incident.conference_bridge.updated
New PagerDuty incidents triggered with conference bridges will have that reflected in the Conference Bridge field of the ServiceNow incident. Changing the conference bridge on an existing PagerDuty incident will update the field in ServiceNow.
Asynchronous Webhook Processing
Prior to the ServiceNow v8 release, webhooks were processed synchronously in ServiceNow with some known implications. One of these implications was the temporary disablement of webhooks when the processing time exceeded the 15 seconds timeout of v2 webhooks. Generic Webhooks (v3) expect a successful 2xx response within five seconds.
To mitigate timeout issues, ServiceNow v8 changes the default webhook processing mode from synchronous to asynchronous for both v2 and v3 webhooks. In asynchronous mode, the ServiceNow webhook processor will immediately send a 200 response to PagerDuty and queue the message for background processing.
Multiple Scheduled Script Execution jobs will be provisioned to de-queue and process the webhook events asynchronously. The logs for these jobs can be found in System Logs Events (x_pd_integration.process_webhook), which shows a record of the jobs and their state.
The process for checking webhook failures remains the same: look for error messages in the webhook import logs, and then verify if a new record was created in the Webhook Import Rows table.
Clone Data Preserver
During the cloning process, the system clone job will read from the clone_data_preserver table to determine which tables and table objects should be preserved within the target instance.
- Records that have a matching Sys ID in the target table will remain unchanged (i.e., preserved) and will not be overwritten when cloning from the source table.
- If the clone data preserver record includes filter conditions, preservation will only apply to records in the target table that match the conditions.
- If no record in the target table matches the Sys ID, then the record clones from the source table to the target table (i.e., adding new records to the target).
The ServiceNow integration package includes a Clone Data Preserver fix script. This uses ServiceNow’s native fix script functionality to automatically create records in the Clone Data Preserver table after you install or upgrade the PagerDuty application.
The fix script creates Clone Data Preserver records to ensure that objects with PagerDuty mappings in the target table are preserved, and it prevents these mappings from being overwritten when cloning from the source table.
If you are using an older version of the integration that does not include the Clone Data Preserver fix script, follow the steps below to configure the Clone Data Preserver feature in ServiceNow.
Manually Configure Clone Data Preserver
> 🚧 Required User Permissions
In order to use the Clone Data Preserver feature, your ServiceNow role must include
clone_adminoradmin.
In some cases, you may want to clone your ServiceNow production data to a developer instance. The Clone Data Preserver is a ServiceNow feature that defines what data should not be replaced when cloning one environment into another.
To clone the PagerDuty integration in a way that it remains functional, you can use the Clone Data Preserver to preserve specified PagerDuty fields. Following the process below, you will make Clone Data Preservers for the four following tables:
System Property Table
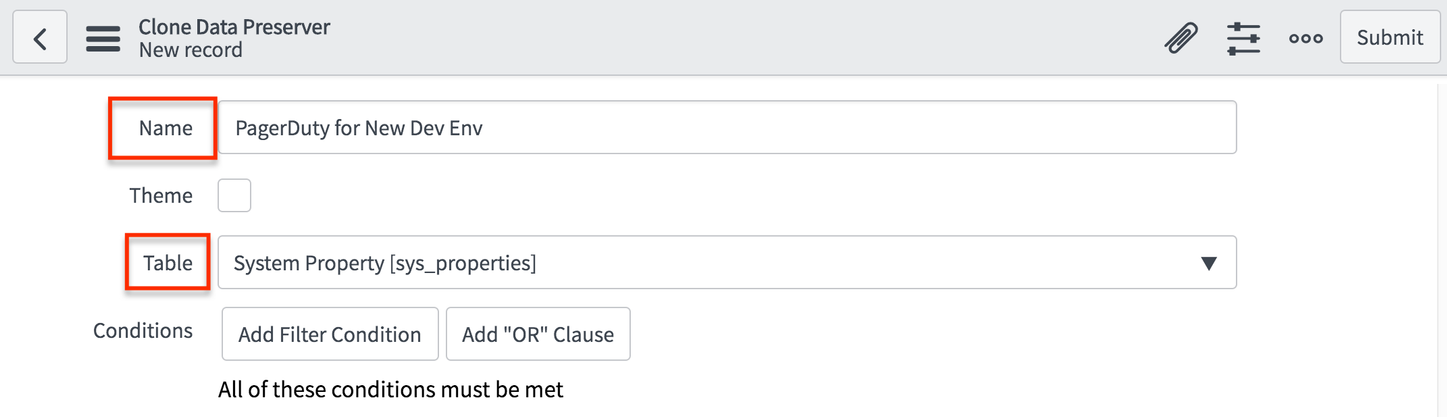
To begin, we'll address PagerDuty fields in the System Property table (sys_properties):
- Navigate to System Clone Preserve Data, and select New.
- Create a new record for the Clone Data Preserver and select the table System Property [sys_properties].
- Create
ORconditions for the following Names.
- Name Is
x_pd_integration.default_userOR - Name Is
x_pd_integration.instance_urlOR - Name Is
x_pd_integration.sn2pd_mappingOR - Name Is
x_pd_integration.default_serviceOR - Name Is
x_pd_integration.api_key`OR - Name Is
x_pd_integration.webhook_restapiOR - Name Is
x_pd_integration.sn_auth_userOR - Name Is
x_pd_integration.sn_auth_userpwd - Name Is
x_pd_integration.connection_id
- Click Submit.
User Table
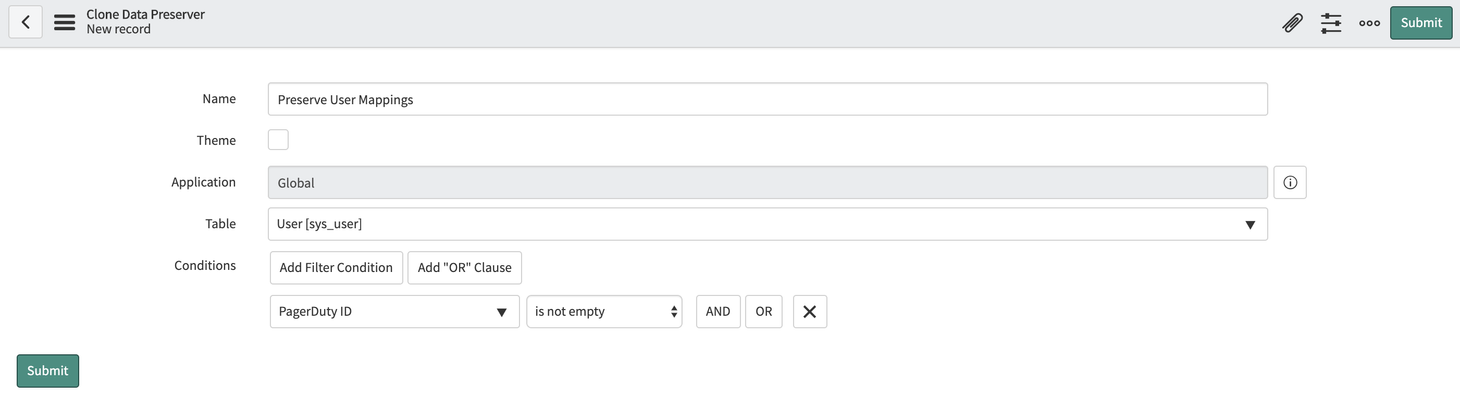
Next, create a Clone Data Preserver for the sys_user table:
- Navigate to System Clone Preserve Data, and select New.
- Create a new record for the Clone Data Preserver and select the table User [sys_user].
- Create a filter with the following condition:
- PagerDuty ID is not
empty.
- PagerDuty ID is not
- Click Submit.
Group Table
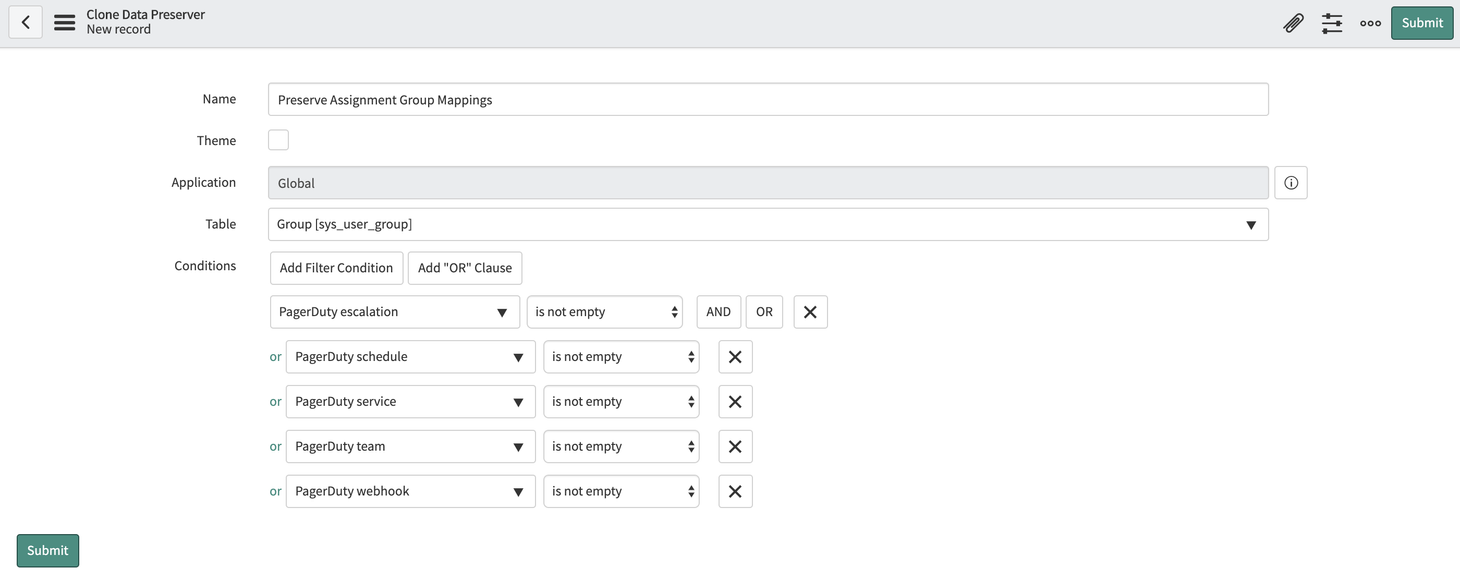
Thirdly, create a Clone Data Preserver for the sys_user_group table:
- Navigate to System Clone Preserve Data, and select New.
- Create a new record for the Clone Data Preserver and select the Group [sys_user_group] table.
- Create filters with the following conditions:
- PagerDuty escalation
is not emptyOR - PagerDuty schedule
is not emptyOR - PagerDuty service
is not emptyOR - PagerDuty team
is not emptyOR - PagerDuty webhook
is not empty
- PagerDuty escalation
- Click Submit.
Configuration Item Table
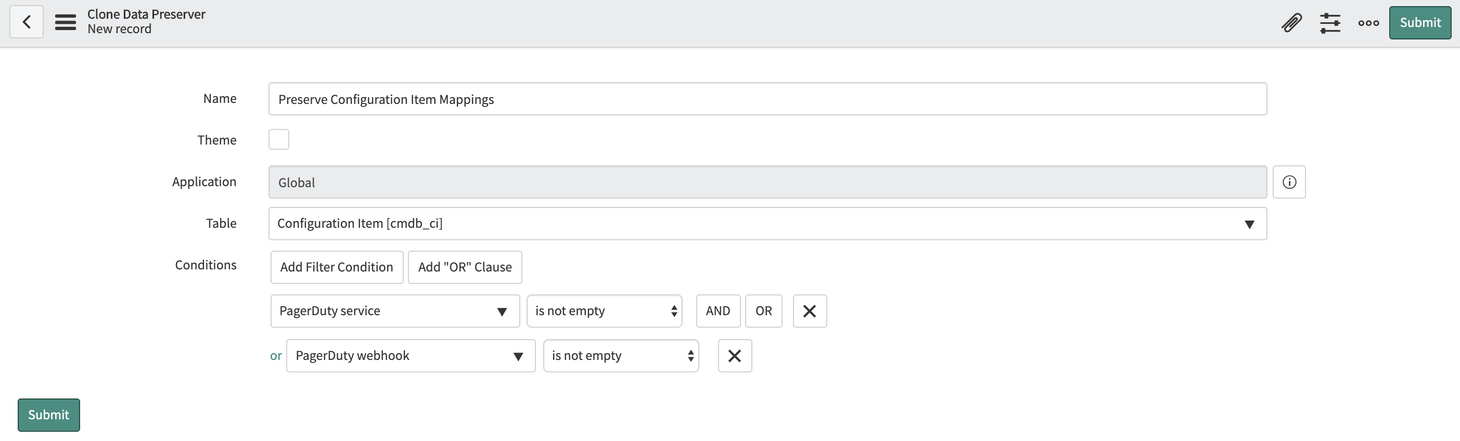
Lastly, create a Clone Data Preserver for the cmdb_ci table.
- Navigate to System Clone Preserve Data, and select New.
- Create a new record for the Clone Data Preserver and select the Configuration Item [cmdb_ci] table.
- Create filters with the following conditions:
- PagerDuty service
is not emptyOR - PagerDuty webhook
is not empty
- Click Submit.
Clone Data Preserver Fix Script Change Log
Clone Data Preserver Fix Script Change Log
v8.3
With the release of ServiceNow OAuth Authentication, the following tables and fields have been added to the Clone Data Preserver Fix Script:
- x_pd_integration.auth_method
- x_pd_integration.oauth_app
- x_pd_integration.oauth_client_id
- x_pd_integration.oauth_app_user
Use a MID Server
ServiceNow allows you to configure a Management, Instrumentation, and Discovery (MID) Server that runs Windows services or UNIX daemons on a server in your local network.
- To enable, navigate to PagerDuty Settings in the application navigator and scroll to the Activity Stream Customization section.
- Check the Use MID Server checkbox.
- The Set MID Server field will have the default MID server auto-populated. Enter your parameters in the ECC parameters field.
- Click Save.
Advanced Customizations
Support NoteThe Advanced Customizations section illustrates ways you may choose to customize workflows in the ServiceNow integration. Please note, however, that any customizations which alter the integration’s out-of-the-box behavior are not supported by the PagerDuty Support team.
Best Practices for Automation
Please ensure the following:
- Do not auto-populate or modify any fields that have dependencies, i.e., fields that use data from the field elsewhere within the integration.
- Do not auto-populate or modify any fields that the integration uses to map objects between ServiceNow and PagerDuty.
For example, if you map Configuration Items to PagerDuty services in the integration, do not set the CI field in the inbound field rules. If you have enabled priority synchronization, do not define any rules that set the Urgency, Impact or Priority fields in ServiceNow incidents.
Keeping automation simple and non-overlapping will help you avoid unpredictable or unstable behavior.
AvailabilityPremium features such as PagerDuty Custom Field synchronization and “Create a ServiceNow Incident” as an Incident Workflow Action are only available on the Enterprise Incident Management plan. Please contact our Sales Team for more information.
Business Rules: ServiceNow to PagerDuty
A business rule is a server-side script that runs when a record is displayed, inserted, deleted, or when a table is queried. Business rules are used to automatically change values in form fields when the specified conditions are met.
PagerDuty Integration Business Rules can be found in ServiceNow under PagerDuty Configuration Configuration Files select the Business Rules tab.
All aspects of the integration that concern any flow of data from ServiceNow to PagerDuty are handled by business rules. If the conditions of a business rule are met, the rule and its associated script runs, which invokes a transaction with the PagerDuty API to perform the necessary actions in PagerDuty.
Most processes that send updates from ServiceNow to PagerDuty will follow this flow: Business Rule Event Queue Script Action Script Includes.
Notable Fields
-
Table: The table to be updated.
-
Active: Whether the rule is active or inactive.
-
When to run (tab): Shows the conditions that must be met for the Business Rule to run.
- Order: Stacks priority of rule execution.
- When: After, before, async (in relation to the action that is taking place on the table, e.g., after an insert happens on table x, do y).
- Insert/Update/Delete/Query: The action that takes place on the table, e.g., a record is created, updated, deleted, queries.
-
Actions (tab): Specifies fields in ServiceNow to update when the business rule executes.
-
Advanced (tab): Will often contain a script that initiates additional logic. This is typically where an event for the business rule is created and added to the event queue. This code can reference other scripts and script actions within ServiceNow.
Inbound Field Rules
You can define rules to automatically set fields in a ServiceNow incident based on the field values in PagerDuty webhooks. The integration can automatically set required fields when incidents are created or modified. Additionally, you can run custom JavaScript code when incident lifecycle data is imported into ServiceNow.

Automatically set fields in a ServiceNow incident
With the introduction of v3 webhooks, some changes have been made to the payload data compared to v2 webhooks. As a result, the existing Inbound Field Rules that are configured to process v2-webhook-specific data will not function properly with v3 webhooks. You will have to manually update their existing v2-based Inbound Field Rules to point to the appropriate v3 webhook payload fields post-upgrade.
Configure Inbound Field Rules
- In ServiceNow, go to PagerDuty Configuration Inbound Field Rules New to open the form to create a new field rule.
- If you wish to make the rule active immediately, check Active.
- Select the PagerDuty Webhook Type to specify which event the rule should be applied to.
- For a list of webhook types, see Webhooks Overview: Event Types.
- The Trigger event type applies to manually-triggered incidents created through the new Create a ServiceNow Incident Workflow action.
- Select the ServiceNow incident field to be populated, and define how the field should be set:
- Set Default Value: Use a fixed value to populate the field.
- Set From PagerDuty Webhook Payload: Using dot notation, specify the namespace path to the property of the PagerDuty webhook to be used.
- A free form text field will appear, in which you can specify the default value for the field.
Set Values Based on the Webhook Payload
- Confirm the properties that are available from the webhook payload.
- When setting values based on the webhook payload, a field named PagerDuty webhook payload field will appear, in which you can enter the property of the webhook to reference.
- To see available properties, you can look in Webhook Import Rows; sample JSON-encoded objects should be saved in the Payload column.
- Navigate to the inbound field rule to test setting this field.
- If you are setting a field from PagerDuty webhooks, you can test the inbound rule by selecting Test Set From PagerDuty Webhook Payload. This will allow you to specify the Webhook Payload Field name, provide a sample payload (copied from one of your Webhook Import Rows table), then verify the returned value.
Run a Lookup Script
- Enable this option to run custom JavaScript that performs additional actions and defines the final value applied to a ServiceNow incident field. This can be used instead of defining field rules to obtain the additional data.
- A text box will appear when you check Run lookup script. Within the script’s body there is a variable named
value, whose value will be retrieved from the webhook payload specified in the PagerDuty webhook payload field. - By the end of the script, define a value for the variable
result, whose value will be used to populate the field. It is not necessary to commit or save the record at the end of the script.
Update Inbound Field Rules to Reference the v3 Webhook Payload
Check Inbound Field Rules
- Check your Inbound Field Rules to confirm which rules set ServiceNow incident fields based on PagerDuty webhook payloads.
- The
log_entriesparameter in v2 webhooks has been modified tofirst_trigger_log_entryfor v3 webhooks. To make an additional API call to retrieve thefirst_trigger_log_entryinformation, a new flagfetch_first_trigger_log_entry(System Property) has been introduced in ServiceNow v8. If you have any Inbound Field Rules referencing thelog_entriesparameter in v2 webhooks, this additional API call will be required in order to retrieve information from the newfirst_trigger_log_entryfield. Please follow these steps to enable the flag:- Navigate to your ServiceNow instance and log in.
- Open the System Properties module, which you can find in the menu type
sys_properties.list. - Search for the new property
fetch_first_trigger_log_entrythat controls the additional API call forfirst_trigger_log_entrydata. - Set the property value to true if you want the system to include
first_trigger_log_entryinformation in the payload of v3 webhooks. Set it to false if you do not want the additional call to be made. - After the flag is enabled, you can update the inbound field rule to reference the
first_trigger_log_entry field:data.first_trigger_log_entry.
Update the Inbound Field Rule
- Repeat the following steps for each Inbound Field Rule identified in Step 1 of Check Inbound Field Rules above.
- Find an example v3 webhook payload:
- Navigate to Pagerduty Import Rows Webhook Import Rows.
- Find an example v3 webhook, matching the PagerDuty webhook type of your inbound find rule.
- Copy the example v3 webhook payload.
- Find an example v3 webhook payload:
- Navigate back to the inbound field rule and check the PagerDuty webhook payload field.
- Reference the example v3 webhook payload to confirm if the field needs to be updated to align with the v3 payload structure.
- Update the PagerDuty webhook payload field as necessary.
- Test the inbound rule by selecting Test Set From PagerDuty Webhook Payload. This will allow you to specify the Webhook Payload Field name, provide a sample payload (e.g., the example webhook payload copied from the Webhook Import Rows), then verify the returned value.
Create a ServiceNow Incident as a Workflow Action
Please read our Incident Workflows article for more information about creating a ServiceNow Incident Workflow action.
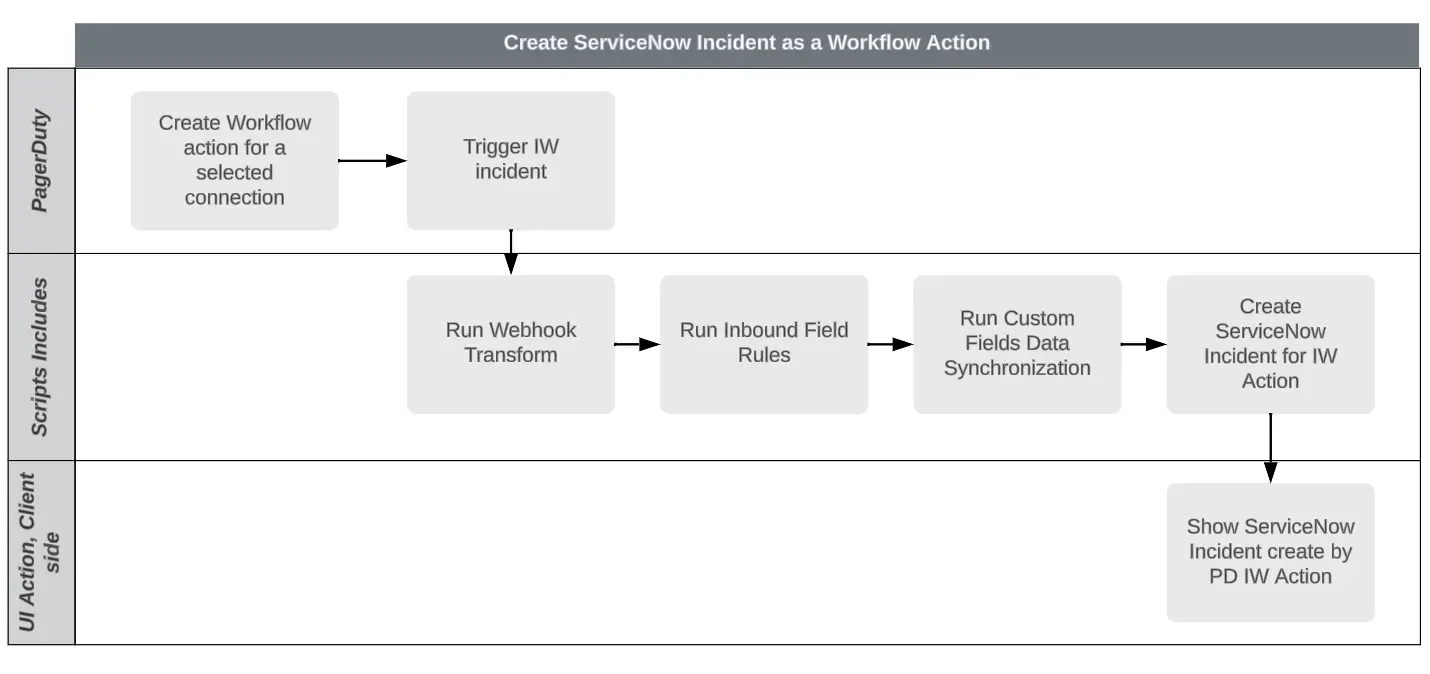
Create a ServiceNow Incident as a Workflow Action
Updated 2 months ago