
ServiceNow OAuth Authentication
Configure ServiceNow OAuth to securely authenticate PagerDuty webhooks and Incident Workflows
ServiceNow OAuth Authentication allows you to use OAuth (Client Credentials) for authenticating PagerDuty webhooks and Incident Workflows in the ServiceNow ITSM integration. With OAuth enabled, PagerDuty and ServiceNow can securely communicate without relying on static credentials. This ensures compliance with industry standards and a streamlined integration experience, particularly for organizations with more stringent security and regulatory requirements.
Availability
- ServiceNow OAuth Authentication is available on Business or Enterprise pricing plans.
- This feature is available for ServiceNow Integration version 8.3.0. See the upgrade instructions if you are not currently on this version.
Authentication Flow
Your ServiceNow Admin registers an OAuth application in ServiceNow, which PagerDuty then uses to authenticate Incident Workflows and webhook communications using secure, time-bound tokens.
Workflow Actions Authentication
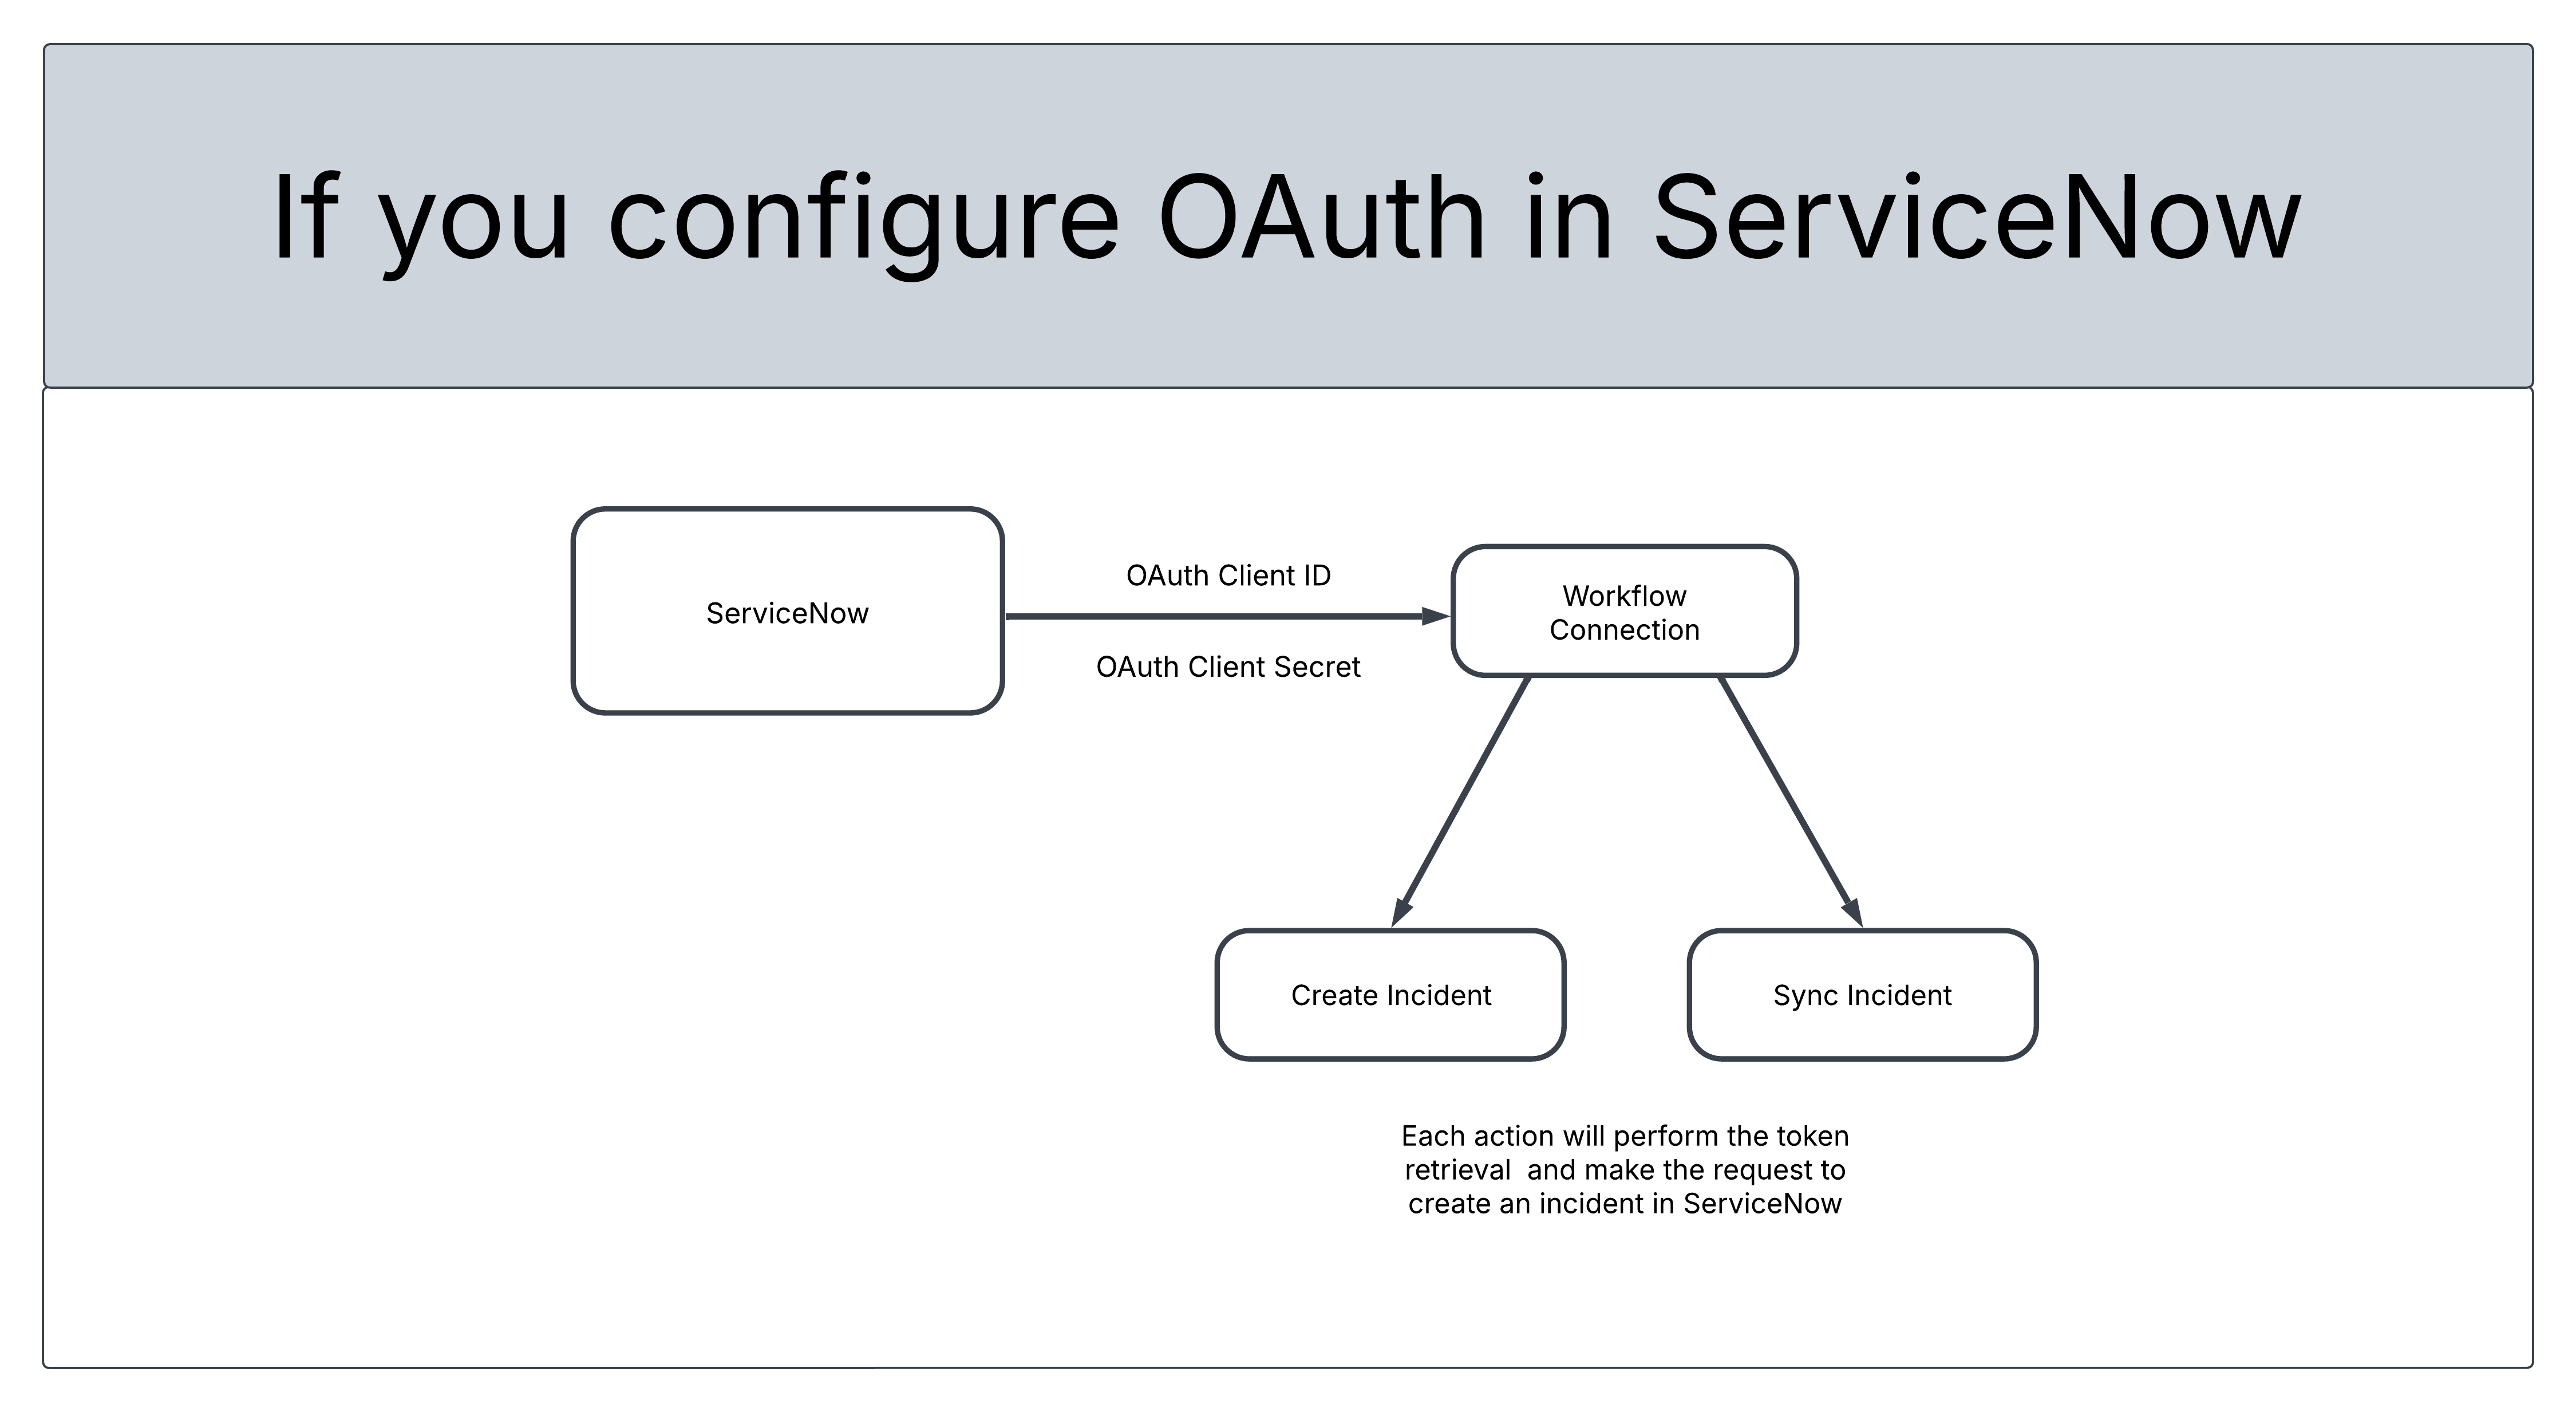
Diagram of how ServiceNow OAuth setup enables secure workflow connections to create and sync incidents using client credentials
Webhook Authentication
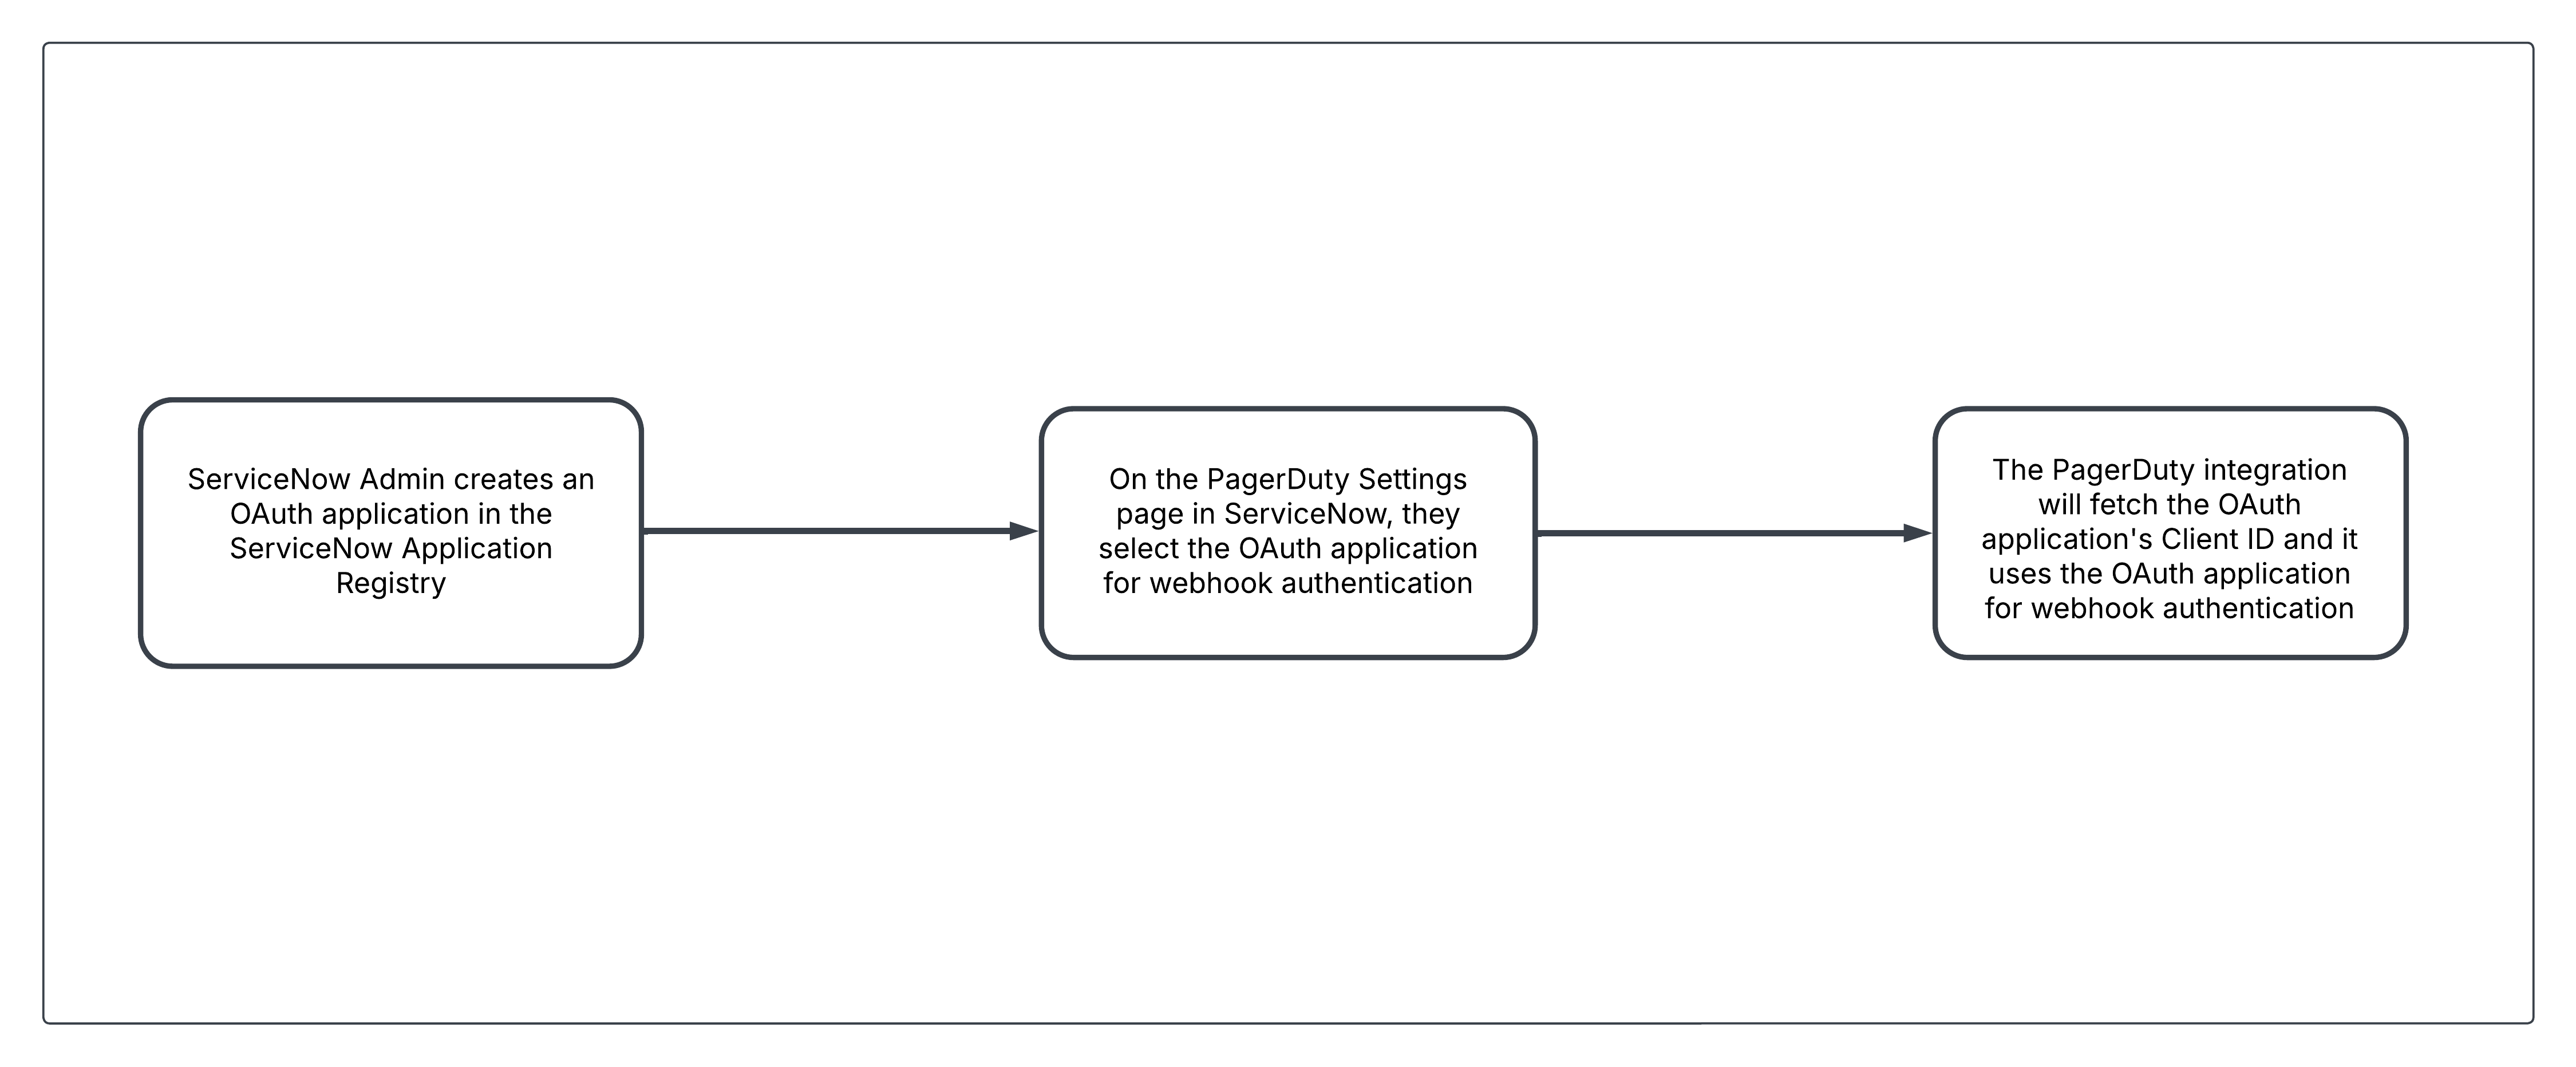
Diagram of ServiceNow OAuth app setup for PagerDuty webhook authentication using the app's Client ID
Configure the OAuth Application
Set up an OAuth application (Client Credentials) for authenticating communications between PagerDuty and ServiceNow.
Requirements
- In ServiceNow: A ServiceNow Administrator role is required for configuration.
- In PagerDuty: A Global Admin or Account Owner base role is required for configuration.
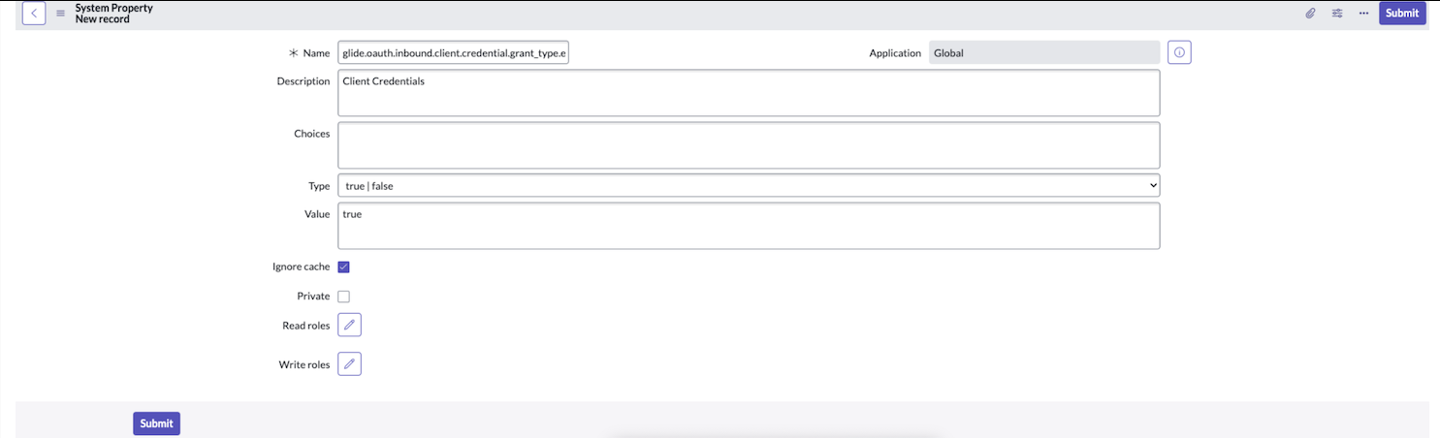
Step 1: Enable the System Property
Application Scope RequirementTo enable the system property, set your application scope to Global.
- Navigate to the System Properties table (
sys_properties_list.do), and click New in the top right. - In the system property form, create the property below with the values listed:
- Name:
glide.oauth.inbound.client.credential.grant_type.enabled - Application Scope: Global
- Value: true
- Type: true | false
- Name:
NoteThe Value flag is the primary mechanism for enabling and disabling this functionality.
- Once complete, you can change to the PagerDuty Incident Resolution Platform application scope.

Step 2: Add an OAuth Entity to Your Application Registry
Create a client and make an update to the OAuth Entity default view.
- Confirm that you are in the PagerDuty Incident Resolution Platform application scope.
- Navigate to System OAuth Application Registry.
- Create a new record by clicking New in the top right, then select Create an OAuth API endpoint for external clients from the interceptor list.
- Configure the following fields in the application registries form:
- Application scope: PagerDuty Incident Resolution Platform
- Accessible from: All application scopes
- Optional: You can modify the refresh token lifespan and access token lifespan if the default values differ from your company's token policies.
- Change to the Global application scope.
- In the newly-created record, click the context menu and select Configure Form Layout.
- Add the OAuth Application User field to the Selected column, then click Save.
- In the OAuth Application User field, select the ServiceNow user account that you configured for webhook authentication, then Save the record.
- If left blank, the Client Secret automatically generates after you save the record.
Step 3: Enable OAuth Authentication
PrerequisiteBefore enabling OAuth Authentication, migrate your v2 webhooks (if any) to v3.
Enable OAuth Authentication in PagerDuty Settings
- To enable OAuth Authentication for the PagerDuty Application, navigate to the PagerDuty Settings page in your ServiceNow instance.
- Scroll down to the Webhook Configuration section.
- Select OAuth Client Credentials.
- Choose the new OAuth application you created in the previous section.
- Click Save.
- Run the webhooks health check.
Webhooks Health CheckRunning the webhooks health check allows you to resolve inconsistencies in the authentication method, which migrates existing basic auth webhooks to OAuth. This step is necessary to complete the migration.
Run the Integration Health Check to Validate OAuth Credentials
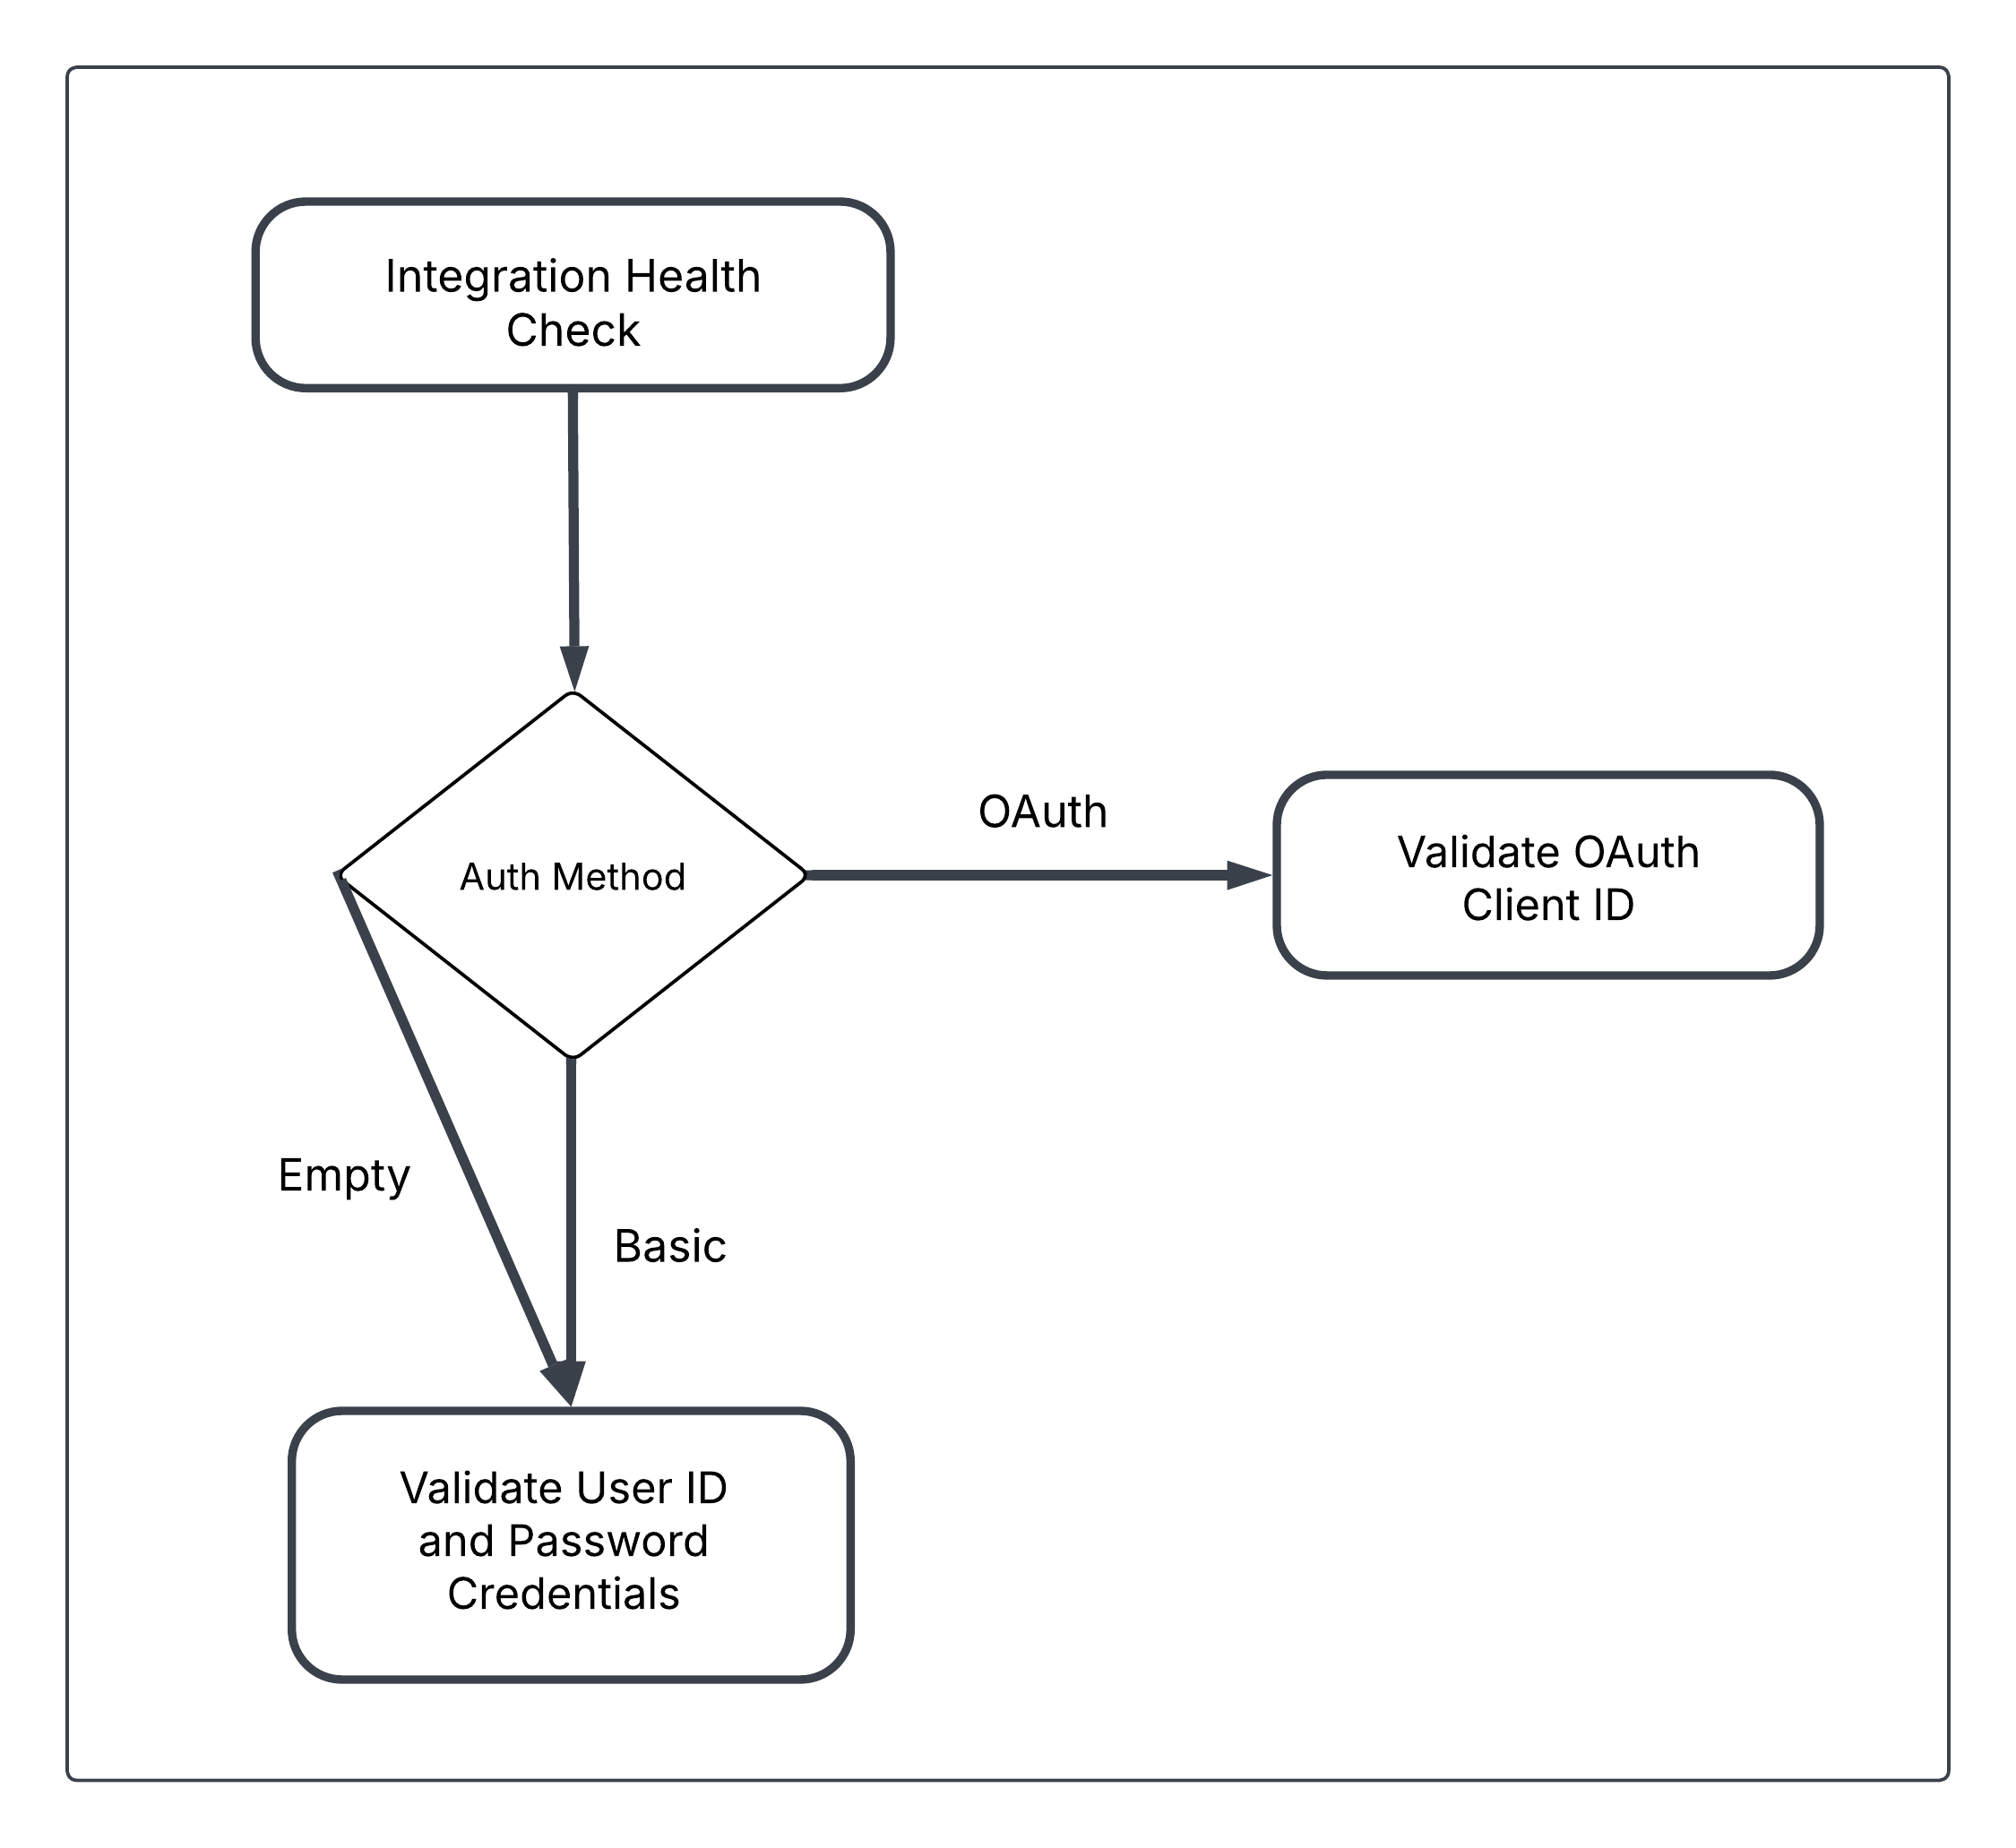
Diagram of how Integration Health Check validates either the OAuth Client ID or user credentials based on the selected authentication method
- Run the Integration Health Check.
- If you configured OAuth as the authentication method, the Integration Health Check automatically switches to validating the OAuth credentials (OAuth Client ID).
Troubleshoot Errors with ServiceNow Key Management Admin
When using OAuth credentials, an error may occur due to Module Access Policies configured via the Key Management Admin. These policies reject the use of the application scripts' decryptor.
- The first Module Access Policy generates when you save the OAuth Client Credentials on the PagerDuty Settings page, and saving this page fails with a
400 Bad Requesterror. - The second generates when the Integration Health Check fails after you create the OAuth client, and you see a Rejected Module Access Policy record.
Resolve Module Access Policy Errors
Step 1: Gain Access to the Module Access Policies Table
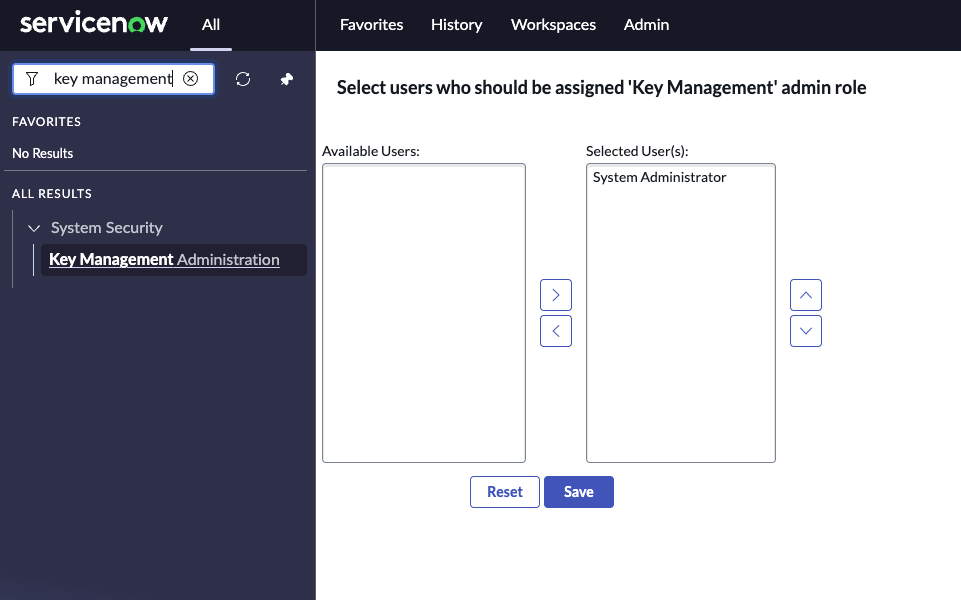
- Navigate to the Key Management Administration screen.
- Move your admin user to the Selected User(s) section and click Save. This allows you to access the Module Access Policies table.
Step 2: Change the Module Access Policy Result

- In the Module Access Policies table, you can use the following filters to locate the rejected module access policies:
- Name contains
AutoGen - Script Table is
Script Include
- Name contains
- Open each policy record, and change the Result field from Reject to Track.
Updated about 1 month ago