
SCIM User Provisioning
Use System for Cross-domain Identity Management (SCIM) provisioning to sync and manage PagerDuty users with Okta, OneLogin or Entra ID
SCIM User Provisioning
Automatically manage users in your PagerDuty account via SCIM and keep them synchronized with supported IdPs:
AvailabilitySCIM user provisioning is available on all plans and in all service regions.
Supported Roles
Supported roles for SCIM provisioning are as follows:
| Role Name | Value | Role Type |
|---|---|---|
| Global Admin | admin | Fixed |
| Full Stakeholder | read_only_user | Fixed |
| Limited Stakeholder | read_only_limited_user | Fixed |
| Manager / User | user | Flexible |
| Responder | limited_user | Flexible |
| Observer | observer | Flexible |
| Restricted Access | restricted_access | Flexible |
| Account Owner * | owner | Fixed |
NoteYou cannot create this role through the REST API or SAML provisioning.
Configure SCIM User Provisioning
Enable Incident Reassignment
If a user has an assigned incident, you cannot delete them unless you have enabled incident reassignment on your account. See Enable Incident Reassignment for instructions to enable this feature if you have not already done so.
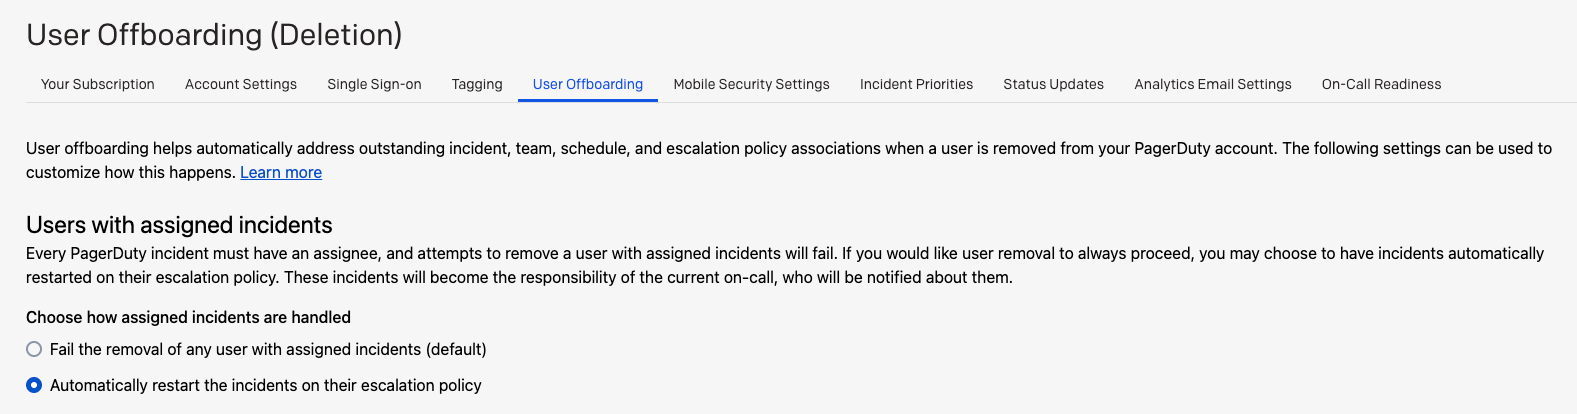
User offboarding settings
NoteIncident reassignment is part of User Offboarding and is available on the following pricing plans: Business, Digital Operations (Legacy), and Enterprise for Incident Management. If your plan does not include incident reassignment, SCIM cannot delete a user who is assigned to any active incidents. To proceed, take one of the following actions:
- Manually reassign the user's active incidents to another user before deprovisioning them.
- Upgrade to a plan that includes incident reassignment to automate this step.
Create a PagerDuty API Key
Create a PagerDuty API key if you do not already have one. For details, see Create a PagerDuty API Key.
Configure the SCIM Integration in Your IdP
Select an IdP for provisioning instructions:
Assign or Deactivate Users
Deactivation WarningPagerDuty does not support deactivating and reactivating the same user. If you deactivate a user in the IdP, this action deletes them in PagerDuty. If you reactivate the user, the SCIM client implementation of the IdP determines how to reconcile the user. Okta, for example, creates a new user, while OneLogin returns a provisioning error message when the user fails to update.
Supported User Attributes
The PagerDuty SCIM API currently exposes the following user attributes:
| Attribute | Type | Read / Write | Description |
|---|---|---|---|
id | String | Read | Unique identifier for the user. |
userName | String | Read + Write | Email and username of the user. (Required) |
displayName | String | Read + Write | Name displayed in PagerDuty. (Required) |
externalId | String | Read + Write | Usually the ID of the IdP for the user. |
roles | Array | Read + Write | Single element array containing the role of the user. The accepted role is an object: {"type": "base", "value": "user"} where the value matches the list of roles supported by the public API. |
active | Boolean | Read + Write | When set to false, the user is deleted. |
title | String | Read + Write | Job title of the user. |
entitlements | Array | Read + Write | Single element array containing the license of the user. The accepted entitlement is an object: {"type": "license", "value": "LICENSE_ID"} where LICENSE_ID is a license ID sourced from the public API licenses endpoint. |
timezone | String | Read + Write | IANA formatted time zone for the user. |
Updated about 1 month ago