
Microsoft Entra ID
Sync and manage PagerDuty users with Entra ID using SCIM user provisioning
Configure the SCIM Integration
- In Microsoft Entra, follow the instructions in Microsoft's documentation to configure a new Microsoft Entra SCIM integration. Create your SCIM app with any name, according to your preferences. Ensure that you select Integrate any other application you don't find in the gallery.
Disregard Suggested AppsYou may see suggested apps pop up when typing in the name of your application (for example, the PagerDuty app). Disregard these suggested apps.
- Create a new provisioning configuration by entering the following:
- Provisioning Mode:
Automatic - Tenant URL:
https://api.pagerduty.com/scim/v2 - API Token:
token=<PagerDuty API KEY>
- Provisioning Mode:
- Test the connection to ensure that it works, then click Save.
- Ensure that you have only enabled user provisioning and mapping. PagerDuty does not currently support provisioning groups, so you should disable group attribute mapping.
Configure Provisioning for Entra ID Users
- Do the following to update the user attribute mapping:
- Enabled: Select Yes.
- Target Object Actions: Check the Create, Update, and Delete checkboxes.
- Attribute Mappings: Define your attribute mappings:
- Important: The
userNamemapping should match the email your users use in PagerDuty to ensure that Microsoft Entra and PagerDuty users are linked correctly. - Ensure the
activeattribute mapping has the expressionSwitch([IsSoftDeleted], "true", "False", "true", "True", "false"). Copy this exactly, as it is case-sensitive. - If you are setting any of the following optional fields via SCIM, edit the attribute list to include the desired attributes:
- PagerDuty role creates an attribute mapping:
roles[primary eq "True"].value - PagerDuty license creates an attribute mapping:
urn:ietf:params:scim:schemas:core:2.0:User:entitlements[type eq "license"].value - Time zone creates an attribute mapping:
timezone
- PagerDuty role creates an attribute mapping:
- Important: The
NoteRemove unused fields in your Attribute Mapping list. Provisioning may fail if you have unnecessary fields.
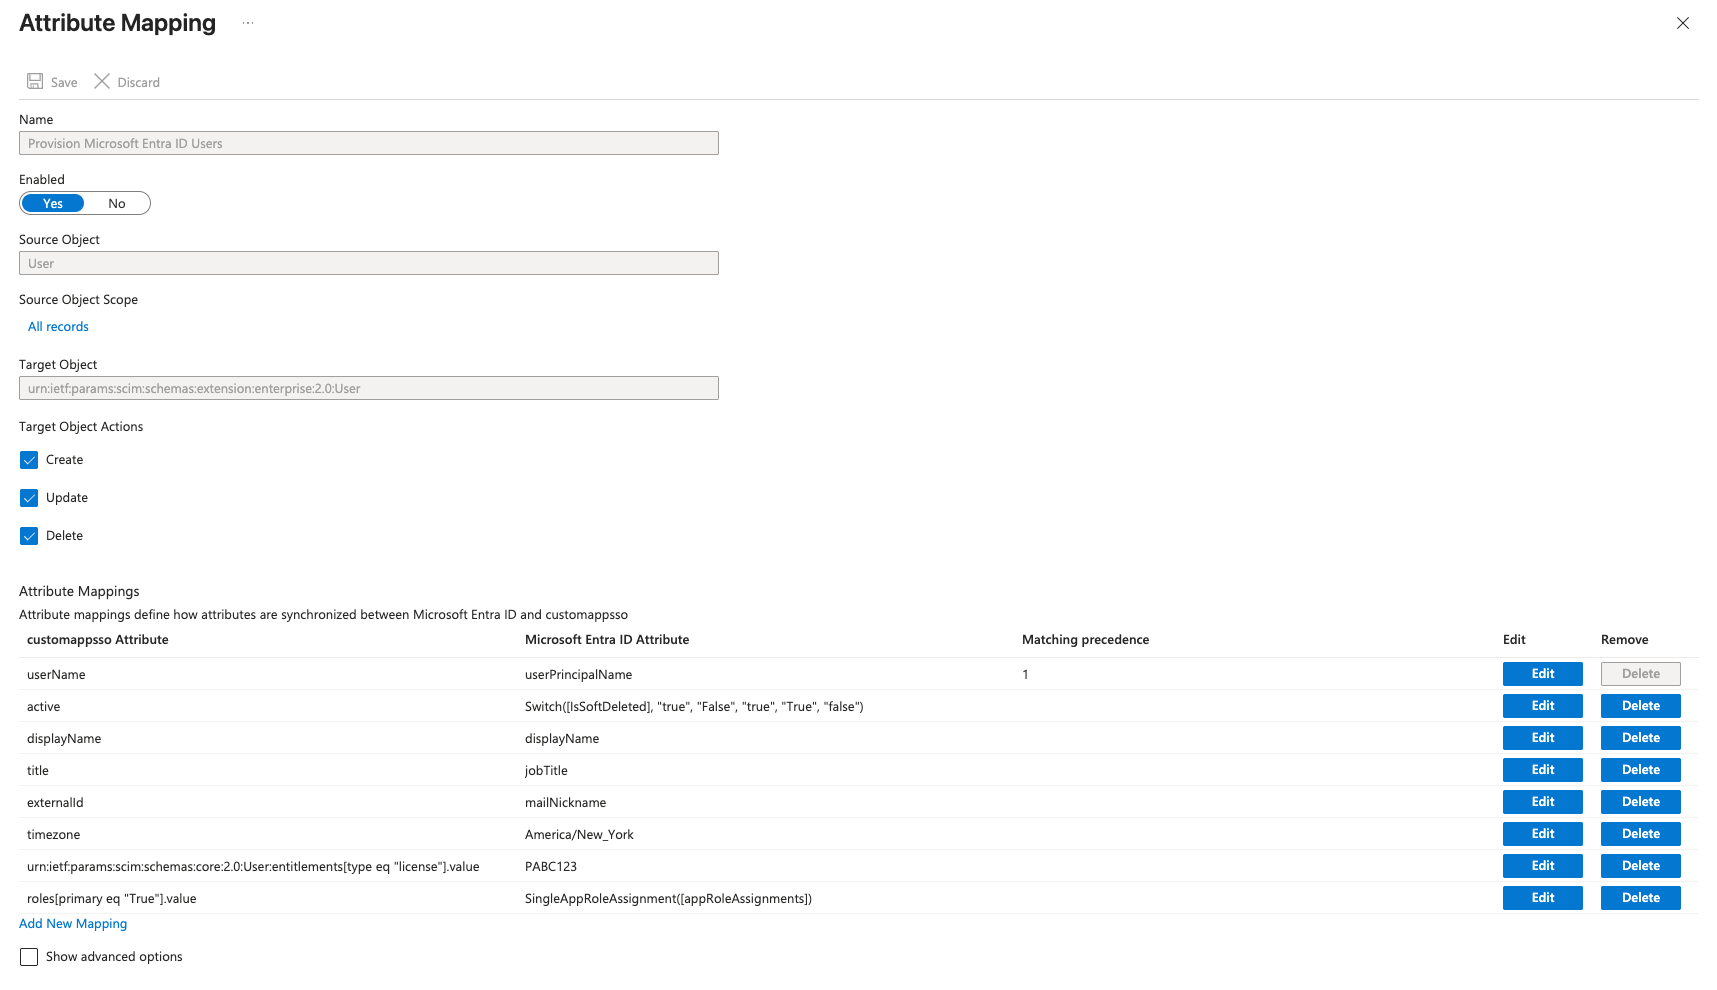
Attribute Mapping in Entra ID
Map Roles
NoteThe following instructions for assigning roles are for guidance only and should be adapted to your organization's needs. Use only one of the options provided when configuring roles.
(Option 1) Configure Group-Based Role Mapping
Step 1: Add PagerDuty Roles
By default, new users are provisioned with the "Manager" role (or your PagerDuty default role).
- From the Entra Home Screen, go to Manage Entra Microsoft Entra ID, then click View.
- Under Manage on the sidebar, go to App registrations and select your application.
- Click App roles.
- Create a PagerDuty role:
- Fill in the Display name, Value, and Description. The Display name and Value should match.
- Ensure Allowed member types is set to Users/Groups.
- Select Do you want to enable this app role?.
- Click Apply.
- Repeat for remaining roles.
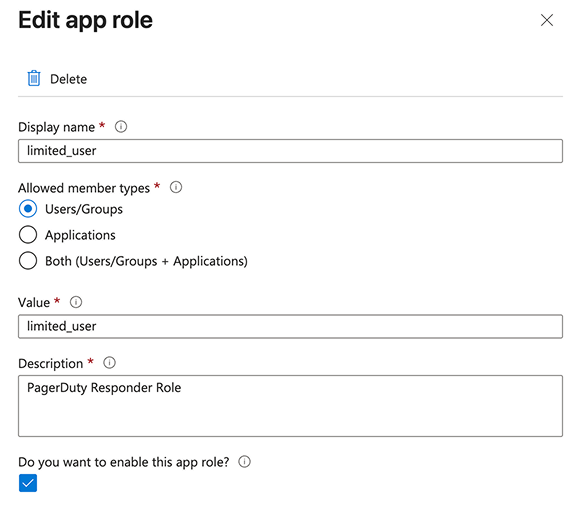
Display name and Value Fields in Entra ID
TipReference our Knowledge Base to see how these values map to PagerDuty role names. For example,
Global Adminmaps toadmin.
Step 2: Configure Role Mapping
- From the Attribute mapping screen for your SCIM Enterprise application, click + Add new mapping.
- Fill in the configuration details as follows:
- Mapping type:
Expression - Expression:
SingleAppRoleAssignment([appRoleAssignments]) - Target attribute:
roles[primary eq "True"].value
- Mapping type:
- Click Save.
Step 3: Assign the Configured Roles to Users/Groups
- From the Entra Home Screen, go to Manage Entra Microsoft Entra ID and select View.
- On the sidebar, click Manage Enterprise Applications.
- Select your application.
- On the sidebar under Manage, click User and groups.
- Click Add user/group.
- Assign the correct PagerDuty roles to your users/groups:
- Under Users and groups, select all the users and groups that should have a specific role and click Select.
- Under Select a role, select a PagerDuty role that you previously configured for the selected users/groups.
- Click Assign.
(Option 2) Configure Group-Based License and Role Mapping
Alternatively, if you do not want PagerDuty's default license assignment and prefer to manually allocate licenses, you can use this option to configure users via app roles that correspond to specific PagerDuty role and license combinations.
Step 1: Create App Roles
- From the Entra Home Screen, go to Manage Entra Microsoft Entra ID, then click View.
- Under Manage on the sidebar, go to App registrations and select your application.
- Click App roles.
- Create a unique role in the Display name. This example uses
PagerDuty Admins (Enterprise Incident Management Full User). - Repeat for remaining roles. For this example, also create the role
PagerDuty Stakeholders (Enterprise Incident Management Stakeholder).
Step 2: Map the PagerDuty Licenses to Role Names
Configure the attribute mappings for urn:ietf:params:scim:schemas:core:2.0:User:entitlements[type eq "license"].value with:
Switch(
  SingleAppRoleAssignment([appRoleAssignments]),
  "<default_license_id>"
  "PagerDuty Admins (Enterprise Incident Management Full User)", "<full_user_license_id>",
  "PagerDuty Stakeholders (Enterprise Incident Management Stakeholder)", "<stakeholder_license_id>"
)
TipUse the List Licenses API to list the licenses associated with your account.
Step 3: Map the App Roles to the Role Values
Configure the attribute mappings for roles[primary eq "True"].value with:
Switch(
  SingleAppRoleAssignment([appRoleAssignments]),
  "<default_role>"
  "PagerDuty Admins (Enterprise Incident Management Full User)", "admin",
  "PagerDuty Stakeholders (Enterprise Incident Management Stakeholder)", "read_only_user"
)
Step 4: Assign the Configured Roles to Users/Groups
Choose the corresponding app role that represents the role and license you want those users/groups to be provisioned with.
- From the Entra Home Screen, go to Manage Entra Microsoft Entra ID and select View.
- On the sidebar, click Manage Enterprise Applications.
- Select your application.
- On the sidebar under Manage, click User and groups.
- Click Add user/group.
- Assign the configured app role that corresponds to the desired role and license combination to your users/groups:
- Under Users and groups, select all the users and groups that should have a specific role and click Select.
- Under Select a role, select the app role that you previously configured for the selected users/groups.
- Click Assign.
Updated about 1 month ago