
Backstage Plugin Guide | PagerDuty
The PagerDuty plugin for Backstage surfaces key PagerDuty information related to a Backstage or Portal entity. Trigger incidents and view on-call users, active incidents, recent changes, and service dependencies directly in your developer portal.
Backstage, Portal, and PagerDuty Benefits
- Display relevant PagerDuty information about an entity within Backstage or Portal, such as active incidents or recent changes.
- Quickly check who is on call for a service.
- Trigger an incident to the current on-call responder(s) for a service.
- Easily map PagerDuty services to Backstage or Portal entities.
- Map service dependencies with either Backstage/Portal or PagerDuty as the source of truth.
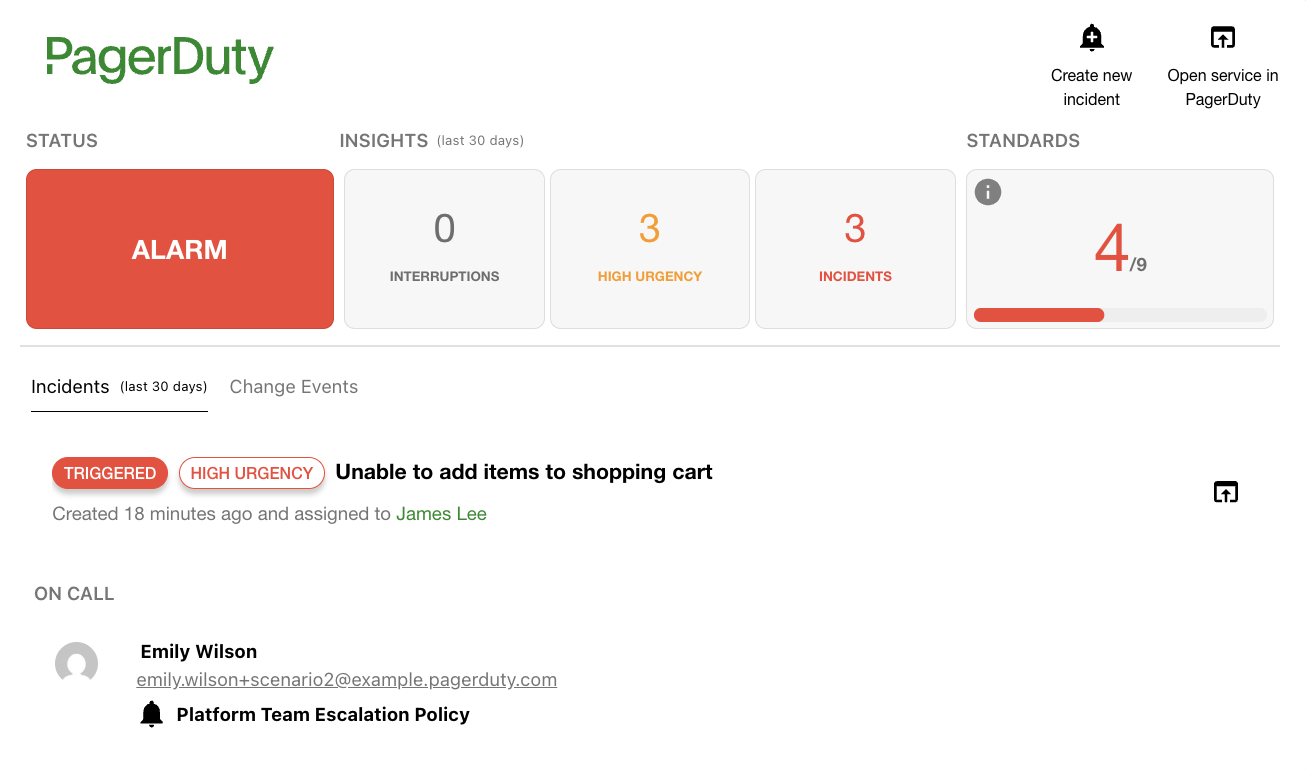
Backstage Interface
Requirements
AvailabilityThe PagerDuty plugin for Backstage is available on Professional, Business, and Enterprise plans for incident management. To upgrade your plan, contact our Sales Team.
Configure the Integration
In Backstage
- Administrator access to install new plugins.
In PagerDuty
- Account owner or global admin access to install new integrations.
Use the Integration
- Ensure you have access to the Backstage or Portal instance.
How It Works
- Services are mapped between Backstage/Portal and PagerDuty.
- Information related to your PagerDuty services is available within Backstage/Portal.
- Data syncs automatically run at regular intervals to help ensure mapped data is kept up to date.
Plugin Versions
There are two versions of the plugin:
- Backstage: Open source plugin.
- Portal: Paid/hosted version of Backstage.
Integration Walkthrough
Configure PagerDuty
- From the top menu, navigate to Integrations Developer Tools App Registration.
- Click New App and configure the following fields on the screen:
| Field | Value |
|---|---|
| Name | Enter a name for the app. |
| Description | Enter a description for the app. |
| OAuth 2.0 | Select the OAuth 2.0 checkbox. |
- Click Next.
- On the next screen, select Scoped OAuth as the preferred authorization mechanism.
- In the Permission Scope section, select the following permissions to ensure that the plugin works as expected:
abilities.read(Used in scaffolder only)Analytics.readEscalation_policies.readIncidents.readOncalls.readSchedules.readServices.readservices.write(Used in scaffolder only)Standards.readTeams.readUsers.readvendors.read(Used in scaffolder only)
WarningYou do not have to assign all the permissions listed in the previous section to your application, but not doing so might prevent the plugin from running as expected, and you might see errors on the PagerDuty card.
- Once you select permission scopes, click Register App.
- Copy the Client ID and Client Secret and store them in a secure location. You use them later when configuring Backstage.
Install the PagerDuty Plugin
You can install the PagerDuty plugin in Backstage or in Portal using the instructions in the following sections:
Configure Backstage
To install the PagerDuty plugin in Backstage, run the following commands from your Backstage root directory:
yarn --cwd packages/app add @pagerduty/backstage-plugin
yarn --cwd packages/backend add @pagerduty/backstage-plugin-backend
Once complete, add the plugin to Backstage and your services.
Install the Entity Processor (Recommended)
The frontend and backend plugins provide the plugin's core functionality, such as displaying PagerDuty data on services mapped through catalog-info.yaml annotations. Most of the plugin's synchronization features — mapping services dynamically through the /pagerduty UI and service dependency sync — require an additional package called the Entity Processor.
To install the Entity Processor, run the following command from your Backstage root directory:
yarn --cwd packages/backend add @pagerduty/backstage-plugin-entity-processorThen enable it in packages/backend/src/index.ts:
backend.add(import('@pagerduty/backstage-plugin-entity-processor'));
NoteThe Entity Processor is optional, but highly recommended for most setups. For a full explanation of what it enables and what does not work without it, see Entity Processor in the plugin documentation on GitHub Pages.
Add the Frontend Plugin to Your Application
Add the frontend plugin to your application, which requires code changes to the Backstage application. Update the EntityPage.tsx file in packages/app/src/components/catalog.
Add the following imports to the top of the file:
import {
isPluginApplicableToEntity as isPagerDutyAvailable,
EntityPagerDutyCard,
} from '@pagerduty/backstage-plugin';
Find const overviewContent in EntityPage.tsx, and add the following snippet inside the outermost Grid defined there, just before the closing </Grid> tag:
<EntitySwitch>
<EntitySwitch.Case if={isPagerDutyAvailable}>
<Grid item md={6}>
<EntityPagerDutyCard />
</Grid>
</EntitySwitch.Case>
</EntitySwitch>
Once complete, the overviewContent definition looks similar to this:
const overviewContent = (
<Grid ...>
 ...
<EntitySwitch>
<EntitySwitch.Case if={isPagerDutyAvailable}>
<Grid item md={6}>
<EntityPagerDutyCard />
</Grid>
</EntitySwitch.Case>
</EntitySwitch>
</Grid>
);
The PagerDuty plugin displays in all your components that include PagerDuty annotations.
NoteThe code samples provided in the previous section reflect the default configuration of the PagerDutyCard entity. You have at your disposal parameters that allow you to prevent users from creating incidents, hide the change events tab, or hide the on-call section of the card.
Configure the Frontend Plugin
You have added the PagerDuty frontend plugin to your application. To display it, configure your entities and the application itself.
Annotate Entities
For every component that appears in your Backstage catalog, you have a .yaml file with its configuration. Add an annotation to the entity like this:
annotations:
[pagerduty.com/service-id](https://pagerduty.com/service-id): [SERVICE-ID]
By default, if you only specify the pagerduty.com/service-id annotation, the PagerDutyCard component disables the Create Incident button. If you use version @pagerduty/backstage-plugin-backend:0.9.0 or higher, a mechanism automatically creates an integration in your PagerDuty services and adds a pagerduty.com/integration-key annotation to the corresponding Backstage entity. This enables the option to create incidents from the PagerDutyCard.
You can optionally decide to annotate with an integration-key instead. The plugin gets the corresponding service-id and adds it as an annotation. Since it requires more steps, we recommend that you annotate with pagerduty.com/service-id.
NoteIf you use multiple PagerDuty accounts in your setup, add an account annotation to your Backstage entities. This way the plugin identifies the correct instance to communicate with. If you do not provide one, the account selected as default is used.
annotations:pagerduty.com/account: [PAGERDUTY-ACCOUNT]
Add the Backend Plugin to Your Application
NoteVersion 0.6.0 of the backend plugin (
@pagerduty/backstage-plugin-backend) introduced support for the Backstage new backend system which simplifies the backend configuration and requires less code.
Once you complete steps in Install the PagerDuty Plugin, you have added the PagerDuty backend plugin to your application. To expose its capabilities to the frontend plugin, you must configure it. There are two approaches for configuration:
WarningIf you used the PagerDuty plugin for Backstage before the release of
@pagerduty/[email protected], you already have the backend configured. In this case, see our migration guidance instead of following the steps in the following section.
Legacy Backend System
Create a new file named pagerduty.ts at packages/backend/src/plugins/pagerduty.ts and add the following content:
import { Router } from 'express';
import { PluginEnvironment } from '../types';
import { createRouter } from '@pagerduty/backstage-plugin-backend';
export default async function createPlugin(
env: PluginEnvironment,
): Promise<Router> {
return await createRouter({
config: env.config,
logger: env.logger,
});
}
This creates the backend plugin that you can configure in your application.
In packages/backend/src/index.ts, import your plugin and add a route for the APIs exposed by the PagerDuty backend plugin.
import pagerduty from './plugins/pagerduty';
// ...
async function main() {
 // …
const pagerdutyEnv = useHotMemoize(module, () => createEnv('pagerduty'));
 // ...
 apiRouter.use('/pagerduty', await pagerduty(pagerdutyEnv));
New Backend System
The Backstage new backend system requires less code to set up plugins. Open the packages/backend/src/index.ts file and add the PagerDuty backend plugin to your Backstage app:
// pageduty plugin
backend.add(import('@pagerduty/backstage-plugin-backend'));
Configure API Authorization
The PagerDuty plugin requires access to PagerDuty APIs. Configure your PagerDuty plugin for Backstage with the necessary credentials to reach them. This step requires using an OAuth access token or an API token.
NoteIf you do not already have this information, follow the steps in the previous section to Configure PagerDuty to obtain the client ID and client secret for OAuth authorization, or Generate a General Access REST API Token to generate a REST API token.
Single PagerDuty Account
If all your services exist in a single PagerDuty account, follow the instructions in the following section.
Scoped OAuth (recommended) In the app-config.yaml file, add the following configuration and set your OAuth configuration:
pagerDuty:
  oauth:
    clientId: ${PD_CLIENT_ID}
    clientSecret: ${PD_CLIENT_SECRET}
    subDomain: ${PD_ACCOUNT_SUBDOMAIN}
    region: ${PD_ACCOUNT_REGION}        // Optional.
                                        // Allowed values: 'us', 'eu'.
                                        // Defaults to 'us'.
NoteThe
subDomainproperty requires only the first segment of your PagerDuty account URL. Example: If your PagerDuty account URL ishttps://myaccount.pagerduty.comthen yoursubDomainvalue ismyaccount. Configuring it with an invalid value can cause authentication to fail.
REST API Token In the app-config.yaml file, add the following configuration to set your REST API token:
pagerDuty:
  apiToken: ${PAGERDUTY_TOKEN}
Multiple PagerDuty Accounts
If your organization uses multiple PagerDuty accounts, multi-account support is available on version 0.14.0 or higher of the frontend plugin (@pagerduty/backstage-plugin). To configure multiple accounts, follow the steps in the following section.
Scoped OAuth (recommended) In the app-config.yaml file, add the following configuration and set your OAuth configuration:
pagerDuty:
  accounts:
  - id: ${PD_ACCOUNT_SUBDOMAIN_1}    // The ID must be the subdomain for the account
    isDefault: true                  // Only one account can be defined as the default/fallback
    apiBaseUrl: ${PD_API_BASE_URL_1}
    oauth:
      clientId: ${PD_CLIENT_ID_1}
      clientSecret: ${PD_CLIENT_SECRET_1}
      subDomain: ${PD_ACCOUNT_SUBDOMAIN_1}
      region: ${PD_ACCOUNT_REGION_1}  // Optional. allowed values: 'us', 'eu'.
                                  // Defaults to 'us'.
  - id: ${PD_ACCOUNT_SUBDOMAIN_2}
    apiBaseUrl: ${PD_API_BASE_URL_2}
    oauth:
      clientId: ${PD_CLIENT_ID_2}
      clientSecret: ${PD_CLIENT_SECRET_2}
      subDomain: ${PD_ACCOUNT_SUBDOMAIN_2}
NoteThe
subDomainproperty requires only the first segment of your PagerDuty account URL. Example: If your PagerDuty account URL ishttps://myaccount.pagerduty.comthen yoursubDomainvalue ismyaccount. Configuring it with an invalid value can cause authentication to fail.
REST API Token In the app-config.yaml file, add the following configuration to set your REST API token:
pagerDuty:
  accounts:
  - id: ${PD_ACCOUNT_SUBDOMAIN_1}    // The ID must be the subdomain for the account
    isDefault: true                  // Only one account can be defined as the default/fallback
    apiBaseUrl: ${PD_API_BASE_URL_1}
    apiToken: ${PAGERDUTY_TOKEN}
  - id: ${PD_ACCOUNT_SUBDOMAIN_2}
    apiToken: ${PAGERDUTY_TOKEN}
NoteIn the multi-account setup, you can configure accounts with Scoped OAuth and others with a REST API token. You can optionally specify the custom API base URL and events URL for specific accounts. All optional properties revert to default values if they are not present.
Test Your Configuration
Start your Backstage app and pass the PagerDuty API token or OAuth parameters as environment variables.
For Scoped OAuth
PD_CLIENT_ID='<ID>' PD_CLIENT_SECRET='<SECRET>' PD_ACCOUNT_SUBDOMAIN='<SUBDOMAIN>' PD_ACCOUNT_REGION='<REGION>' yarn devFor REST API Token
PAGERDUTY_TOKEN='<TOKEN>' yarn devThis adds an Authorization header to all requests made to PagerDuty REST APIs.
Configure Portal
To display the plugin on your Portal instance, you must install it. Portal references the name of the plugin package, and Portal manages it for you. It installs the latest version and refers to related plugins. The main plugin is @pagerduty/backstage-plugin. By including this plugin, @pagerduty/backstage-plugin-backend is also presented for installation.
To install in Portal:
- Navigate to Plugins Install Plugin.
- In the Package Name field, enter
@pagerduty/backstage-plugin. To include the necessary backend modules for full feature access, click Add Another button two times and add the following packages:@pagerduty/backstage-plugin-entity-processor@pagerduty/backstage-plugin-scaffolder-actions
- After completing the installation, navigate to the Plugins page to verify the plugin appears.
- To activate the backend module plugins, navigate to each extended plugin and activate them:
- Plugins Catalog (View) Modules @pagerduty/backstage-plugin-entity-processor (Manage Module) Start Module
- Plugins Scaffolder (View) Modules @pagerduty/backstage-plugin-scaffolder-actions (Manage Module) Start Module
- Configure the OAuth section with the credentials collected in the steps in the previous section:
| Field | Description |
|---|---|
| clientId | Private application client ID |
| clientSecret | Private application client Secret |
| subDomain | Your account’s subdomain name on <name>.pagerduty.com |
| region | Your account’s service region (available regions are US and EU). This defaults to US if you do not provide a region. |
Configure Multi-Account Support
The PagerDuty plugin for Backstage supports multiple accounts. To use multiple accounts, select Add Items in the Accounts section instead of completing the OAuth section. This allows you to set up unique client credentials for each account (you must create an OAuth private application for each account). Providing only one account designates it as the default.
User Guide
Navigate to your Backstage or Portal account to view the integrated PagerDuty experience. The integration is available on the PagerDuty page within your instance and on a PagerDuty card on your services’ Backstage entity pages. Click Create Incident to create a PagerDuty incident from your developer portal.
Uninstall the PagerDuty Plugin for Backstage
- In PagerDuty, navigate to Integrations Developer Tools App Registration.
- To the right of the app used for the Backstage or Portal integration, click the overflow menu and select Delete. In the confirmation modal, click Delete again to confirm.
Get Help
The PagerDuty plugin for Backstage is an open source project maintained by PagerDuty. PagerDuty employees and the Backstage community contribute based on availability.
For additional details, view the Backstage Plugin docs on GitHub Pages.
Updated 3 days ago