
Examples of Event Orchestration
Event Orchestration Examples
Event Orchestration is a highly customizable suite of features and capabilities. The examples on this page are taken from real-world customer use cases, which you are welcome to replicate in your own PagerDuty account.
- Create Rules for Complex Alert Grouping
- If Events Match Certain Conditions
- On a Recurring Weekly Schedule
- Advanced Configuration with the
andOperator - Capture Unrouted Trigger Events
- Standardized Triage
- Notification Management for Specific Incidents
- Route Alerts with Dynamic Service Routes
- Automated Remediation for Specific Incidents
- Disable System Auto Resolve for High Priority Incidents
- Track Event Spikes with Cache Variables
- Track Heartbeat Events with Cache Variables
Create Rules for Complex Alert Grouping
Leverage Event Orchestrations to stamp structured metadata onto events, then use Content-Based Alert Grouping to group alerts that share that metadata. This enables sophisticated grouping scenarios that are difficult to express with default fields alone.
In this example, you:
- Add a rule in Global or Service Orchestration that sets a custom detail only when your grouping conditions are met. You can extract dynamic values with a rule variable (regex) or stamp a static flag.
- Configure Alert Content or Intelligent + Alert Content grouping on a service to group alerts based on that custom detail.
Grouping is evaluated after Global and Service Orchestration rules complete.
Step 1: Create the Orchestration Rule
- In your desired orchestration, create a new rule. Use a Global Orchestration if the scenario applies across many services; otherwise use a Service Orchestration.
- Under When should this rule be applied?, select If events match certain conditions.
- Define the event field values that indicate you want alerts to group (for example, specific sources, components, error codes, or text in
event.summary). Click Next.- Optionally, click Create rule variable and use regex to extract a value from an event field that you want to group by (for example, a shard ID embedded in
summary).
- Optionally, click Create rule variable and use regex to extract a value from an event field that you want to group by (for example, a shard ID embedded in
- Under Event Fields, create or set a custom details event field, for example:
custom_details.advanced_grouping.- If you created a rule variable in step three, set
custom_details.advanced_groupingto the variable value. - Alternatively, set a static value like
TRUEto flag matching events for grouping.
- If you created a rule variable in step three, set
TipChoose a custom details name that does not already exist in your payload, so it is only set when your rule runs. Grouping does not occur on fields with a
NULLvalue.
- Click Save to apply the rule.
- If you have more than one scenario, repeat steps one through five with additional rules as needed.
Step 2: Configure Content-Based Alert Grouping
- Navigate to Alert Grouping settings for the relevant service via the Service Directory or the Noise Reduction homepage.
- Select the service(s) where you want these settings applied.
- Choose Alert Content or Intelligent + Alert Content as your grouping mode.
- Under Select Fields, choose Custom Details.
- In the field name input, enter the custom details key you set in your orchestration rule (for example,
advanced_grouping). - Click Save.
Step 3: Validate and Tune
- Trigger test events that meet your rule conditions and confirm that
custom_details.advanced_groupingis present and correctly valued on the resulting alerts. - Verify that alerts with the same value for this field are grouped as expected on the service.
- Iterate on your regex extraction or conditions to avoid over- or under-grouping.
If Events Match Certain Conditions
In this example, you create a routing rule that routes events to a service when matching conditions are met.
- Create a routing rule and, under When should events be routed here?, select If events match certain conditions.
- Indicate the event conditions you would like the orchestration to match using one of the following methods:
| Method | Description |
|---|---|
| Base conditions on incoming JSON | Depending on your account's activity, recent events may appear on the right side of the screen if events have been sent to the incoming event source. View these events to determine which values to use. |
| Events sent through the API | Use the JSON field names directly (for example, summary). For nested fields, separate names with a dot (.) (for example, payload.taskid). If you are sending data through additional fields, enter them exactly as they are sent to PagerDuty. For example, if your events have a tags field, enter that field name in your rule condition as tags. |
| Events sent through email | Note: The following functionality only works when you send emails to a global email integration address. It will not work for emails sent directly to a service-level email integration. Rules may be based on the content of an email by entering the appropriate email field as custom details in the event field. The email subject is used as a default deduplication key — emails with the same subject line are automatically deduplicated. To change this behavior, add a custom deduplication key with an orchestration rule action. The most common email fields are: event.custom_details.from[0] (the from address) , event.custom_details.subject (the subject line)**, and event.custom_details.plain_body (the email body).The [0] refers to the first position in a list of emails. To generally search through a list of emails in the to or from field, enter event.custom_details.from or event.custom_details.to. **For email-generated events, event.summary is populated with the same value as event.custom_details.subject by default. However, these are separate fields and their values may differ based on customer-specified configurations. |
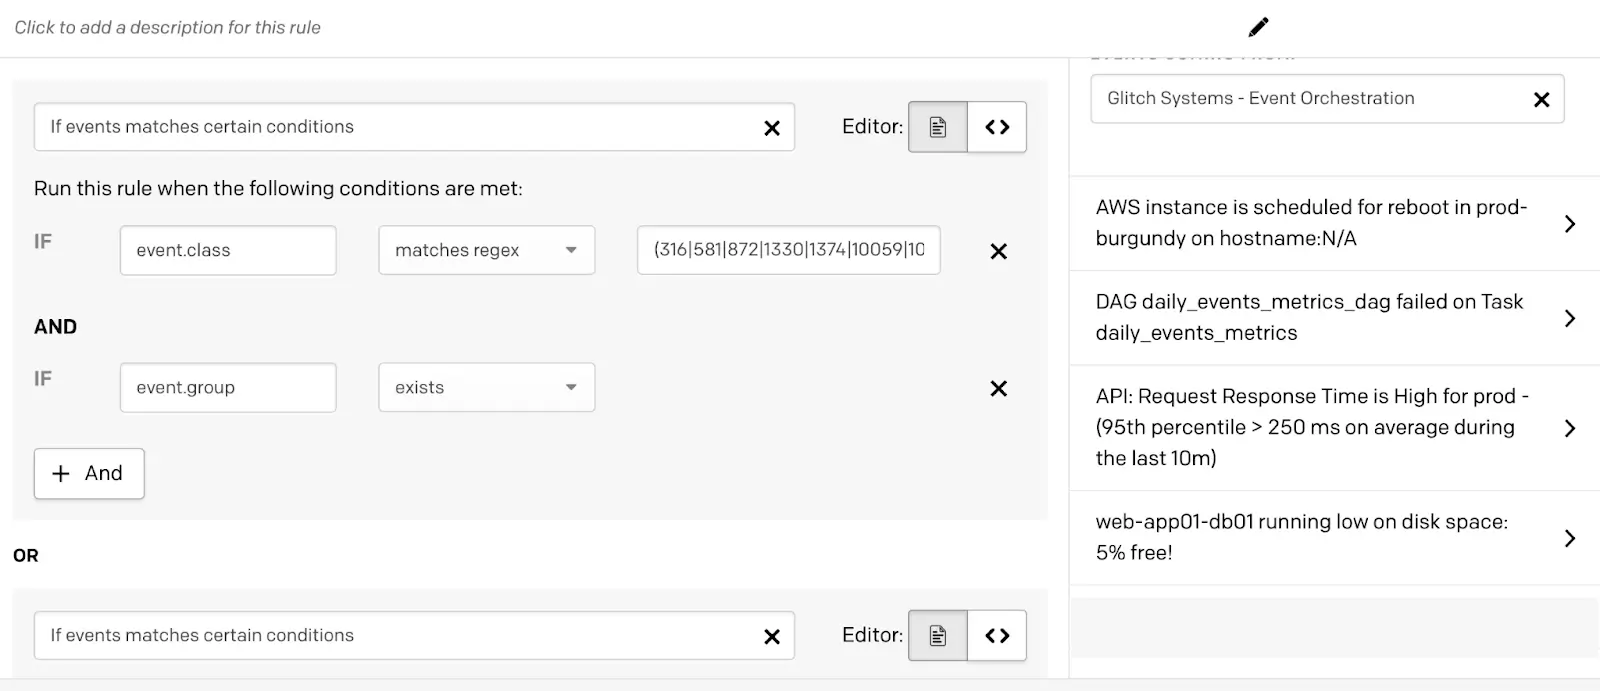
Configure Routing Rule
- In the middle dropdown, select how the event should be filtered.
| Filter Option | Description |
|---|---|
| matches part / does not match part | The field contains or does not contain a value. |
| matches / does not match | The field equals or does not equal a value. This operation requires the field to be passed in as a string. |
| exists / does not exist | The field exists or does not exist. |
| matches regex / does not match regex | The field matches or does not match a regular expression. Regular expressions must use RE2 syntax. |
Negative OperationsRules with negative operations — such as does not contain or does not equal — will match events that do not contain your specified value and events that do not contain the field at all. For example:
severity field does not equal critical— this will match events where the severity field does not equalcriticaland events that do not contain a severity field at all.To avoid this, add an additional condition that matches only when the field exists. For example, when all conditions are true:
severity field existsseverity field does not equal criticalYou must select all conditions must be true for the rule to match.
- In the second value field, enter the value that should be met from the payload. This can be a string or regular expression.
Case SensitivityCondition values in Event Orchestrations are case-insensitive. For example, if a condition is set with
Summarymatches partDOWN, this will match if theSummarycontainsDown,down, and other variations of the word.
- When additional conditions should be added, use the following options:
- + And: Additional conditions must be met.
- + New Condition: Create another set of conditions that must be met. A new condition block creates an
ORoperator of conditions that will also be evaluated alongside other blocks.
- Click Save to save your configuration.
Condition LimitsYou can create up to 25 condition blocks within a rule, and up to 64 operators (i.e.,
AND,OR), or a maximum of 2,048 bytes (for example, if you are using PCL) in a single condition block.
On a Recurring Weekly Schedule
AvailabilityScheduled conditions are available with Advanced Event Orchestration.
In this example, you create a routing rule that routes events to a service on a weekly recurring schedule.
- Create a routing rule and, under When should events be routed here?, select On a recurring weekly schedule.
- Enter appropriate times for Start and End, select your preferred Days of the week, and select your Timezone.
- Click Save.
Advanced Configuration with the and Operator
and Operator
AvailabilityScheduled and threshold conditions are available with Advanced Event Orchestration.
This example details how to edit PCL to create an advanced condition that the UI does not natively support.
If you select one of the following options for When should events be routed here?, the UI does not offer a way to set an and condition:
- On a recurring weekly schedule
- During a scheduled date range
- Depends on event frequency
You can work around this by directly editing the PagerDuty Condition Language (PCL).
For example, to route events to a service when the following conditions are met:
- The event's
sourcematchesmainframe. - It is Wednesday or Sunday between 11:00 a.m. and 12:00 p.m. Eastern.
The following PCL statement meets these conditions: event.source matches 'mainframe' and now in Wed,Sun 11:00:00 to 12:00:00 America/New_York
Capture Unrouted Trigger Events
Orchestration service routes include a catch all rule for events that do not match the configured rules. The default behavior creates a suppressed alert from unrouted trigger events; however, you can route these events to a specific service instead. To support event deduplication across all services, the orchestration can resolve any open alert previously created when a matching dedup_key exists, regardless of which service the open alert belongs to.
In this example, you create a routing rule that uses trigger events to create incidents on a catch all service.
- Create a routing rule and, under What service should events route to?, select the service you would like to use as a catch all for these events.
- Under When should events be routed here?, select If events match certain conditions. Configure the following condition:
- If
event.event_actionmatches part (contains)trigger
- If
- Click Save.
- If necessary, reorder the rule so that it is directly above the default catch all rule.

Routing Rule for Trigger Events
This configuration raises the visibility for trigger events that do not match existing routing rules while also preserving the default resolve behavior described above.
Standardized Triage
AvailabilityGlobal Orchestrations, incident suppression, and variables are available with Advanced Event Orchestration.
Use Global Orchestration rules to standardize the triage process across your entire organization.
- Create a Global Orchestration. You will send your events to the orchestration's integration.
- Create an Event Count Cache Variable. You can use this to count the number of specific events received within a designated timeframe.
- Create a rule with an event condition to suppress any known false positive events:
- Under When should events be routed here?, select If events match certain conditions.
- Define a condition that will match your false positive events. For example, if
event.summarymatches part (contains)[No error]. Click Next. - Under What action(s) should be applied?, select Suppress incident and notifications.
- Click Save.
- Create an Else rule with an event condition to evaluate the current cache variable count:
- Under When should events be routed here?, select If events match certain conditions.
- In the field selector, choose Cache Variable and add your cache variable's name. Configure your desired threshold for when an incident should be created. For example, if
cache_var.myEventCountis greater than or equal to2. Click Next. - Under What action(s) should be applied?, choose your desired priority and/or severity level for these incidents.
- Click Save.
- Create a final Else rule to set a lower priority and/or severity for incidents that do not pass the event count threshold set in the previous rule:
- Under When should events be routed here?, select Always (for all events) and click Next.
- Under What action(s) should be applied?, choose your desired priority and/or severity level for these incidents.
- Click Save.
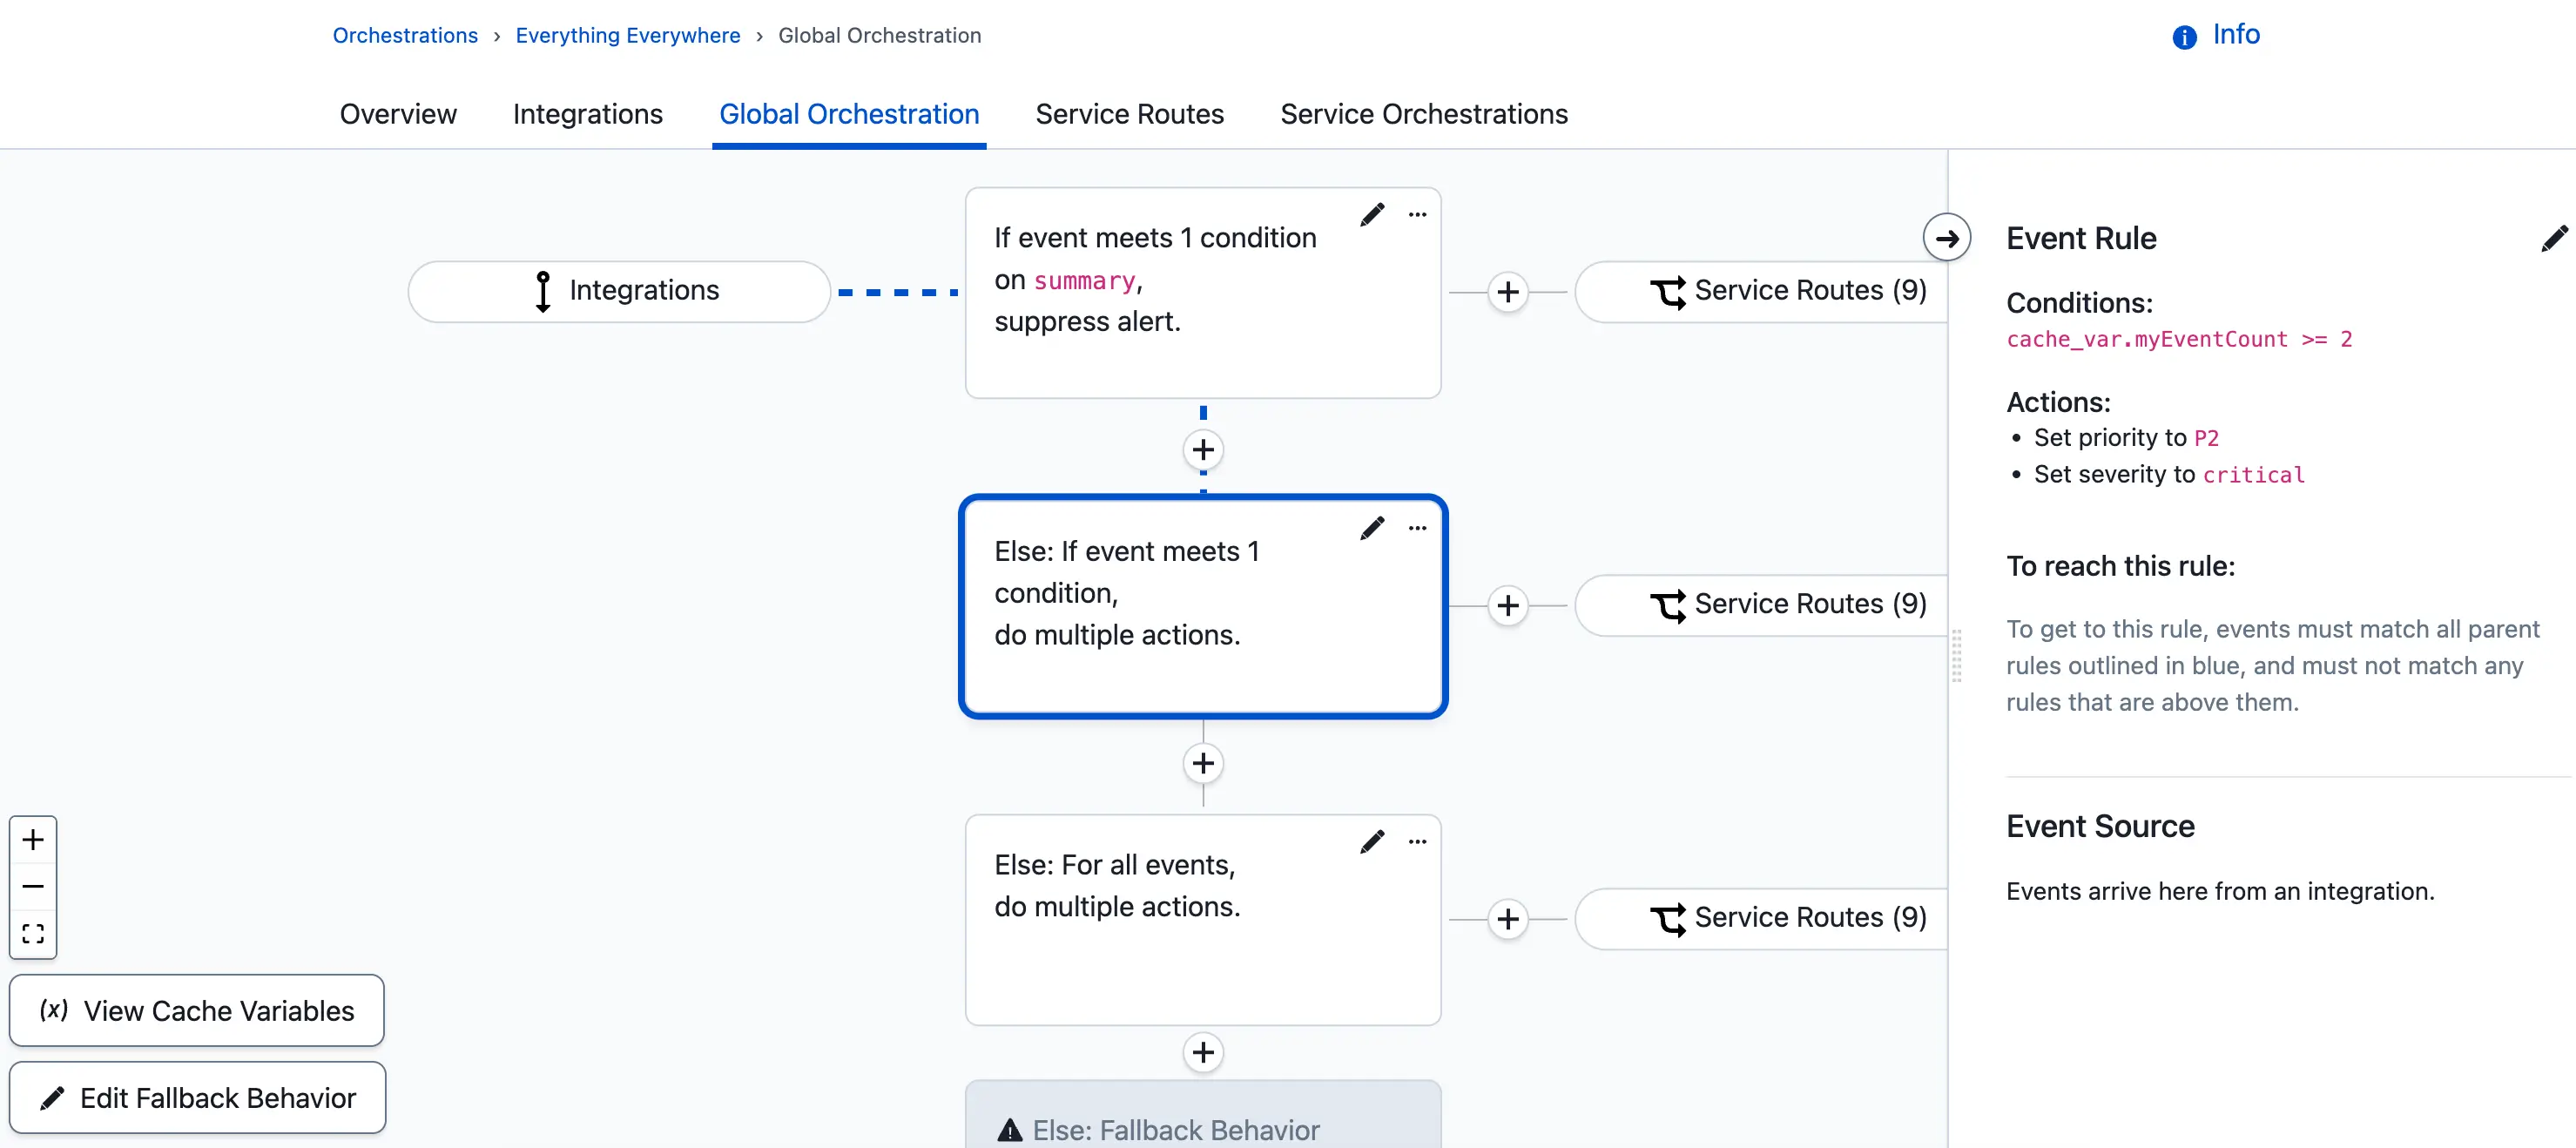
Standardized Triage Example
With this configuration in place, any event sent to the global orchestration is evaluated by these rules. If the event is a false positive and matches the condition set in step three, it is automatically suppressed and does not create an incident.
If the event does not meet that condition, it increments the cache variable count, is routed to a service, and creates an incident on that service. The current event count for the cache variable determines whether the incident has a high or low priority and/or severity.
Notification Management for Specific Incidents
AvailabilityDynamic Escalation Policy Assignment is available with Advanced Event Orchestration.
Leverage Dynamic Escalation Policy Assignment to notify a Subject Matter Expert (SME) instead of the current on-call user when an incident requires a specific skill set to resolve.
- Create an escalation policy with the SME user in the first level.
- If the SME should be on-call 24/7, add them as a user target. Otherwise, create a schedule to define the hours the user should be on-call.
- In your global orchestration, create the following rule:
- Under When should events be routed here?, select If events match certain conditions.
- Define a condition that will match events indicating a specific SME should be notified instead of the current on-call user. For example, if
event.summarymatches part (contains)Database error. Click Next.
- Under What action(s) should be applied?, locate Override service's assigned escalation policy with this policy and select your desired escalation policy from the dropdown.
- Click Save.

Override Escalation Policy with SME
When the orchestration receives an event that matches the condition, the selected escalation policy is used for the incident, regardless of which service the event is routed to.
Route Alerts with Dynamic Service Routes
AvailabilityDynamic routing, dynamic field enrichment and extraction, and variables are available with Advanced Event Orchestration.
Use Global Orchestrations to standardize the event format and automatically route events to the correct service with a dynamic routing rule.
A dynamic routing rule evaluates all events and does not have conditions. Instead, dynamic routing rules route events to services based on the Service name or Service ID included within the payload. If service details are not included in your initial payload, you can update the payload with dynamic field enrichment and extraction.
- In your global orchestration, create a rule with the following actions:
- Create a rule variable and use regex to extract the desired value from an event field.
- Create an event field (for example,
custom_details.service_route) and use the rule variable you created to set the value.
- In your global orchestration, navigate to the Service Routes tab.
- Create a new dynamic route and enter the event field you created in step one.
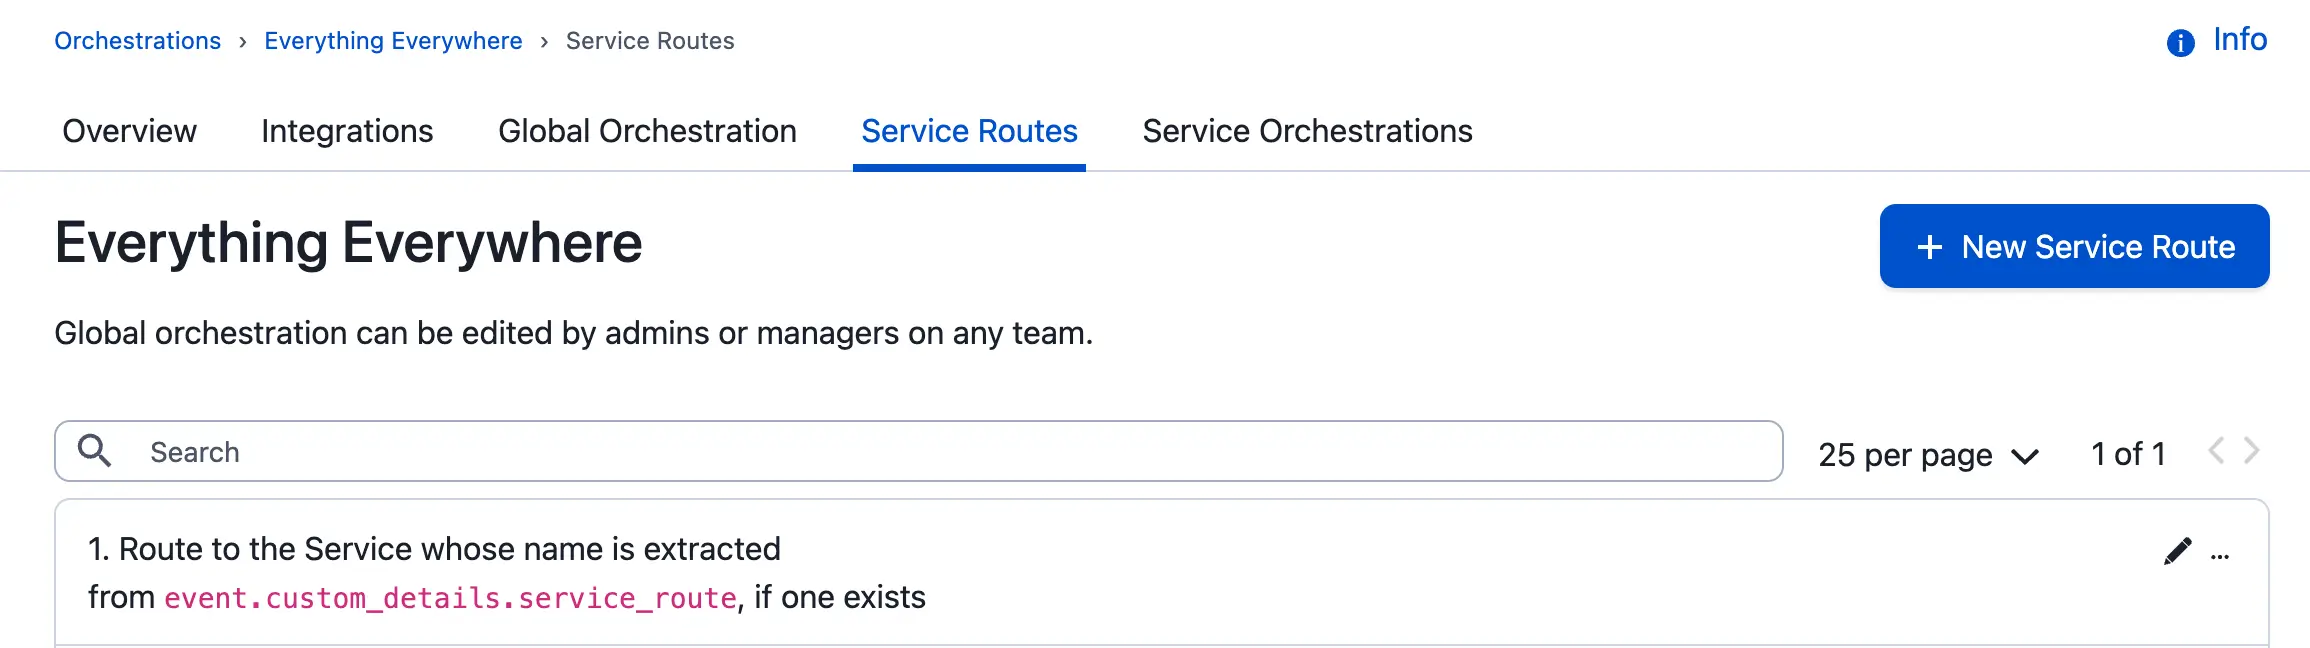
Dynamic Routing Rule
When the orchestration receives an event with a valid service name in the event field, it automatically routes it to that service. The event can be processed further by the service's orchestration rules if desired.
Automated Remediation for Specific Incidents
AvailabilityThis example uses Automation Actions, which are available for Business, Enterprise for Incident Management, and Digital Operations (Legacy) plans that meet the following criteria:
- Business Plans: Accounts must have the PagerDuty AIOps and PagerDuty Automation Actions add-ons, as well as Advanced Event Orchestration.
- Enterprise for Incident Management and Digital Operations (Legacy) Plans: Accounts must have the PagerDuty Automation Actions add-on and Advanced Event Orchestration.
Contact the Sales team if you are interested in PagerDuty AIOps, or fill out this form if you are interested in Automation Actions.
You can pause notifications and suspend alerts for a set duration while simultaneously triggering a remediation automation with an Automation Action. If the automation successfully resolves the issue, an incident will not trigger. If the pause duration expires without a resolution, the incident will trigger as normal. Configure this within a service orchestration by following the steps below.
- In your service orchestration, create a rule with your desired conditions.
- Under Basic Event, enable Pause notifications. Enter a value (in seconds) for Suspend alert for ___ seconds before triggering an incident. Set a pause duration long enough for your entire automation to complete.
- Under Automation Automation Actions, enable Use Automation Actions if an event reaches this rule.
- For When should we run this Action?, select Automatically when Alert is suspended/paused.
- For Automated Action, select your configured Automation Action.
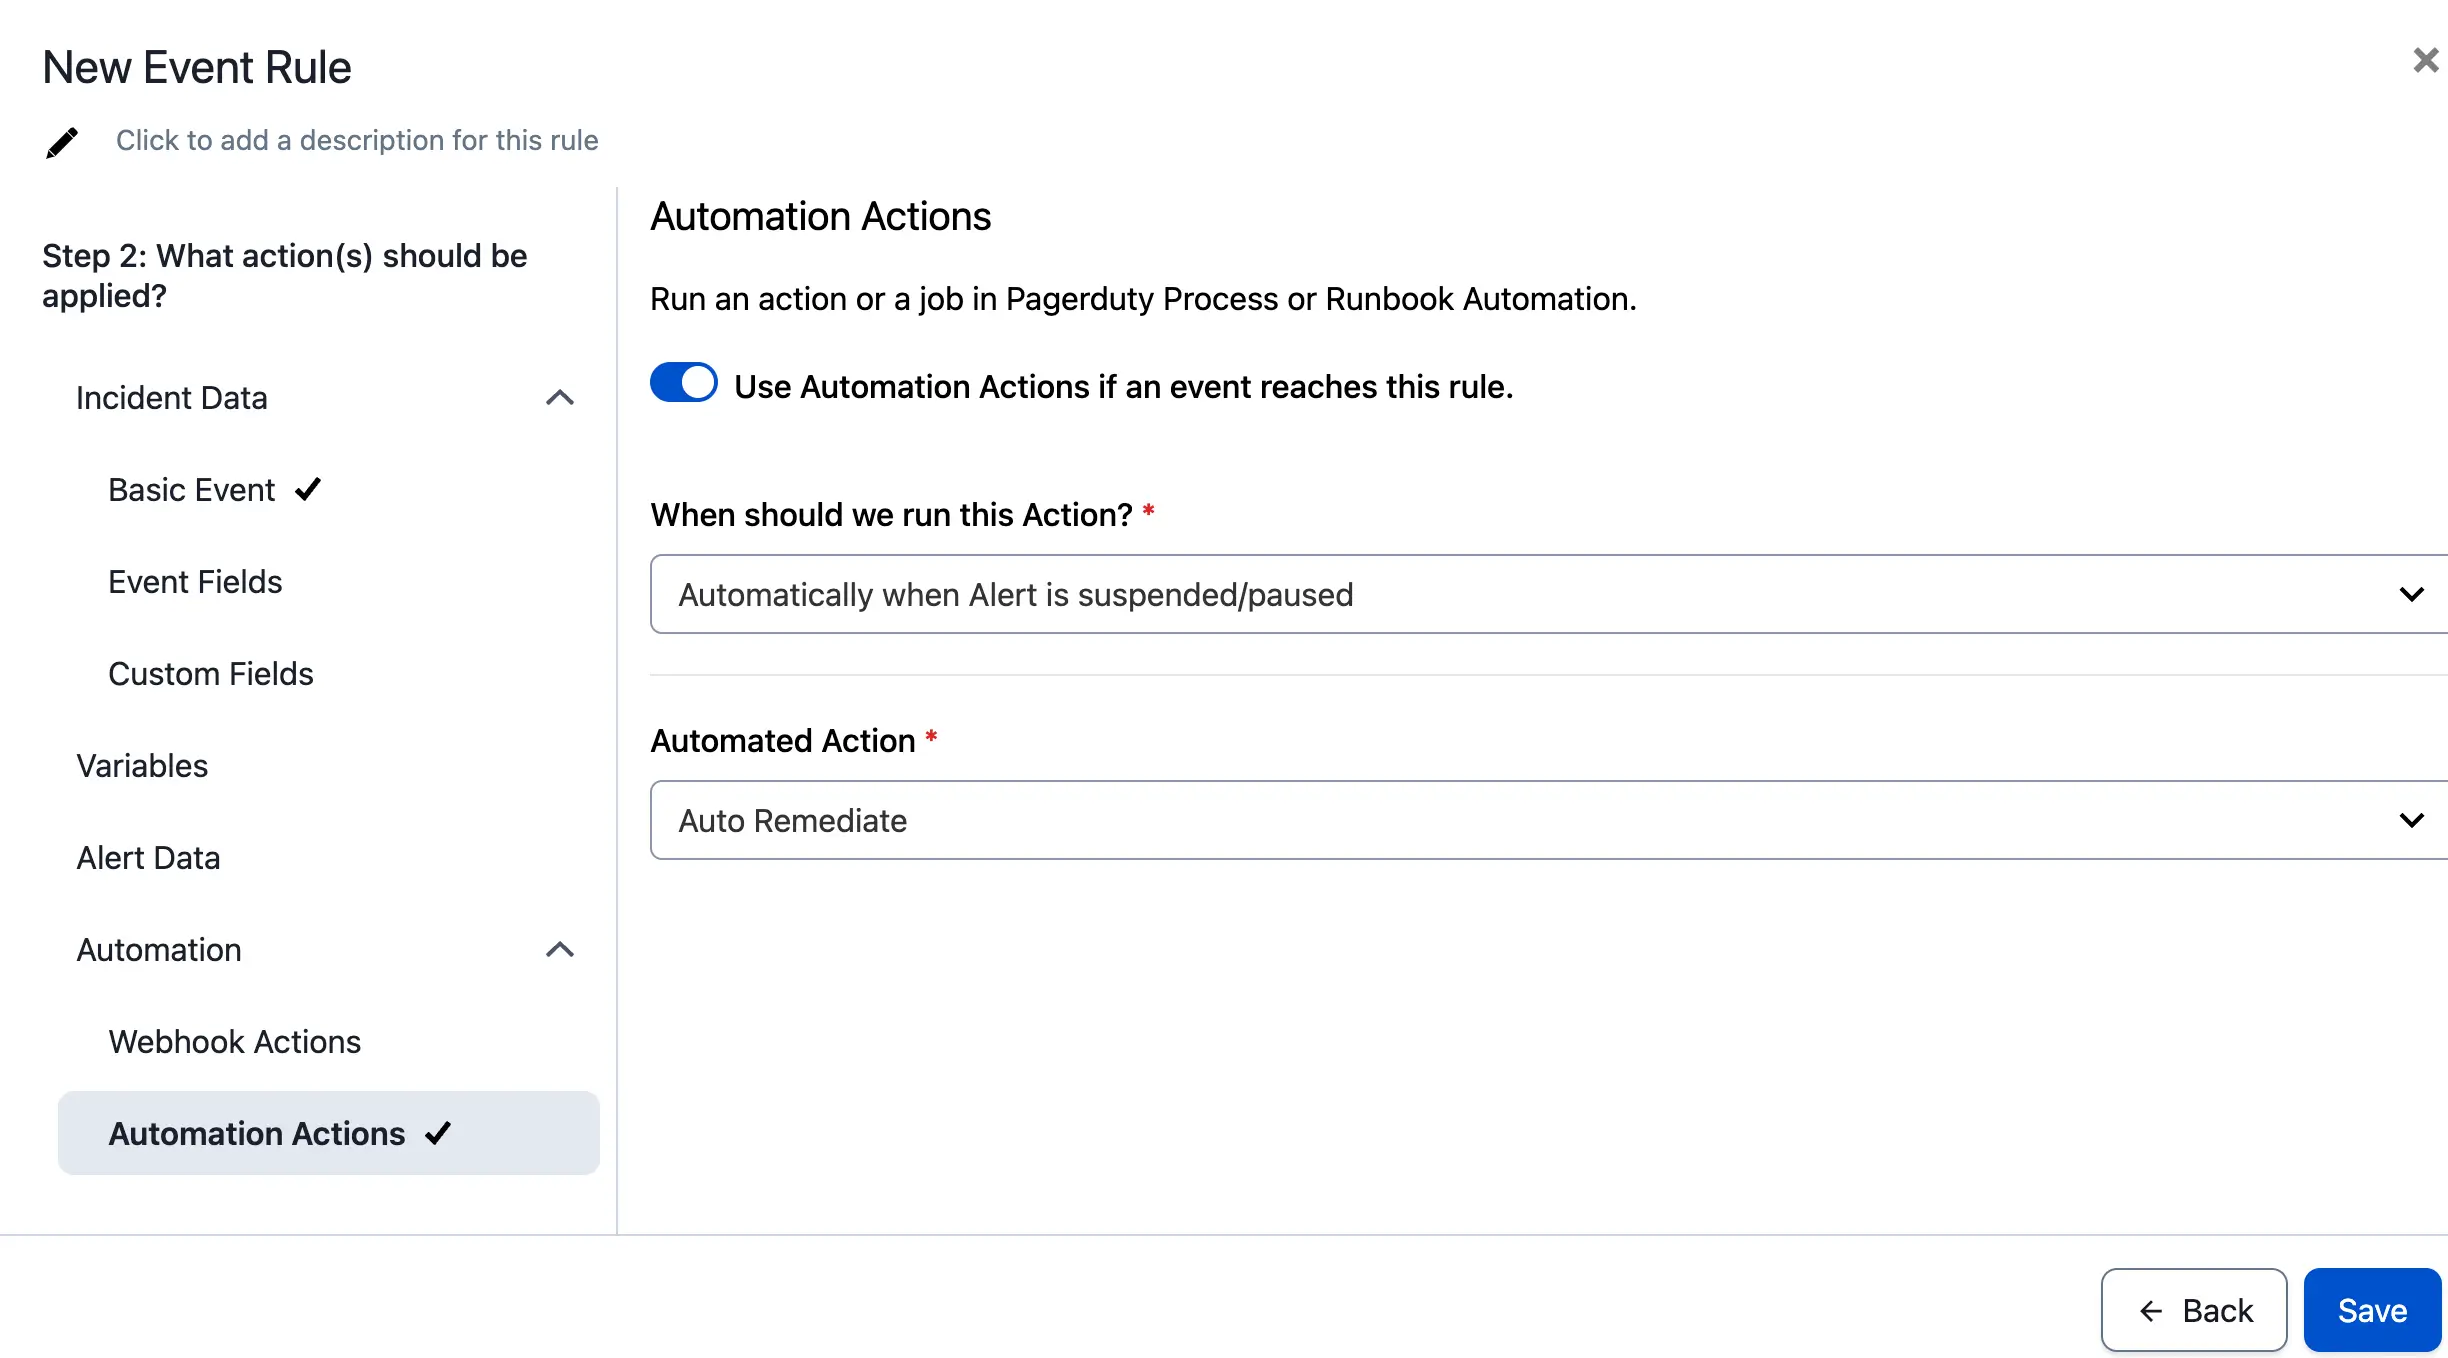
Configured Actions for Auto Remediation
Disable System Auto Resolve for High Priority Incidents
Ensure a human — not an automated system event — is responsible for resolving all high priority incidents by automatically blocking resolve events for specific incidents.
- Create a Custom Field, which will use event data in the incident workflow.
- Create a Cache Variable in your desired orchestration:
- For Type, choose External Data.
- For Data Format, choose Text String.
- Within your orchestration, create a new rule with the following:
- In Step 1: When should this rule be applied?, select If events match certain conditions.
- Using the Cache Variable you created, create the following condition using the Advanced PCL condition editor:
not cache_var.your_new_cache_variable matches part event.dedup_key
- Using the Cache Variable you created, create the following condition using the Advanced PCL condition editor:
- In Step 2: What action(s) should be applied?, select Custom Fields Add Custom Incident Field.
- Under Custom field to set, select the Custom Field you created earlier. For Replace with value, enter
event.dedup_key.
- Under Custom field to set, select the Custom Field you created earlier. For Replace with value, enter
- Click Save.
- In Step 1: When should this rule be applied?, select If events match certain conditions.
- Create an Else rule with the following:
- In Step 1: When should this rule be applied?, select Always (for all events).
- In Step 2: What action(s) should be applied?, select Alert Data. Enable the Always trigger an alert option.
- Click Save.
- Create an Incident Workflow to prevent auto resolves for matching incidents:
- Click Add Trigger and select Conditional trigger. Configure the trigger as follows:
- When should this Workflow start?: Select When conditions are met.
- Create the following condition using the Advanced PCL condition editor:
incident.priority matches 'P1' and not incident.custom_fields.your_custom_field == '' - Click Save.
- Click Add Action. Select Append to a Cache Variable value and follow the steps in the Workflow Actions article to configure this action. Enter your custom field in the Value field.
- Click Add Trigger and select Conditional trigger. Configure the trigger as follows:
- Create a second Incident Workflow to remove the Cache Variable's current value once the incident is resolved:
- Click Add Trigger and select Conditional trigger. Configure the trigger as follows:
- When should this Workflow start?: Select When conditions are met.
- All of the following conditions must be met: Create two conditions:
Status matches ResolvedandResolve Reason does not match merge
- Click Save.
- Click Add Action. Select Remove from a Cache Variable value and follow the steps in the Workflow Actions article to configure this action. Enter your custom field in the Value field.
- Click Add Trigger and select Conditional trigger. Configure the trigger as follows:
Track Event Spikes with Cache Variables
AvailabilityCache Variables and threshold conditions are available with Advanced Event Orchestration.
Use Cache Variables to count events over a rolling time window and an event orchestration rule to trigger an incident when the count exceeds your defined threshold.
Step 1: Create a Cache Variable
- In your orchestration, click View Cache Variables.
- In the Cache Variables side panel, click + Variable.
- For Variable Type, select Event Count.
- Enter a descriptive Name, for example:
event_spike_threshold. - For Count matching events over the last, enter the window you want to count events with a maximum of
86400(24 hours). Choose a duration that reflects your normal event cadence. - For When should this variable be updated?, select Always (for all events).
- Click Save.
Tips
- Shorter windows (for example, 60–300 seconds) help detect bursty spikes; longer windows (for example, 1,800–3,600 seconds) help detect sustained increases.
- You can create multiple Event Count variables per service (for example, five-minute and one-hour windows) to differentiate burst from sustained noise.
Step 2: Create the Orchestration Rule
- In your orchestration, add a new rule in a position where it will be evaluated and not suppressed by a subsequent rule. If you use suppression rules, place the spike detection rule before them or ensure your suppression logic will not catch spike events.
- Under When should this rule be applied?, select If events match certain conditions.
- In the field selector, choose Cache Variable and add your variable (for example,
cache_var.event_spike_threshold). - In the operator dropdown, select is greater than.
- Enter the spike Threshold value — the number of events within your window that should trigger an incident (maximum
999). Pick a value aligned to your normal event volume and the duration you defined. - Click Next.
- Under What action(s) should be applied?, select your desired actions. Common choices include:
- Always trigger an alert to ensure an incident is created.
- Priority and/or Severity to elevate visibility (for example,
P2andcritical). - Custom Fields or Tags (for example,
spike_detected: true,window_seconds: 300,threshold: 50).
- Click Save.
After saving, generate test traffic or replay sample events to verify that the count crosses your threshold as expected. Review the resulting incidents and Event Analytics to confirm the rule's usefulness, then adjust the time span and threshold to balance sensitivity and noise.
Important
- If you use additional rules that suppress alerts, verify ordering so the spike detection rule is not negated by later suppression.
- Thresholds should be tuned to reduce false positives — start higher and step down as you observe behavior.
Track Heartbeat Events with Cache Variables
Event Orchestration can use Cache Variables and webhooks to track heartbeat events for AIOps accounts. If an orchestration does not receive a heartbeat within the user-defined window (maximum 4 hours), it creates an incident.
This flow works as follows:
- First event: create and suspend →
- Next event on time: resolve previous, save new key as cache variable →
- Missed event: resume alert, open incident, do not auto-resolve.
To track heartbeat events, you need to create two cache variables, an orchestration rule to resolve alerts, and an if/else rule to capture your first heartbeat event.
Step 1: Create Two Cache Variables
- Create an Event Data Cache Variable:
- Create a Cache Variable using Event Data (CEF) and name it accordingly.
- Extract the
dedup_keyfield from the current event. - Set the condition for events where
event.event_actionmatchestrigger.
- Create an Event Count Cache Variable:
- Create a Cache Variable using Event Count and name it accordingly.
- Set the duration for your desired heartbeat time window (for example, 300 seconds).
- Set the condition for events where
event.event_actionmatchestrigger.
Step 2: Create an Orchestration Rule to Resolve Alerts
- Add Conditions:
- Set the Event Data Cache Variable to
exists; and - Set the Event Count Cache Variable >= 1; and
- Set
event.event_actionmatchestrigger.
- Set the Event Data Cache Variable to
- Add Action:
- Suspend the alert for the desired heartbeat time window + five seconds (for example, 305 seconds). The additional time is a buffer to allow the webhook to resolve the previous alert.
- Create a webhook:
- Under Automation Webhook Actions, trigger a webhook Automatically when Alert is suspended/paused.
- Enter a Name for the action.
- Add the webhook URL:
https://events.pagerduty.com/v2/enqueue - Add the following Body fields:
routing_key: copy the integration key from your Event Orchestrationdedup_key:{{EVENT DATA CACHE VARIABLE NAME}}event_action:resolve- Additional fields may be required depending on the routing rules within the Event Orchestration, so that the event lands on the correct service to resolve the alert. This is not required if the Event Orchestration has Global Dedup configured.
Step 3: Create an If/Else Rule to Capture the First Heartbeat Event
- Add Conditions:
- Set
event.event_actionmatchestrigger; and - Set the Event Count Cache Variable < 1.
- Set
- Add Action:
- Suspend the alert for the desired heartbeat time window + five seconds (for example, 305 seconds).
Summary
On the first heartbeat, there is no alert to resolve, so the alert is suspended and its dedup_key is stored in the Event Data Cache. For each subsequent heartbeat that arrives within the time window, the previous alert is resolved via webhook using the last dedup_key, then the new dedup_key is saved to the cache variable. If a heartbeat is missed, the previously suspended alert resumes and opens an incident, and the Event Count Cache ensures that this incident is not auto-resolved by any later missed events.
Updated 26 days ago