ServiceNow Integration Details
An overview of how the ServiceNow v8 integration works
ServiceNow is a powerful platform-as-a-service, which offers advanced automation and process workflows for the enterprise environment. This article is an overview of the components and concepts that drive the ServiceNow v8 integration, and will give you a deeper understanding of how it works at a fundamental level.
Looking for a Different Version?
ServiceNow Integration Details for the v7 integration are also available.
Integration Capabilities

ServiceNow integration capabilities
Installation and Configuration
- Installation: For installation instructions, please refer to the ServiceNow Integration Guide.
- Advanced Configuration: For more in-depth information about customizing ServiceNow integration, please refer to Advanced ServiceNow Configuration.
Upgrade to ServiceNow v8
Required User Permissions
You must have a ServiceNow Admin role to upgrade the integration.
- Revert customizations prior to upgrading from the store, as the upgrade path will not patch customized/modified files. Be sure to capture these customizations in an update set and store a copy for future reference before reverting to the out-of-the-box versions.
- After reverting all app files, upgrade the PagerDuty app to the newest version in the ServiceNow Store.
- Then, navigate to System Diagnostics Upgrade History and select the upgrade of the PagerDuty app that you just ran. In the Skipped Changes to Review tab, you may see a list of records that did not upgrade successfully for some reason or another. Important misses will be marked Priority 1 or Priority 2; if there are any high-priority skipped files in that list (Priority 1 or 2), go through each in turn by clicking their File name. On the following details page, click Revert to Base System – this will override the customizations that prevented upgrade and will force-upgrade the file to the version of the PagerDuty app you’ve just installed. Lower priority skipped files should be left as is.
- Navigate to the PagerDuty Settings page to update the new fields in this form. A new workflow connection will be automatically provisioned upon clicking Save at the bottom of the screen. This will enable ServiceNow as a Workflow Action. Once this is complete, manual sync is immediately restored.
- If there is a ServiceNow user ID or ServiceNow user password change, the integration will force a connection update.
- A valid PagerDuty configuration (PagerDuty account URL, PagerDuty API access key, REST API Endpoint) is required in order to provision a connection.
- Select a Sync optionin the new Webhook Configuration management section.
- In the Activity Stream section, confirm that there are check marks next to the event types that you want to sync to your ServiceNow activity stream.
- Ensure that application access is granted for the
sysauto_scripttable for read, create, and update operations, as indicated in this step of our integration guide. - Navigate to Integration Health Check. The integration health check will run automatically, to ensure initial connection is intact and verify that the workflow connection has been enabled.
- Navigate to Webhooks Health Check Run health check, and resolve any inconsistencies prior to migration.
- Navigate to Webhooks Migration to migrate webhooks to v3, and convert all ServiceNow extensions to the latest version.
- Navigate to PagerDuty Inbound Field Rules to update existing Inbound Field Rules to extract data from the new v3 webhook payload.
- If you had customizations (Optional):
- Determine whether historical customizations are still necessary (new integration versions introduce new functionality and fixes, such that the cause for a previous customization may no longer exist).
- Manually implement each required customization on the new version of the file (i.e., do not revert any files to their pre-upgrade versions or import old versions of files). Test after each addition to ensure that the customization does not incur breakage in the new version of the integration.
Manage Integration Settings
Once the ServiceNow v8 integration has been initially configured or upgraded to, global integration settings can be found by navigating to PagerDuty Settings.
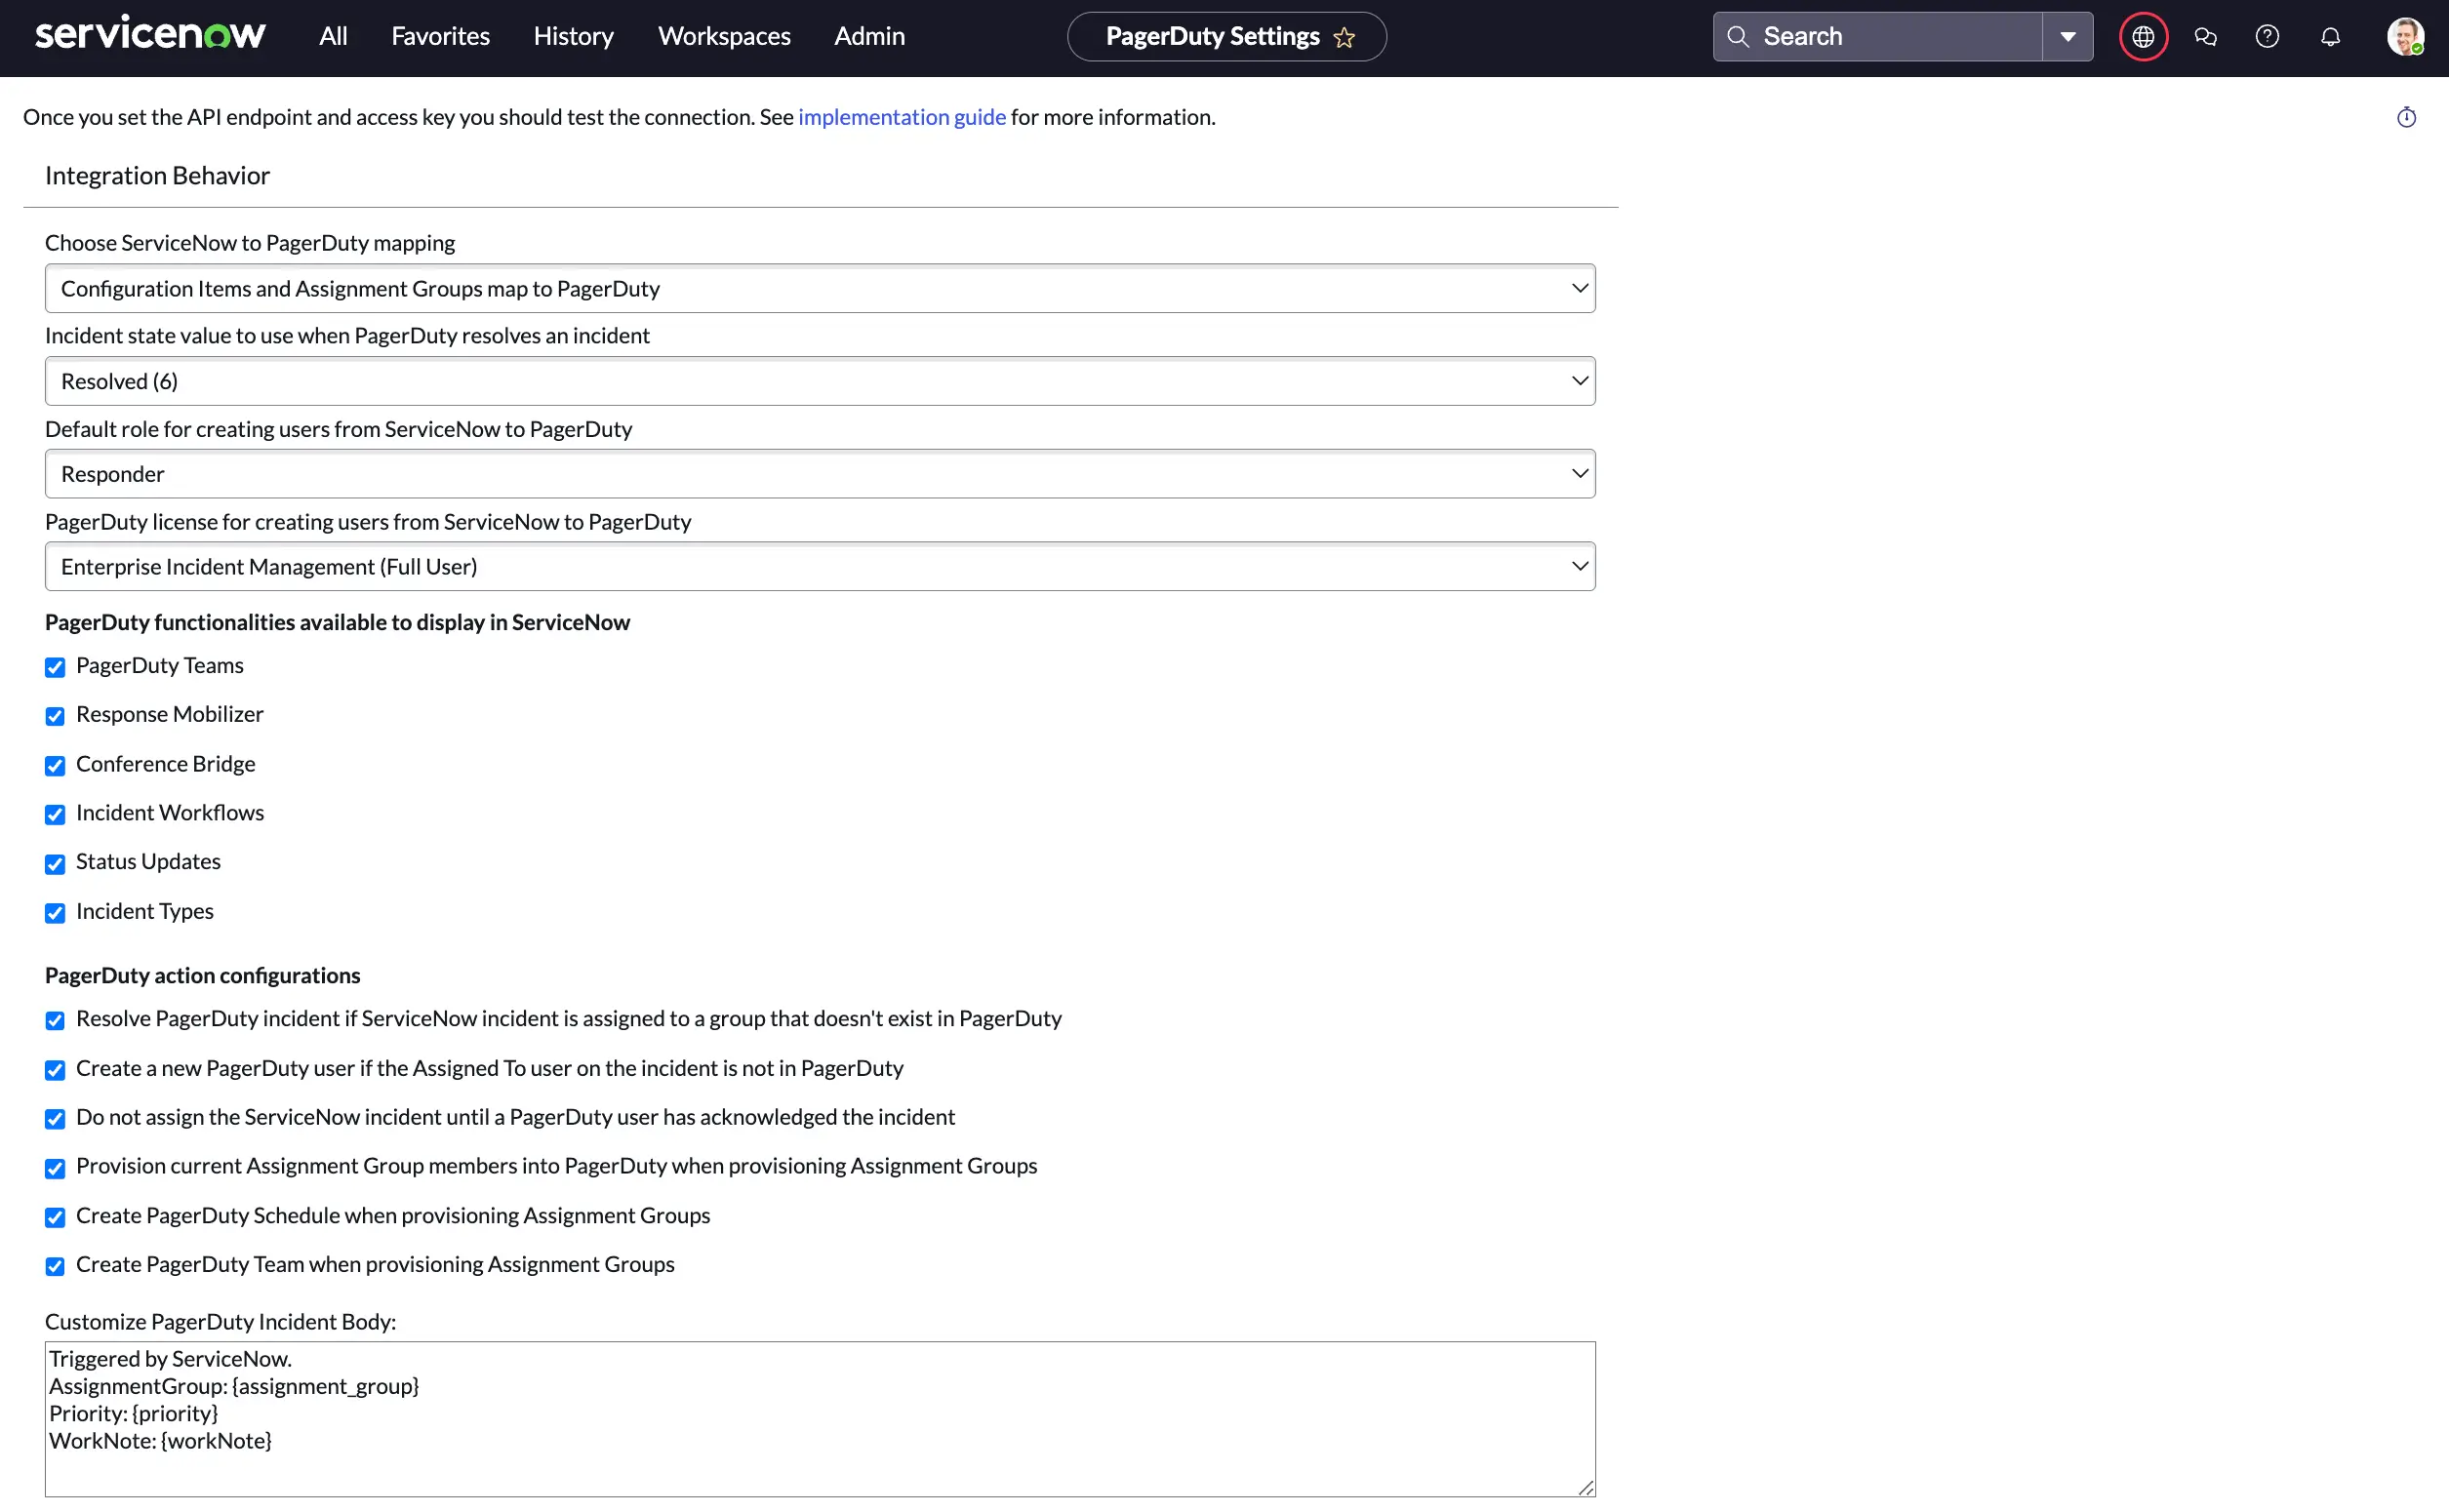
PagerDuty Settings page in ServiceNow
Integration Behavior
Integration Behavior
| Setting | Values |
|---|---|
| Choose ServiceNow to PagerDuty mapping | Select one of the following from the dropdown: - Configuration Items and Assignment Groups map to PagerDuty (Recommended) - Assignment Groups map to PagerDutyTo learn more, see How ServiceNow Objects Map to PagerDuty Objects. |
| Incident state value to use when PagerDuty resolves an incident | Select the integer value associated with the Resolved state in your ServiceNow instance. |
| Default role that should be used when provisioning users from ServiceNow into PagerDuty | Select your preferred default role for provisioned users from the dropdown: - Observer - Responder - Manager - Global Admin |
| PagerDuty functionalities available to display in ServiceNow | Check the features that you want enabled in your ServiceNow instance: - PagerDuty Teams: Make use of the PagerDuty Teams functionality along with assignment groups in ServiceNow. Teams are available on the following pricing plans: Business, Digital Operations (legacy) and Enterprise for Incident Management. - Response Mobilizer: Add one or more users as responders to an existing incident from the ServiceNow interface. The Add Responders feature is available on the following pricing plans: Business, Digital Operations (legacy) and Enterprise for Incident Management.-Conference Bridge: Add conference bridge information to an incident from the ServiceNow interface. The Conference Bridge feature is available on the following pricing plans: Business, Digital Operations (legacy) and Enterprise for Incident Management. - Incident Workflows: Run Incident Workflows from the ServiceNow interface. Incident Workflows are available on the following pricing plans: Business, Digital Operations (legacy) and Enterprise for Incident Management. - Status Update: Send incident status updates from the ServiceNow interface. Status Updates are available with the following pricing plans: Business, Digital Operations (legacy) and Enterprise for Incident Management. - Incident Types: Associate incidents with a specific incident type and its custom fields, so that responders only see the custom fields relevant to the incident context. |
| PagerDuty action configurations | - Resolve PagerDuty incident if ServiceNow incident is assigned to a group that doesn't exist in PagerDuty: Choose whether or not a PagerDuty incident should resolve if it's assigned to a Group that doesn’t exist (has been mapped to) PagerDuty. This is useful if not all ServiceNow Groups are mapped to PagerDuty escalation policies. - Create a new PagerDuty user if the Assigned To user on the incident is not in PagerDuty: Optionally auto-provision ServiceNow users to PagerDuty when they are assigned to or manage a ServiceNow Incident. This may impact billing on your account. - Do not assign the ServiceNow incident until a PagerDuty user has acknowledged the incident - Provision current Assignment Group members into PagerDuty when provisioning Assignment Groups: Optionally auto-provision all users who are part of an Assignment Group when you provision the Group to PagerDuty. - Create PagerDuty Schedule when provisioning Assignment Groups: Automatically create a new schedule when you provision an Assignment Group to PagerDuty. When you create a schedule, it will automatically add the Manager for the Assignment Group to the schedule. You will then need to populate the schedule with other users in PagerDuty. |
| Customize PagerDuty Incident Body | Customize the PagerDuty incident body when you create an incident from ServiceNow. Use braces to input variables from columns in the incident table and {workNote} to include a work note. |
PagerDuty Settings
PagerDuty Settings
You can gather some of these values by following the initial steps in the Integration Walkthrough. However, you may choose to edit them at a later date by following steps 2-5 again.
| Setting | Values |
|---|---|
PagerDuty account URL (https://subdomain.pagerduty.com) | Your PagerDuty subdomain URL, e.g., https://subdomain.pagerduty.com |
| PagerDuty API access key | Paste the REST API key that you generated in PagerDuty. |
| Default service ID (Optional) | - You can provision a default PagerDuty service by clicking Provision default service. - If you have an existing PagerDuty service that you want to use as the default service, copy the 7-character ID starting with P at the end of the service's URL and paste it into this field. |
| Default user ID | - This is the integration user (sometimes also referred to as the service user or application user) that you created in PagerDuty. - Paste the user ID associated to the Default PagerDuty User Account for ServiceNow . |
| REST API Endpoint | - If your account is hosted in the US service region: This should be left as the default, https://api.pagerduty.com - If your account is hosted in the EU service region: Enter https://api.eu.pagerduty.com |
Webhook Configuration
Webhook Configuration
| Setting | Values |
|---|---|
| ServiceNow user ID | The ServiceNow user ID that PagerDuty should use to authenticate with ServiceNow for webhook delivery. |
| ServiceNow user password | The corresponding password to the aforementioned ServiceNow user. |
| Sync option | This setting only applies to how PagerDuty creates ServiceNow incidents. You may select the incident sync method from the dropdown: - Auto: When a PagerDuty incident triggers, it automatically creates a ServiceNow Incident. - Manual: When a PagerDuty incident triggers, it will not automatically create a ServiceNow Incident. Instead, you will see a Sync with ServiceNow button on the PagerDuty incident’s details page. |
| Task type | At this time, only Incident task types are available. |
| ServiceNow REST endpoint for webhook | It is recommended that you leave this value as is. |
| Workflow Connection | The connection used to create ServiceNow Incidents based on PagerDuty Incident Workflows. After you save the PagerDuty Settings page, please navigate back to this field to verify that a workflow connection has generated successfully. |
Activity Stream Customization
Configuration options to control what PagerDuty information is shown in the ServiceNow incident activity stream (e.g. ServiceNow incident work notes stream). Check the options that you want to display in the incident activity stream:

ServiceNow activity stream customization
PagerDuty API requests customization
HTTP headers
Add custom headers for PagerDuty API requests. In the field, add one on each line without quotes (e.g., name:value).
Use MID Server
The ServiceNow integration comes with optional MID server support. Please see our Advanced ServiceNow Configuration article for more information.
Legacy Settings
Logging verbosity level
Modify the amount of information contained in the logs for the PagerDuty integration. Default value is info; consider changing to debug for troubleshooting.
Core Components
All of the source code that performs the actions underpinning the integration can be accessed by going to PagerDuty Configuration Configuration files.
Most of the tasks performed to synchronize data between PagerDuty and ServiceNow are executed in the following application files, under Script Includes:
| PagerDuty | Functions for performing actions on incidents, i.e., incident assignment, syncing work notes, and triggering incidents |
| PagerDutyInbound, PagerDutyInboundV3 | Functions that handle receipt and processing of webhooks from PagerDuty |
| PagerDutyProvisioning | Handles the creation of objects in PagerDuty from ServiceNow |
| PagerDuty_REST | Core functions for making REST API requests |
| PagerDutyInboundWorkflowActions | For Workflow actions, and manual sync of PagerDuty incidents to create a ticket in ServiceNow |
It is possible to modify these components. However, please note that any customizations to these core components, which alter the integration’s out-of-the-box behavior, are not supported by the PagerDuty Support Team.
Integration Health Check
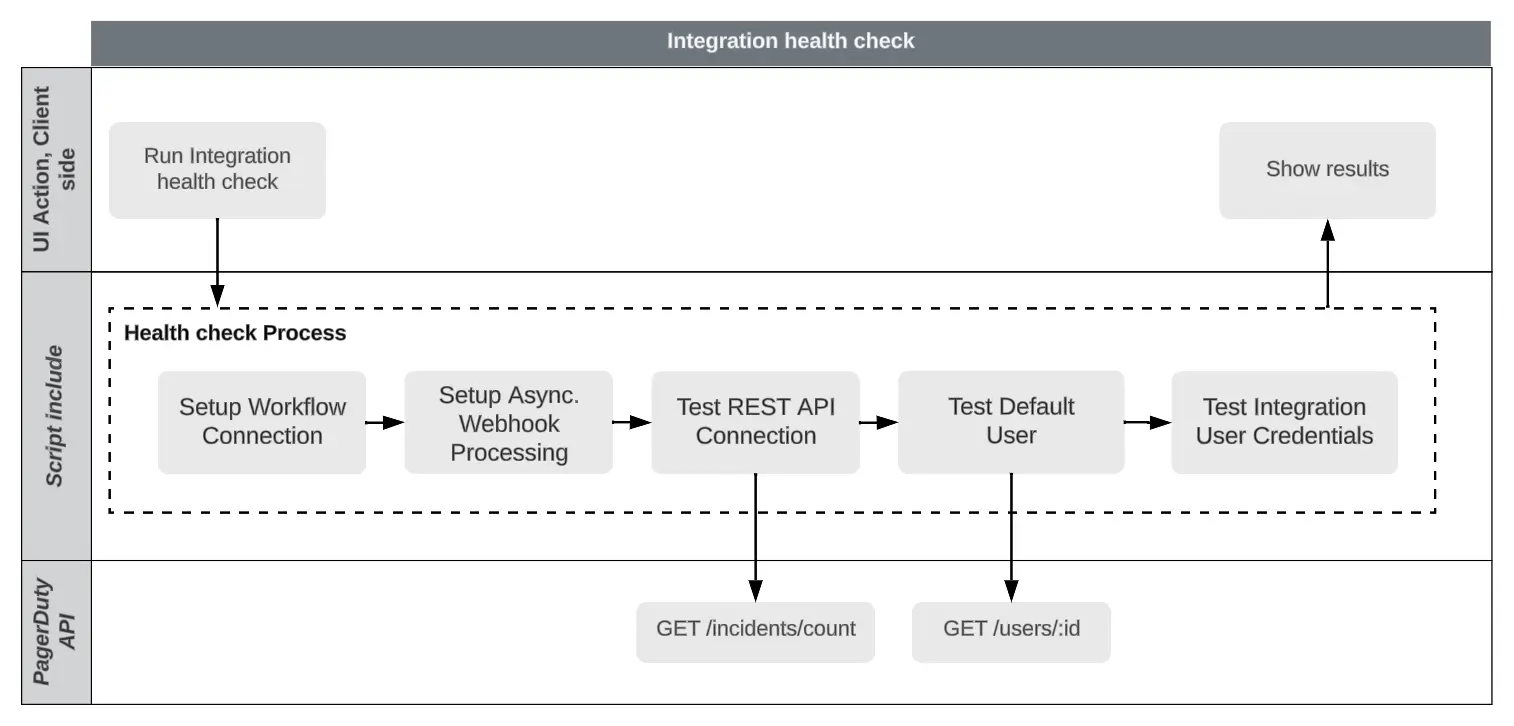
Integration health check
What Happens During an Integration Health Check
- Test REST API Connection: The Health Check validates if the integration is able to successfully make requests to the PagerDuty REST API. You should get a Connection test successful (200) response if the request was successful.
- Test ServiceNow User Authentication: The Health Check validates the username and password for the integration user in ServiceNow. Specifically, the ServiceNow integration user on the PagerDuty Settings page. You should get a ServiceNow user authentication test successful (200) response if the validation was successful.
- Test Default User Settings: The Health Check validates the UserID and email for the PagerDuty integration user. Specifically, for the PagerDuty user corresponding to the Default user ID on the PagerDuty Settings page. You should see a series of success messages. If you do not receive a success message, you will be informed if there are any changes required.
- Test Workflow Connection: The Health Check validates if a Workflow Connection has been established.
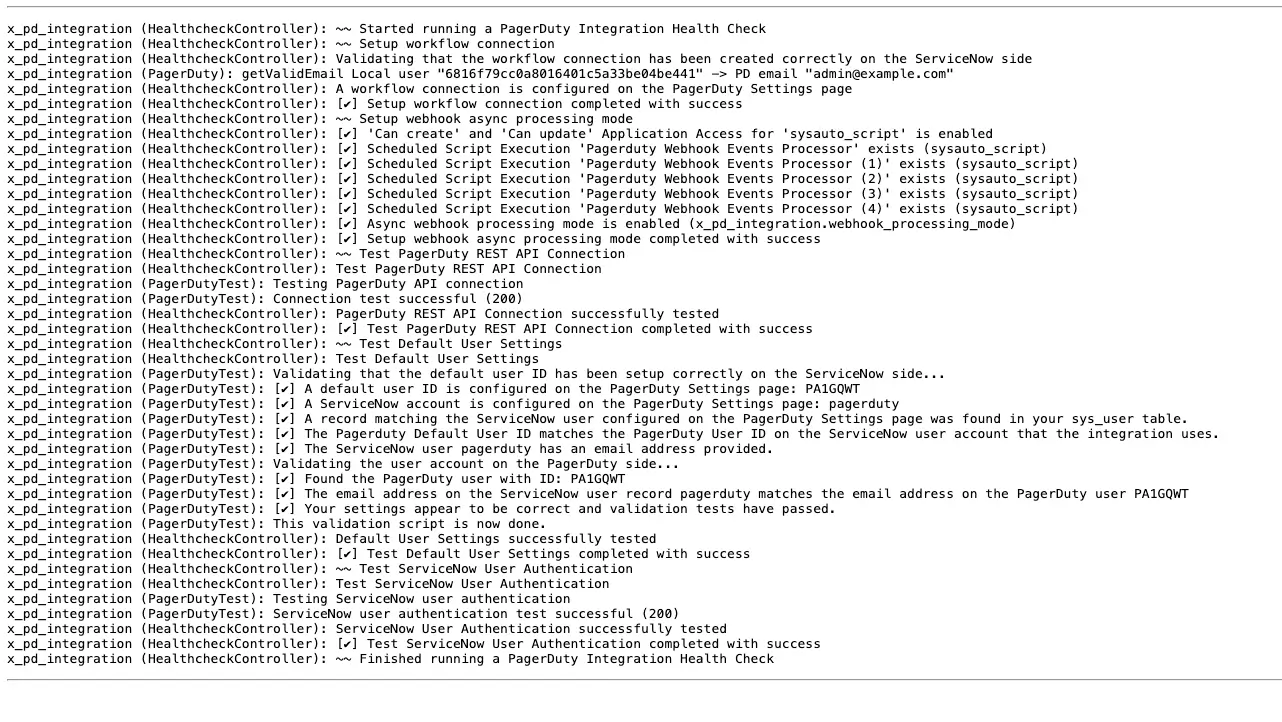
Integration Health Check example
How and When to Run the Integration Health Check
Required User Permissions
You must have the
x_pd_integration.adminrole in ServiceNow to run the Integration Health Check.
- How to run the Integration Health Check: In ServiceNow, navigate to Integration Health Check. The health check will run automatically. Once the health check is complete, the results will be displayed on this page.
- When to run the Integration Health Check: We recommend running Integration Health Checks during the initial configuration of the PagerDuty app in ServiceNow, and also when upgrading the app to v8.
Webhooks Health Check
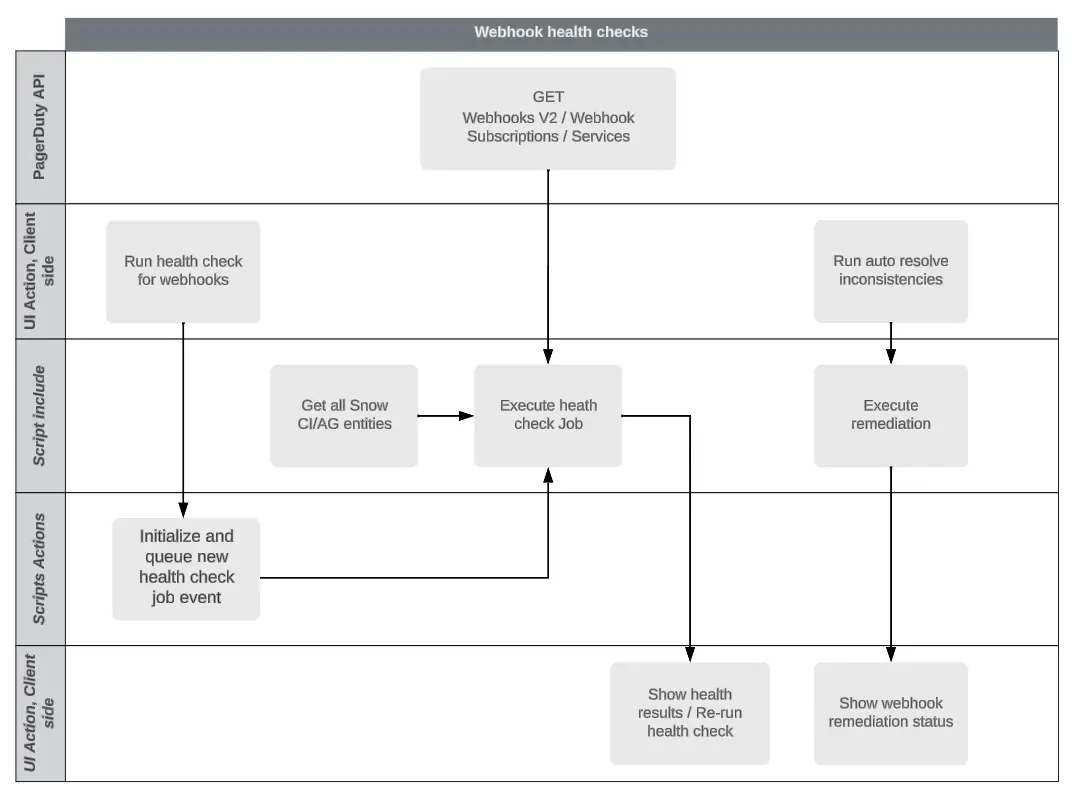
Webhook health checks
What Happens During a Webhooks Health Check
The Webhooks Health Check scans the existing system-wide webhook configurations connecting PagerDuty and ServiceNow, highlighting any errors or inconsistencies. The Webhooks Health Check also provides remediation guidance, such as bulk re-enabling disabled webhooks.
This feature uses the concept of asynchronous job execution to fetch all required data from PagerDuty and ServiceNow, and then it builds a snapshot of the status and configuration of your webhooks.
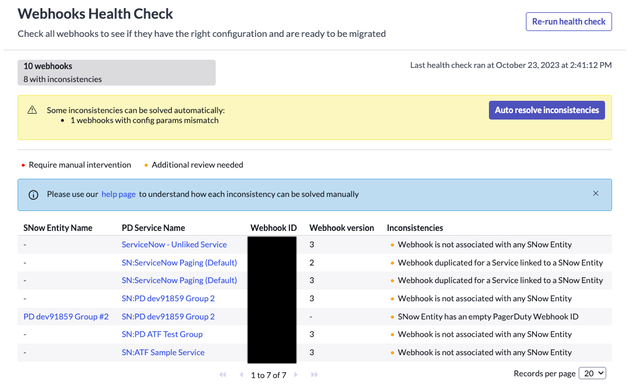
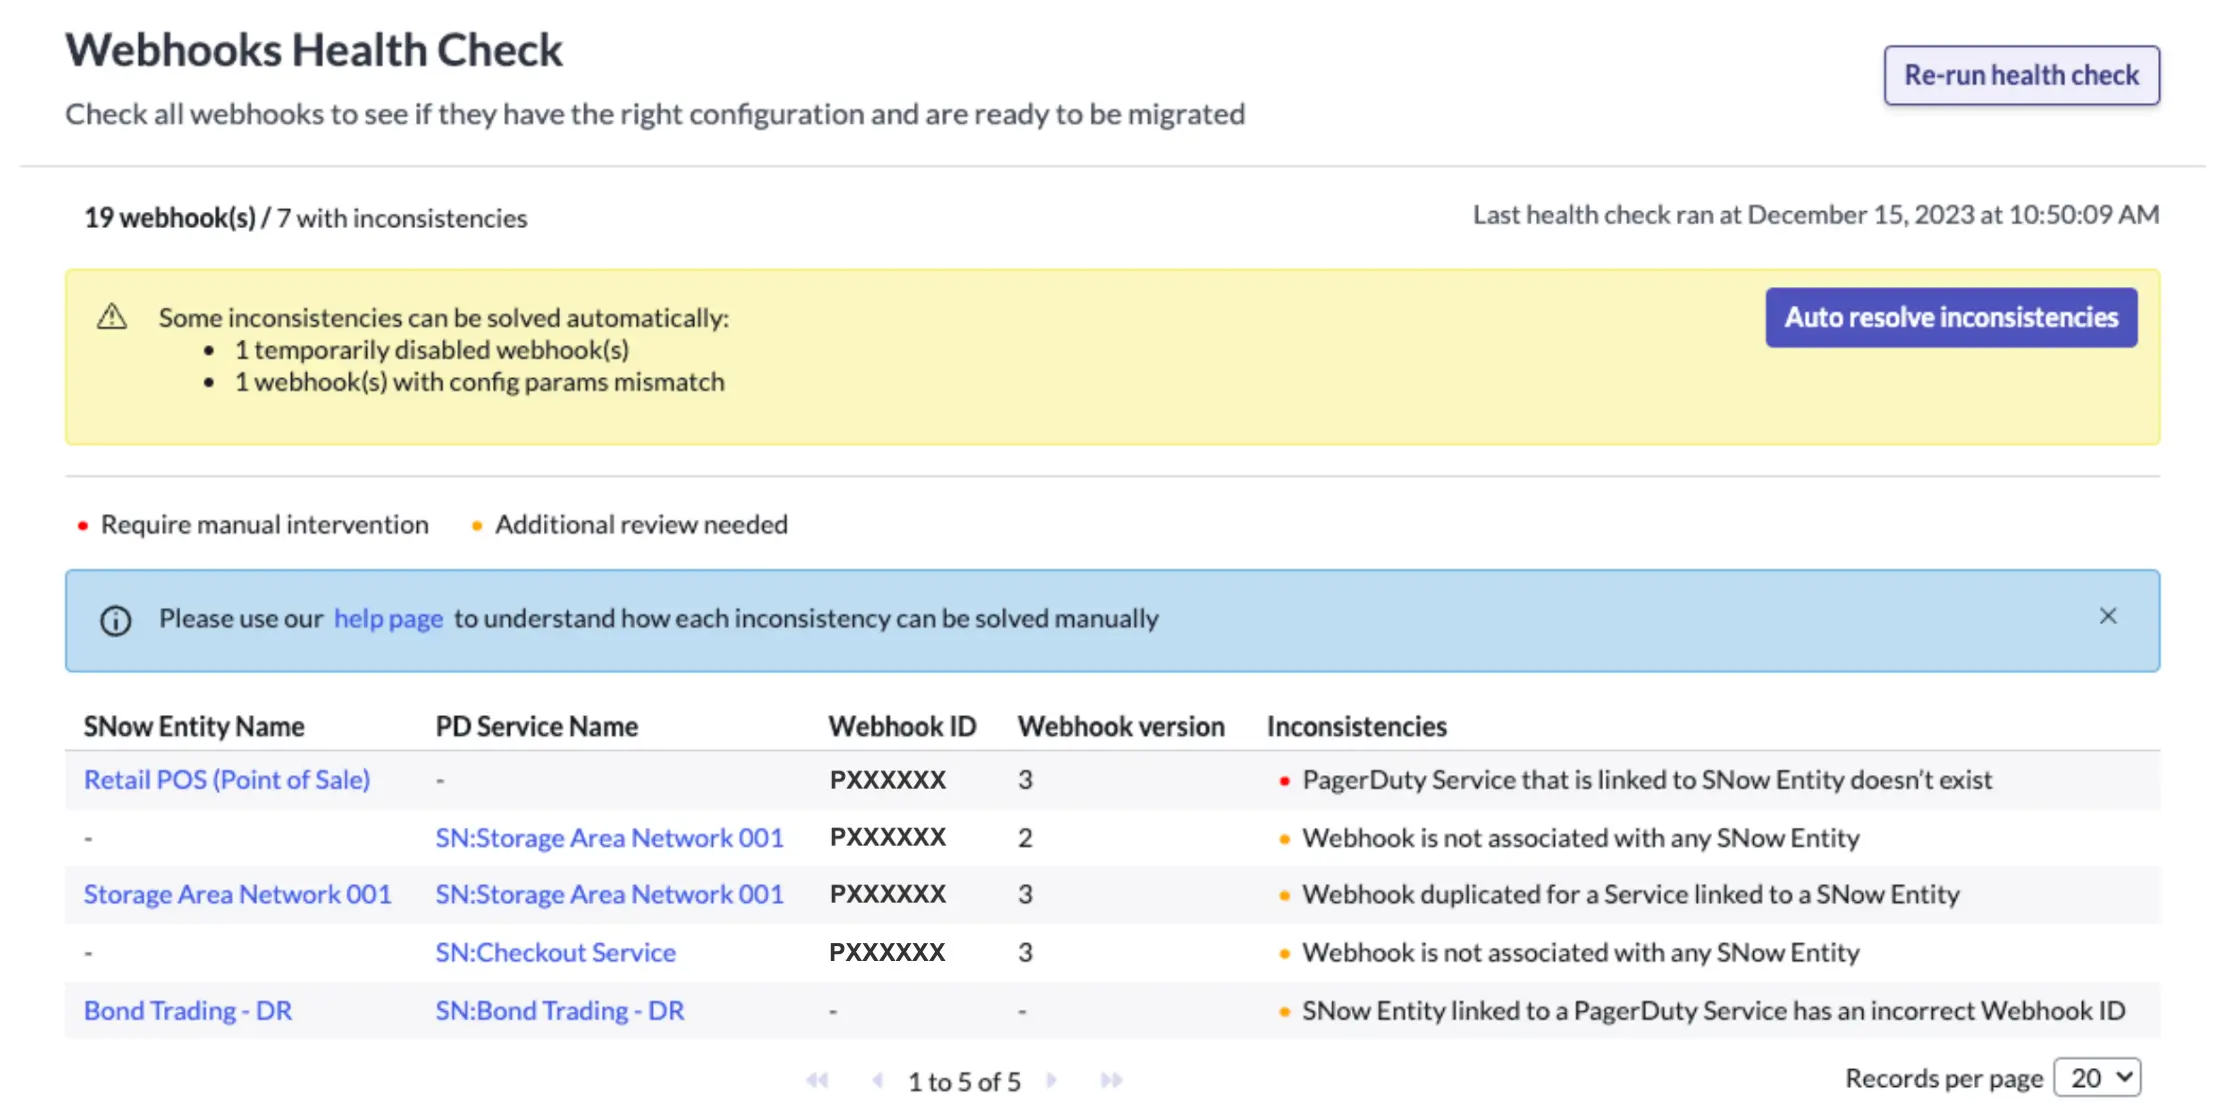
Webhook status
How and When to Run a Webhooks Health Check
Required User Permissions
You must have the
x_pd_integration.adminrole in ServiceNow to run the Webhooks Health Check.
- How to Run a Webhooks Health Check: Navigate to Webhooks Health Check. Then click Run health check to initiate the process. Review the results, and resolve any inconsistencies detected by the health check. Then re-run the health check again to confirm that the inconsistencies have been resolved.
- When to Run a Webhook Health Check: Run the Webhooks Health Check during initial configuration of the PagerDuty app in ServiceNow, and also when upgrading the app to v8. You can execute additional Webhooks Health Checks after installation/upgrade at the Admin’s discretion.
Webhooks Migration
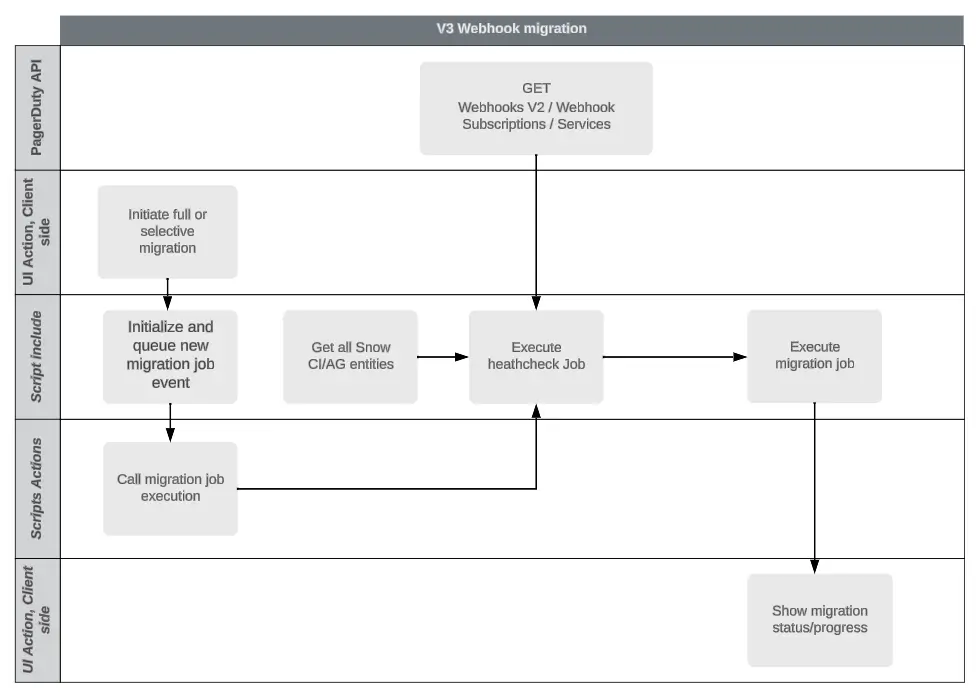
v3 webhook migration
Introduction to the Webhooks Migration Module
The Webhooks Migration module converts existing v2 ServiceNow extensions into generic v3 webhooks. We highly recommend running the Webhooks Health Check prior to migration, since this is the process that identifies v2 webhooks. To access the Webhooks Migration module in ServiceNow, navigate to Webhooks Migration.
Migrate Webhooks to v3
- Before migrating your webhooks to v3, please confirm that the workflow connection has been enabled. This can be verified by navigating to Integration Health Check, which will run automatically.
- Do not migrate webhooks, or continue using the integration, until you have completed this check.
- Next, navigate to Webhooks Health Check.
- Click Run health check.
- If there are any inconsistencies, we recommend resolving them prior to migrating webhooks to v3.
- Next, select All and search and select Webhooks Migration and Migrate your webhooks.
- You should see a confirmation modal indicating that migration was successful.
Additional Notes Regarding Webhook Migration
- When managing v3 webhooks, refrain from re-configuring webhooks via the PagerDuty web UI. Instead, navigate to the Assignment Group/CI record in ServiceNow, to make changes to webhook configuration.
- Installations upgraded to v8 will keep their existing v2 webhooks until the webhook migration is performed. However, any new webhooks created after the upgrade will be v3.
Data from PagerDuty to ServiceNow
How PagerDuty Communicates to ServiceNow
Real-time incident updates in PagerDuty are communicated to ServiceNow through extensions on each PagerDuty service that correspond to a provisioned Assignment Group in ServiceNow. When you initially provision a Group, it creates an extension on the service. In version 3.5 and later, a service extension will be provisioned automatically (if one does not already exist) whenever a new incident is created.
The extensions, also known as webhooks, specify URLs in your ServiceNow instance to which JSON-encoded data is sent via HTTPS/POST requests.

PagerDuty to ServiceNow communication flow
The following variables dictate the actions that will be taken on the target record for each webhook import:
The PdWebhookTransform script – PdWebhookTransformV3 script for v3 webhooks – contains the logic for all default operations taken when updating or inserting an incident (e.g., additional fields to populate and workflow logic). Within the local scope, the following variables dictate the actions that will be taken on the target record for each webhook import.
By the time the script completes, the incident’s properties will be stored in the target variable. Changes will be saved after the script exits.
| Variable | Description |
|---|---|
source | The import record. The field source.message_type is particularly important, since it will be one of the webhook types. |
action | This will be insert or update depending on whether a new incident record is created, or an existing incident is updated. |
assignOnAckOnly | This is a boolean value (i.e., true or false), determined by the setting Only assign based on an acknowledgment from PagerDuty user.Its value determines whether the ServiceNow incident should be assigned based on acknowledgment from PagerDuty, or if the integration should synchronize incident assignment between ServiceNow and PagerDuty with each webhook update. |
target | This is a GlideRecord object representing the incident in ServiceNow that will be created or updated. |
Syncing PagerDuty Incident Notes to ServiceNow
Starting in version 5, the integration uses the annotate webhook event type to keep incident notes synchronized between PagerDuty and ServiceNow. When you add a PagerDuty incident note, the webhook transform will recognize the event, and add the note as a work note with the suffix (PagerDuty: PAGERDUTY_USER_NAME on TIMESTAMP).
In earlier versions (v7.6 and below), the process that ran in the opposite direction was initiated by a business rule (in addition to the user-initiated UI action Refresh PagerDuty Notes), which appeared as an action in the context menu for any given linked incident. The business rule PD Update Worknotes from PagerDuty Notes polls for updates, and raises the event x_pd_integration.import_notes (handled by the Import Notes from PagerDuty incident script action). In both cases, the functions PagerDuty.getIncidentNotes and PagerDuty.createNoteImports are used to import and save notes from PagerDuty. ServiceNow incident work notes will appear in PagerDuty with the prefix (from ServiceNow:SERVICENOW_USER_NAME).
Data from ServiceNow to PagerDuty
How ServiceNow Communicates to PagerDuty

ServiceNow to PagerDuty communication flow
Syncing ServiceNow work notes to PagerDuty
Work notes are copied from ServiceNow to PagerDuty through the PD Copy worknote to PagerDuty incident business rule, which triggers the x_pd_integration.post_worknote event, which then invokes the PagerDuty.postIncidentNote function. This runs any time a work note changes on a linked incident.
How ServiceNow Interacts with PagerDuty Incidents
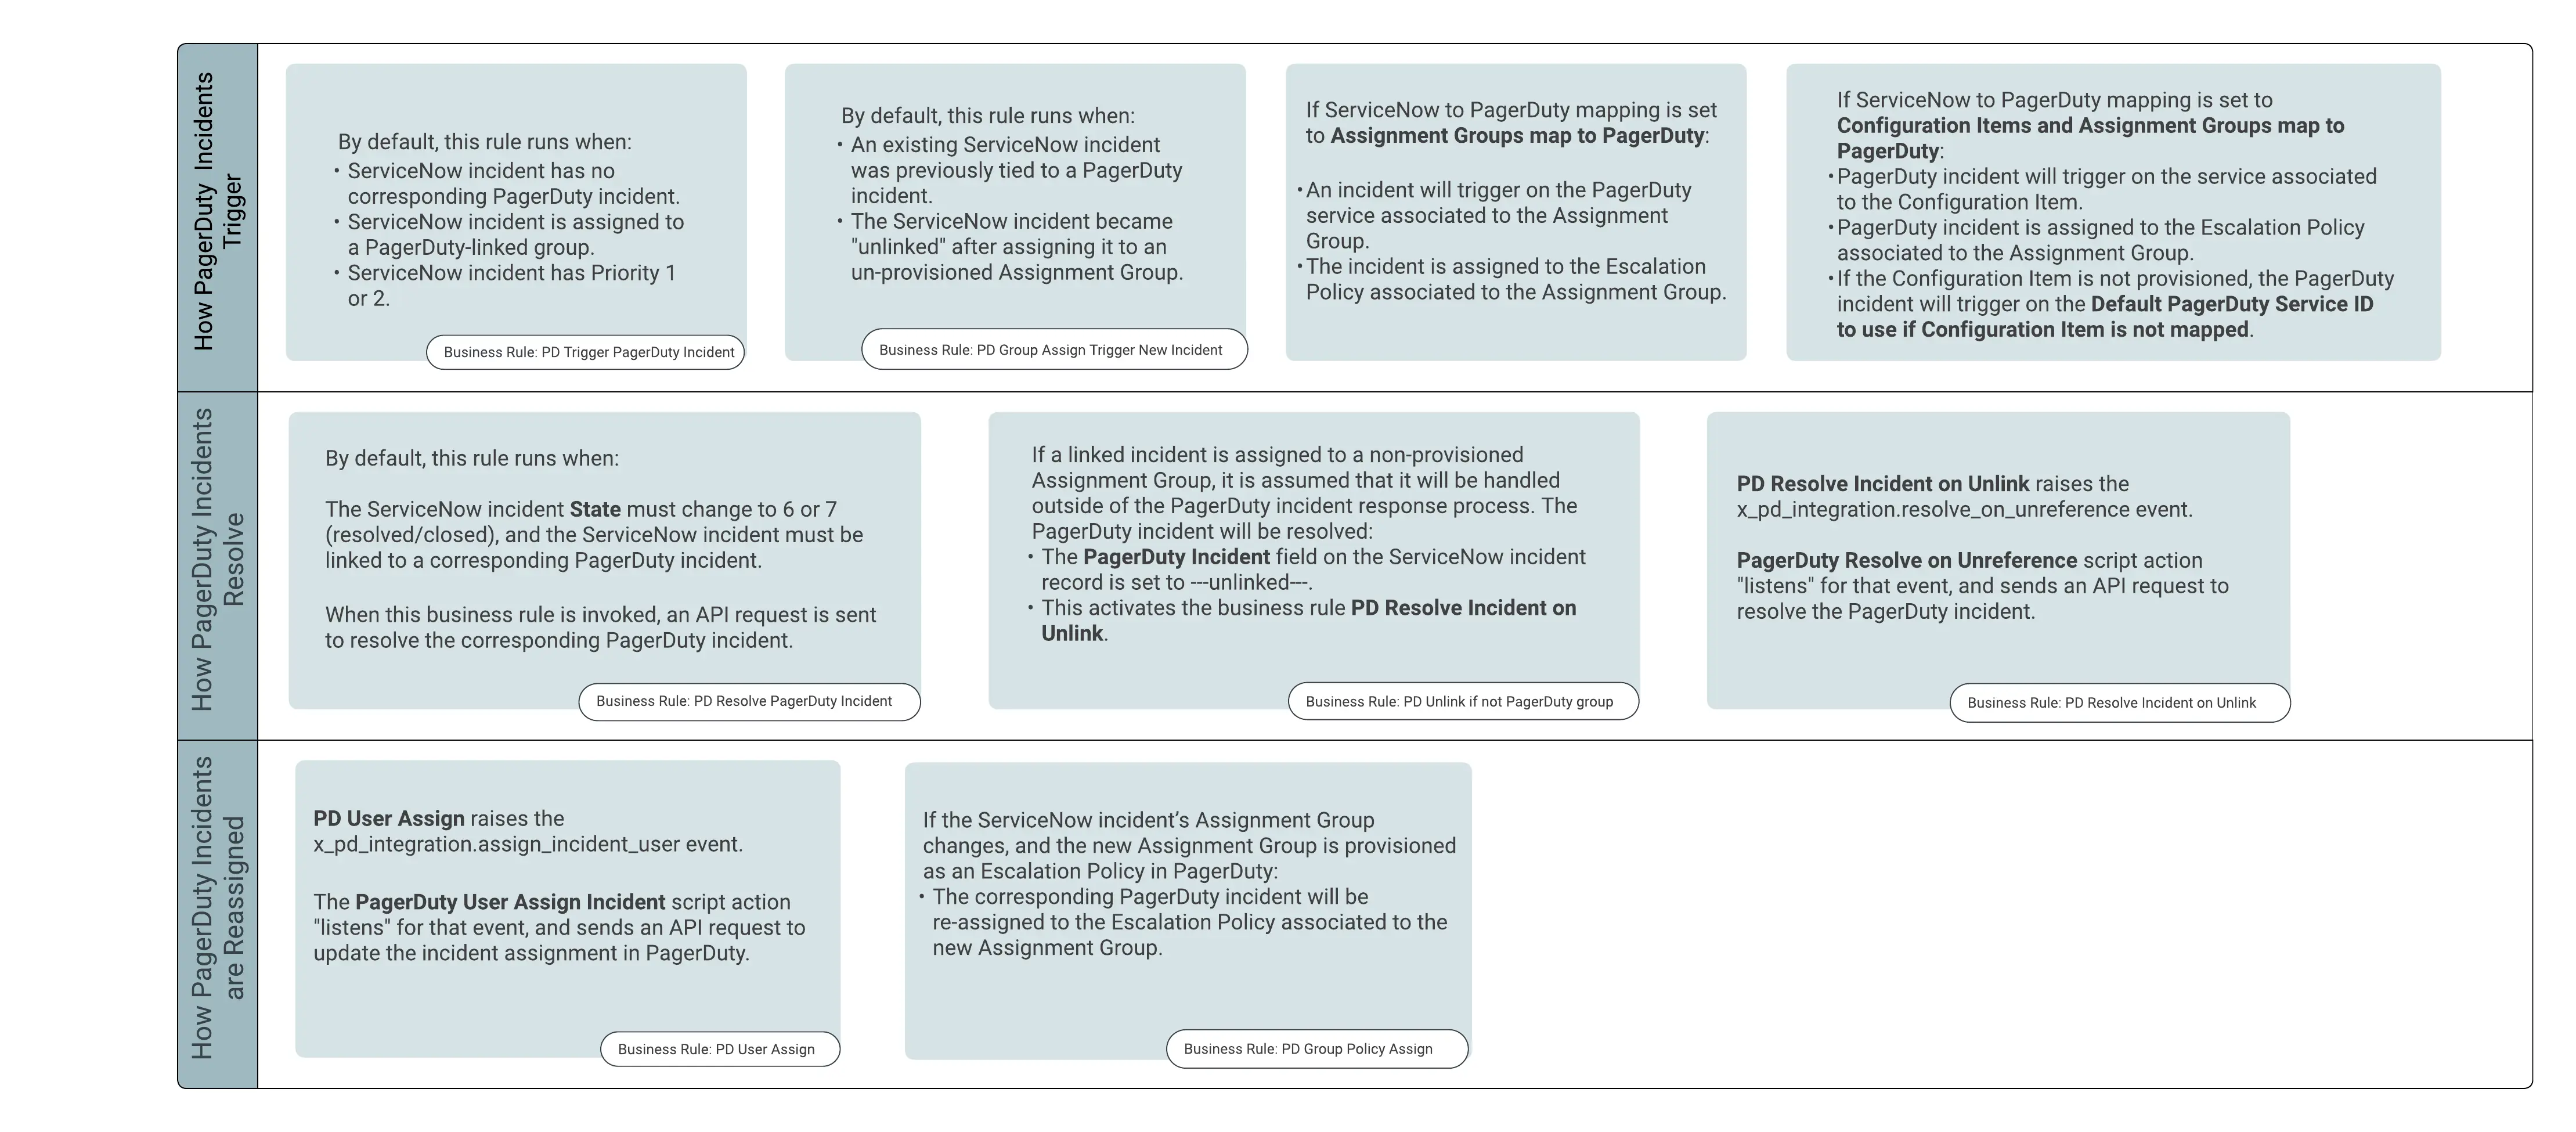
ServiceNow and PagerDuty incident interaction
Updated 3 months ago
