Salesforce Service Cloud Integration Guide | PagerDuty
Configure the Salesforce Service Cloud Integration
Salesforce Service Cloud + PagerDuty Integration Benefits
- Orchestrate responses and actions around customer issues, sales opportunities, and other activities across your organization.
- Customize when to notify the proper on-call team about relevant activities occurring in Salesforce Service Cloud.
- Create and/or update Salesforce Service Cloud objects with relevant information as soon as there’s a PagerDuty incident update such as an acknowledge, resolve, reassign, etc.
- Connect a single PagerDuty subdomain to multiple Salesforce Service Cloud objects to streamline cross-organizational collaboration.
- Access a Command Console interface that allows agents to create PagerDuty incidents and view linked incidents directly from a case record. The Command Console can help identify customer-impacting issues and escalate urgent issues to engineering / IT.
- Access a Status Dashboard that provides agents with status updates for ongoing, customer-impacting incidents and context that enables tailored customer communications.
How it Works
- Once a Salesforce Service Cloud object is connected to your PagerDuty instance, new record creations and updates on that object are evaluated against rules that you predefine. If the rule criteria is met, PagerDuty will perform actions specified by those predefined rules, including creating new PagerDuty incidents and updating the fields of Salesforce Service Cloud objects.
- PagerDuty can also send information to Salesforce Cloud, where you can define the evaluation criteria against the updates made in PagerDuty and select an action to be performed in Salesforce Cloud.
Requirements
Pricing Plan
The Salesforce Service Cloud v3.x integration is available to accounts on the following pricing plans: Customer Service Professional, Customer Service Business, Customer Service Digital Operations (legacy) and Enterprise Customer Service. Please contact our Sales Team if you would like to upgrade to a plan featuring the Salesforce Service Cloud integration.
Required Permissions to Configure or Upgrade the Integration
In Salesforce Cloud:
- Permissions to install Salesforce Managed Package applications.
- A Salesforce Professional, Unlimited or Enterprise edition, which allows a Managed Package to run Apex classes.
- Ensure that API Access is enabled on your Organization. Salesforce Organizations in Trial Mode will normally not have API access enabled.
In PagerDuty:
A Global Admin or Account Owner base role is required for configuration.
Required Permissions to Use the Integration
If you are using custom permissions in Salesforce, please see the FAQ below for more information: What kind of custom permissions do users need to use this integration?
Integration Walkthrough
In PagerDuty
Create an API Key
Generate a General Access REST API Key to allow Salesforce Service Cloud to connect to PagerDuty.
- Navigate to Integrations API Access Keys and click Create New API Key.
- Enter a Description (e.g. “Salesforce Service Cloud API Key”) and click Create Key.
- On the next screen, copy the API Key and paste it in a safe place for later use. Note: You will not have access to this key after this screen.
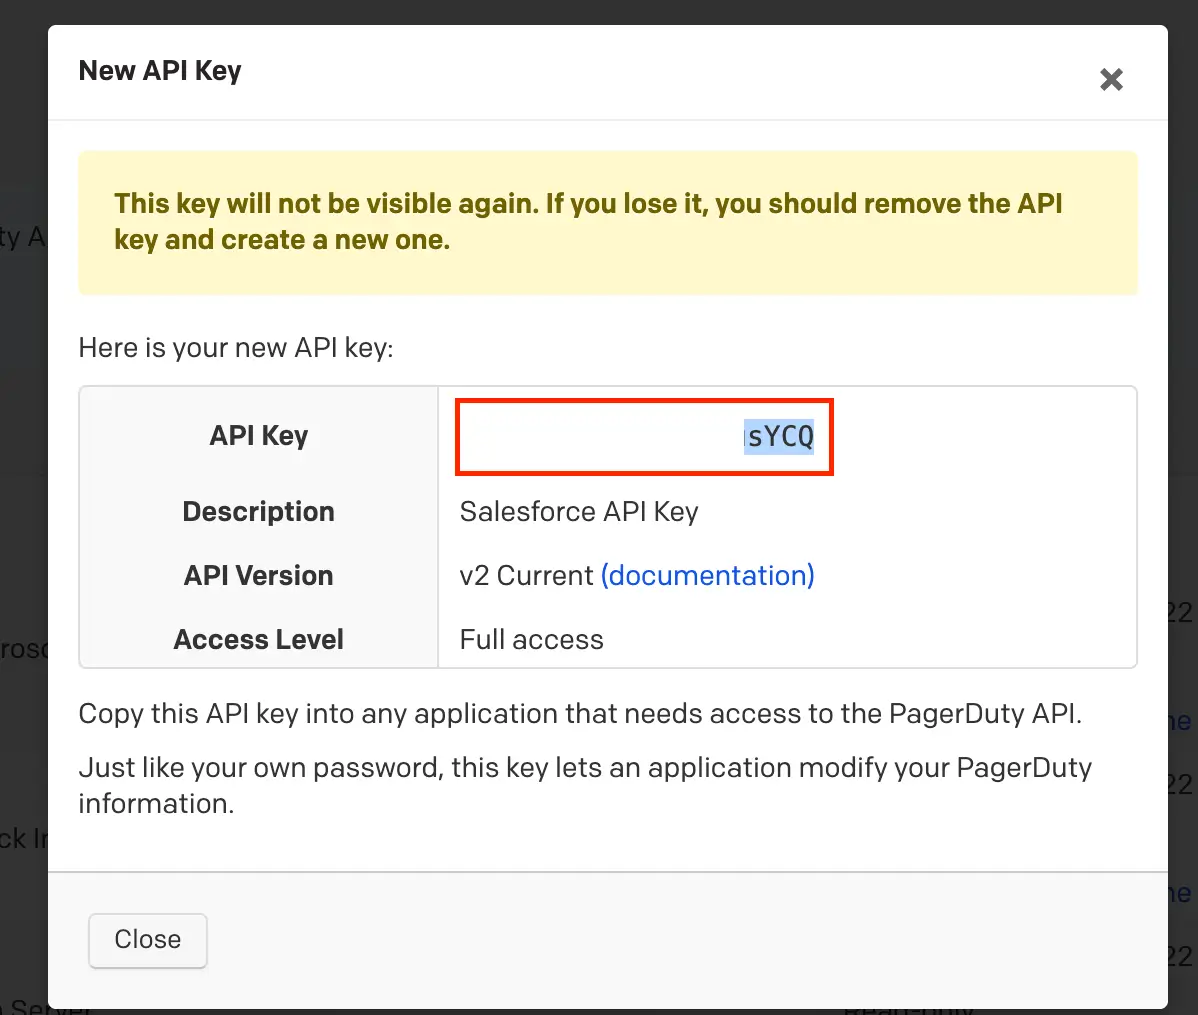
Copy API key
In Salesforce Service Cloud
Download the PagerDuty Application
- Download the PagerDuty Application to your Salesforce Service Cloud Account. Salesforce will prompt you to select which users you want to download the application for. We recommend that you select Install for All Users. You can restrict which users can access PagerDuty functionality later during installation. Click Install.
- Salesforce will also prompt you to approve third party access to PagerDuty APIs. Please check the box Yes, grant access to these third-party web sites and click Continue.
- If you see a message that says, “The app is taking a long time to install,” Salesforce will email you when the app has finished the installation:

Example email
Manage Connected App Permissions and Credentials
- Navigate to Setup.
- In the left menu, select Apps App Manager.
- In the list of installed apps, locate PagerDuty Platform V3 and select Manage from the right-hand dropdown.
- Select Edit Policies. In the Permitted Users field, select Admin approved users are pre-authorized, click Ok when prompted and then click Save. This is a necessary step to ensure that PagerDuty rulesets function appropriately.
- Lower on the PagerDuty Platform V3 page, click the Manage Profiles button under the Profiles heading.
- Check the box next to the Profile type (for example,
System Administrator) belonging to the integration user, and then click Save. This user’s PagerDuty email will be required when you configure the PagerDuty Application; their permissions will be used to update records in Salesforce based on your rulesets.
Assign User Permissions for the PagerDuty Application
All users logging in to the PagerDuty Command Console or Status Dashboard must have permissions to the relevant Salesforce Objects in the PagerDuty Managed Package. If the only user/user profile who plans to use this application is the integration user/user profile you selected in the previous section, you can skip to the next section .
- As a Salesforce Administrator, navigate to Setup Users Permission Sets.
- Select the desired permission set (e.g.,
PagerDutyUserorPagerDutyAdmin). - Click Manage Assignments Add Assignments. Select the user(s) you want to assign the
PagerDutyUserorPagerDutyAdminpermission set to. Select Next and then click Assign.
Note
If you would prefer to use Salesforce Profiles, please see our FAQ for more information.
Add the PagerDuty Console to a Salesforce Service Cloud Case
You will need to add the PagerDuty application to the pages your team members will access. For this guide, we’re going to add the PagerDuty app to the Salesforce Service Cloud Case.
- Navigate to any Case in the Service Console.
- Click into the case, navigate to the in the upper right hand corner and select Edit Page from the dropdown.
- In the left side bar, search for “PagerDuty”. You can drag one of the following into the Case View to your desired location:
- PagerDuty Combined Console (Recommended): The best of PagerDuty, including both the PagerDuty Command Console and the PagerDuty Status Dashboard. With the Combined Console, frontline agents immediately become aware of customer impacting issues, and can engage key experts across the organization when they hear about a new high-priority issue.
- PagerDuty Command Console: Only the PagerDuty Command Console. Recommended for any PagerDuty teams that do not plan to use the PagerDuty Status Dashboard.
- PagerDuty Status Dashboard: Only the PagerDuty Status Dashboard. Best for teams that want to understand which issues are customer-impacting, or teams setting up 24/7 after hours support for the first time.
- Click Save, then click Activation.... When prompted, select the permissions that best fit your needs. We recommend:
- Org Default click Assign as Org Default Desktop Next Save
- App Default Assign as App Default Service Console Desktop and Phone Next Save.
- Navigate back to any case to confirm you can see the selected PagerDuty application.
Add the PagerDuty Console to a Salesforce Service Cloud Incident or other Non-Case Record
If you would like the Command Console or Status Dashboard to work with other Salesforce Service Cloud Records (e.g. an Incident or Opportunities), you can repeat the previous section in this guide starting on the record where you want the console to appear.
Configure the PagerDuty Application
Click the App Launcher in the top left menu, search for and select PagerDuty Configuration. Perform the following:
In the Summary Tab
| Field | Instructions |
|---|---|
| Connection | Disregard the error message. It will be addressed in the next step. |
| Object Mappings | Disregard the error message, this will be addressed in the next step. |
| Webhook | Disregard the error message, this will be addressed in the next step. |
| Enable PagerDuty rule engine | Keep this enabled. |
In the Connections Tab
- Under API information, enter your PagerDuty API key and select the data region for the PagerDuty account where you created the API key.
- In the Webhooks section, enter the Salesforce Service Cloud username of a Salesforce user with the required permissions to carry out the changes needed with the integration, then click Save.
This webhook subscription saves the subdomain for the Salesforce account to the Salesforce Extension page in your PagerDuty account.
In the Object Mappings Tab
In this tab, you will configure the object mappings and integration user mapping. The Salesforce Case and Incident Objects will be mapped by default. The available options for each object are listed below:
Salesforce Case Fields
| Option | Instructions |
|---|---|
| Sync Salesforce Case description to PagerDuty Incident description | Leave this enabled to continue syncing the Salesforce Case description with PagerDuty Incident description when an Incident or case is created. |
| Sync Salesforce Comments to PagerDuty Notes(optional) | You can sync Salesforce Service Cloud Case Comments to PagerDuty Notes. Please note that syncing may consume your API request limits in Salesforce Service Cloud. |
| Enable PagerDuty triggers on Case Creation and Case Comments (optional) | You can Enable PagerDuty triggers for Case Creation and Case Comments. |
Salesforce Incident Fields
| Option | Instructions |
|---|---|
| Sync Salesforce Incident description to PagerDuty Incident description | Leave this enabled to continue syncing the Salesforce Incident description with PagerDuty Incident description when an Incident is created. |
| Enable PagerDuty triggers on Incident Creation (optional) | You can enable PagerDuty Incidents to sync with Salesforce Incident objects, instead of the default sync to Salesforce Case objects. Notes: - Requirement: Incident Management must be enabled to use this feature. - This will create an Apex Trigger on the Salesforce Incident Object. Because Salesforce doesn’t allow create or edit Apex actions in production, this step must be performed in a sandbox and then migrated to production. |
Salesforce and PagerDuty User Mapping
For the PagerDuty Integration Email field, search for and select the email that belongs to the integration user who has permission to create and update incidents in PagerDuty.
Once you've finished configuring the three sections above, click Save.
In the Logger Tab
| Field | Instructions |
|---|---|
| Log Level | Select from the following log types: - Debug: This type records and displays all log types. - Info: This type records and displays both info and error logs. - Error: This type records and displays error logs only. |
| Storage Delete Intervals | Select the number of days Salesforce should store your PagerDuty logs for before they are deleted. |
- Click Save.
Configure Rulesets
You can set up rules to create/modify incidents based on the content of a Salesforce record, or vice versa.
- Select the Rulesets tab. This is where you build the rules that specify what should happen to the object and fields when PagerDuty sends an update back to Salesforce Service Cloud.
- Click Add Ruleset on the right, enter a Ruleset Name and click Save. This Ruleset acts like a folder that holds any rules you create. For ease of troubleshooting, we recommend that you maintain one ruleset for actions triggered from Salesforce to PagerDuty, (e.g., "SFDC > PD”) and one ruleset for actions triggered from PagerDuty to Salesforce (e.g., “PD > SFDC”).
- Select the ruleset and then click Add Rule. Enter a Rule Name, click Save and then click the name of the rule.
- Each rule will ask for conditions that must be met prior to performing the actions specified in the latter part of the rule definition. Configure the following:
| Field | Instructions |
|---|---|
| Choose Salesforce Object | Search and select the Salesforce Service Cloud object that you would like to map to PagerDuty based on this rule’s criteria. |
| Run rule on | Depending on the direction you would like actions to be triggered, make the following selection: - Salesforce to PagerDuty Actions: Select [Salesforce-Object] create or update. OR - PagerDuty to Salesforce actions: Select PagerDuty incident create or update. |
| When | Depending on your preferences, select: - All conditions are met OR - Any conditions are met |
- Click Add Condition. Under Choose Field, choose the field(s) from PagerDuty, or from the Salesforce Service Cloud object that this rule will run on. The following PagerDuty Fields are available:
| Field | Definition |
|---|---|
| Event Type | Run the rule based on the type of PagerDuty event. Trigger, Acknowledge, Resolve, Assign, Escalate, Custom or Delegate. |
| Incident Title | Run the rule based on whether the PagerDuty incident Title matches a predefined string. |
| Incident Status | Run the rule based on the PagerDuty incident’s status. Triggered, Acknowledged or Resolved. |
| PagerDuty Service | Run the rule based on events generated by a selected PagerDuty service. |
| PagerDuty Service Name | Run the rule based on events generated by a PagerDuty service name that matches a predefined string. |
| PagerDuty Escalation Policy | Run the rule based on incidents assigned with a selected PagerDuty escalation policy. |
| Escalation Policy Name | Run the rule based incidents assigned with a PagerDuty escalation policy name that matches a predefined string. |
| PagerDuty Incident Priority | Run the rule based on the selected incident priority. |
| Urgency | Run the rule based on the selected incident urgency. |
- The available Salesforce Fields vary by object label and account configuration. Please search for your object’s fields in Salesforce’s documentation for more details.
- Next, select an Operator and enter a value to complete the condition. You may choose to add multiple conditions for each rule. Once you are done adding your conditions, proceed to the next step.
- Select when the following actions should be executed after the conditions are met:
- New PagerDuty Incidents and Salesforce Objects created by this ruleset will only execute the actions when a new object is created in PagerDuty or in Salesforce.
- All linked PagerDuty Incidents and Salesforce objects that match the conditions specified above will execute the actions on new and existing linked objects in PagerDuty or in Salesforce.
- Now click Add Action and select a PagerDuty Action or Salesforce Action. You may choose multiple actions for each rule.
| PagerDuty Actions | Definition |
|---|---|
| Create new Incident, if there are no linked incidents | If rule conditions are met, create a PagerDuty incident. |
| Create new Incident, if there are no linked incidents Set PagerDuty Incident Title | If rule conditions are met, a PagerDuty incident will be created with a custom, preconfigured title. To create a custom incident title: - Select the PagerDuty Action Create new Incident, if there are no linked incidents. - Click the Set PagerDuty Incident Title dropdown and select Use Custom Incident Title. - You can add preliminary custom text as the prefix and select up to three Salesforce case fields to construct the custom incident title. - Use the Preview bar to see how the title will look. Incident titles longer than 1024 characters will be truncated when the incident is created. |
| Acknowledge Incident | If rule conditions are met, acknowledge the PagerDuty incident. |
| Resolve Incident | If rule conditions are met, resolve the PagerDuty incident. |
| Set Incident Priority | If rule conditions are met, set the PagerDuty incident’s priority to a specified value. |
| Set Incident Urgency | If rule conditions are met, set the PagerDuty incident’s urgency to a specified value. |
| Run Response Play (Deprecated) | Response Plays are deprecated. Please use Incident Workflows. |
| Run an Incident Workflow | If rule conditions are met, run a specified Incident Workflow on the incident. |
| Run Automation Action | If rule conditions are met, run a specified Automation Action on the incident. |
| Reassign | If rule conditions are met, reassign the PagerDuty incident. |
| Add Responders | If rule conditions are met, add responders to the PagerDuty incident. |
| Salesforce Actions | Definition |
|---|---|
| Set [Salesforce-Object] field value | If rule conditions are met, set an object’s specified field value. |
| Create new [Salesforce-Object] | If rule conditions are met, create a new specified object. |
| Set Incident Conference | If rule conditions are met, set the value of the PagerDuty conference bridge to the value of the selected Salesforce URL field. To update the PagerDuty Incident Conference field every time the salesforce field is updated, add a condition with the linked Salesforce field and the “changes” operator. |
| Set Incident Description | If rule conditions are met, set the value of the PagerDuty incident description to the value of the selected Salesforce test field. To update the PagerDuty Incident Description field every time the Salesforce field is updated, add a condition with the linked salesforce field and the “changes” operator. |
- Click Save to complete the rule configuration. Navigate back to the Rulesets tab and click the toggle switch to enable your ruleset.
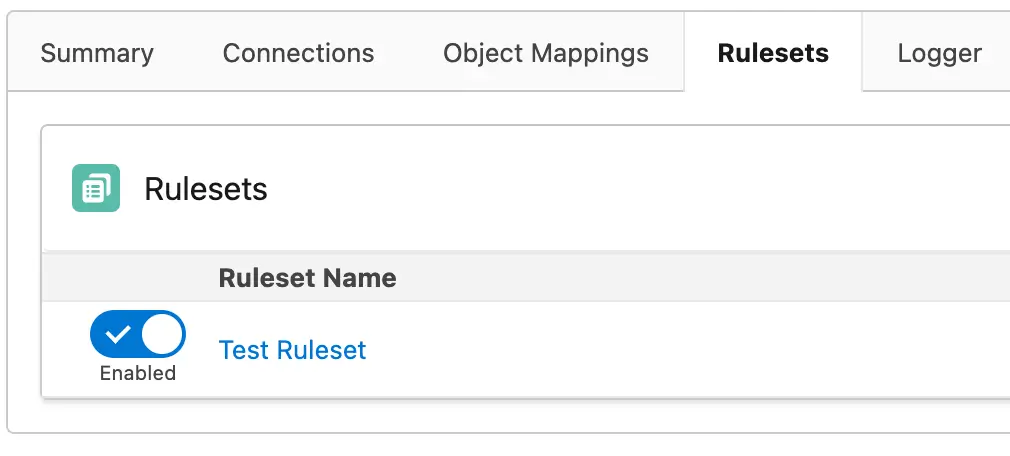
Enable Ruleset
Test Ruleset
If you configured a rule to create Salesforce cases from PagerDuty incidents, you can test the ruleset by creating an incident.
- Navigate back to your PagerDuty account and select Services Service Directory and click the name of the service you would like to test with. Manually trigger a test incident on this service.
- Once the test incident has been triggered, return to Salesforce Service Cloud, click the App Launcher and search and select PagerDuty Logs to see if a webhook from PagerDuty arrives. When you receive the webhook, the integration is complete. If you do not receive the webhook, check your log management tool to troubleshoot why the webhook failed to deliver.
Remove a Salesforce Extension
To remove the Salesforce extension from your PagerDuty account:
-
Log in to your connected SalesForce Service Cloud instance, click the App Launcher in the top left and then search for and select PagerDuty Configuration.
-
In the Summary tab, click the Enable PagerDuty rule engine toggle to disabled.
-
In the Connections tab, click Remove webhook and then click Update.
-
In the Objects Mapping tab, remove PagerDuty Integration Email and click Save.
Upgrade to v3.x
If you have an earlier version of v3 installed in your Salesforce Service Desk environment, follow the instructions below to upgrade to v3.x. You can check your current PagerDuty app version in Salesforce Service Cloud by navigating to Setup and then search for and select Installed Packages.
In Salesforce Service Cloud
Upgrading from Version 3.6 and Lower
If you're upgrading from version 3.6 or lower, please follow instructions below to remove the old connected app before installing the new application (This is not a complete uninstall of the application from AppExchange). The most recent version of the application contains a new connected app package.
Note: It is expected that PagerDuty-to-Salesforce rulesets will not execute after disconnecting the old app and before connecting the new one. Salesforce-to-PagerDuty rulesets will not be affected during this time.
To remove the old connected app:
- In Salesforce, navigate to Setup Manage Connected Apps.
- Click PagerDuty Platform V3 Uninstall.
After installing the new application, please complete the Manage Connected App Permissions and Credentials section to set up the new connected app.
Upgrade the PagerDuty Application
- Download the PagerDuty Application to your Salesforce Service Cloud Account. Salesforce will prompt you to select which users you want to download the application for. We recommend that you select Install for All Users. You can restrict which users can access PagerDuty functionality later during installation. Click Upgrade.
- Salesforce will ask you to approve third party access to PagerDuty APIs. Please check the box Yes, grant access to these third-party web sites and click Continue.
- After the app has finished upgrading, navigate to App Launcher in the top-left menu, and search and select PagerDuty Configuration in the Connections tab.
- Upgrade to the new Salesforce named credential feature by entering the PagerDuty API key and selecting the related data region for your PagerDuty account in the API information section.
- Subscribe to the new PagerDuty webhooks v3 by entering the Salesforce Service Cloud username of a Salesforce user with the required permissions to carry out the changes needed with the integration, then click Save.
- After the new webhooks subscription is complete, you will see a prompt to remove old PagerDuty webhooks from your PagerDuty account. Click the link to prevent duplicate incident creation in PagerDuty.
- You are now ready to use the newest version of the PagerDuty for Salesforce application.
Salesforce Service Cloud User Guide
Please read our User Guide for more information on how to use the integration after it has been configured.
FAQ
How can I use this application to set up 24/7 after-hours support for high priority cases or premium customers?
- First, create a PagerDuty service for your Support team and create an on-call rotation that will determine which service agents will be alerted when an urgent issue arises.
- Next, create a ruleset that creates an incident on this service whenever a new Salesforce case is created that meets your qualifying criteria (e.g., a high priority Salesforce Service Cloud case outside of business hours).
- Trigger a case that meets the qualifying criteria in your ruleset to confirm that the ruleset is working as expected.
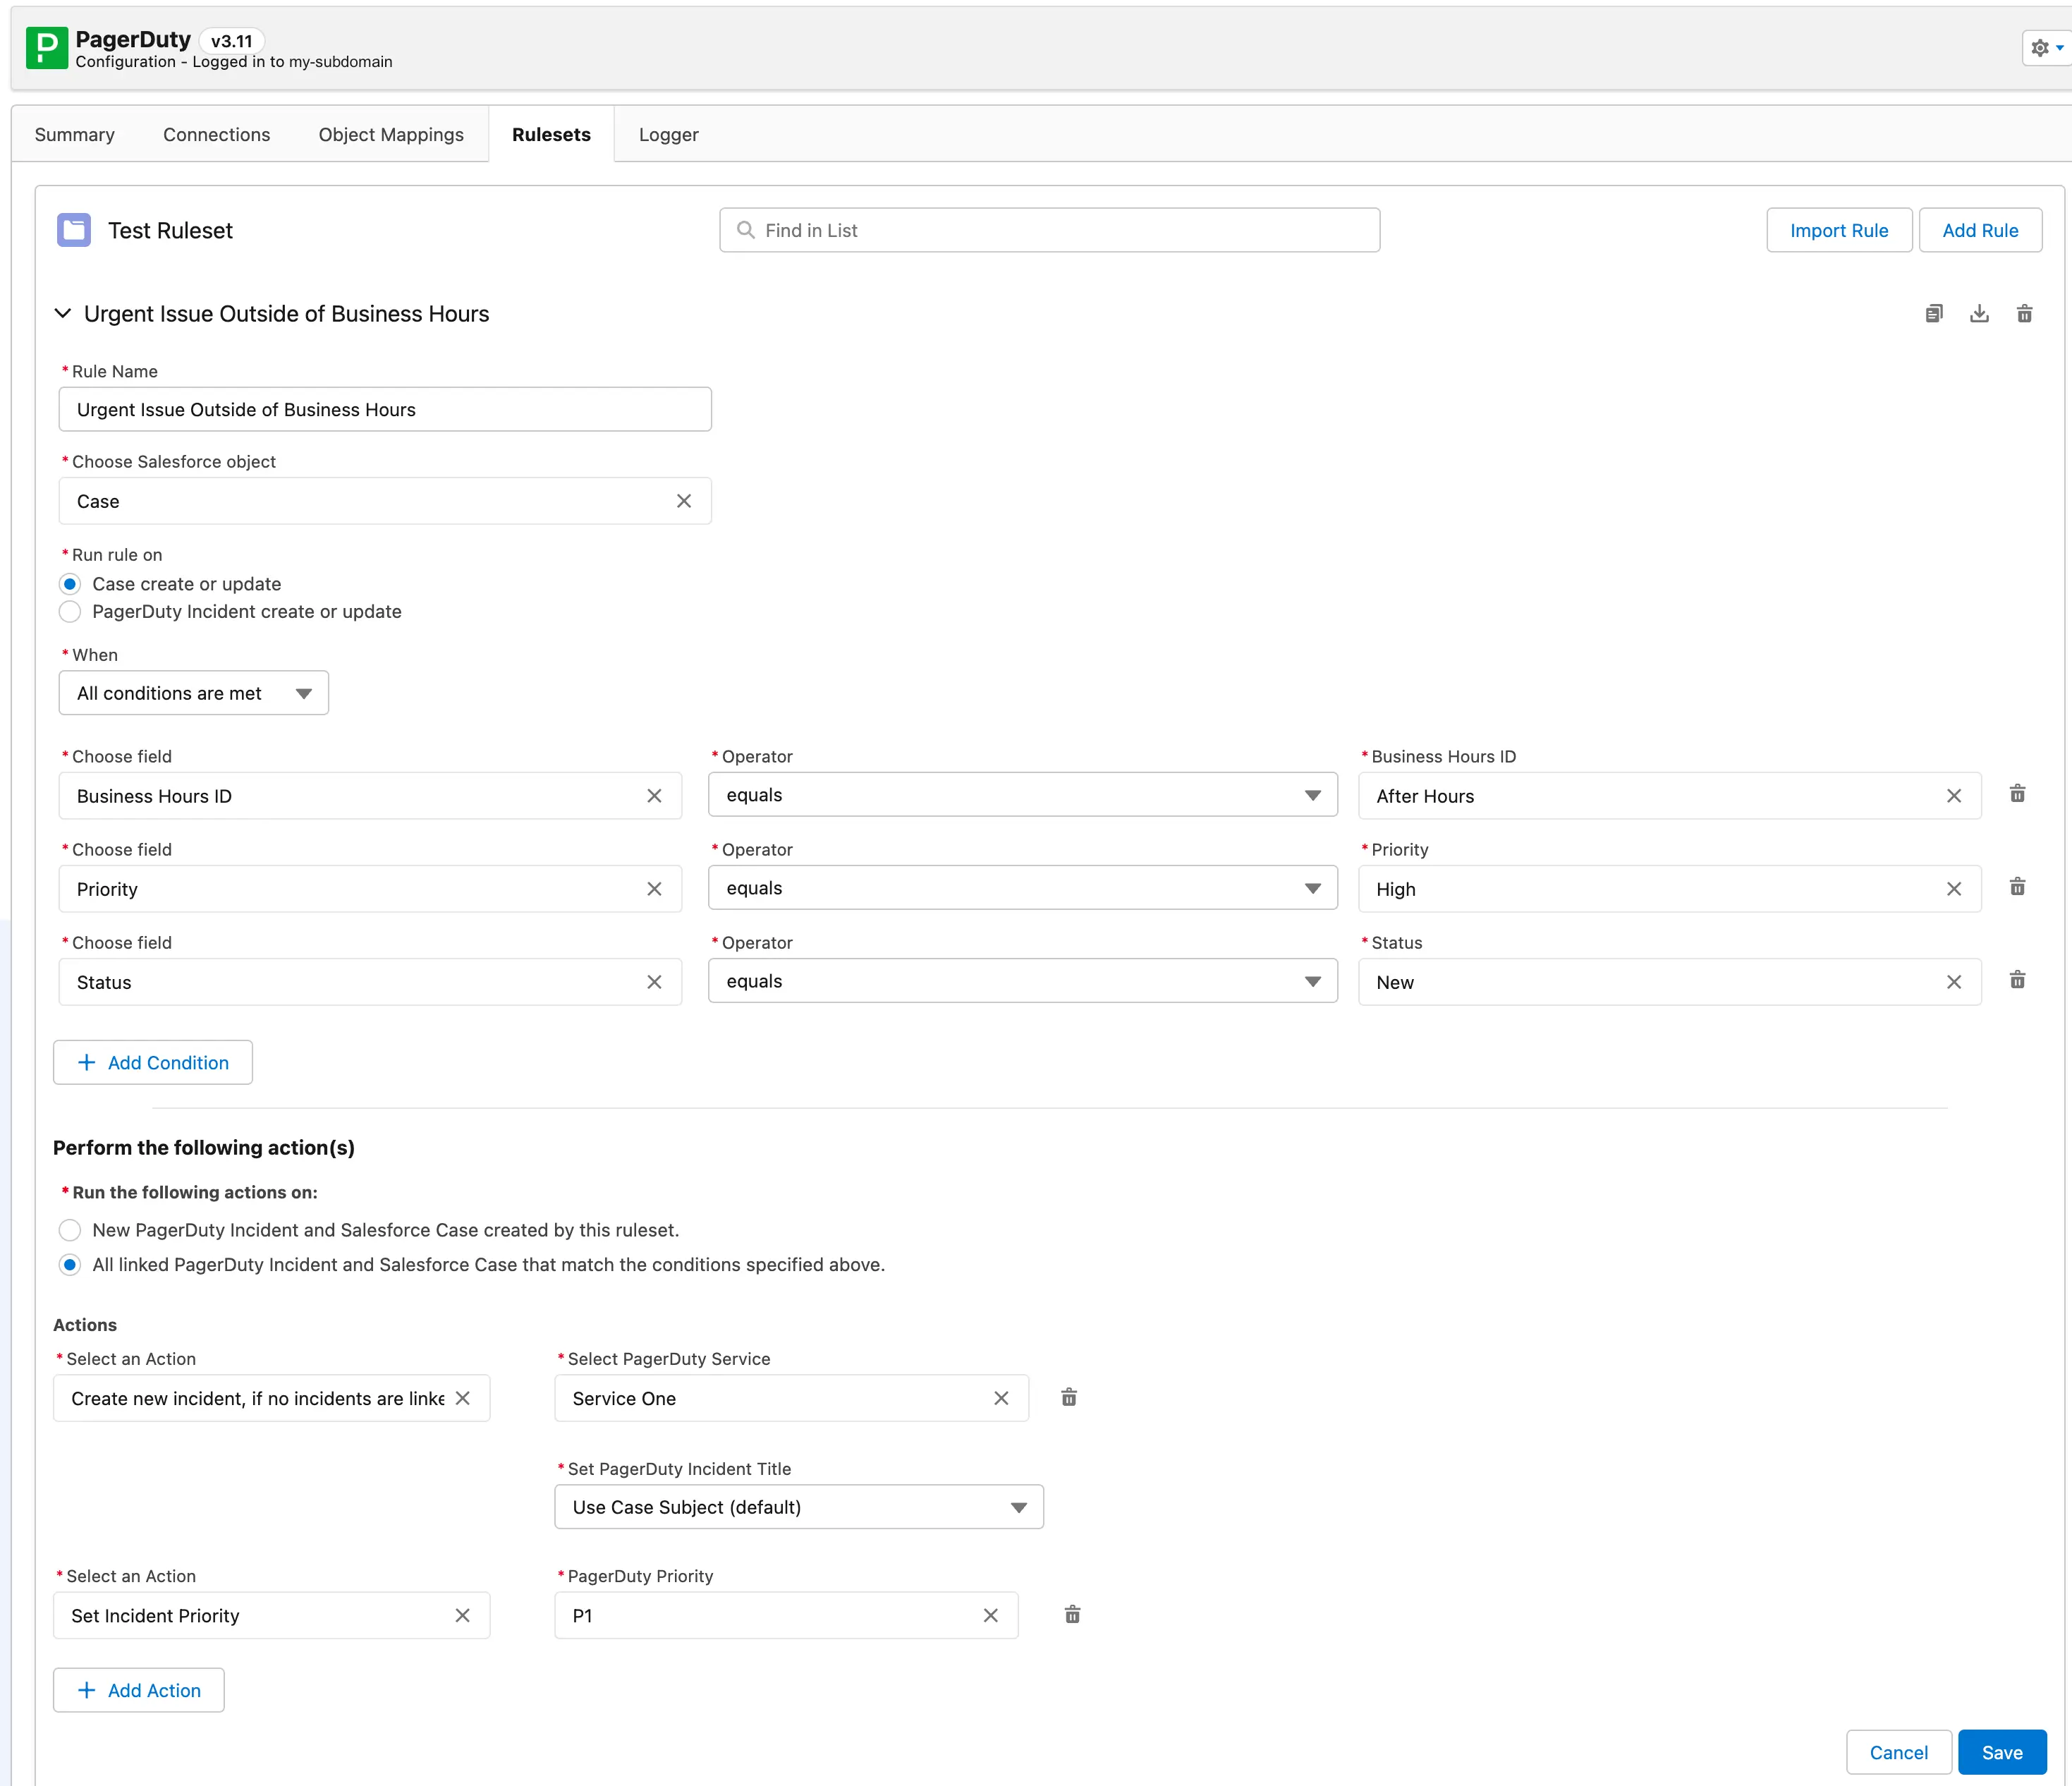
Example 24/7 After-Hours Support Ruleset
How can I create new cases in Salesforce Service Cloud based on the content of a PagerDuty incident?
Create a rule and select PagerDuty Incident create or update instead of [Salesforce-Object] Create/Update. Specify what conditions to look for on a PagerDuty update, and what you would like Salesforce Service Cloud to do when it meets that criteria. Make sure you also use the Set [Salesforce-Object] field value action for ALL required fields in your Salesforce Service Cloud object.
For example, if you want to automatically create a Salesforce Service Cloud Case object when a PagerDuty incident is created on Service “XYZ”, create a Ruleset with the following conditions:
- Event Type equals Triggered
- PagerDuty Service equals XYZ
In your Ruleset, configure the following actions:
- Create new Case
- Set Case field value for Status to New
- Set Case field value for Subject to Incident Title
- Set Case field value for Description to Incident Description
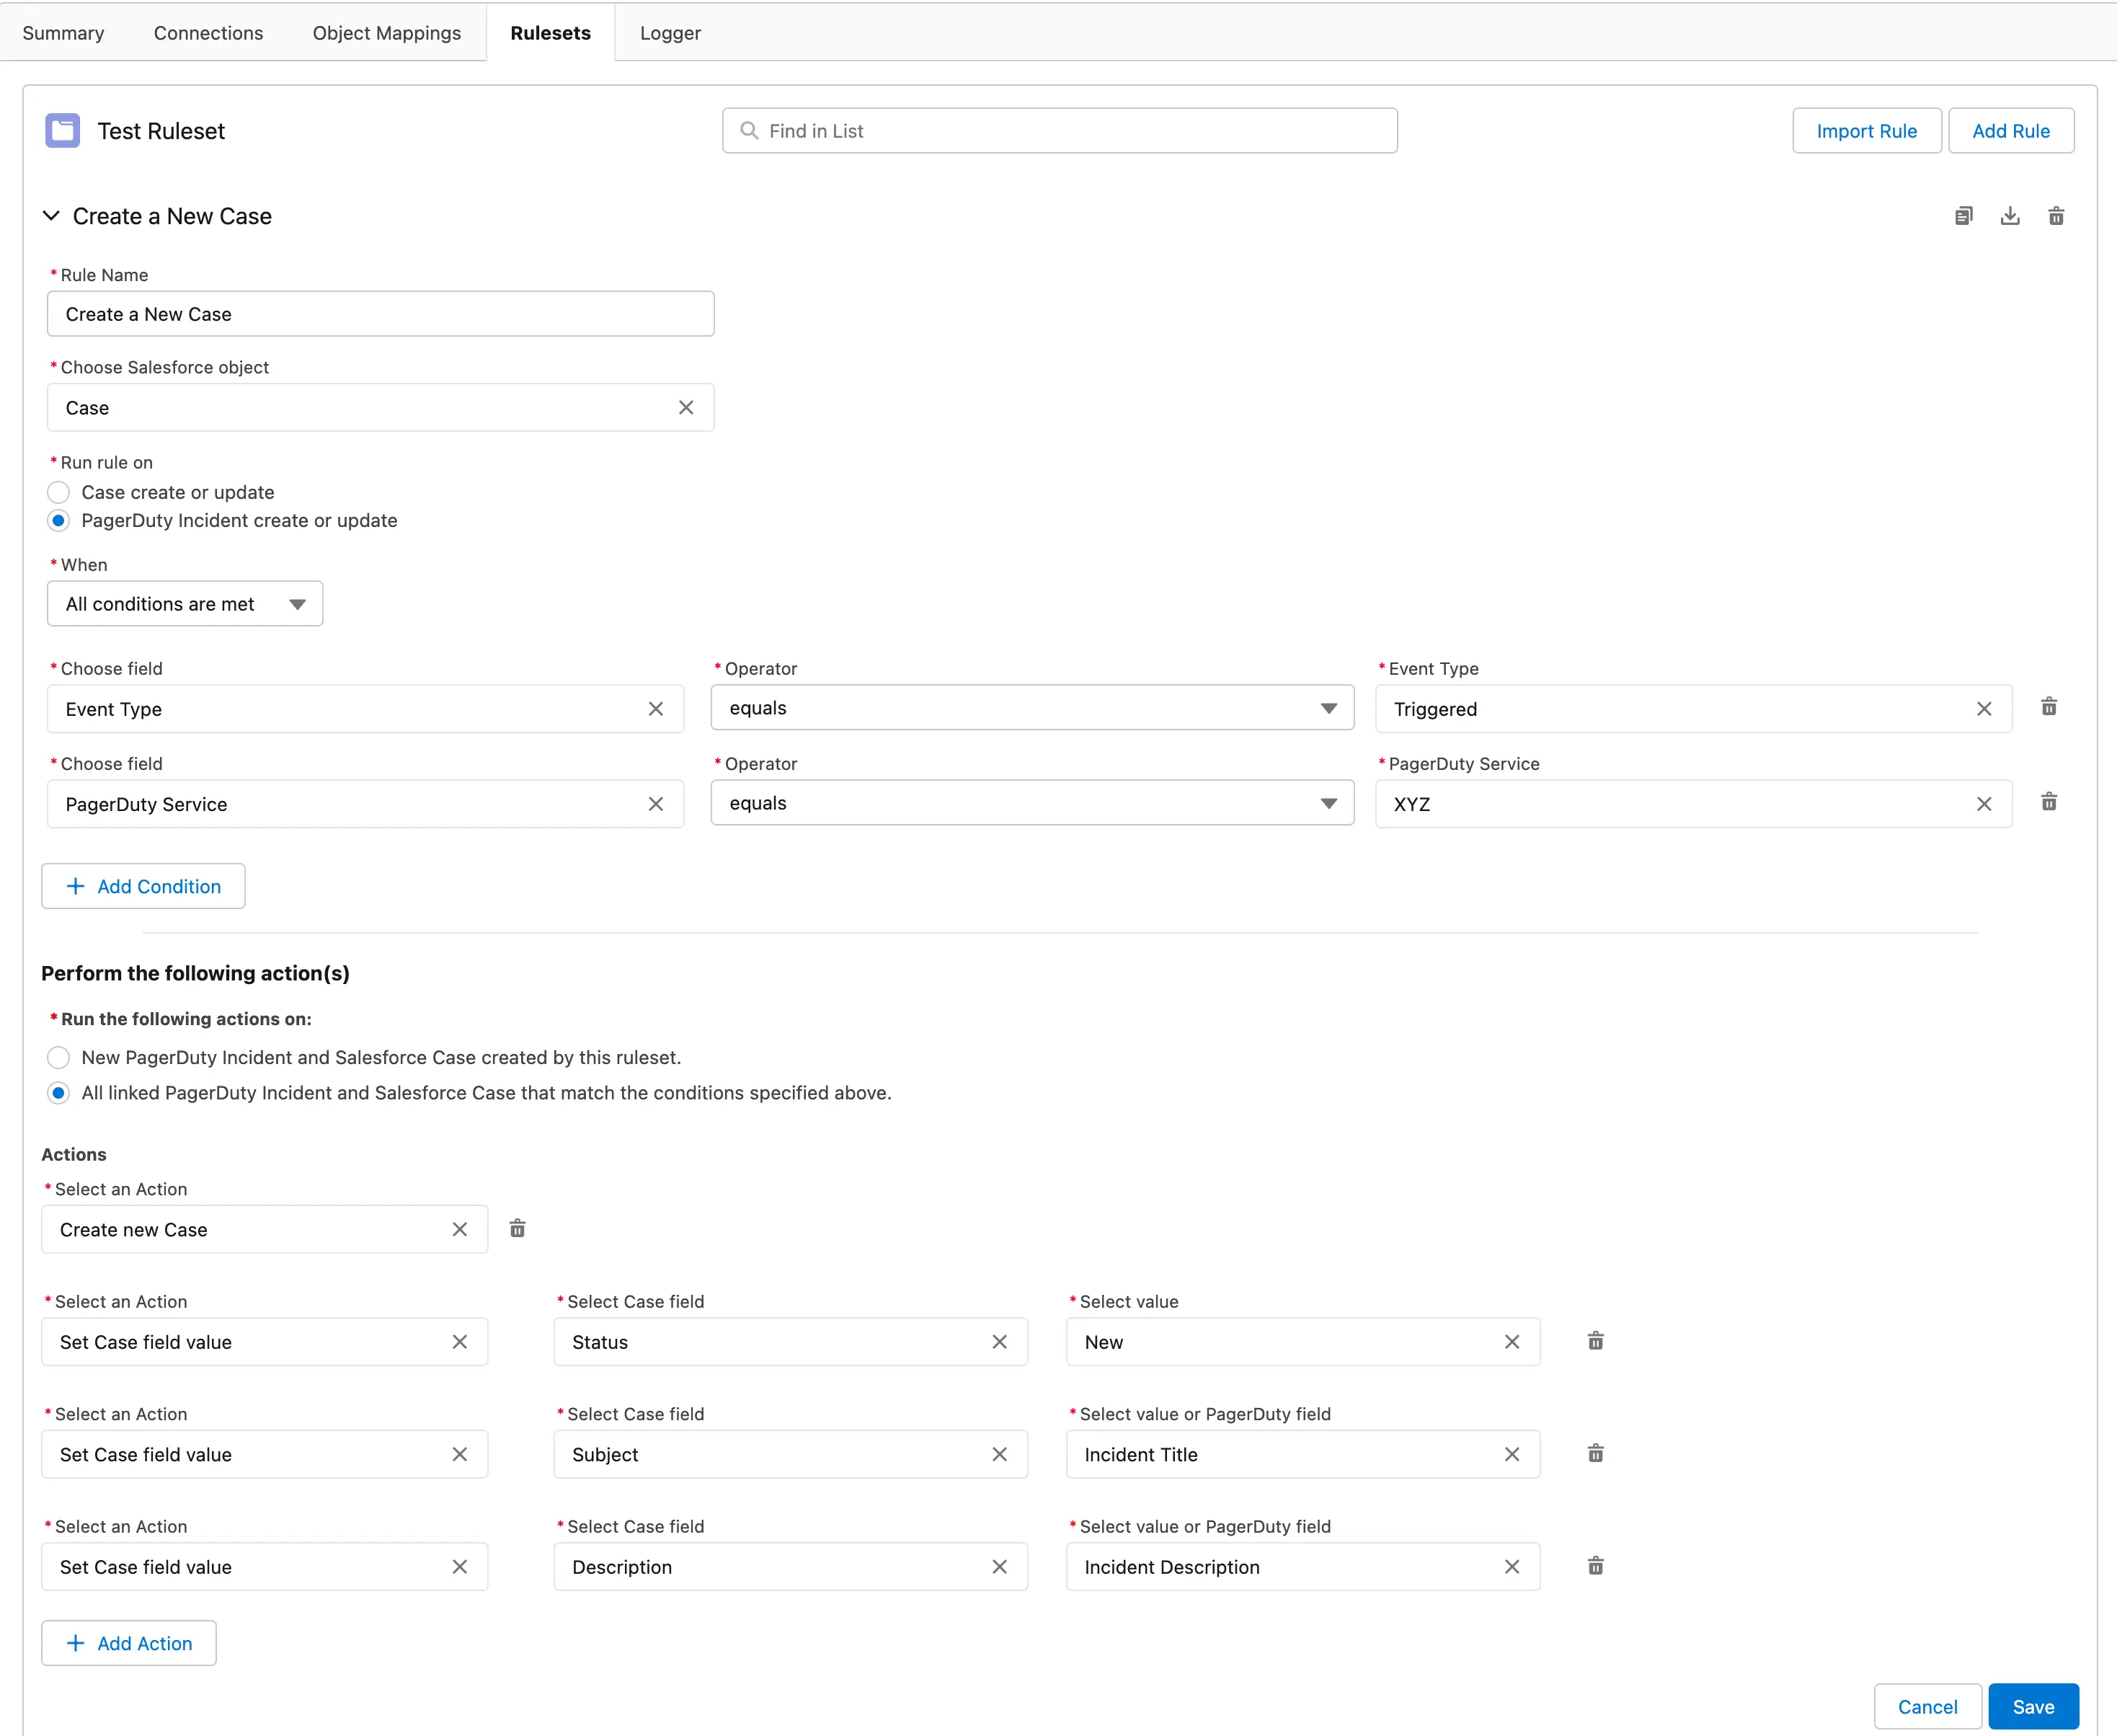
Example ruleset for creating new cases in Salesforce Service Cloud based on the content of a PagerDuty incident
Can I use PagerDuty Rulesets with other Salesforce records besides Cases and Incidents?
Yes. Please follow these steps to allow PagerDuty rulesets to interact with other Salesforce records:
- In Salesforce Service Cloud, click Setup.
- In the left hand menu, select Objects and Fields Object Manager.
- Click the Label name of the object on which you would like to create a trigger and click Triggers in the left hand menu. Click New on the right side of the screen.
- Enter the following text as a trigger body, replacing [Salesforce-Object] with your Salesforce Service Cloud object:
trigger PagerDuty[Salesforce-Object]Trigger on [Salesforce-Object] (after insert, after update) {
    if (!System.isFuture() && !System.isBatch()) {
        String oldStr = JSON.serialize(Trigger.oldMap);
        String newStr = JSON.serialize(Trigger.newMap);
        if (!Test.isRunningTest()) pagerdutyinc.PagerDutyEngineLauncher.launchByTrigger(oldStr, newStr, Trigger.isInsert);
    }
}
Example:
trigger PagerDutyOpportunityTrigger on Opportunity (after insert, after update) {
    if (!System.isFuture() && !System.isBatch()) {
        String oldStr = JSON.serialize(Trigger.oldMap);
        String newStr = JSON.serialize(Trigger.newMap);
        if (!Test.isRunningTest()) pagerdutyinc.PagerDutyEngineLauncher.launchByTrigger(oldStr, newStr, Trigger.isInsert);
    }
}
- Click Save. Repeat these steps for each object on which you would like to create a trigger.
Why don’t I see any data on my Status Dashboard?
If you don’t see any data on your Status Dashboard, please confirm that you have one configured in PagerDuty. To check, navigate to https://[your PagerDuty subdomain].pagerduty.com/status-dashboard.
What kind of custom permissions do users need to use this integration?
If you use custom permissions in Salesforce, you must ensure that agents have the correct permissions to use and access the PagerDuty integration. There are four permission sets included in the managed package that you can give to users.
| PagerDutyAdministrator | PagerDutyAuditor | PagerDutyManager | PagerDutyUser | |
|---|---|---|---|---|
| PagerDutyConfiguration | read write |
read | read | read |
| PagerDutyIncident Mapping | read create edit delete |
read | read create edit delete |
read create edit |
| PagerDutyRules & Rulesets | read create edit delete |
read | read create edit delete |
read |
| PagerDutyConfiguration Tab | on | on | on | off |
If you do not want to add permission sets to your users, you may check their profiles and ensure the profiles have similar object permissions for their user type.
How can I troubleshoot issues during login to the PagerDuty console?
- Check to make sure all users have valid permissions.
- Check to make sure the redirect URL is set correctly in PagerDuty.
- Check to make sure that the OAuth app has read/write privileges and not just read privileges.
How can I troubleshoot my integration?
We provide a logging tool in Salesforce to help troubleshoot problems in the integration. Navigate to PagerDuty Configuration Logger and select one of the following levels:
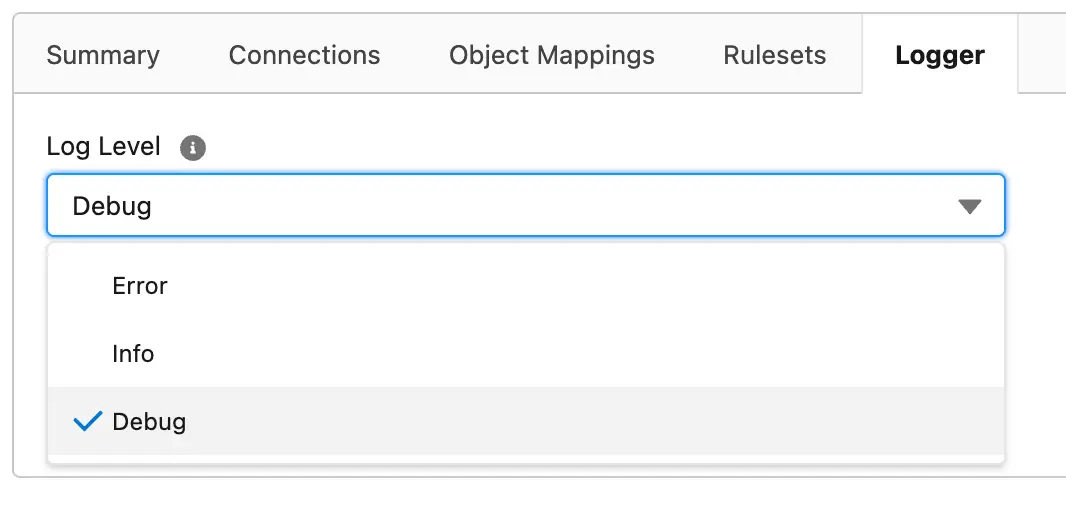
Logger Tab for Troubleshooting
Click Save. Reproduce the issue to generate logs for further troubleshooting. To access the logs, click App Launcher and search for and select “PagerDuty Logs”.
How can I troubleshoot my Rulesets?
We provide a logging tool to help troubleshoot problems in the integration. To access PagerDuty logs, click App Launcher and search for “PagerDuty Logs”. This page displays a record of all webhooks successfully delivered to Salesforce Service Cloud from PagerDuty, as well as all errors. If you are still experiencing issues, please reach out to PagerDuty support.
Can I invoke PagerDuty actions from Salesforce Flows?
You currently cannot invoke PagerDuty actions from Salesforce Flows. To share your interest in the development of this feature, please contact PagerDuty support.
How can I set up PagerDutyUser equivalent permissions with Salesforce Profiles?
As a Salesforce Administrator:
- Log in to Salesforce Service Cloud and navigate to Setup Users Profiles select the Profile to modify.
- Add the required permissions below:
Object Level Permissions for a PagerDuty User
| Objects | Required Permissions |
|---|---|
| PagerDutyConfigurations PagerDutyRules PagerDutyRulesets | read view all |
| PagerDutyIncidentMappings | read create edit view all |
Field Level Security for a PagerDuty User
| Objects | Required Permissions |
|---|---|
| PagerDutyConfigurations | Read Access Required for the following Fields: API Token Created By Last Modified By Logging JSON Mapping JSON Owner PagerDuty Base Url PagerDuty Configuration PagerDuty Default Email Edit Access Required for the following Fields: Owner PagerDutyConfiguration |
| PagerDutyRules | Read Access Required for the following Fields: Created By Last Modified By Owner PagerDutyRule Rule Name Edit Access Required for the following Fields: Owner PagerDutyRule Rule Name |
| PagerDutyRuleSets | Read Access Required for the following Fields: Created By Last Modified By Owner PagerDutyRuleset Ruleset Name Edit Access Required for the following Fields: Owner PagerDutyRuleset Ruleset Name |
| PagerDutyIncidentMappings | Read Access Required for the following Fields: Created By Incident ID Last Modified By Linked Case Owner PagerDutyIncidientMapping SObject ID Subdomain Edit Access Required for the following Fields: Incident ID Linked Case Owner PagerDutyIncidentMapping SObject ID Subdomain |
What can I do about an error that says I don't have enough trial cache capacity while upgrading in my developer account?
a. Salesforce Developer accounts must request Cache Partition Capacity in Salesforce Service Cloud. Click Setup search and select Platform Cache Request Trial Capacity.
b. Set Session Cache Allocation (Set Trial 2)
c. Set Org Cache Allocation Trial (Set Trial 2)
d. Click Save.
Can I connect more than one PagerDuty account to Salesforce, or more than one Salesforce account to PagerDuty?
- One PagerDuty account can be linked to multiple Salesforce accounts.
- Only one Salesforce account can be linked to one PagerDuty account.
Updated 7 months ago
