
Post-Incident Reviews
PagerDuty Post-Incident Reviews allow you to turn incidents into learning opportunities. Post-Incident Reviews integrate with your incident lifecycle, Slack data, and the PagerDuty Advance Scribe Agent to help your team uncover systemic patterns, build chronological incident narratives, and coordinate preventative follow-up actions directly within the PagerDuty platform.
To learn more about how PagerDuty designed and built these AI tools with mission-critical work in mind, access the PagerDuty Advance AI Disclosure.
AvailabilityPost-Incident Reviews are available on Professional, Business, and Enterprise Incident Management plans, and on PD Reliability Platform plans. Contact the Sales Team to upgrade to a plan with Post-Incident Reviews.
PagerDuty AI is not required for post-incident reviews, but it is required to use the AI features. Without PagerDuty AI, post-incident reviews can be completed manually.
User PermissionsAny user with permission to view an incident has permission to create an associated post-incident review.
Post-incident review access is determined by the access settings of the incident it is associated with. There are no additional access controls on a per-review basis.
Editing templates requires an Admin or Account Owner base role.
Create a Post-Incident Review
You can create a post-incident review in the following ways:
In the Web App
-
Navigate to the desired incident's details page and click the Post-Incident Review tab.
-
Click Generate with AI or Start from Scratch. To use a template other than the default, click the caret on either button and select a template from the dropdown. For more information, see Use a Custom Template for a New Post-Incident Review.
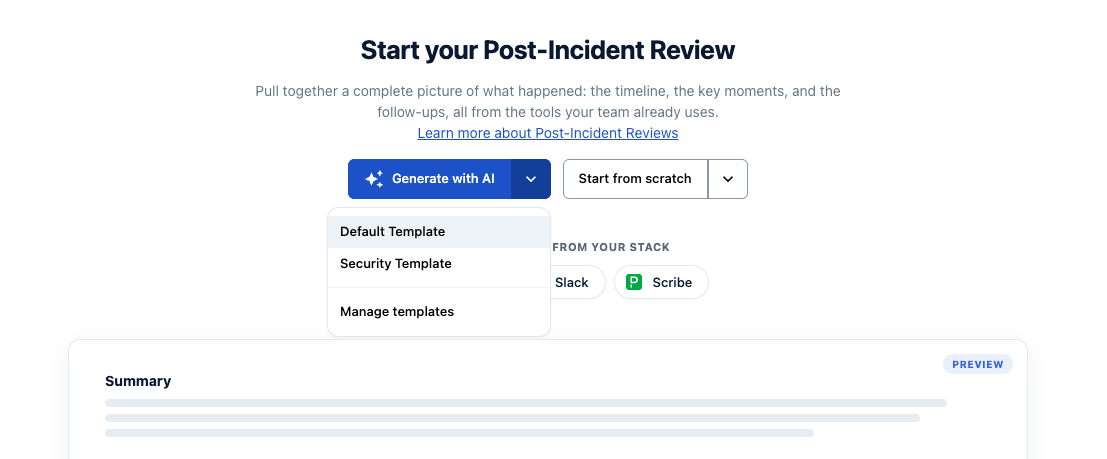
Start your post-incident review
Via Slack
When an incident is resolved, PagerDuty posts a message to the incident's dedicated Slack channel with an option to start a post-incident review.

Start a Post-Incident Review from Slack
Starting a post-incident review from Slack uses your account's default template. As when you start a review from the web app, this begins ingesting data from the dedicated incident channel, Scribe Agent transcripts, and PagerDuty Incident Lifecycle Events (ILE) into the review.
Generate with AI
When you generate a post-incident review with AI, PagerDuty pulls data from up to three sources:
- Scribe Agent
- Slack messages from the dedicated incident channel
- Incident Lifecycle Events (ILE)
The AI uses this data to write the individual sections of your review, generate narrative markers, and create follow-up actions.
Missing Data SourcesIf Scribe Agent was not active during the incident, that data source is not available. The AI generates the review using whichever sources are present.
Edit a Post-Incident Review
The entire post-incident review is editable. The editor supports rich text formatting, inline comments, and live collaborative editing.
- Highlight text to apply formatting options.
- Click the comment icon to leave a comment.
- Tag teammates using @mention.
- Changes made by collaborators appear in real time.
- AI-generated content is labeled with an AI badge. Editing an AI-generated section removes the badge.
Attachments
You can attach files — such as screenshots, logs, documents, and recordings — to a post-incident review to keep supporting evidence alongside the narrative.
Each account has a total storage limit for attachments, based on plan:
| Plan | Total Attachment Storage |
|---|---|
| Business | 100 GB |
| Enterprise, Operations Cloud | 500 GB |
The following file types are supported:
| Category | Supported Formats |
|---|---|
| Images | BMP, GIF, ICO, JPEG, PNG, SVG+XML, TIFF |
| Microsoft Office | DOC, DOCX, XLS, PPT |
| Multimedia | MP3, MP4, WAV, MOV, AVI, WMV, MPG, MPEG, VOX |
| Open Document | ODT, ODS, ODP, ODG |
| Other | CSV, HTML, TXT, XML, XMLA, PDF, ZIP, X-ZIP, BIN |
You can add attachments in three ways:
- In the Attachments section of the right-side sidebar, click Attach File.
- Click into a text section of the review, then select the + icon from the hover menu.
- For images, paste directly from your clipboard into a text section.
Import Data From Slack
If the AI output has gaps, you can supplement it with additional Slack data:
-
In the narrative section, click Import Data Custom Import Data.
-
Select the Workspace and Channel you want to pull from. This is most commonly used to add data from other channels in the same workspace.
-
Select a Date Range. You can drill down to a specific start time and end time.
-
Select Messages to import. This can be everything from a channel or only pinned messages.
-
Click Import Data.
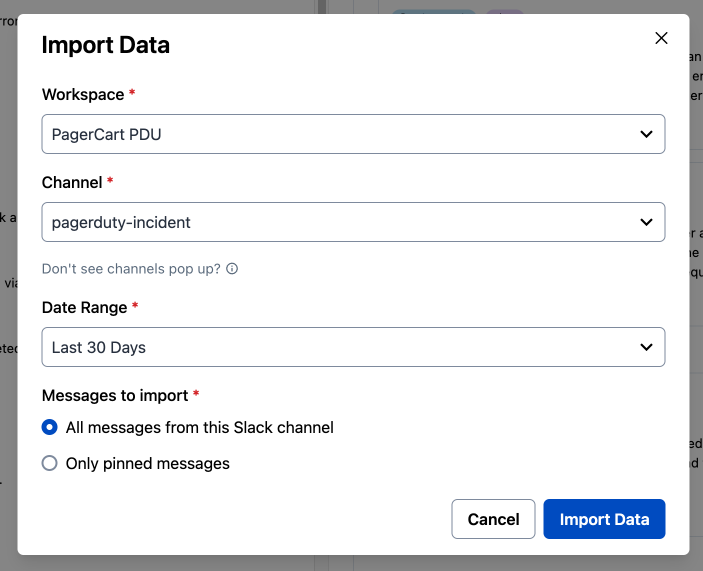
Import data from Slack
-
Click Generate Markers. The narrative updates based on the newly imported data.
Narrative Builder
The narrative builder displays the incident narrative with supporting evidence attached to each narrative marker. Click Supporting Evidence next to a marker to expand the evidence that informed that section of the narrative.
If you started your post-incident review from scratch, or would like to rebuild the incident narrative, you can do so in two ways:
- With AI: Click on the narrative builder, and then click Generate Markers in the Narrative Builder screen.
- Manually: Click on the narrative builder, select events from the left-side panel, and attribute them to narrative markers by clicking Create New Marker.
Once a narrative is built, it automatically populates the incident's timeline.
Narrative Marker Types
Each narrative marker is categorized by type. The type indicates which phase of the incident the marker represents, which helps you and your team read the narrative as a chronological story of what happened.
| Marker Type | Description |
|---|---|
| Detection | Marks how and when the incident was first detected — for example, the automated alert or signal that surfaced the problem. |
| Diagnosis | Marks the investigation phase, capturing the events where responders identified the cause or scope of the incident. |
| Repair | Marks the remediation phase, capturing the actions taken to mitigate impact and resolve the incident. |
| Key Moments | Marks an important event from a resolved incident. It highlights a point in the process that shaped how the incident unfolded — for example, a responder noticed the errors started right after a routine deployment, which pointed the team toward the cause. |
Follow-Up Actions
Follow-up actions track tasks that help remediate the impacts of an incident, prevent similar incidents from recurring, or implement monitoring.
You can create follow-up actions in two ways:
- With AI:
- Click Generate with AI on the Post-Incident Review landing page, if you have not yet started your review.
- Click the sparkle icon on the Follow-up Actions section and select your preferred generation settings.
- Manually: Click on the Follow-up Actions section and fill out the relevant details of the follow-up action.
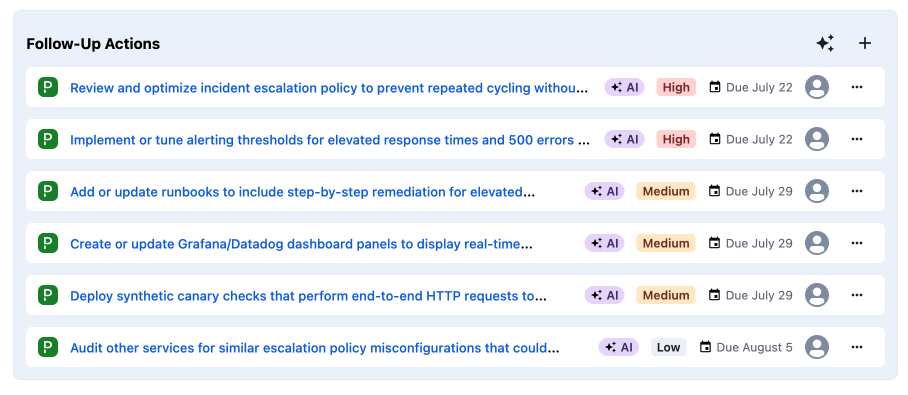
Follow-up actions
To view a filterable list of follow-up actions, navigate to Incidents Post-Incident Reviews and click the Follow-Up Actions tab.
Assign a Follow-Up Action
You can assign follow-up actions to teammates:
- Click next to the follow-up action and select Edit Follow-Up.
- Add a note, assign a person to the task, and set a due date.
Create Jira Tickets from Follow-Up Actions
If your account has the Jira integration configured, you can create Jira tickets directly from a post-incident review's follow-up actions. This uses your existing Jira configuration — no additional setup is required in the post-incident review.
To create a new Jira ticket from a follow-up action:
- In the Follow-Up Actions section, click the + icon.
- Select Create in Jira.
- Select the Project, Issue type, and the relevant fields, including any custom fields configured in Jira for the selected issue type.
- Click Create in Jira.
To convert an existing follow-up action into a Jira ticket:
- Next to the follow-up action, click the menu and select Convert to Jira.
- Fill out the required fields, according to your Jira project and issue type.
Once synced, a link to the associated Jira ticket appears on the follow-up action in PagerDuty. The status syncs bi-directionally — when the ticket is marked complete in Jira, the follow-up action shows a checkmark in the post-incident review.
Inbound Sync RequirementsSyncing a ticket status change in Jira to its follow-up action's status in PagerDuty requires the Jira Forge app, version 4.0 or higher. Accounts still on the legacy Jira Connect app do not receive this inbound sync. Outbound sync (marking a follow-up action complete in PagerDuty, which updates the Jira ticket) is not affected.
To check your version, in Jira go to Connected Apps, find PagerDuty for Jira Cloud, and select View App Details. If an upgrade is available, click Upgrade. Accounts still on the Connect app see a warning banner on this page.
Full Screen Mode
Click the icon to enter a focused editing view that removes surrounding UI elements and displays only the post-incident review.
Export a Review
You can export a post-incident review from the sidebar. Under Export, select one of two options:
- HTML: View a shareable link to the post-incident review.
- PDF: Download the post-incident review as a PDF.
Manage Templates
To ensure post-incident reviews are written in the format, and contain the information, that your team prefers, you can create custom templates.
The number of custom templates available to you is determined by your plan:
| Plan | Custom Templates |
|---|---|
| Professional | 1 |
| Business | 2 |
| Enterprise, Operations Cloud | No set limit |
Create a Custom Template
To open the Template Management page:
- In the main navigation, click Incidents and select Post-Incident Reviews.
- Open the Templates tab.
On the Template Management page, you can edit the default template or create a new one. Each template automatically includes a set of built-in sections to get you started. The Incident Narrative and Follow-Up Actions sections are built in with every template and cannot be removed.
In addition to the built-in sections, you can add custom sections. For each section, you can specify:
| Field | Description |
|---|---|
| Section Name | The name of the template section. |
| Section Description | Instructions for the people filling out the section on what to write. |
| Required Section | Determines whether the section must be filled in before the post-incident review can be completed. |
| Generate with PD Advance / AI Prompt | Instructions for the LLM on how to fill out the section. This field appears when the Generate with PD Advance toggle is on. |
To reorder sections, drag and drop the section blocks on the page.
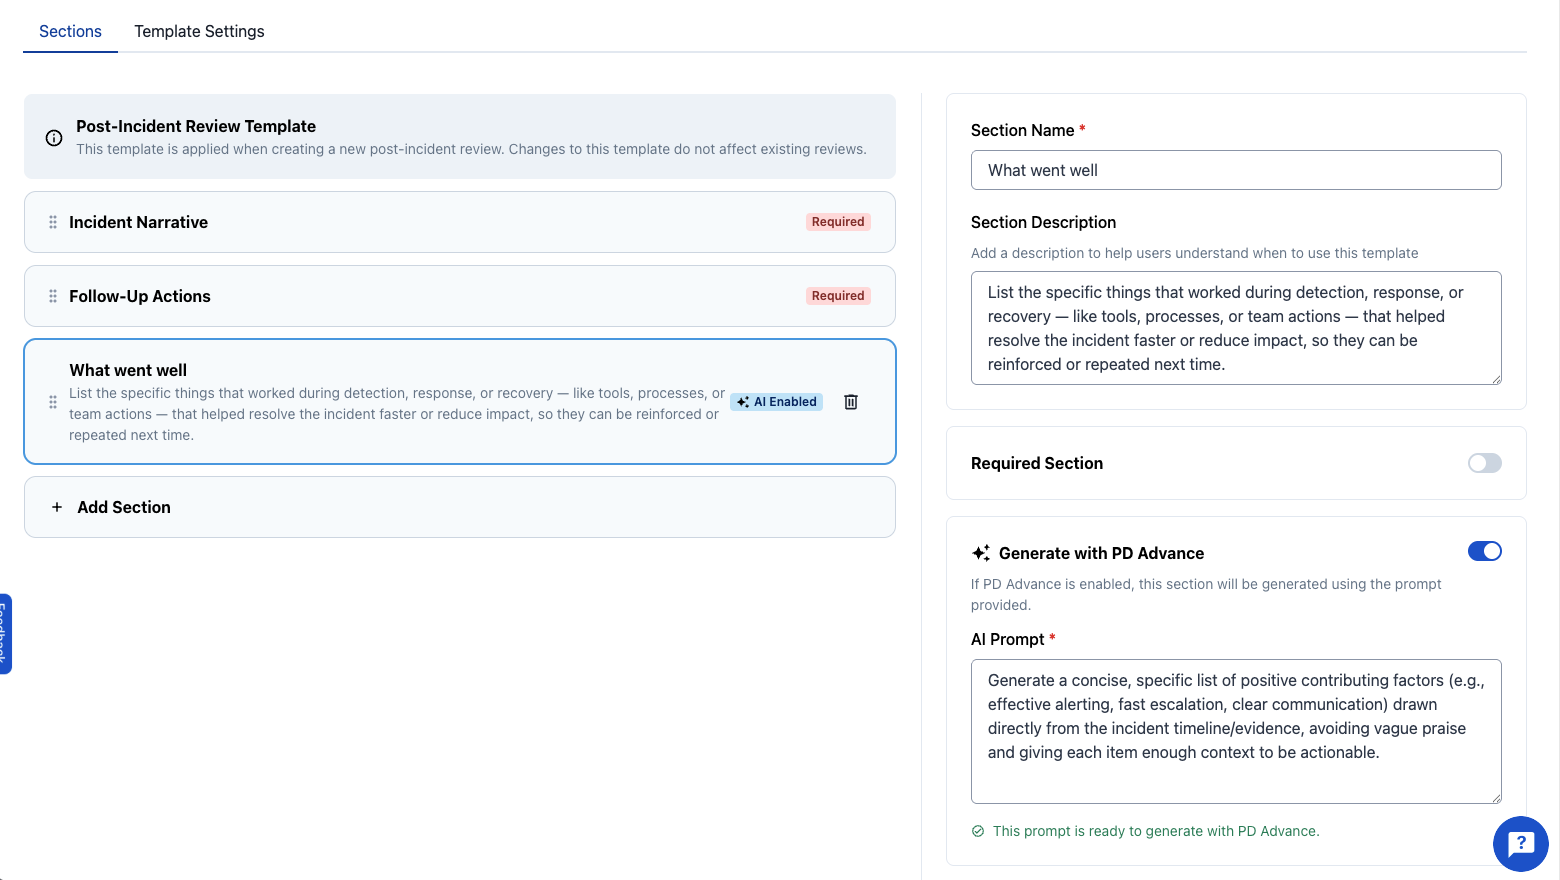
Post-incident review template builder
If you are not ready to publish a template, save it as a draft. A draft does not display as an option for users to choose from.
Set Default Template
To make a custom template the default across your organization, click the menu and select Set as Default. The default template is used when the person creating a post-incident review does not specify a template. Users can still select any of your other published templates when a different format is needed.
Use a Custom Template for a New Post-Incident Review
When creating a new post-incident review, you can use the default template by clicking either Generate with AI or Start from Scratch. To use a different template, click the caret on either button and select a template from the dropdown.
When you use Generate with AI, the post-incident review is written according to the custom prompts specified in the selected template.
Updated 25 days ago