Email Management: Filters and Rules
Use filters and create rules to customize how email integrations process events
Email integrations allow users to integrate PagerDuty with any service capable of sending email alerts. PagerDuty provides a number of features to assist with administering email integrations, which can be broken down into the two following broad categories:
Email Filters
Email filters allow you to determine which messages your email integration should accept. Only messages that meet your specified criteria will trigger an incident. The integration will discard any messages that do not pass the filter.
Configure an Email Filter
To set up an email filter, in the web app:
- Go to Services Service Directory and select the service with the desired email integration.
- Select the Integrations tab next to the email integration you want to edit click Edit Integration.
- In the section Email Filters, make a selection from the dropdown, depending on your needs:
- Accept all incoming email: PagerDuty will not filter out any emails that are sent to your integration email address.
- Accept email only if it matches ONE OR MORE rules below: Emails will only be accepted if they match at least one filter rule.
- Accept email only if it matches ALL of the rules below: Emails will only be accepted if they match all filter rules.
- Configure appropriate rules:
- The dropdowns for subject, body, and from default to is anything. Next to your desired field, select the appropriate action (matches the regex or does not match the regex) and enter a regular expression.
- Optional: If required, click Add New Rule and repeat the previous step to add more filtering criteria.
- Click Save.
Delete an Email Filter
- Go to Services Service Directory and select the service with the desired email integration.
- Select the Integrations tab, then next to the email integration you want to edit, then click Edit Integration.
- Click in the top right of the email filter you’d like to delete.
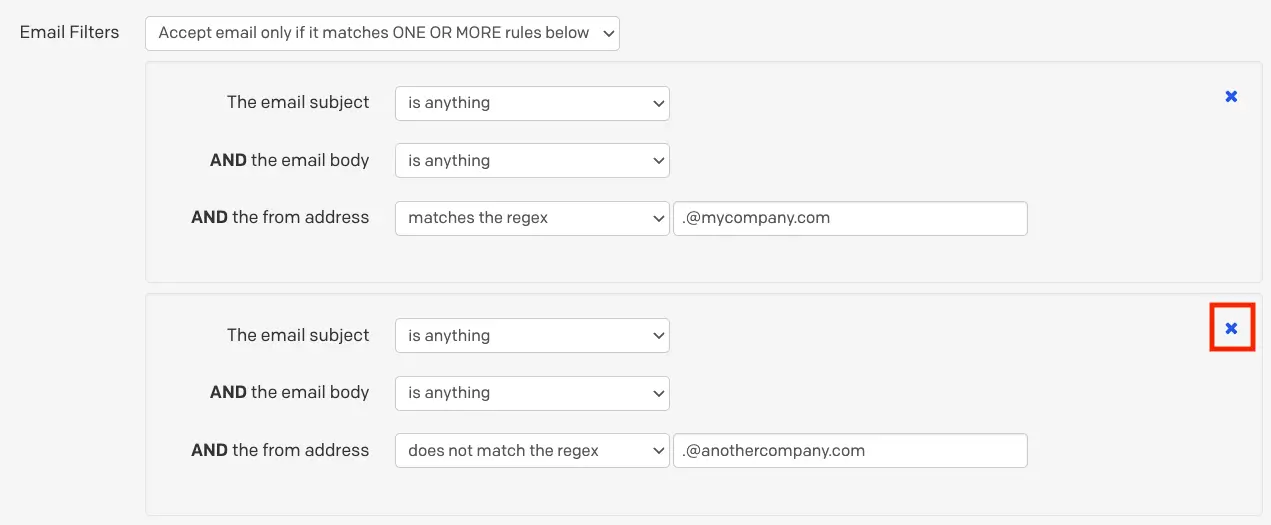
Delete an email filter
- Click Save changes.
Email Filter Example
Below is an example of how to configure email filters based on an event’s critical/noncritical status. In this example, you have a system that sends emails with the subjects CRITICAL and NONCRITICAL to PagerDuty, but you only want those with CRITICAL in the subject line to trigger incidents.
- In the web app, go to Services Service Directory and select the name of the service with an email integration.
- Select the Integrations tab click to the right of the email integration you want to edit click Edit Integration.
- Under Email Filters, select Accept email only if it matches ALL of the rules below.
- Add two filter rules:
- For the first rule, enter The email subject matches the regex
CRITICAL. - For the second rule, enter The email subject does not match the regex
NONCRITICAL.
- For the first rule, enter The email subject matches the regex
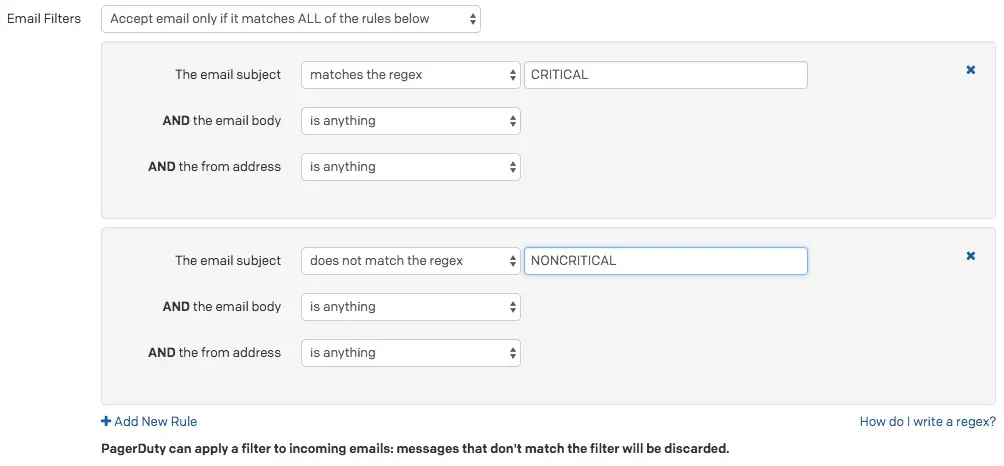
Email filters for "CRITICAL" and "NONCRITICAL"
- The option Accept email only if it matches ALL of the rules below ensures that both rules must match with the incoming events. A second filter for
NONCRITICALis needed, since it contains the substringCRITICAL. In other words, the second rule prevents messages with the subjectNONCRITICALfrom triggering incidents, since it also matches the regexCRITICAL. Please also note that regex is case sensitive.
- Click Save changes.
Email Management
By default, PagerDuty opens a new incident every time an email is received at the integration address of an email integration. Depending on how your monitoring tool works and your organization’s needs, this behavior might not be desirable.
As a first step, we recommend configuring one or more email filters to ensure that your service only accepts valid email events.
When your email filters determine that an event is valid, you can use email management rules to fine tune how the events behave. For example, the email management feature allows you to create custom rules that parse inbound messages and automatically resolve incidents.
Configure When Incidents or Alerts Trigger
You can control when PagerDuty creates new incidents or alerts in response to emails by adjusting your email integration’s settings in the web app:
- Navigate to Services Service Directory.
- Select the name of the service with the desired email integration Integrations tab to the right email integration click Edit Integration.
- In the section Email Management, select your desired setting:
- Open a new incident/alert for each new trigger email subject (default): Emails with the same subject line will deduplicate. For example, if PagerDuty triggers an incident in response to an email with the subject
Host Down, subsequent emails with the same subject will not trigger a new incident. You will find the new email appended to the existing alert's timeline. - Open a new incident/alert for each trigger email: Each email sent to the integration email address opens a new incident.
- Open a new incident/alert only if an open incident does not already exist: The integration will only trigger one open incident at any time. If an email is received while the integration already has an open incident (regardless of its subject line), it is appended to the existing incident’s activity log.
- Open and resolve incidents/alerts based on custom rules: This option is explored in-depth in the section Trigger and Resolve Alerts/Incidents.
- Click Save.
Trigger and Resolve Alerts/Incidents
Selecting the option Open and resolve alerts/incidents based on custom rules allows you to configure rules that determine when an incident should trigger and resolve, based on the message’s content.
There are two components to configure, and both are accessed in the web app by navigating to Services Service Directory select the name of your desired service Integrations tab click next to the desired email integration click Edit Integration:
Create a Trigger Rule
- From the dropdown, select trigger.
- Select Any (default) or All depending on whether you’d like to trigger an incident when any or all following conditions match.

Trigger rule
- Determine the matching condition:
- Select from the dropdown whether you’d like to match on the email from address, subject or body.
- Select from the following matching options:
- contains
- does not contain
- matches the regular expression
- does not match the regular expression
- exactly matches
- is anything except
- Enter your desired matching criteria
- Optional: If you’d like to configure more than one trigger condition, click New Condition and repeat step 3.
- Configure an incident/alert key: It is important that this information matches in the corresponding resolve rule.
- In the section Alert/Incident Key, select subject or body from the dropdown.
- Select from the following matching options:
- all text between
- this regular expression
- everything
- all text after
- all text before
Use Regex to Extract an Incident/Alert Key
If you plan to use a regular expression to generate the unique key for an incident/alert, please refer to the section Extract an Alert Key for more information.
- Optional: Configure Custom Fields. This feature can be helpful if your trigger emails contain information that you’d like to be included in incident details.
- Enter a Name for the field.
- Configure the Value:
- Select subject or body from the dropdown.
- Select from the following matching options:
- all text between
- this regular expression
- everything
- all text after
- all text before
- You may add more custom fields by clicking New custom field and repeating the steps above.
- Click Save changes.
Create a Resolve Rule
A resolve rule is required if you’d like incidents to automatically resolve when PagerDuty receives a valid email event.
Auto-Resolve Using an Alert/Incident Key
For a pair of email management trigger and resolve rules to work together, the alert/incident key in both rules must be a perfect match. The alert/incident key is what allows your service to pair events and apply resolve rules to open incidents.
- Select Add Another Rule at the bottom of the page.

Add another rule
- Configure the resolve rule similarly to the trigger rule, however you will select resolve from the dropdown, and configure the condition(s) that should resolve incidents/alerts. The information for Incident/Alert Key should exactly match the corresponding trigger rule.

Resolve rule
No Matching Open Incident
If an email matches your "resolve" rule but there is no open incident for that email to resolve OR the email's incident key does not match an existing open incident, then this rule will not be applied.
Create Multiple Rules
In some cases, you may want to create more than one trigger and/or resolve rules. To do this, click Add Another Rule.
When you create multiple email management rules, PagerDuty will attempt to apply the first rule to the incoming email. If it does not match it will attempt to apply the second rule, and so on. The hierarchy continues in this order until it reaches your last rule. There is a limit of ten rules per service.
You can change the order rules are applied in by clicking Move up and Move down buttons on each rule.

Move rule up or down
Configure Default Behavior If No Rules Match
If an email does not match any email management rules, you can configure whether you’d like to create a generic alert or discard the email.
Select your preference from the dropdown:
- create a generic alert
- Generic alerts will use the email’s subject line as the name of the incident. Note: Email events, which do not match management rules, but do have matching subject lines, will deduplicate into the same alert.
- discard it

Configure default behavior
Delete an Email Management Rule
- Go to Services Service Directory and select the service with the desired email integration.
- Select the Integrations tab, then next to the email integration you want to edit, then click Edit Integration.
- Click in the top right of the email management rule you’d like to delete.

Delete email management rule
- Click Save changes.
Email Management Example
In this example, you want to trigger an incident when PagerDuty receives an email (from a monitoring system, for example) that contains DOWN in the subject line. The body of email is always formatted such that a numeric string representing the host follows “Host: “, which can be used as the incident/alert key. We can use a [regular expression] to for this: Host: (\d+).
- Create a trigger rule that captures the scenario outlined above.
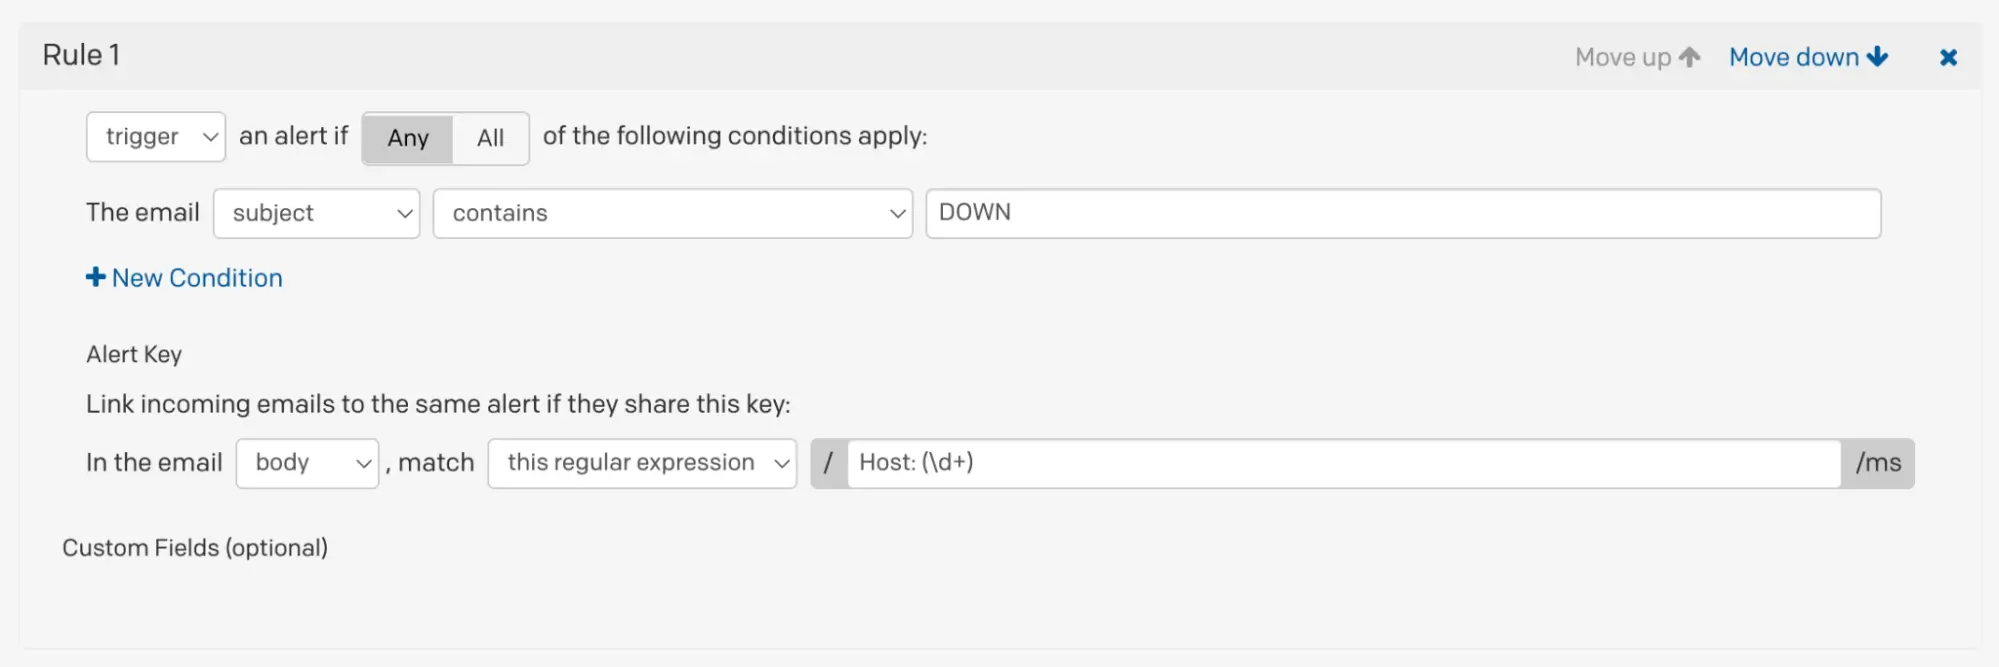
Email management trigger rule

Email management resolve rule
With the email management rules in place, when PagerDuty receives an appropriate email that meets your trigger rule’s conditions, an incident will trigger.
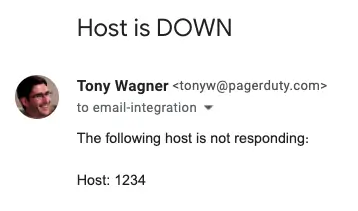
Trigger email
Similarly, when the email integration receives an appropriate resolve message, the incident will automatically resolve
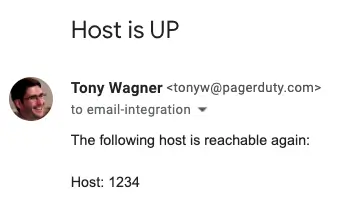
Resolve email
Troubleshoot Email Management Rules
Please refer to our Email Integration Troubleshooting Guide for helpful tips and solutions if your integration is not functioning as expected.
Regular Expressions
Please see our Regular Expressions article for more information.
Updated 7 months ago
