
Shift-Based Schedules
Use shift-based schedules to map your coverage needs and determine who receives a notification when an incident triggers. When an incident impacts a service, notifications go to the user on the service’s associated escalation policy. Shift-based schedules are the current scheduling experience and differ from legacy schedules in how coverage is structured. Shift-based schedules are built from named rotations, where each rotation defines active days, active times, a handoff, and a shift assignment type.
Feature AvailabilityIf you do not see the option to create a shift-based schedule, your account may not have access yet. Contact your Customer Success Manager (CSM) to confirm availability for your account.
Required User PermissionsIf you have one of the following roles, you can create, edit, and delete on-call schedules:
- User
- Manager base roles and team roles
- Manager team roles can only manage schedules associated with their team.
- Admin/Global Admin
- Account Owner
Create a Basic Schedule
A basic shift-based schedule consists of at least one rotation. However, you should have multiple rotations to ensure there are no gaps in the schedule. Each rotation defines the time window during which a user is on call. You can use multiple rotations to create different schedule arrangements and view your on-call coverage at a glance.
To create a shift-based schedule in the web app:
- Navigate to People Schedules.
- Click + Create Shift-Based Schedule.
- Enter the following schedule details and click Continue:
| Field | Value |
|---|---|
| Schedule Name | Enter a unique name. |
| Description (Optional) | Enter a description to provide context. |
| Template Options | Select Custom, or choose a pre-defined template (such as Weekly Handoff, Workday / Weekend, or Follow the Sun) to pre-populate your schedule settings. |
- Click + Create Rotation.
- Configure the following rotation settings in the modal:
| Field | Value |
|---|---|
| Rotation Name | Add a descriptive name that you can clearly identify from the schedule. |
| Time Zone | Review the time zone for the region. The time zone is set to the account-level time zone by default. Use the dropdown to change to the desired time zone. |
| Rotation Type | Select a rotation type. You can set it to Hourly_Daily, Weekly, or Monthly. This value determines how frequently users change on-call responsibilities. |
| Active Days of the Week | Set the active days of the week. You can select specific days or a range that starts and ends on specific days and times. |
| Active Times of Day | If you selected specific days under Active Days of the Week, select the active times of day. |
| Shift assignment type | Choose whether shifts rotate through individual members or if all team members are on-call at the same time. |
| Handoff | Select a handoff time to determine specifically when responsibilities must rotate. |
| Members | Click the Members tab to add individual users or teams to the rotation. |
Adding UsersYou can add all users, except Limited and Full Stakeholders, to schedules. If someone does not appear in the dropdown, Admin users or higher can add users to the account.
- Click Create Rotation.
- Repeat steps 4 through 6 for additional rotations.
- Click Save Schedule.
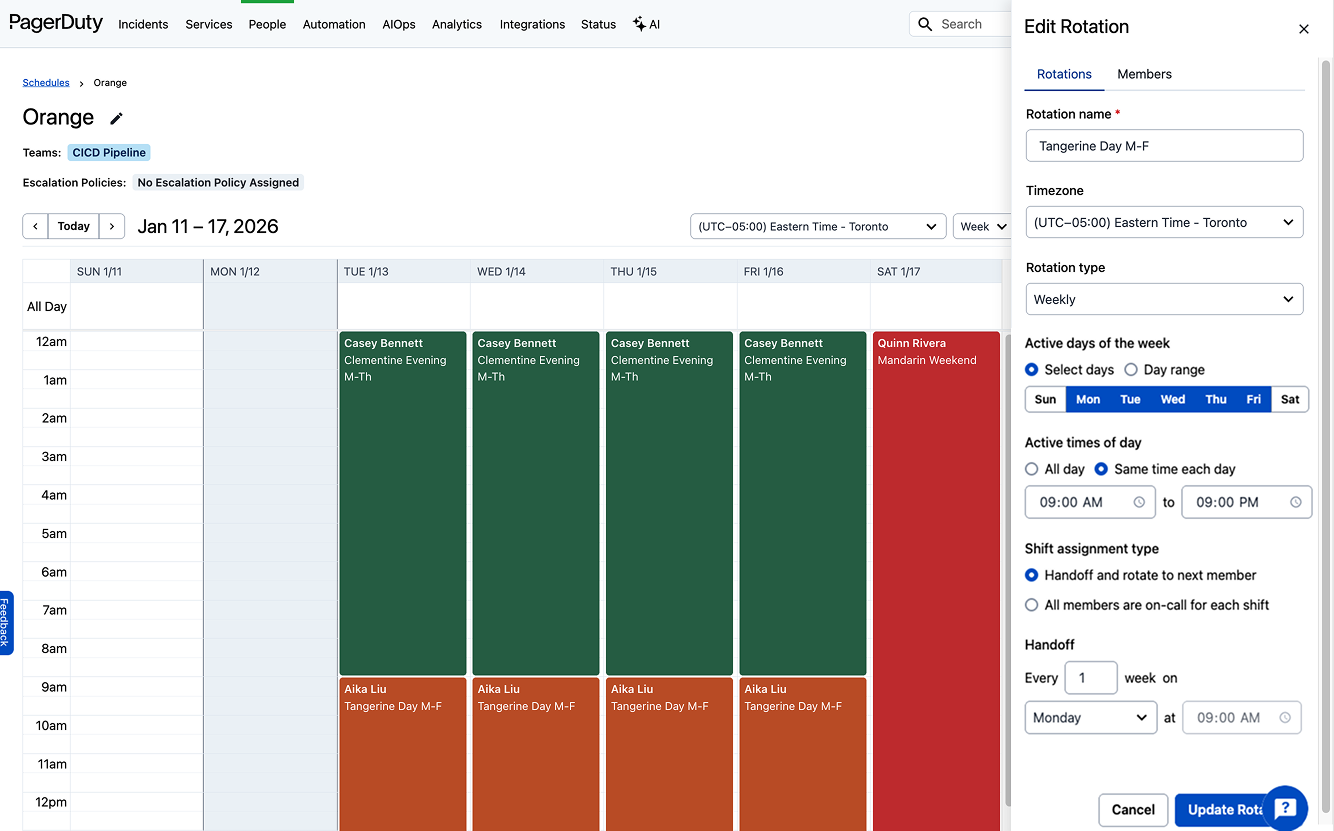
Basic Schedule
Connect a Schedule to a ServiceImportant: You must connect the schedule to a service via an escalation policy. After you associate a schedule with an escalation policy, on-call users receive notifications about incidents on any service(s) that use the escalation policy.
Once you create an escalation policy, follow the instructions in Connect a Schedule to a Service via Escalation Policy.
Edit Schedules
Review the Edit Schedules article for more information.
Shifts and Overrides
Within Edit Schedules, you can find content on manual adjustments such as:
- Custom Shifts: Create one-off changes to an existing rotation that differ from the recurring pattern.
- Overrides: View, create, or delete manual one-time adjustments (such as vacations or shift swaps).
NoteNeed help deciding? Learn when to pick an override versus a custom shift based on whether you are replacing an existing responder or adding extra coverage to your schedule.
Schedule Settings Overview
To access a rotation's configuration settings:
- For the desired schedule, select and click Edit.
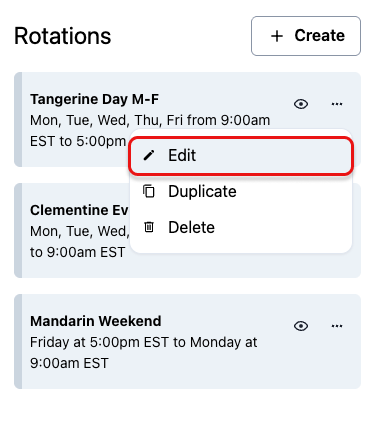
Edit Rotation
Rotation Name
When naming your rotation, choose a clear, descriptive name that helps you easily identify it in the schedule. A good naming convention helps distinguish between multiple rotations, especially when managing complex or overlapping shifts.
For example: Support - Weekday AM (PST)
Time Zone
When you create a new schedule, it is set to the account-level time zone by default. Follow the instructions in Change the Schedule-Level Time Zone if you want your schedule to have a different time zone than the account.
Rotation Types
Rotation types determine how frequently responsibilities change.
- You can set the rotation type to Hourly, Daily, Weekly, or Monthly.
- For example, Hourly is useful for eight-hour shift coverage, while a Monthly rotation can work better for lower-urgency situations where a single individual remains on call for longer periods.
Schedule Restrictions
When creating a rotation, you can set the following:
- Active Days of the Week: This option creates uniform shifts for every day of the week and determines the days the rotation is active. You can select either specific days when you are on call or a range that starts on one day at a specific time and ends on another day at a specific time.
- Active Times of Day: This defines the window during which a responder is on call. You can set the time window for specific days here.
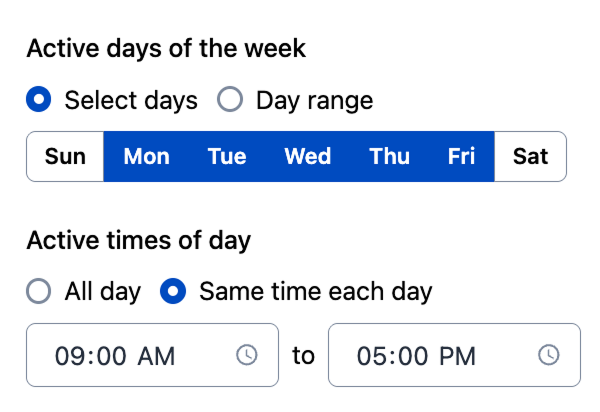
Active Days and Times
Shift Assignment Type
Select Handoff and rotate to next member to set a handoff time when on-call responsibilities rotate. You can configure this rotation to occur at a set frequency.
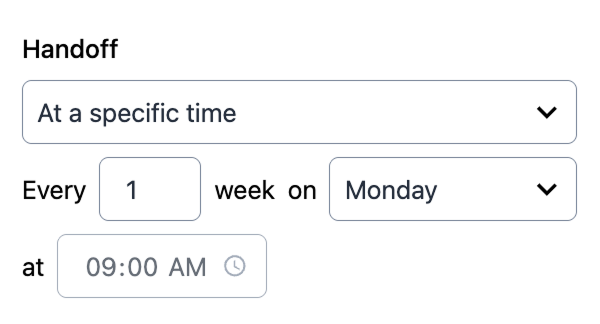
Handoff Times
If you select All members are on-call for each shift, all members assigned to the rotation are on call simultaneously.
Rotation Start and End
- Rotation starts defines when the rotation must begin — either immediately or at a specific date and time in the future.
- Rotation ends specifies when the rotation must conclude. You can configure it to continue indefinitely or specify an exact end date and time.
Export a Schedule to Your Calendar
You can add a schedule to an external calendar application, such as Google Calendar or Outlook, using a calendar feed or file. Choose a WebCal feed to subscribe to a live feed that updates as the schedule changes, or an iCalendar feed to download a static .ics file.
- Navigate to People Schedules.
- Locate your schedule in the list and click the Export dropdown.
- Select one of the following options:
| Option | Description |
|---|---|
| WebCal feed — My calendar | Provides a webcal:// subscription link for only your own on-call shifts on this schedule. |
| WebCal feed — Everyone's calendar | Provides a webcal:// subscription link for all members' shifts on this schedule. |
| iCalendar feed — My calendar | Downloads an .ics file containing only your own on-call shifts on this schedule. |
| iCalendar feed — Everyone's calendar | Downloads an .ics file containing all members' shifts on this schedule. |
Keep Your Calendar Feed PrivateA WebCal subscription link grants access to your on-call schedule. Treat it like a password — anyone with the link can view the calendar. Do not share it publicly or paste it where others can see it.
FAQ
Can I create an open schedule with unassigned rotations/shifts?
Yes. You can create an "open" schedule by using a template or building a custom schedule without assigning team members to the rotations.
Once you share the blank schedule with unassigned rotations, team members choose their commitment level. They click on the unassigned rotation and select:
- Override: To claim a single, one-time shift.
- Edit Rotation: To join the rotation for its entire duration.
If there is no rotation to insert themselves into, they create a shift.
Can I create a future schedule to prepare for team changes or new hires?
Yes. This feature allows you to prepare for team changes — such as a new hire starting next month — without disrupting the current live on-call rotation.
- Navigate to the schedule where you want to create a future rotation.
- On the rotation card, select the menu and click Edit.
- From the Updates take effect dropdown, select On a specific date and choose a date.
- Add the new team member to the Members list.
- Click Update Rotation.
- Click Save Schedule.
Updated 23 days ago