
Jeli Incidents (Legacy)
Track and manage incidents seamlessly with Jeli | Jeli Part of PagerDuty Legacy
Jeli incidents represent issues that require investigation and mitigation. You can manage incidents via the Jeli integration for Slack, and you can open, view, and share incident details via the Jeli web app.
Availability
- Jeli Incidents are only available on the Jeli Standalone (Legacy) plan. This feature does not come standard with the Enterprise for Incident Management plan.
- At this time, Jeli is not available for accounts in the EU service region (i.e.,
https://subdomain.eu.pagerduty.com).
Jeli Incidents in Slack
The Jeli Slackbot streamlines incident management directly within Slack, making it easier for teams to respond to critical issues.
Configure the Jeli Slackbot
See the Slack Integration | Jeli guide for instructions to configure the Jeli Slackbot. The Jeli Slackbot Commands article provides a comprehensive list of available commands.
Open a Jeli Incident in Slack
- In a Slack channel with the Jeli Slackbot configured, enter
/jeli opento open a new incident.
| Field | Value |
|---|---|
| Incident name | Enter a name for the incident, or leave blank to open an incident with a randomly generated name. |
| Select incident type | Select an incident type from the dropdown. Read Jeli Incident Types for more information. |
| Add more details | You can add more incident details, such as Summary, Severity, Add or remove relevant Broadcast Channels, Assign yourself to a role within response. You can edit these sections later using the appropriate Jeli Slackbot Commands. |
| Use integrations | Your Incident Settings determine the default selections on this page, and you can change them on a per-incident basis here, including: Automatically initiate a Zoom, Automatically initiate a Google Meet, Create a Primary Jira ticket when the Jeli incident opens. More information about creating Jira tickets from Jeli is available here. Note: Using the Primary Jira ticket integration changes the naming scheme of the incident channels. |
| Use current channel for Incident | Check Use current channel for Incident to begin using the Jeli Slackbot in the current channel. Note: This feature can only be used once per channel. If you open an incident in a channel for the first time, this field is available. If you have opened an incident in the channel in the past, this field is not available. |
| Make private | Check Make private to make the incident private. Jeli creates the incident in a private channel. Private incidents do not post updates to broadcast channels, and do not display on the Jeli Incident View. When closing an incident, only the users who were members of the private channel have access to the Opportunity. If you need additional people to have access to your private opportunity, you can configure access in the Jeli web app. |
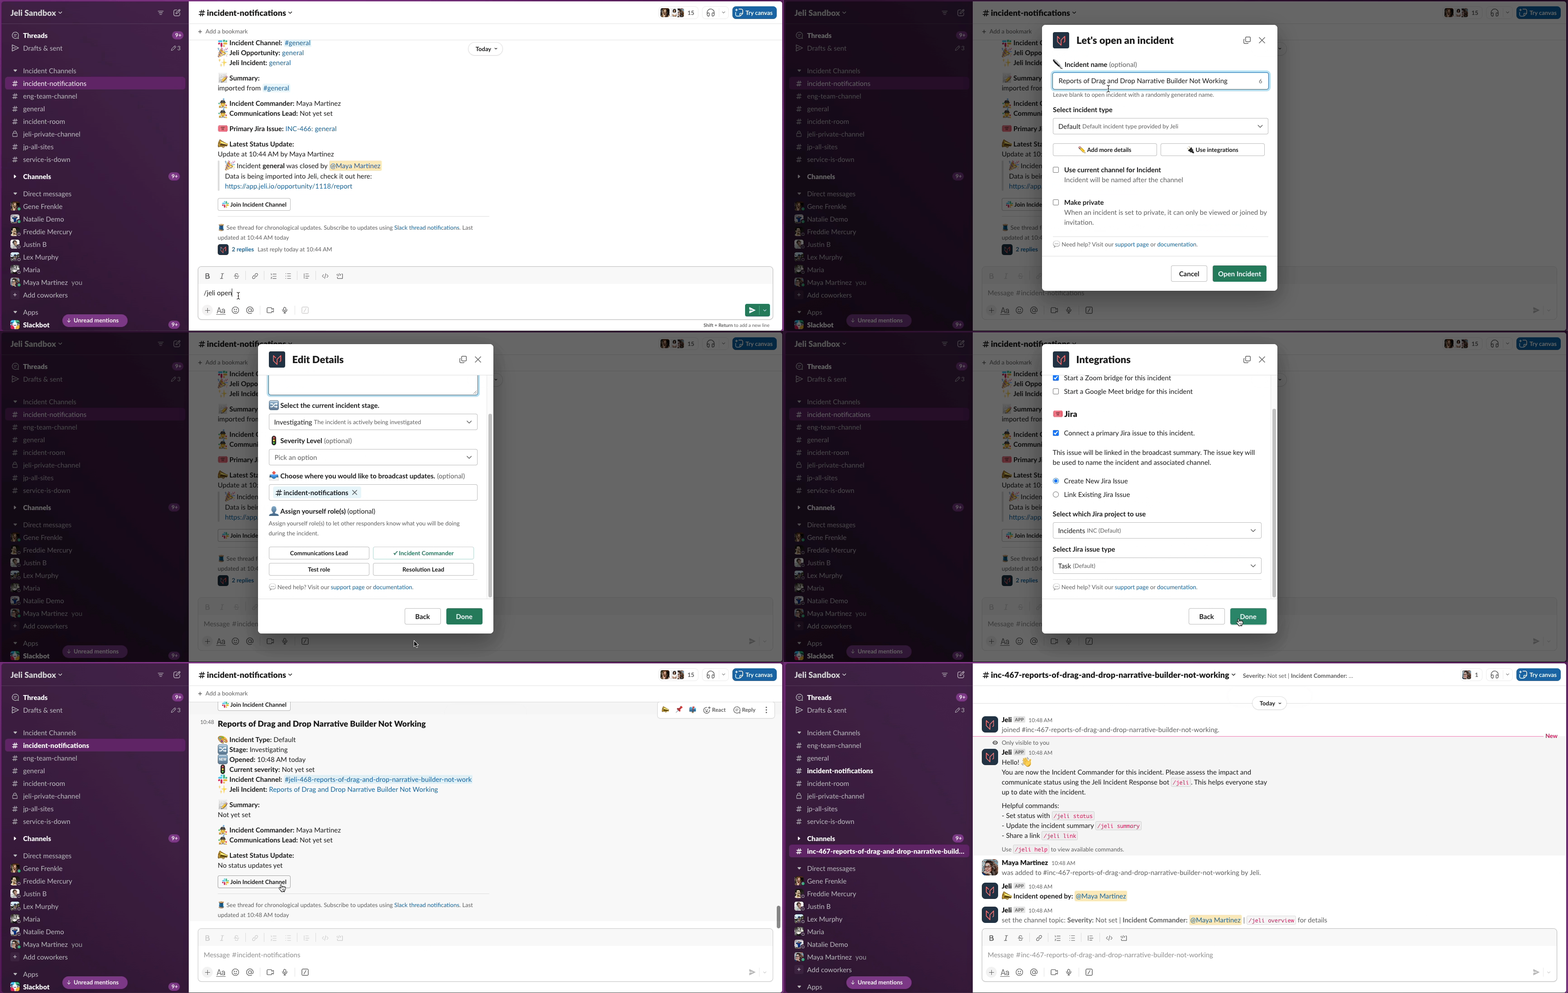
Jeli in Slack
- Click Open Incident.
Jeli sends an ephemeral message confirming the incident's creation, along with a link to the generated Slack channel. Jeli also notifies your selected broadcast channels that you created an incident. See the Jeli Slackbot Commands article for documentation on other Slackbot commands to use during and after incident response.
Aliases: /jeli incident, /jeli open-incident, /jeli start, /jeli start-incident
Jeli Incident Channel Naming Convention
- When you create a Jeli incident, the generated Slack channel name follows this format:
#jeli-[incident number]-[incident name], e.g.,#jeli-29-docs-pages-are-down. - If you select the option to automatically create a primary Jira ticket, it adds the Jira ticket number as a prefix on the channel name instead of the
#jeliprefix:#[jira ticket project and ticket id]-[incident name], e.g.,#inc-133-payroll-is-down. - If you do not add a name, Jeli generates one for you from a randomized list of adjectives and nouns, and the channel name gets the
#jeliprefix, or the Jira ticket prefix based on your configurations, e.g.,#eng-34-full-lemon. - To distinguish demo incidents from actual events, the naming differs:
#jeli-demo-[incident name]-[YYYY-MM-DD], e.g.,#jeli-demo-just-testing-2023-06-20. - If Jeli is currently undergoing an incident of our own impacting incident creation, fallbacks change the name format to:
#jeli-[incident name]-[YYYY-MM-DD], e.g.,#jeli-emails-are-delayed-2023-06-21.
Jeli Slackbot Commands
See the Jeli Slackbot Commands article for more information on how to use commands during and after incident response. This article includes the following commands, and more:
- Get an Overview of the Current Incident
- Update the Status of an Incident
- Escalate an Incident
- Set the Incident’s Stage to Mitigated
- Import Event Data into Jeli for Analysis
Jeli Incidents in the Web App
The Incidents view in the Jeli web app keeps responders up to date on response efforts by providing all details from the broadcast channel on a webpage. This provides a URL that you can send to stakeholders as an internal status page, and the link to the Incidents view is also available in the broadcast channel message. The information on this page updates automatically as soon as you add details, or make changes with the Jeli Slackbot.
Incidents View
In the Jeli web app, select Incidents in the left menu to:
- Filter and sort through recent and active incidents.
- Keep track of progress across multiple incidents at once.
- View response details and updates outside of Slack.
Note: Private incidents do not display on the Jeli Incident view.
Access the Incident ViewThe incident view is internal-only. Log in to your Jeli account to access this page.
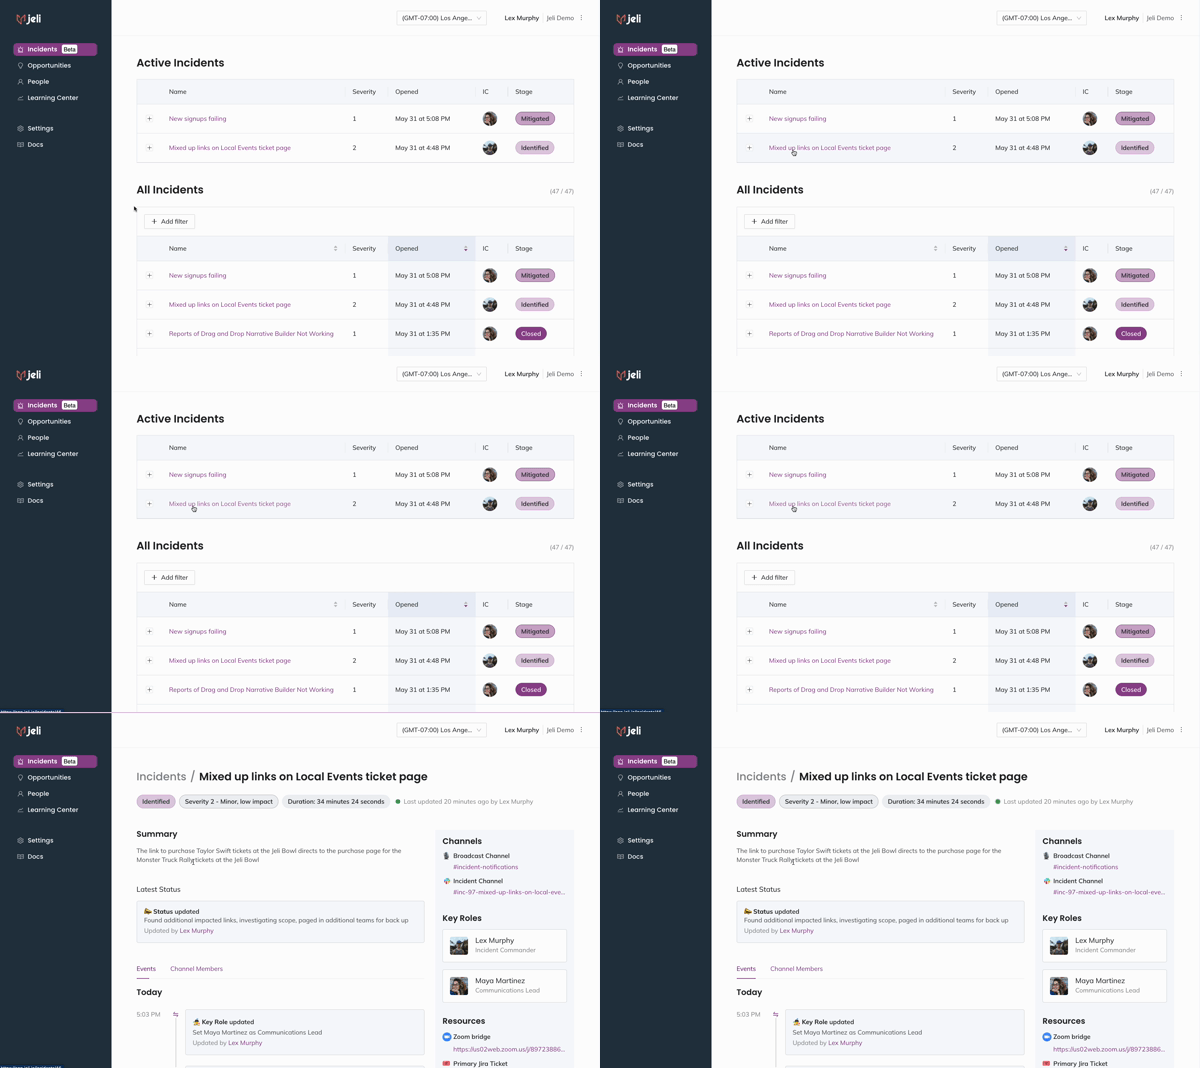
Navigating from Incidents View to Incident Details
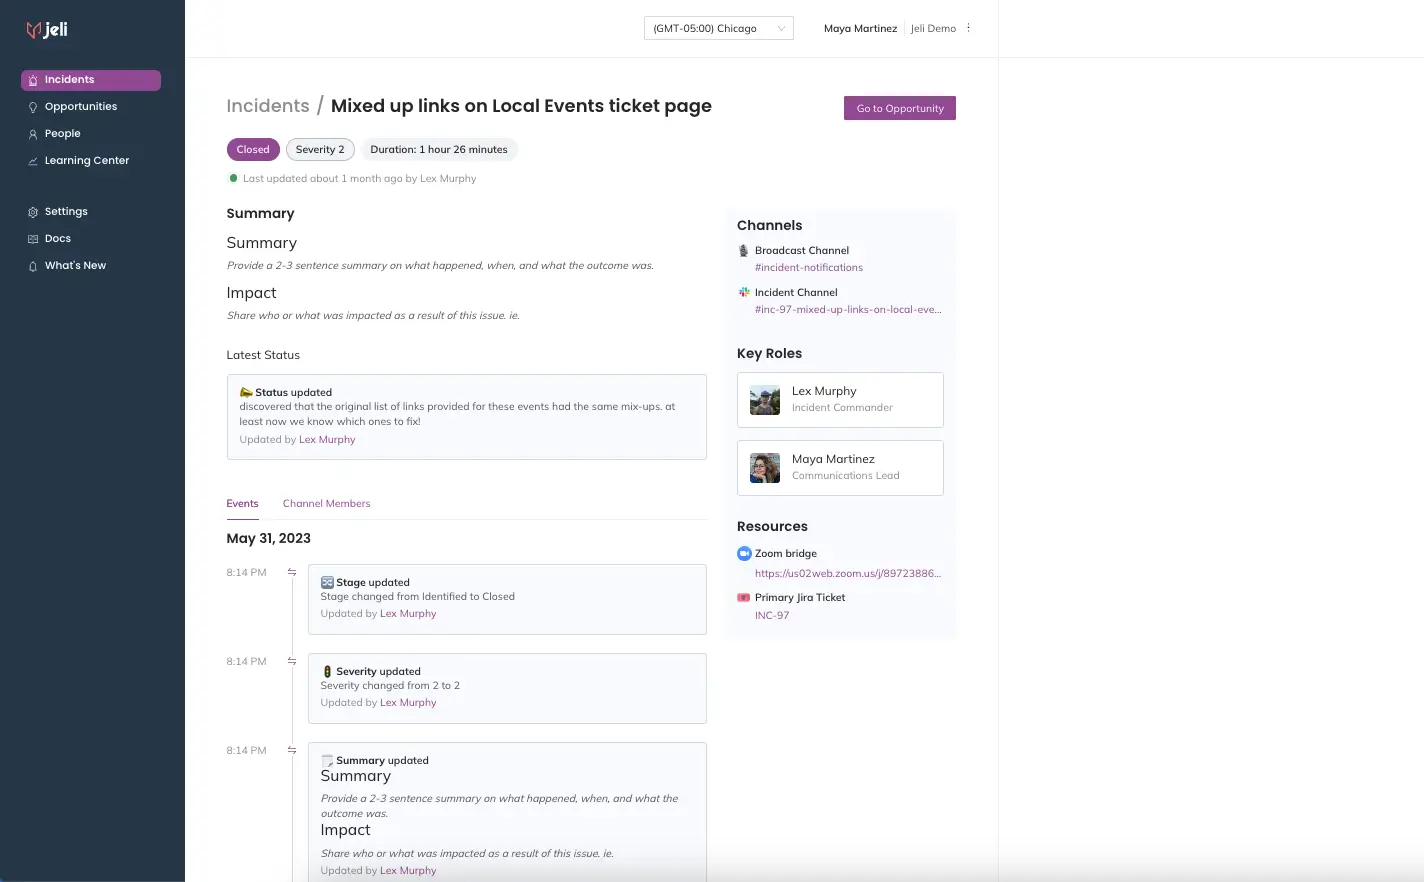
Incident Details in the Jeli web app
Historical IncidentsIncidents created prior to June 1, 2023 do not appear in the Incidents view in the Jeli web app. Incidents created prior to June 1, 2023 appear in the
/jeli activeview in Slack.
Active Incidents
From the Incidents menu in the Jeli web app, Active Incidents (any incident not in the closed stage) display at the top of the page. You can view their stage, severity, how long they have been active, and who is coordinating response. Similar to /jeli active in Slack, this view provides a dashboard to track the progress of multiple incidents at once, and indicate to responders whether an incident has already been created for an issue they are seeing.
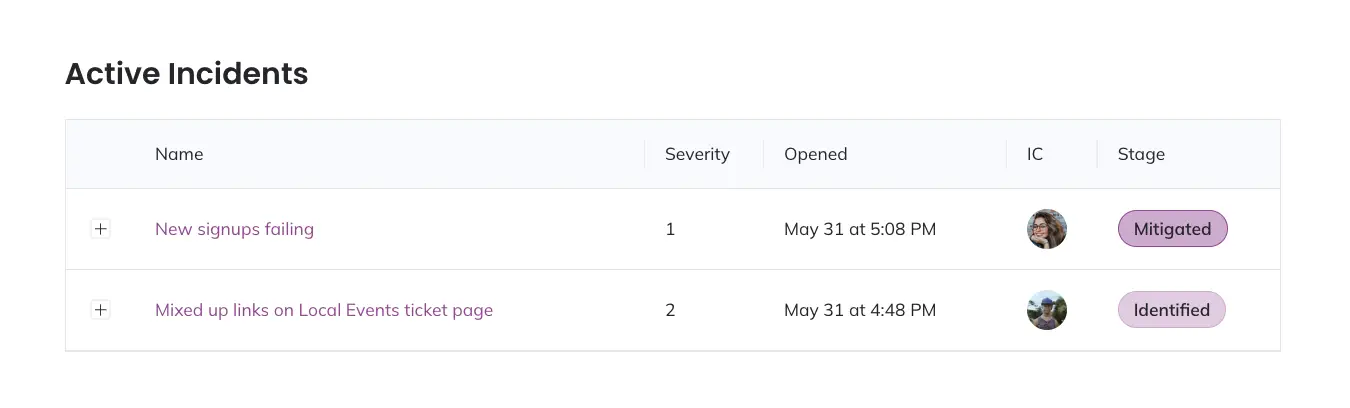
Active Jeli incidents
All Incidents
Search, Filter, Sort, and Track All Jeli Incidents
In the All Incidents view, (below the Active Incidents), you can view, search, filter and sort the response details from all of your incidents.
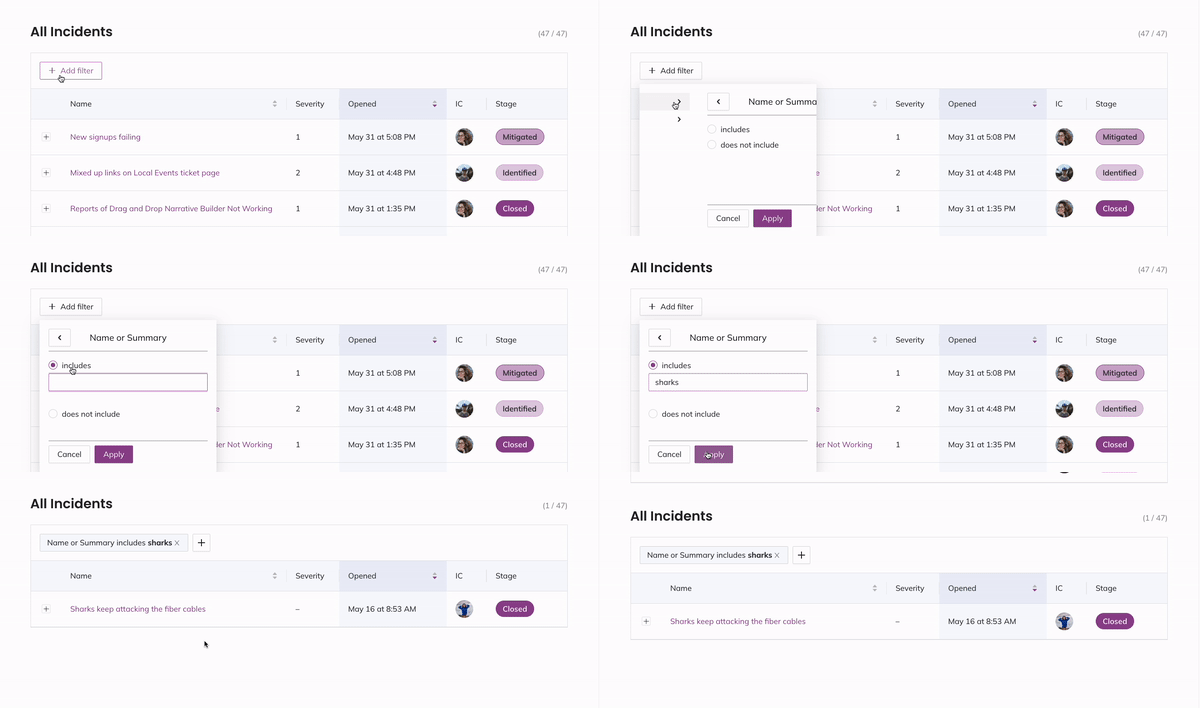
Filter Jeli incidents
| Capability | Instructions |
|---|---|
| Search | In the search bar, you can search by words found in the incident title and/or summary. |
| Filter | Click Add Filter under the search bar. You can filter by Incident Stage and Incident Type. Incident Stage parameters include is set, is not set, includes, does not include. Incident Type parameters include includes, does not include. Once you select your parameter, click OK to enable the filter. To remove the filter, click the on the filter displayed under the search bar. |
| Sort | You can sort incidents by clicking the Name or Opened columns. |
Jeli Incident Details
To view an Incident Details page, navigate to the Incidents view and click an incident's Name. At the top of the Incident Details page you find the following information:
- Incident Name
- Current Stage
- Current Severity
- Duration: time elapsed since the incident opened.
- Summary
- Last Status: The most recent Status Update.
Channels, Key Roles and Resources
On the right is a block containing:
- Channels: Easy access to the Slack channels involved in response, including the dedicated incident Slack channel, and currently selected broadcast channels.
- Key Roles: Who is currently assigned to each key role.
- Resources: This section displays Zoom or Google Meet conference bridges, the primary Jira ticket created for response, and any relevant links attached to the incident via
/jeli linkin Slack.
Events and Channel Members
Below the incident details are two tabs, Events and Channel Members. The Events tab contains all the updates made to the incident as they happen, and who made the updates.
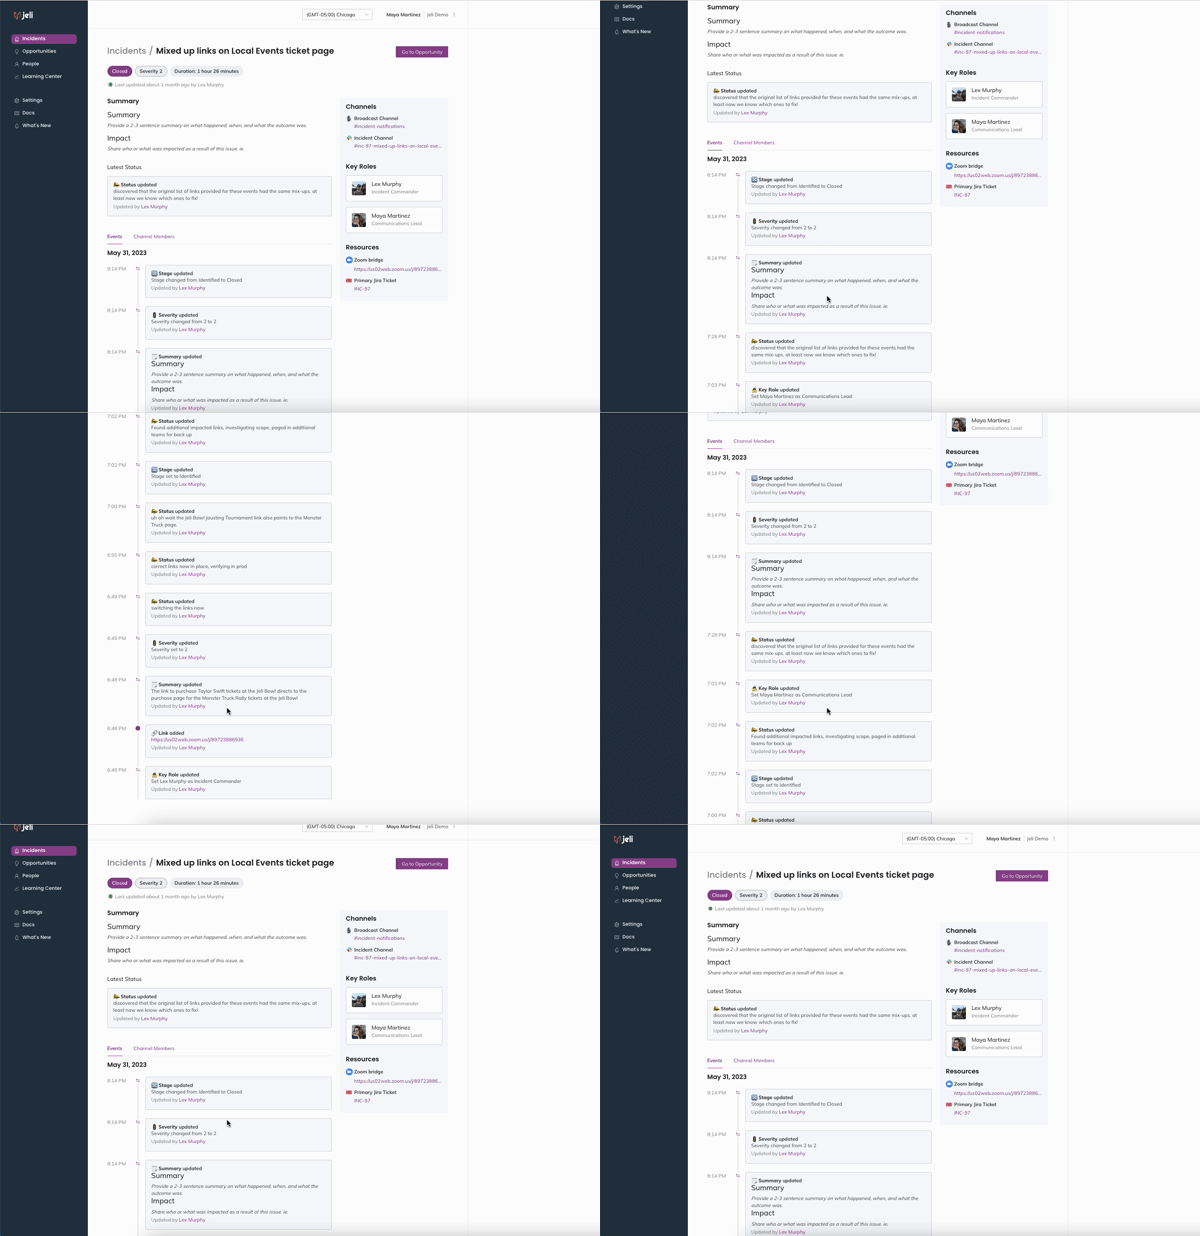
Jeli events
This includes the following events:
- Status Updates
- Stage Changes
- Severity Updates
- Assigning (and reassigning) Key Roles
- Updates to the Summary
- Added Links
The updates are in reverse chronological order, so the most recent updates are at the top, with progressively older updates below.
The Channel Members tab displays responders who have joined the dedicated incident Slack channel and adds their profile data to display their Name, Organization Role, and Group. It also includes a link to their People page in Jeli, which provides rich historical data about their time spent in other incidents, and provides insights into their areas of expertise or potential risk for burnout.
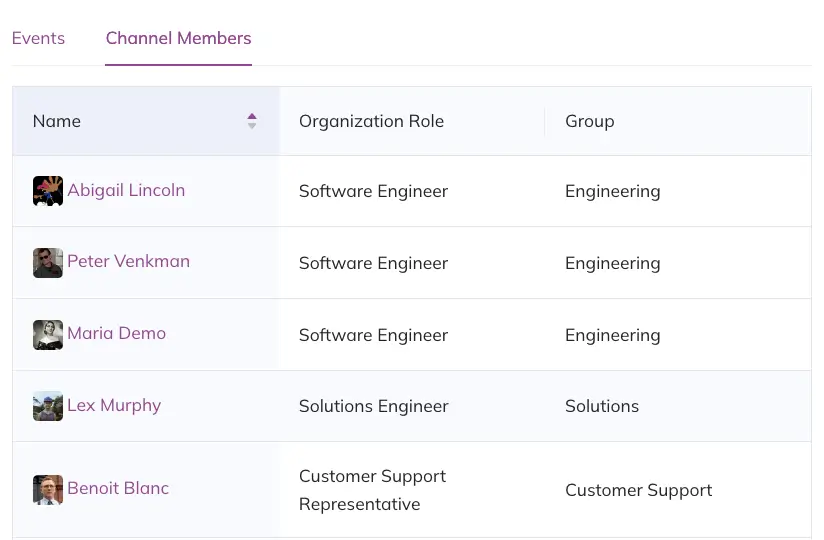
Channel members
Open a Jeli Incident in the Web App
To start an incident from the Jeli web app:
- Navigate to the Incidents menu in the Jeli web app.
- Click Open Incident.
| Field | Value |
|---|---|
| Incident name | Enter a name for the incident. |
| Select incident type | Select from one of your account’s preset Incident Types. |
| Choose a Slack workspace for this incident | Select your preferred Slack workspace. |
| Add optional details | You can Select the current incident stage, select Severity Level, and Assign yourself role(s). |
| Use integrations | Check the boxes to Start a video call and Create a Jira issue for this incident. |
- Click Start.
Once you start an incident from the web app, Jeli creates an associated Slack channel, conference bridges, and broadcast messages just as if you had started the incident in Slack.
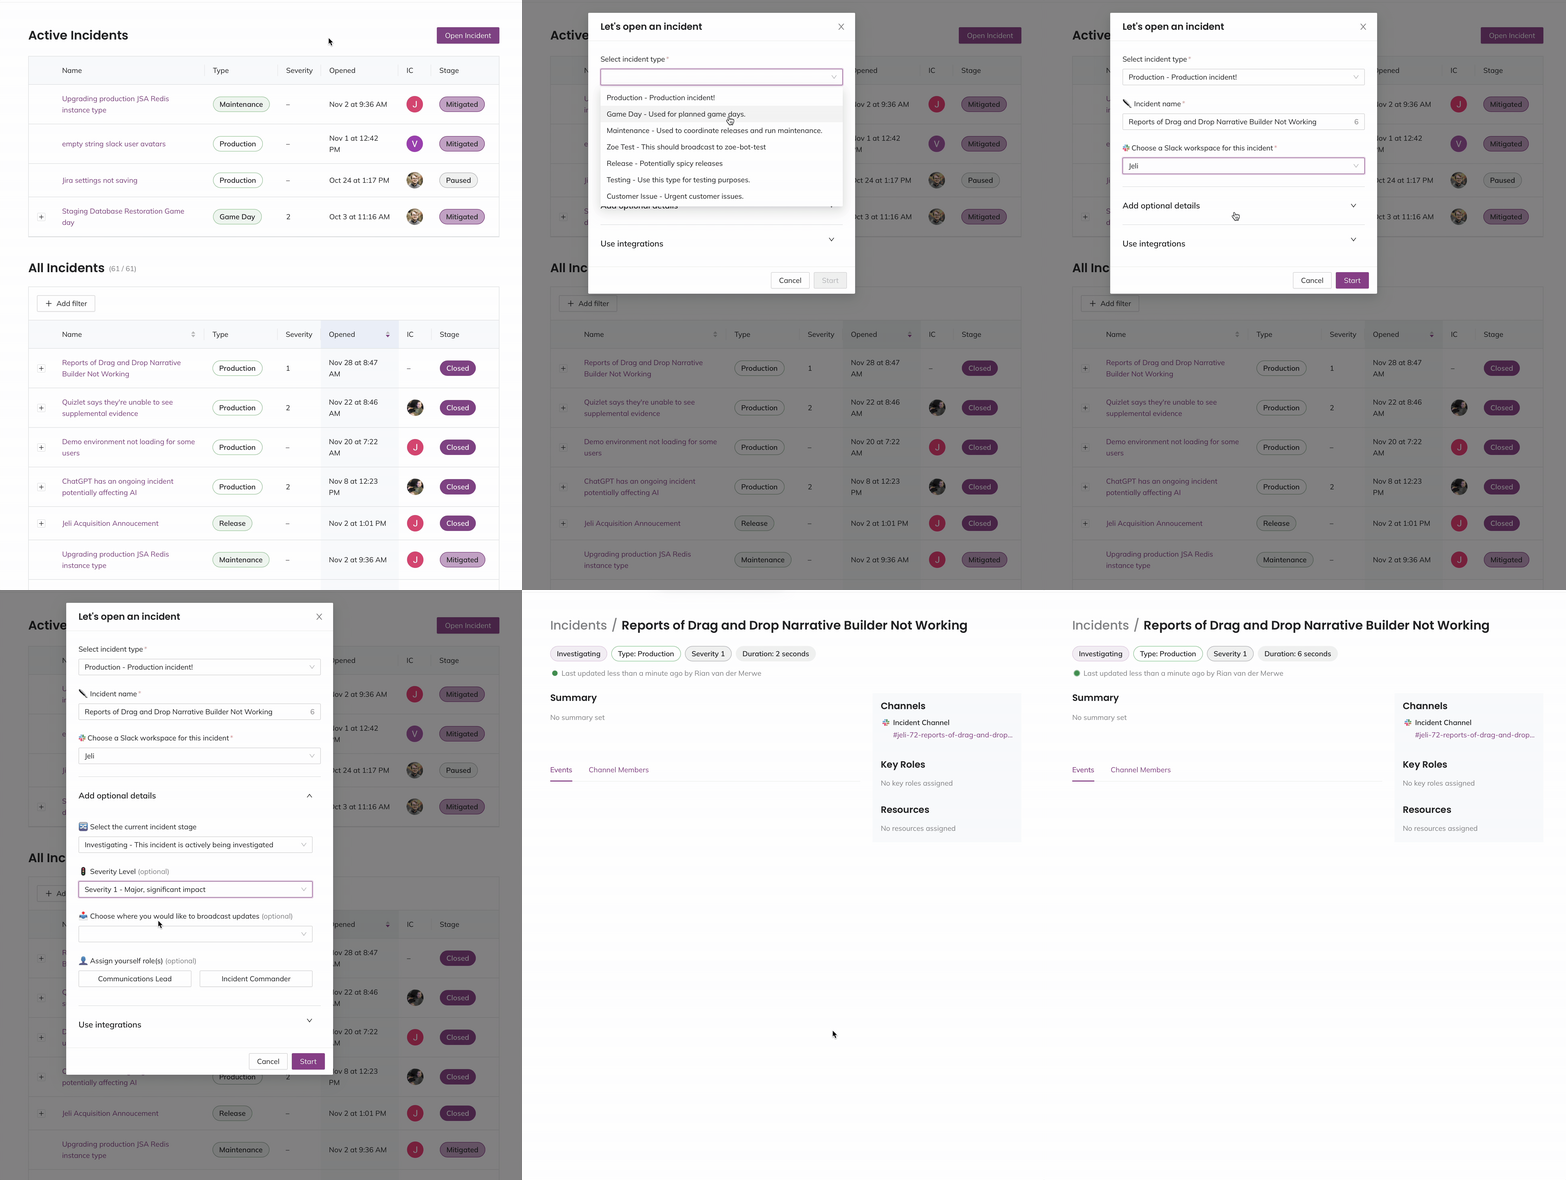
Open an incident in the Jeli web app
Jeli Incident Types
You can use custom Incident Types to categorize your incidents. You might create types like Staging or Production to indicate the incident location, and Customer Facing or Internal Only to indicate impact. You could also create types like API Team or Security to provide team-specific automation and filtering. Responders can select Incident Types when opening a new Jeli Incident, and they are used as workflow conditions that trigger automated actions.
Add Incident Types
- Navigate to Settings Incident Response Types tab.
- Click Add type and enter a Name and Description.
- Click OK.
When you add a new Incident Type, it displays when you create Jeli incidents from Slack, and in Jeli Workflows to use as a condition when creating a new automation.
Edit Incident Types
- Navigate to Settings Incident Response Types tab.
- Click the menu to the right of your preferred Incident Type and select Edit.
- Edit the Name and/or Description.
- Click OK.
Delete Incident Types
- Navigate to Settings Incident Response Types tab.
- Click the menu to the right of your preferred Incident Type and select Delete.
- A confirmation modal appears. Click Delete again to delete the Incident Type.
Updated 3 months ago