
Insights Filters
Filters allow you to refine Insights data about incidents, services, escalation policies, teams, and custom fields. Apply filters to each report by clicking at the top of the page next to the date range dropdown. This opens an editor where you can add, edit, and remove filters.
Add Filters
Filtering Teams
- When you add a Teams filter, results for subsequently added filter values change to reflect objects associated with the selected team or teams. Example: If you add a Teams filter to return results for Team A and then add a Services filter, you can only select services associated with Team A.
- If you add a Teams filter after adding another filter with a value not associated with that team, the Teams filter removes the value for the previous filter. Example: If you add a Services filter for Service B and then add a Teams filter for Team A (not associated with Service B), it removes Service B from the Services filter value.
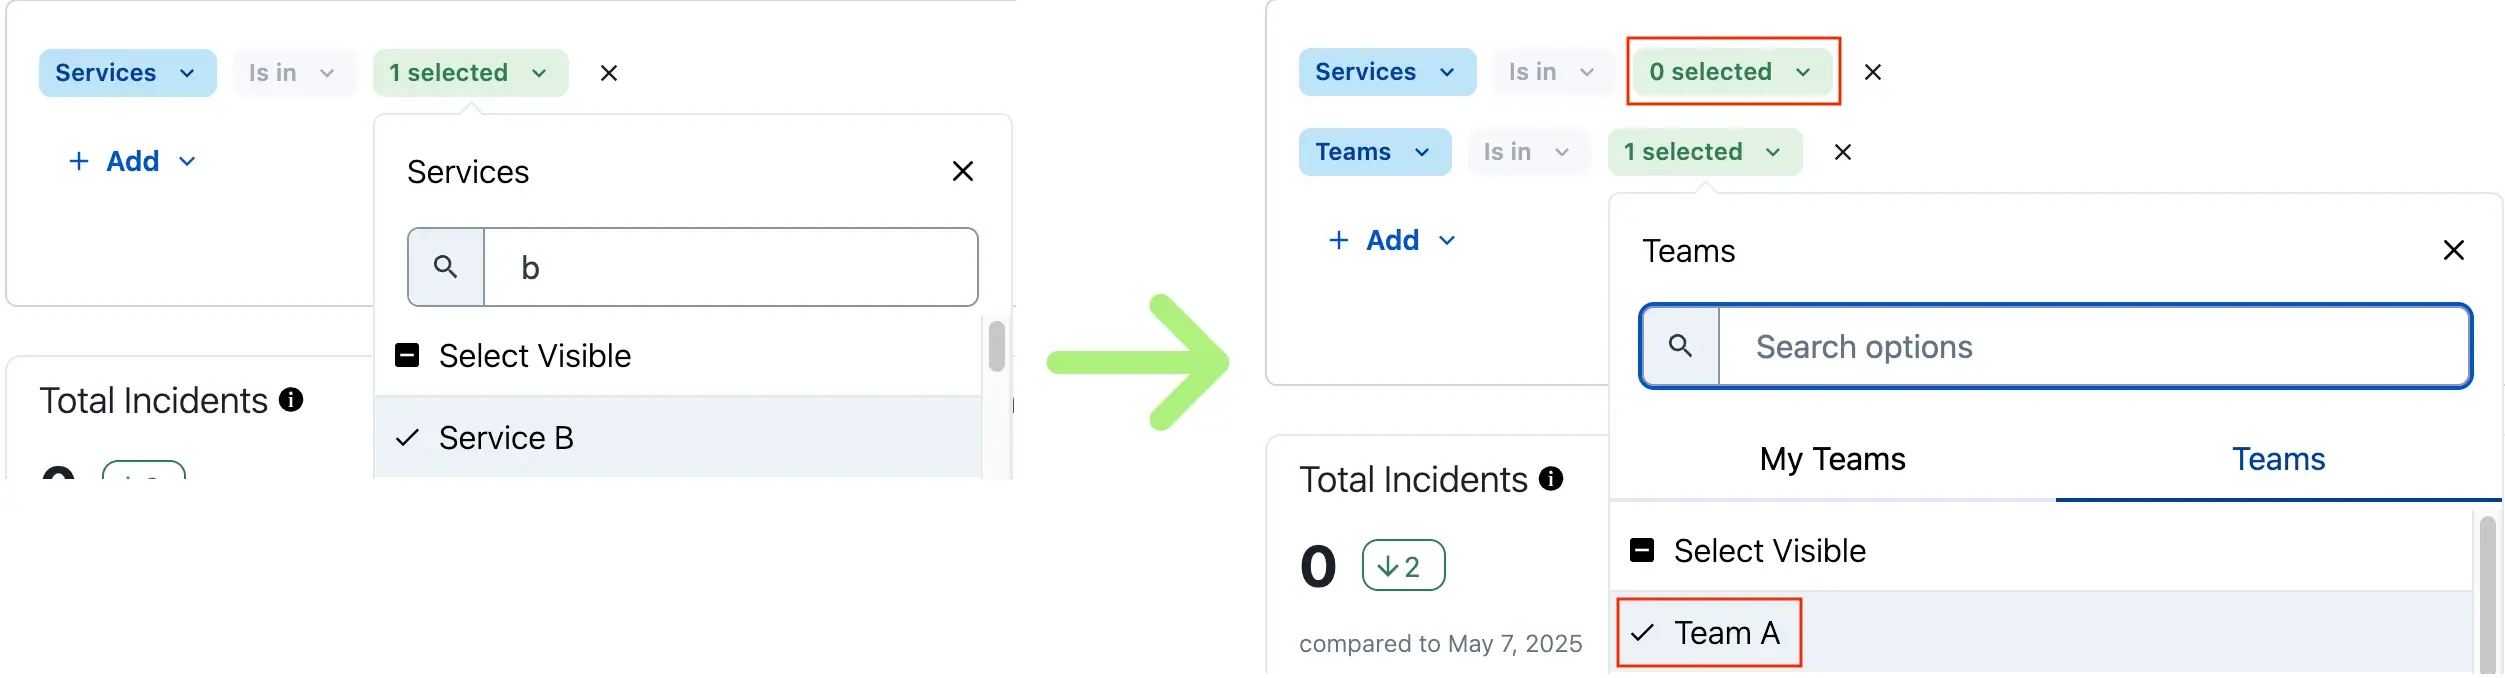
Example of service filter removed by team selection
To add filters:
- Select a Date Range from the dropdown at the top of the page.
- Click to the right of the date range dropdown.
- Click Add. The following filters are available per report:
- Click Apply Filters in the bottom right of the editor.
Incident Activity Filters
| Filter Condition Type | Operators | Value Instructions |
|---|---|---|
| Escalation Policies | - is in | Select escalation policy(ies). |
| Incident ID | - is in - is not in | Enter an incident ID. |
| Priority | - is in | Select the priority level(s). |
| Services | - is in | Select service(s). |
| Status | - is in - is not in | Select the incident status(es). |
| Teams | - is in | Select the My Teams tab to see only your teams, or the Teams tab to see all teams. Then select the desired team(s). See Filtering Teams for more information. |
| Urgency | - equals | Select the urgency level. |
CUSTOM-FIELD-DISPLAY-NAME-HERE (Incident Custom Fields — if you have configured Custom Fields) | Text: - equals - does not equal - contains Single Select: - is in - is not in Multiple Select: - equals - does not equal - contains Tag: - equals - does not equal - contains URL: - equals - does not equal - contains Checkbox: - equals - does not equal Date Time: - is greater than - is less than - is greater than or equals - is less than or equals Decimal: - equals - does not equal - is greater than - is less than - is greater than or equals - is less than or equals Integer: - equals - does not equal - is greater than - is less than - is greater than or equals - is less than or equals | Text: Enter a text value. Single Select: Select a single value. Multiple Select: Enter multiple values. Tag: Enter a tag name value. URL: Enter a URL value. Checkbox: Select a True or False value. Date Time: Select date and time values. Decimal: Enter a decimal value. Integer: Enter an integer value. |
Service Performance Filters
| Filter Condition Type | Operators | Value Instructions |
|---|---|---|
| Priority | - is in | Select the priority level(s). |
| Services | - is in | Select service(s). |
| Teams | - is in | Select the My Teams tab to see only your teams, or the Teams tab to see all teams. Then select the desired team(s). See Filtering Teams for more information. |
| Urgency | - equals | Select the urgency level. |
Responder Filters
| Filter Condition Type | Operators | Value Instructions |
|---|---|---|
| Priority | - is in | Select the priority level(s). |
| Responder | - is in | Select responder(s). |
| Teams | - is in | Select the My Teams tab to see only your teams, or the Teams tab to see all teams. Then select the desired team(s). See Filtering Teams for more information. |
| Urgency | - equals | Select the urgency level. |
Team Filters
| Filter Condition Type | Operators | Value Instructions |
|---|---|---|
| Priority | - is in | Select the priority level(s). |
| Teams | - is in | Select the My Teams tab to see only your teams, or the Teams tab to see all teams. Then select the desired team(s). See Filtering Teams for more information. |
| Urgency | - equals | Select the urgency level. |
Escalation Policy Filters
| Filter Condition Type | Operators | Value Instructions |
|---|---|---|
| Escalation Policies | - is in | Select escalation policy(ies). |
| Priority | - is in | Select the priority level(s). |
| Teams | - is in | Select the My Teams tab to see only your teams, or the Teams tab to see all teams. Then select the desired team(s). See Filtering Teams for more information. |
| Urgency | - equals | Select the urgency level. |
Business Impact Filters
| Filter Condition Type | Operators | Value Instructions |
|---|---|---|
| Priority | - is in | Select the priority level(s). |
| Teams | - is in | Select the My Teams tab to see only your teams, or the Teams tab to see all teams. Then select the desired team(s). See Filtering Teams for more information. |
| Urgency | - equals | Select the urgency level. |
Edit or Remove Filters
- Click under the date range dropdown at the top of the page.
- Edit the available filters, or click to the right of a filter to remove it.
- Click Apply Filters in the bottom right of the editor.
Saved Filters
Saved Filters lets you save, name, and instantly reapply any filter configuration in your Insights Incident Activity dashboard. Instead of rebuilding filter states from scratch each time, you can store your most-used views, including smart relative date ranges like "last 30 days", and return to them in one click.
Availability and LimitsSaved Filters are available on all legacy and Ops Cloud plans. This feature is only available in the Incident Activity section of Insights.
- You can create up to 25 saved filters per user per report type.
- Saved filters are private by default and are visible only to the user who created them.
Access Saved Filters
Navigate to Analytics Insights Incident Activity.
Save a Filter Configuration
- Navigate to Analytics Insights Incident Activity and add a filter.
- Click Apply Filters.
- Click Save Filters.
- In the modal, enter the following details:
| Field | Value |
|---|---|
| Name | Enter a name for the saved filter. (Required) |
| Description | Enter an optional description for the saved filter. |
- Click Save. The saved filter appears in your filters list.
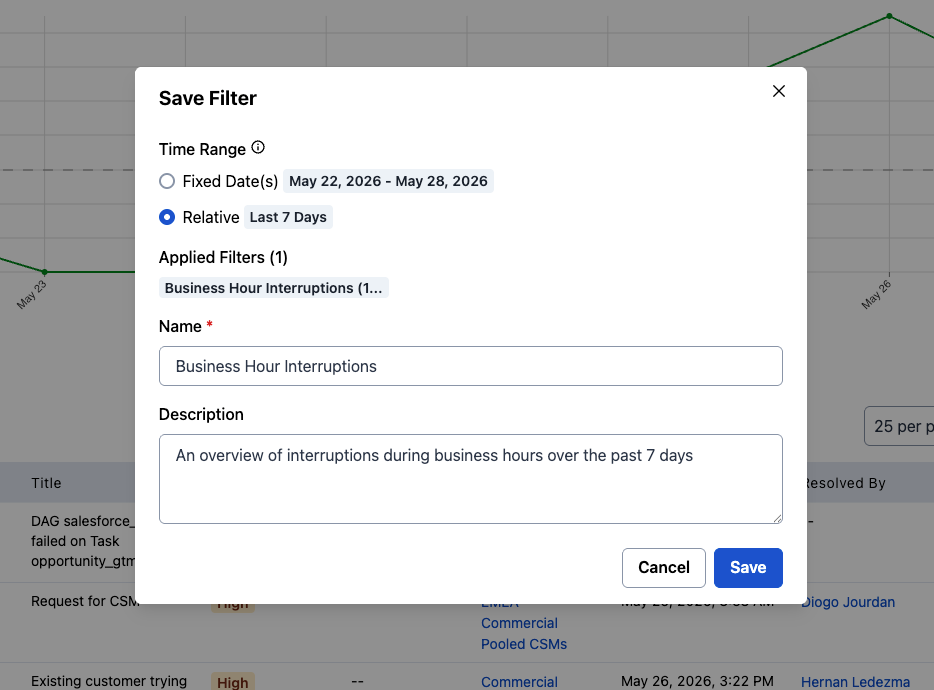
Save filter modal
Apply a Saved Filter
- Navigate to Analytics Insights Incident Activity and open the filters panel.
- Click the Saved Filters dropdown and select a filter.
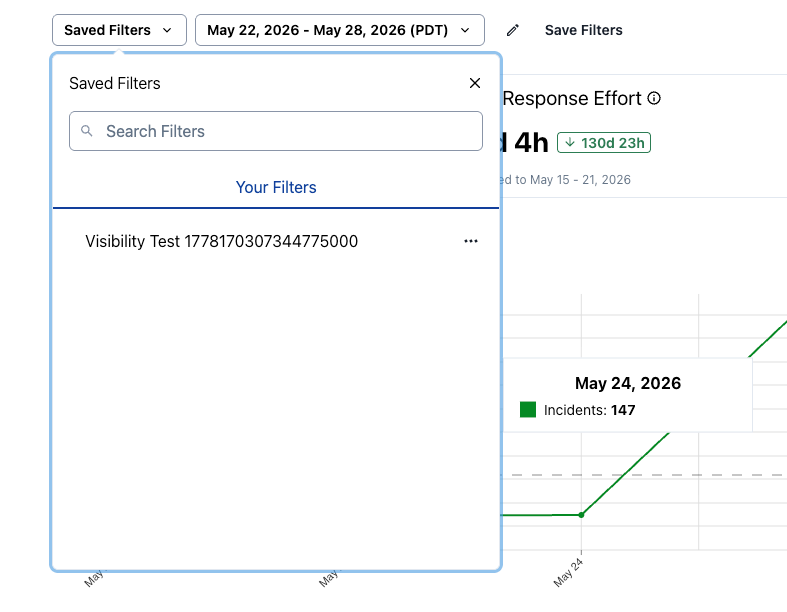
Saved filters list
Manage Saved Filters
Edit a Saved Filter
- Click the Saved Filters dropdown and click next to the filter you want to update.
- Click Edit Saved Filter.
- Modify the name, description, or filter state, then click Save to overwrite the existing configuration.
Delete a Saved Filter
- Click the Saved Filters dropdown and click next to the filter you want to delete.
- Click Delete.
- Confirm the deletion when prompted.
Share a Saved Filter via URL
- Apply a saved filter to the dashboard.
- Copy the URL from your browser. The URL encodes the full filter state and can be shared directly with others.
Typical Workflows
You can use saved filters to support the following workflows:
- Weekly Team Reviews: Save a filter scoped to your team with a relative "last seven days" date range to open the data in one click without reconfiguring filters.
- Service Owner Deep Dives: Create a saved filter per service to switch between ownership views.
- Migration Baseline: Save filters that replicate your existing reporting views to establish parity from day one when migrating from other tools.
- Organization Reporting Preparation: Save a broader organization-level filter used for weekly operations reviews so anyone preparing the report starts from a consistent state.
Filter Limits
Each report has the following filter limits:
- Service, Responder, and Escalation Policy Filters: 1,000
- Team Filter: 200
When the count of filtered objects exceeds the limit, the list greys out and you can no longer select or deselect individual objects. Click Clear at the top of the filter list to reset your selections.
If you expect to exceed the limit:
- Use the Team filter first to reduce the number of escalation policies, services, or responders.
- Once the list is below 1,000, deselect from there.
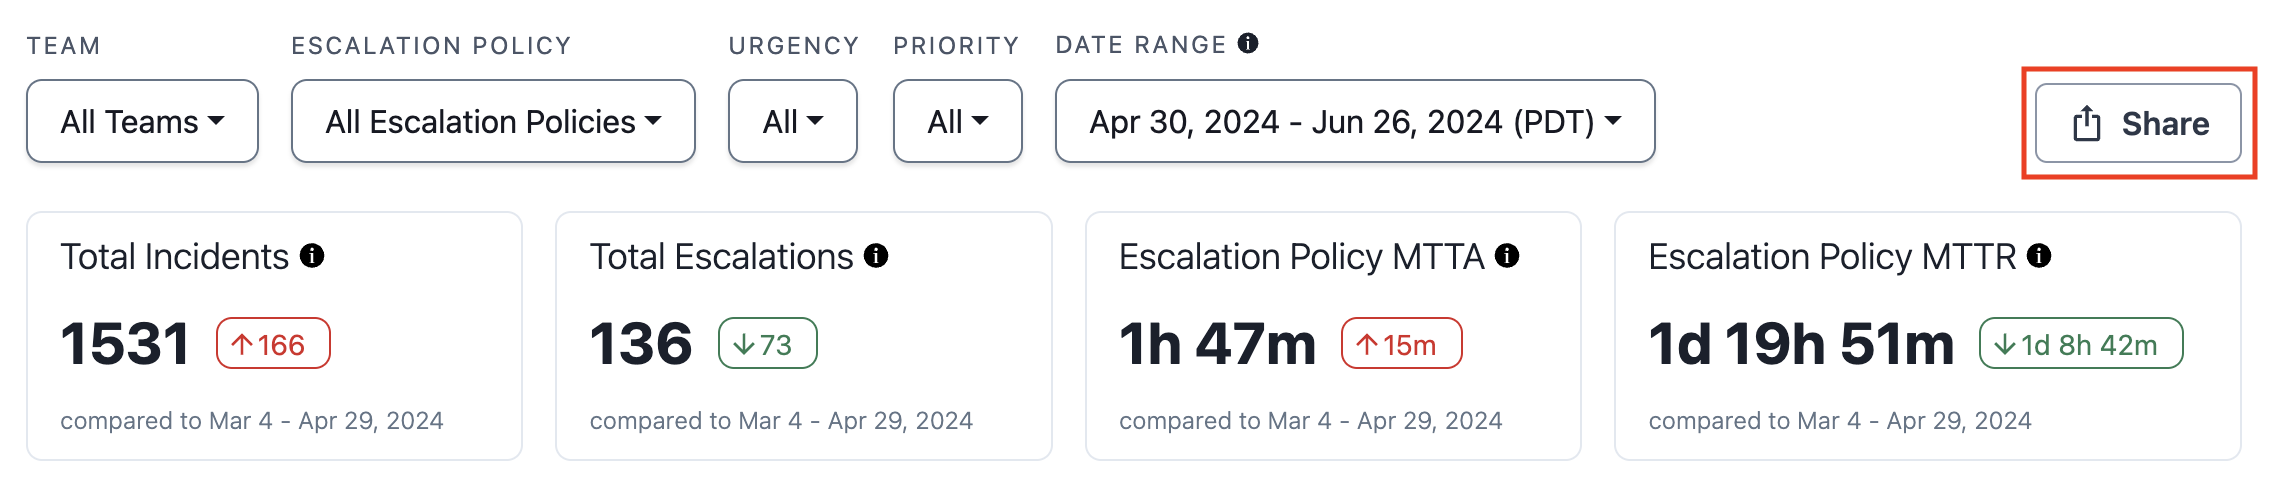
Share a Report
There are two ways to share Insights reports:
Share Button
To share a report or save a filter set, click Share Copy Link. Send the URL to others or save it as a bookmark for your own reference. The link is unique, and signed-in users who visit it see the same report and filters applied.
Share a report
Export CSV
Export Size LimitDepending on your pricing plan, there is a limit to the number of rows you can export.
If your exported report exactly matches the limit, your data has likely been truncated. Reference your report in the PagerDuty web app to see the total count (e.g., Total Incidents). Add filters or adjust the date range to reduce results, and export in batches as needed.
Pricing Plan Export Limit Professional, Business 100,000 rows Enterprise Incident Management, Digital Operations (legacy) 250,000 rows
To export a report as a .csv file, click Export CSV. The file retains the view and results based on your search and filter selections.

Export CSV
Large reports — such as the Incident Activity Report, which can contain more than 10,000 rows — are fetched in the background and sent to you via email.

Generating report
If you remain on the Insights page until the report is delivered, a success banner appears.

Report generated
You can navigate away from the page while waiting, but no success banner appears in the PagerDuty web app when delivery is complete. Check your email to confirm receipt. Click the link in the success banner or email to view your report in .csv format.
Analytics Email Settings
Read the Account Settings article for more information on how Admins can configure who receives weekly Analytics emails.
Updated 24 days ago